Create extra product options in WooCommerce: A complete guide

Adding extra product options allows visitors to customize products and can significantly improve your store conversions. Here's a step-by-step guide to easily add advanced WooCommerce product options to any store.
WooCommerce lets you create product variations so that customers can choose from a list of options. However, these can be limited and aren't suitable for all industries.
For example, if you are running a pizzeria and want to add an extra option to allow customers to add toppings and sauces, there is no direct way to achieve this. The best way is to let customers choose from a list of toppings or product options on the product page. Since this is not possible with WooCommerce alone, I'll show you how to use the WooCommerce Product Options plugin to add a wide range of extra options to products.
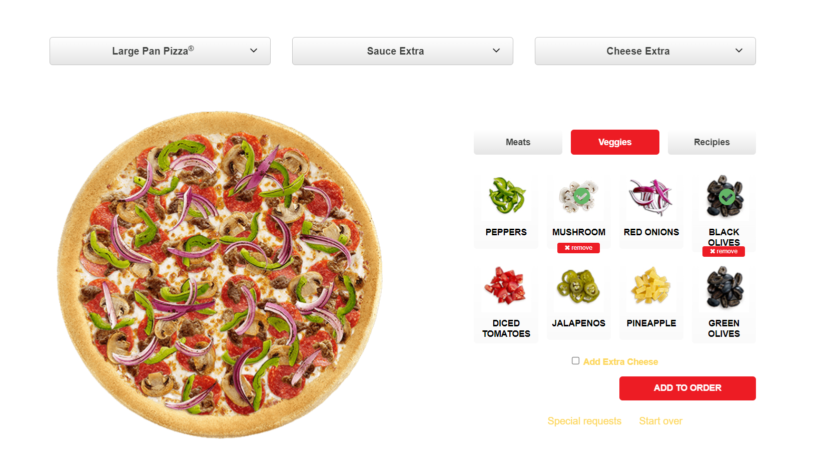
How to create WooCommerce products with multiple options
WooCommerce Product Options makes it easy for store owners to add advanced extra options to WooCommerce products. It's incredibly flexible and designed with multiple use cases in mind. Whether you want to offer a gift wrapping option, custom messages on products such as engravings and printings, or add product add-ons such as pizza toppings or custom groceries, WooCommerce Product Options has it all:
- Multiple product fields such as swatches, checkboxes, text, radio buttons, images, file upload, etc.
- Easily add custom product fields to your products from a single page (or select product variations to display as options).
- You don't have to add product options individually for each product. You can add them once and assign them to respective products from the plugin settings page.
- Assign fixed and variable pricing for each product option separately, depending on the nature of the option.
- Add advanced quantity rules such as minimum or maximum boxes for product options.
- Enable advanced conditional logic to show or hide additional options depending on selected custom options.
- Seamlessly integrated with WooCommerce and all other Barn2 WooCommerce plugins.
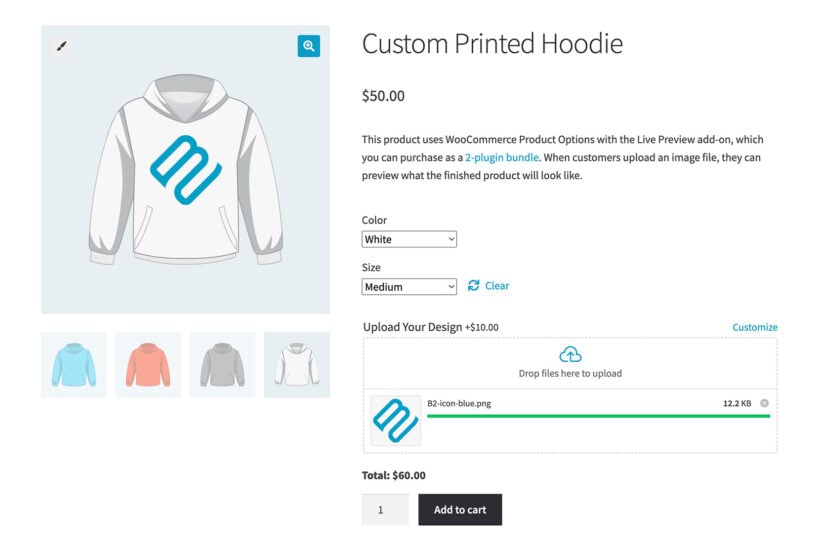
- Display live previews so that customers can see their uploaded images on the finished product.
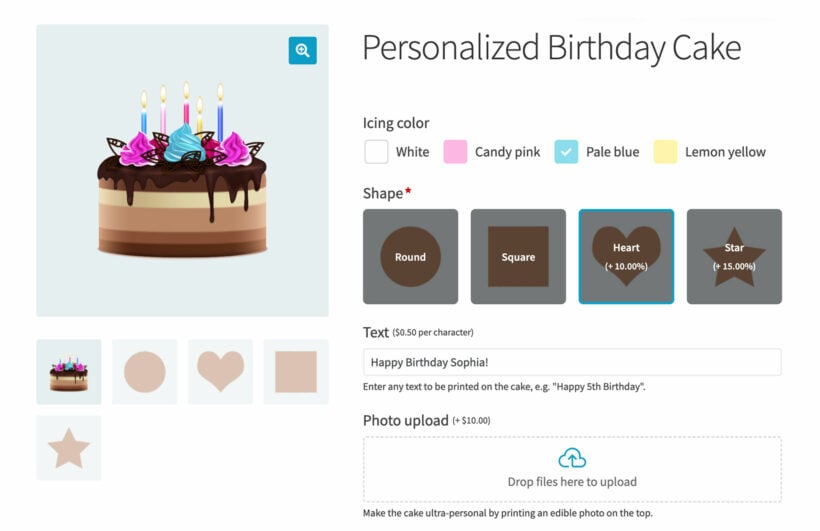
If you are looking for a reliable solution to add extra fields to WooCommerce, then this is the best product options plugin. Keep reading to learn how to set it up.
1. Install WooCommerce Product Options
Firstly, let's see how you can install and set up this plugin on your WooCommerce store. If you do not have the plugin, you can get it here. You can either buy it on its own, or with the optional Live Preview add-on.
- Go to WordPress admin dashboard → Plugins → Add New.
- Install and activate the plugin. You will then be redirected to the setup wizard.
2. Add extra product options in groups
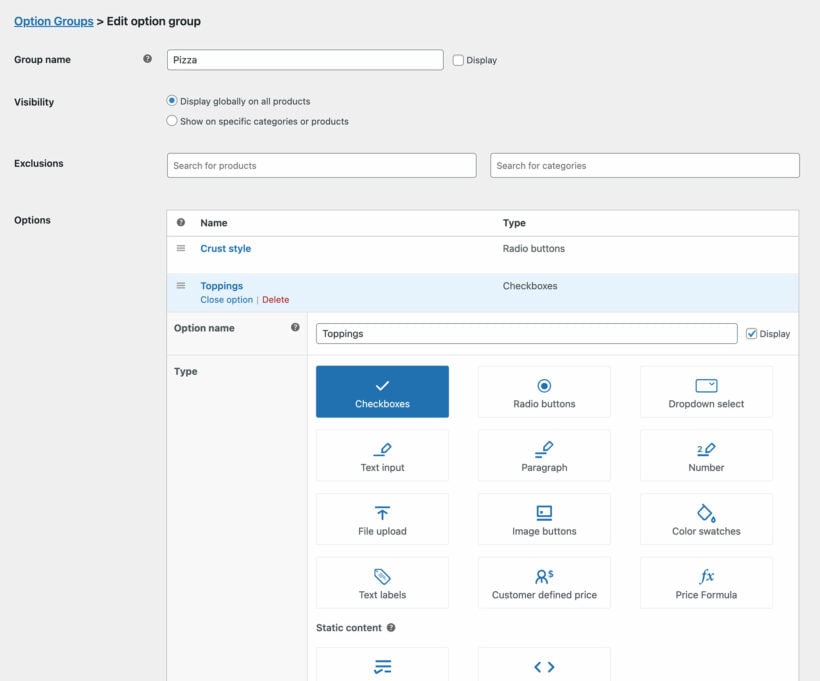
You can create as many WooCommerce product options as you like, structured into groups. Options groups host multiple product options, and you can assign groups to any product or category in your WooCommerce store.
For example, to add toppings, veggies, and sauce options for all pizzas, you need to add three different product options: Toppings, Veggies, and Sauces. If these three are in the same options group, you can assign the group to any pizzas in your store, and the three options will start showing up on respective product pages.
You get one options group already set up by default. You can edit the existing group or create a new group:
- Go to Products → Product Options in the WordPress admin.
- Next, click on the Add Group button or edit an existing group.
- Choose where you want the options to appear. You can:
- Restrict the group to only a few products or product categories.
- Show on all products in your store.
- Restrict to exclude some products or product categories.
- Create 'Add Option' and set it up however you like.
3. Choose how to display your multiple product options
For my dummy store, I will display pizza toppings only on all pizza options. For this, I'll only enable it to be displayed in the Pizza product category. This way, the options will not show for burgers, desserts, or beverages.
Firstly give your option a proper name. For example, I'm adding the Pizza Sauce product option, so I'll name the product option 'Sauce'.
Select the field type of option you wish to add. The WooCommerce products with multiple options can have various field types such as radio button, checkbox, dropdown, text, paragraph, file upload, images, color swatches, or even HTML:
- Checkbox: Enable this when you wish to allow selecting multiple options such as pizza add-ons like beverage, dessert, sides, etc.
- Radio button: Use this option to allow selecting a single option from multiple options. For example, pizza base (flat bread, thin crust, hand-tossed, or double cheese)
- Text: Text input fields are perfect for sending custom one-liner messages to the store. For example, sending the name for custom birthday cakes.
- Paragraph: A text area is ideal for letting customers add a custom message. For example, customers can simply add a "Less spicy" message to inform the chefs to keep the dish less spicy.
- Image: This is ideal for scenarios where an image is required from the customer to process the order. Usually, store owners ask the customer to email the image later, but with this option, customers can send the picture while placing the order. This is recommended for products like photo frames, photo cakes, coffee mugs, etc.
- Color swatches: This adds color swatches to the product, and users can select the product and place the order accordingly. This is also referred to as the color picker in many instances.
4. Set up prices for multiple product options
Depending on the option you enable, you get the option to set pricing for that option as well. You can add a flat price or set variable pricing for product options. If you don't want to add custom pricing, you can skip this section too.
- Flat price: The flat or fixed price adds a flat price for the addon or option. If the flat fee is $1 and you choose four variations of the same option, the total addition will be $1.
- Quantity-based price: The price under this setup will increase depending on the number. For example, if the flat rate per topping is $1, adding four toppings will increase the price of the pizza by $4.
- Percentage increase: If an addon product option is supposed to take up the total price by a specified percentage, you can mention the percent, and the total product value after adding the option will go up as mentioned. If the percentage increase is 10%, adding the product option will take the $10 product to $11.
- Percentage decrease: This works just like the percentage increase, but this option will reduce the product's price by the specified percentage. For example, stores often offer discounted prices for small portion sizes for kids. So, if customers select the 'kids' checkbox option, the price will automatically decrease by the prespecified percentage.
- Character count - This is available for the text field option, and every character in the text field adds up to the price. This is perfect for use cases where custom names are branded on the jewelry or any other product. For example, if the per character price is 50 cents, adding ten characters to the text field will increase the price of the product by $5.
Select an option type from the list above. If needed, you can also add pricing for the options.
5. Set up your product sub-options
WooCommerce Product Options provides 2 methods to add choices to each set of options:
- Add extra product options directly.
- Select product variations to display as extra options.
5a. Add extra product options directly
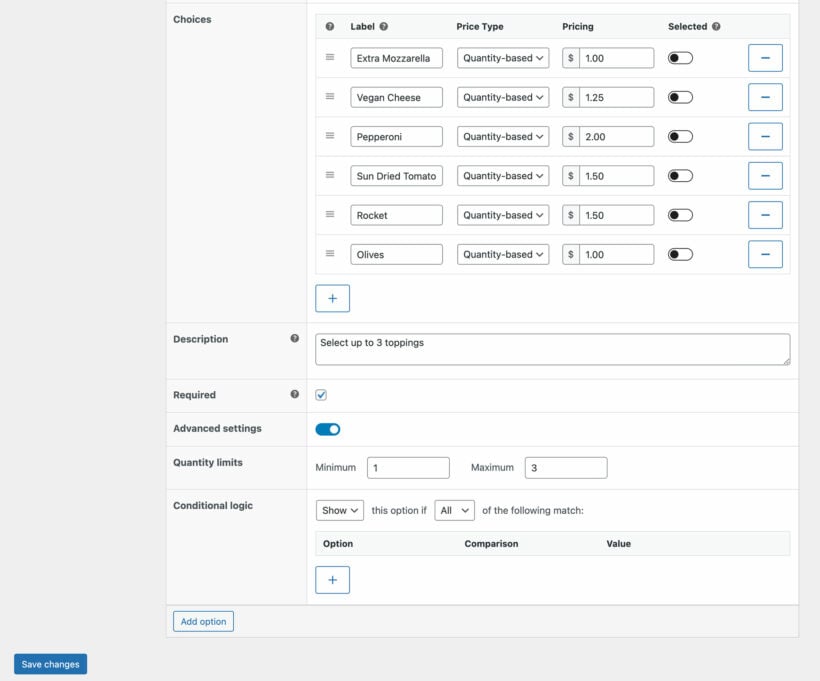
Next, you can add the choices for the respective option type. For example, if I'm adding toppings options for pizzas, I can add pepperoni, black olives, green bell pepper, red onions, etc., as topping options.
After adding the choices, you can select if you wish to make some options selected by default on the front end. For example, if you want to make the classic hand-tossed pizza base as default, you can make it selected by default from the backend. If users want a different base, they can select it accordingly.
To help the customers understand complex product options, you can display the option name and description on the front end. This will be displayed underneath the product options.
Lastly, you can enable the 'required' checkbox to make the product option mandatory. For example, you can make the topping' mandatory for single-topping pizzas on your online food delivery store.
5b. Select product variations to display as extra options
Alternatively, you can select the "Create choices using existing variation attributes" option to add extra product options to WooCommerce based on existing product variations. You should do this if you need to use features that are only available for variations, such as stock control or integration with other plugins.
When you select this option, the choices for the extra product options are pre-populated using the variation attributes. You can customize some elements such as selecting colors for the color swatch style, and whether to pre-select any of the variations.
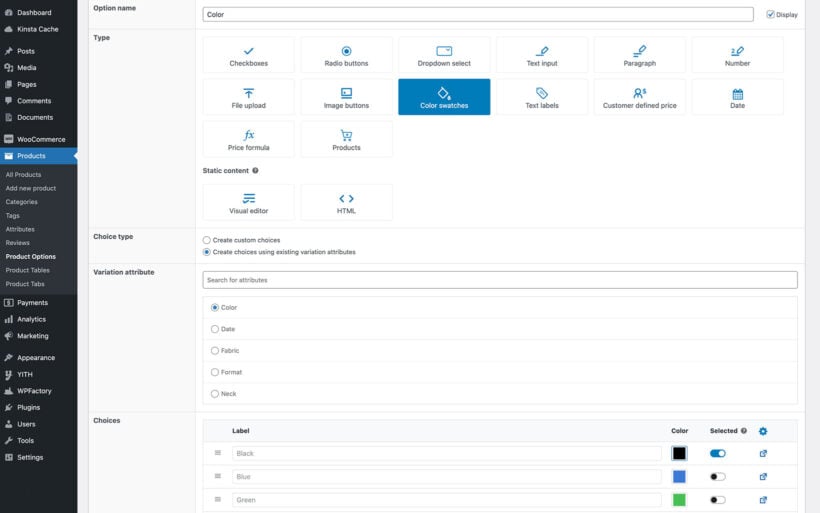
This option is only available for field types that can be used as single choice, for example checkboxes, radio buttons, dropdowns, color swatches and image buttons. For other field types, you'll need to create the extra product options directly in the plugin.
6. Configure advanced product option settings
If you want to add advanced attributes to your product options, here are the option you get:
- Quantity limits For some product options, you can limit the number of options a user can choose at a time. For example, if you want to limit the number of toppings per pizza to 4, you can do it with the quantity rules field.
- Character limitThis limits character limits for the text and paragraph option types. This option is available for text input and text fields.
- Conditional logicThis is a brilliant and useful one. You can make some product options appear only when the user selects a particular choice from a 'parent' option. For example, if you wish to display the 'cheese burst' checkbox to show up only when the user selects 'extra cheese' for a pizza order, you can do it by adding conditional logic for the same.
Once you've made all the changes, you can click on the Add option button. This will add one option to your option group.
You can repeat the steps above to add more options to the product option group.
Now you can go to your store's product pages and preview how the extra product options look in the front end:
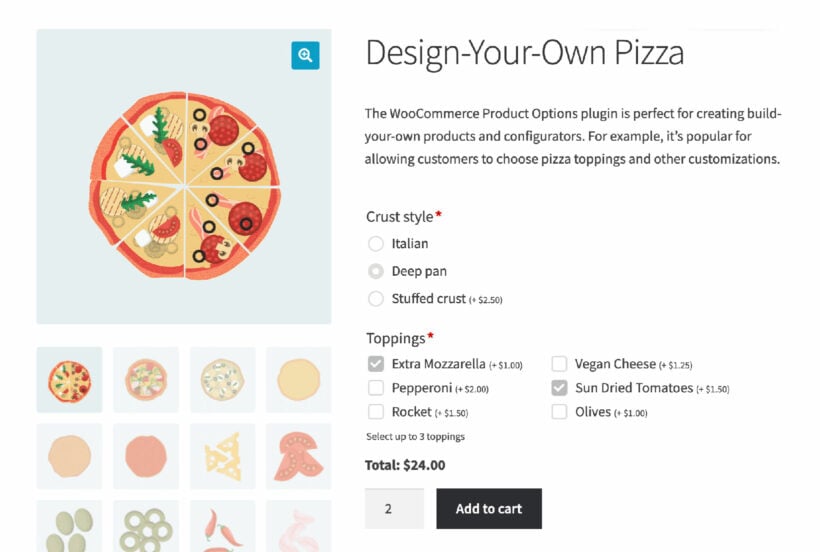
Or if you've set up image previews then it might look more like this:
FAQ
What are WooCommerce extra product options?
Extra product options are a more advanced way of adding choices to WooCommerce product pages. This can include checkboxes, radio buttons, text fields, file uploads, and so on. It's much more flexible than normal product variation options, which only appear as dropdown lists.
How are product options different to variations?
There's a built-in feature to create WooCommerce products with multiple options (known as variations) and display them as choices on the product page. However, if you are not familiar with product variations, it is easy to confuse variations with extra options.
Variations can help you add options to your products but can only get you so far and have a few limitations:
- Variations are not flexible and pre-defined on the backend. This limits variations to only a few options.
- Variations are difficult to manage because you need to create a variation for every possible combination of options. This grows exponentially every time you add a new option and can quickly lead to making you manage hundreds of variations on a single product.
- You only get the dropdown options to add product variations, and if you want to display other options such as radio buttons or swatches, you need to install a WooCommerce extension.
With the WooCommerce Product Options plugin, you can either create extra options without variations; or display existing variations using the extra product options field styles (e.g. checkboxes or color swatches).
The solution: WooCommerce extra product options
On the other hand, product options extend individual SKUs and reduce the workload, and makes things more streamlined for store owners.
- You don't need to create and keep up with every possible product combination. By simply adding options for a product will not require you to set up a new stock keeping unit (SKU). All new combinations will be processed under the same SKU along with the custom addon information input by the customer.
- The prices for extra addons are updated automatically, and you don't need to manage them for all product combinations.
- WooCommerce products with multiple options come with a range of choices. This includes color swatches, radio buttons, checkboxes, text fields, file upload, paragraph input, etc.
What are the benefits of adding multiple options to WooCommerce products?
It is important to know when to add product variations and product options. It can vary from case to case basis, but here's a simple rule of thumb: If your product has a unique SKU (stock keeping unit), you can go with variations. Otherwise, you can add custom WooCommerce product addons.
For example, if you have flatbread and thin crust pizza as different products (different SKUs) in your pizzeria, you can use variations. But if you want to add custom options such as sauces and toppings, adding them as product options for every SKU will make your online store more organized.
Another example is selling tees in a clothing/apparel store. If you have blue, red, or another color shirt as different SKUs, you can add them as variations from WooCommerce itself. But if you want to allow your customers to enter the custom text or design to be printed on the Tees, you need to do it by enabling custom product addons.
What are the best practices for using multiple product options?
My best advice on creating WooCommerce extra product options is to consider the most user-friendly way for customers to select the choices.
Don't just add each field as a basic dropdown. Instead, look at the full range of styles and choose the most intuitive way to display each one:
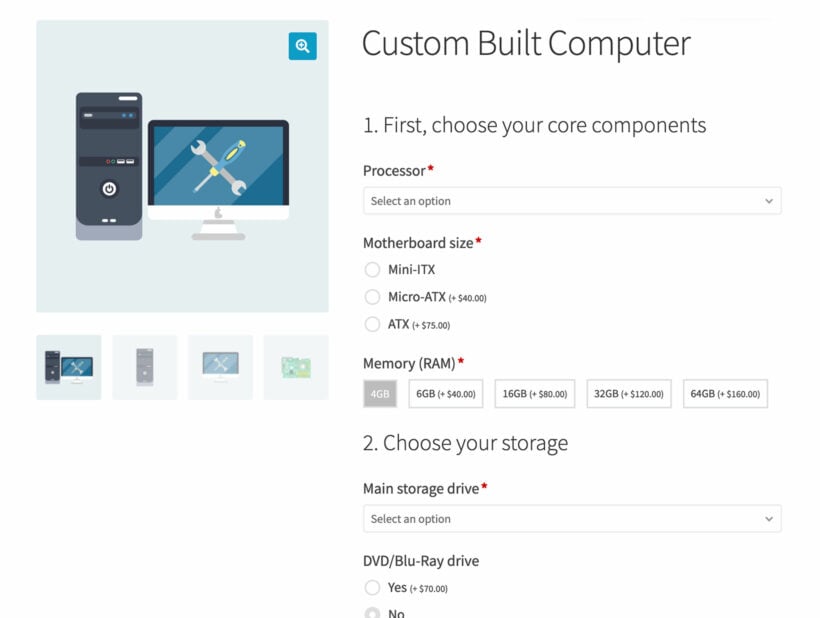
While you're adding advanced product fields to WooCommerce, think about the best way to set up each one. For example, consider whether each field should be required. Think about whether to set default values to pre-select popular options and encourage customers to spend more. Consider whether to add a minimum or maximum quantity for each field.
WooCommerce Product Options is an incredibly advanced extra product options plugin, so make sure you use it to its full potential.
Take action: Transform your WooCommerce store with advanced product options 🚀
Adding extra product options to your WooCommerce store has multiple benefits. You can increase customer retention, add an interactive ordering system, build potentially increase cart value by pricing product options.
With the WooCommerce Product Options plugin, you can easily add flexible custom options to your products. In this article, we considered the example of a pizzeria accepting online orders, but you can use the same plugin and options to customize the products in any industry selling customizable products online.
- Easily add custom product options to your existing WooCommerce products.
- Instead of adding custom options for each product, create option groups and assign them to all or some products in the store at once.
- Add fixed and variable products and pricing to each custom option type.
- Restrict display conditions to only display the options group when a specific condition is met.
- Enable upsells to increase average order value and profits.
- Automate everything and eliminate the need for customers to send you order-related information after the purchase.
So what are you waiting for? Get WooCommerce Product Options now and start adding extra product options to WooCommerce easily!
2 Comments
Hi, WooCommerce Product Options plugin is exact the plugin I'm looking for. But I have to work with DIVI. Is this plugin compatible with DIVI?
LG, Stephan
Hi, Stephan. We're thrilled to know that you're interested in the WooCommerce Product Options. Our plugins are tested regularly against the latest WordPress themes to be able to support as many themes as possible. You'll be happy to know that Divi is one of our recommended and supported themes so I can guarantee its compatibility with our plugin.