How to create a WooCommerce events page (with or without an events plugin)

If you use your WordPress website to sell upcoming events, you'll need an effective way to display them. While you can use a dedicated WooCommerce events plugin, these can be complex and weigh down your site – which is the last thing you want. Keep reading to learn the pros and cons of both options, and how to set them up.
Are you looking to create an events page for your WooCommerce store but not sure where to start? Look no further! In this comprehensive guide, I'll walk you through the process of creating a dynamic and engaging events page, with or without using an events plugin.
What are WooCommerce events?
WooCommerce events are products which are configured to represent bookable occasions with specific dates and times. These products function as tickets or registrations for live performances, conferences, courses, or online webinars.
There are two main approaches to add events to WooCommerce. You can either:
- Add a date picker to a WooCommerce product with the WooCommerce Product Options plugin, or;
- Use a traditional WooCommerce events plugin like Events Calendar with the Tickets add-on.
Each method has distinct advantages. The date picker approach offers simplicity and lightweight implementation. A dedicated events plugin provides advanced features like attendee management and recurring events.
After setting up your events, you can list them in a searchable table. Install the WooCommerce Product Table plugin to create an organized display. This format helps customers find and book events more efficiently.
In this post, I'm going to tell you all about both ways to create a WooCommerce events page. I'll also show you how to list your events in a table so that more people will find and book your events.
Let's get started!
Comparison: 2 ways to add events to WooCommerce
| Feature | Method 1: Date picker field | Method 2: Events plugin |
|---|---|---|
| Setup complexity | Simple - install one plugin, add date field | Complex - multiple plugins and configuration |
| Setup time | 15-30 minutes | 1-2 hours |
| Cost | $69 (Product Options plugin) | $99+ (Events Calendar Pro + Tickets) |
| Site performance impact | Minimal - lightweight solution | Moderate - additional database queries |
| Date and time selection | Yes - calendar picker | Yes - advanced scheduling |
| Recurring events | No | Yes - weekly, monthly, custom |
| Capacity limits | No - uses stock management | Yes - per event and ticket type |
| Multiple ticket types | Limited - through product variations | Yes - unlimited ticket tiers |
| Attendee management | Basic - through WooCommerce orders | Advanced - dedicated attendee lists |
| Waitlist functionality | No | Yes |
| Calendar view display | No | Yes - month, week, day views |
| Google Maps integration | Manual | Automatic |
| Event import/export | No | Yes - CSV, iCal formats |
| Email notifications | Standard WooCommerce emails | Custom event-specific emails |
| Best for | Simple bookings, classes, appointments | Complex events, conferences, festivals |
Which method should you choose?
Answer these questions to find your best WooCommerce events solution:
1. How many events do you run monthly?
- Less than 10 → Use date picker method
- More than 10 → Consider events plugin
2. Do you need recurring events?
- No → Date picker method works fine
- Yes → You need the events plugin
3. Do you sell multiple ticket types per event?
- No, just one type → Date picker method
- Yes, various tiers → Events plugin recommended
4. What's your technical skill level?
- Beginner → Start with date picker method
- Intermediate/Advanced → Either method works
5. What's your budget?
- Under $70 → Date picker method
- Over $100 → Events plugin viable
6. Do you need attendee capacity limits?
- No → Date picker sufficient
- Yes → Events plugin required
Overall recommendation: If you answered mostly with the first option, choose the date picker method (Method 1). If you answered mostly with the second option, invest in a dedicated events plugin (Method 2).
Method 1: Add an event date field to your WooCommerce products
A date field conversion is the simplest method to transform WooCommerce products into bookable events. The WooCommerce Product Options plugin enables this transformation through customizable field additions.
The plugin adds a calendar-based date field to product pages. Customers select their preferred date and time directly from this calendar. You can include additional fields to collect attendee information or sell event extras.
This method provides essential event management features without plugin complexity. You control available dates and booking windows. You set time slot restrictions and advance booking limits. The system handles event scheduling through standard WooCommerce orders.
The date picker lacks some specialized features. It doesn't include attendee capacity limits or waitlist management. However, it delivers a streamlined solution for basic event sales.
How to add a date field to a product
- First, create the products that you will be adding the event date field to (Products → Add New).
- Next, install the WooCommerce Product Options plugin.
- Go to Products → Product Options in the WordPress Dashboard.
- Create a new options group and give it a name that you will remember. Select the product(s) that you want the date field to appear on, or leave this field blank to add it to all products.
- Next, click 'Add Option'. Choose the 'Date' option type.
- Fill in all the options for your event date field.
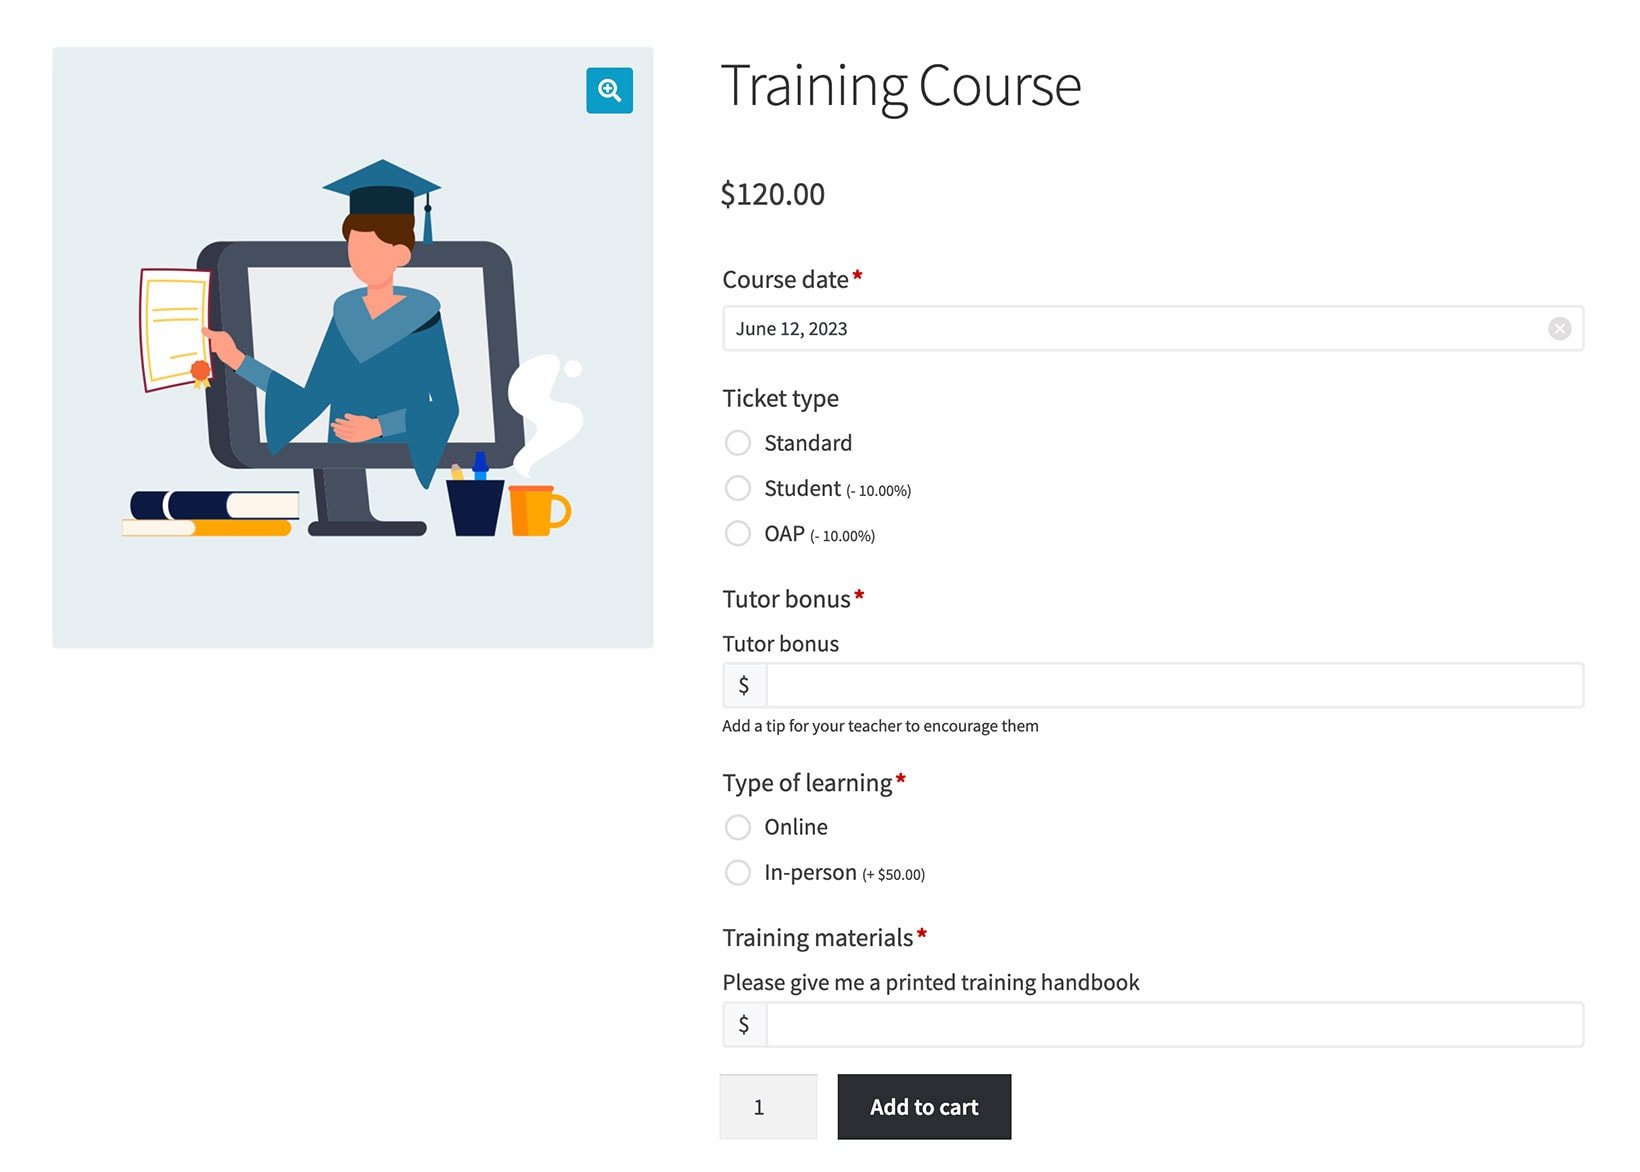
- Finally, visit the product page. You will see the event date field above the add to cart button.
Now go back and add any other fields that you need for your event pages. This is an excellent way to collect information about the people who will be attending your events. You can also sell extras, such as training handbooks or lunch.
Method 2: Use a WooCommerce events plugin
A dedicated WooCommerce events plugin is software that adds comprehensive event management capabilities to your store. These plugins provide features like capacity management, ticket tiers, and attendee tracking.
The Events Calendar stands as the leading event management solution for WooCommerce. It integrates seamlessly with WooCommerce through the Event Tickets add-on. The combination enables full-featured event creation and ticket sales.
The plugin offers both simplicity and advanced functionality. Beginners find the interface intuitive. Advanced users access powerful customization options. The system handles everything from basic event listings to complex ticketing scenarios.
Features
The Events Calendar includes these core capabilities:
Easy event creation: The interface streamlines event setup. Add event name, date, time, location, description, and organizer information through simple forms.
Calendar view and list view: Display options include visual calendar layouts and straightforward list formats. These work well for small event collections. For larger catalogs, combine Events Calendar with WooCommerce Product Table for enhanced searchability.
Responsive design: The plugin adapts to all screen sizes. Events display correctly on desktop, tablet, and mobile devices.
Customizable templates: Pre-built templates control event page appearance. Custom CSS enables unique designs.
Integration with Google Maps: Location data automatically generates map displays. Attendees receive visual navigation assistance.
Recurring events: Schedule repeating events once. The system automatically creates weekly or monthly occurrences.
Import and export functionality: Transfer events between platforms. Import existing event data or export for backup.
Event Tickets add-on: Sell multiple ticket types per event. Manage attendees and track sales. Offer general admission, VIP, and custom ticket categories.
Using Events Calendar to create WooCommerce events
- Install and activate The Events Calendar plugin: Navigate to the 'Plugins' section in your WordPress dashboard. Click 'Add New', search for 'The Events Calendar', and then install and activate the plugin.
- Install and activate the Event Tickets add-on: Similarly, search for 'Event Tickets' in the 'Add New' plugin section, then install and activate the plugin.
- Now you need to purchase and install the premium version of Event Tickets. This is what adds the WooCommerce integration for selling access to your events.
- Configure plugin settings: Go to Events → Settings in your WordPress dashboard to configure the plugin settings, such as your preferred calendar view, timezone, currency, and more.
- Create an event: Click on Events → Add New to start creating your first event. Fill in the required event details, such as title, date, time, location, and description.
- Add tickets to your event: With the Event Tickets add-on installed, you can add tickets to your events by scrolling down to the 'Tickets' section on the event editing page. Set ticket prices, quantity, and any other relevant details. This creates a WooCommerce product, which is your 'ticket'.
As you can see, Events Calendar is harder to set up than the Product Options method. However, it's worth it if you need the extra WooCommerce events management features.
Why you need a better way to display WooCommerce events on your website
With both of the methods described above, each event has its own unique product page. Visitors must click through numerous pages to compare events or book multiple tickets.
The solution is to list all your events in a single, searchable interface. You can do this with the WooCommerce Product Table plugin, which presents all events in a structured table view.

Why list events in a WooCommerce table?
A WooCommerce event table is a structured display format which shows multiple events in rows and columns. This layout provides immediate access to event details and booking options. Customers can compare events and access essential information without leaving the main events page. It's an excellent way to peak your visitors' interest and encourage them to sign up for more events.
- You can include the essential information about each event, providing visitors with what they need to make a decision without overwhelming them with details.
- Customers can quickly search and filter the list of events to find what they're looking for.
- Plus, they'll be able to make comparisons easily, choose the number of places they want to book, and even purchase tickets to several events at once.
How to create a WooCommerce events page
Creating a WooCommerce events table requires initial event setup and plugin installation. Both event creation methods described earlier work with this display system.
Follow the simple steps below to display your WooCommerce events effectively.
Step 1: Install the WooCommerce Product Table plugin
- Download the plugin zip file after purchase.
- Install the plugin through WordPress admin via Plugins → Add New.
- Upload and activate the downloaded file.
- Navigate to Products → Product Tables → Add New to access the table builder.
Step 2: Create your WooCommerce events table
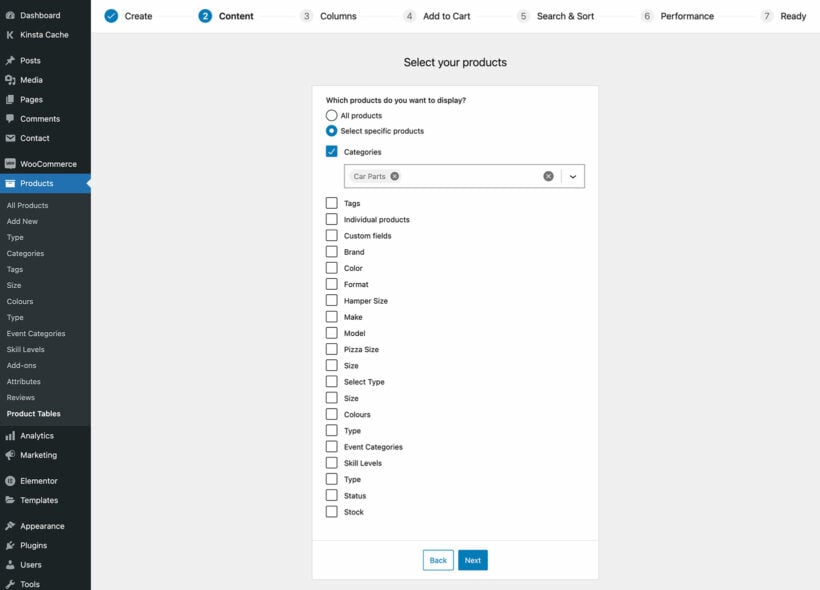
- First, select the option to add the table to a page using a block or shortcode.

- Next, choose which products to include in the table. For example, if you use WooCommerce to sell products that aren't events then you should just select the event categories here. The rest of your store will be unaffected.
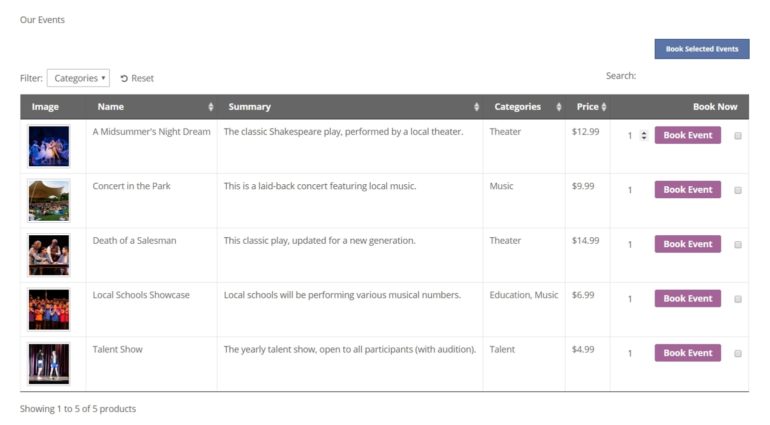
- Choose which columns of information about your WooCommerce events to include in the table. Try to strike a balance between providing all the necessary information, and not overwhelming your visitors. For an events table, we’d recommend the following columns at a minimum: image, name, summary, categories, price, and buy.

- You may want to rename some of the labels in your events table. For instance, instead of using Buy above the final column, you could use something more events-specific, such as Book Now. To do that, click on the pencil icon for each column and rename it as needed.
- On the 'Add to cart' page, you’ll definitely want to check the Quantity selectors box. That way, if people want to bring along friends or family to the event, they can reserve multiple places at once.

- If you choose Button and checkbox for the 'Add to cart method', then customers will be able to purchase tickets for more than one event at a time, and add everything to their cart with a single click. This is a smart way to streamline their experience.
- After that, take a look at the Filter dropdowns field. You may want to add filters for data such as product categories, tags or attributes. This will place one or more dropdown menus above your WooCommerce events table. If you offer more than a few events, this makes the events list much more user-friendly.

Step 3: Change the add to cart button text
The default "Add to cart" text doesn't suit event bookings.
Go to Products → Product Tables → Settings to modify button text. Change the label to "Book Now" or similar event-appropriate wording.
This small change clarifies the action for event purchasers, giving them the confidence to add the event to their cart.
Step 4: Create your WooCommerce events page
Now, it’s time to create the page where your WooCommerce events will be displayed. To do that, just navigate to Pages → Add New.
If you're using the WordPress block editor then insert a 'Product Table' block and select your table. Otherwise, get the shortcode from Products → Product Tables and add the table that way.
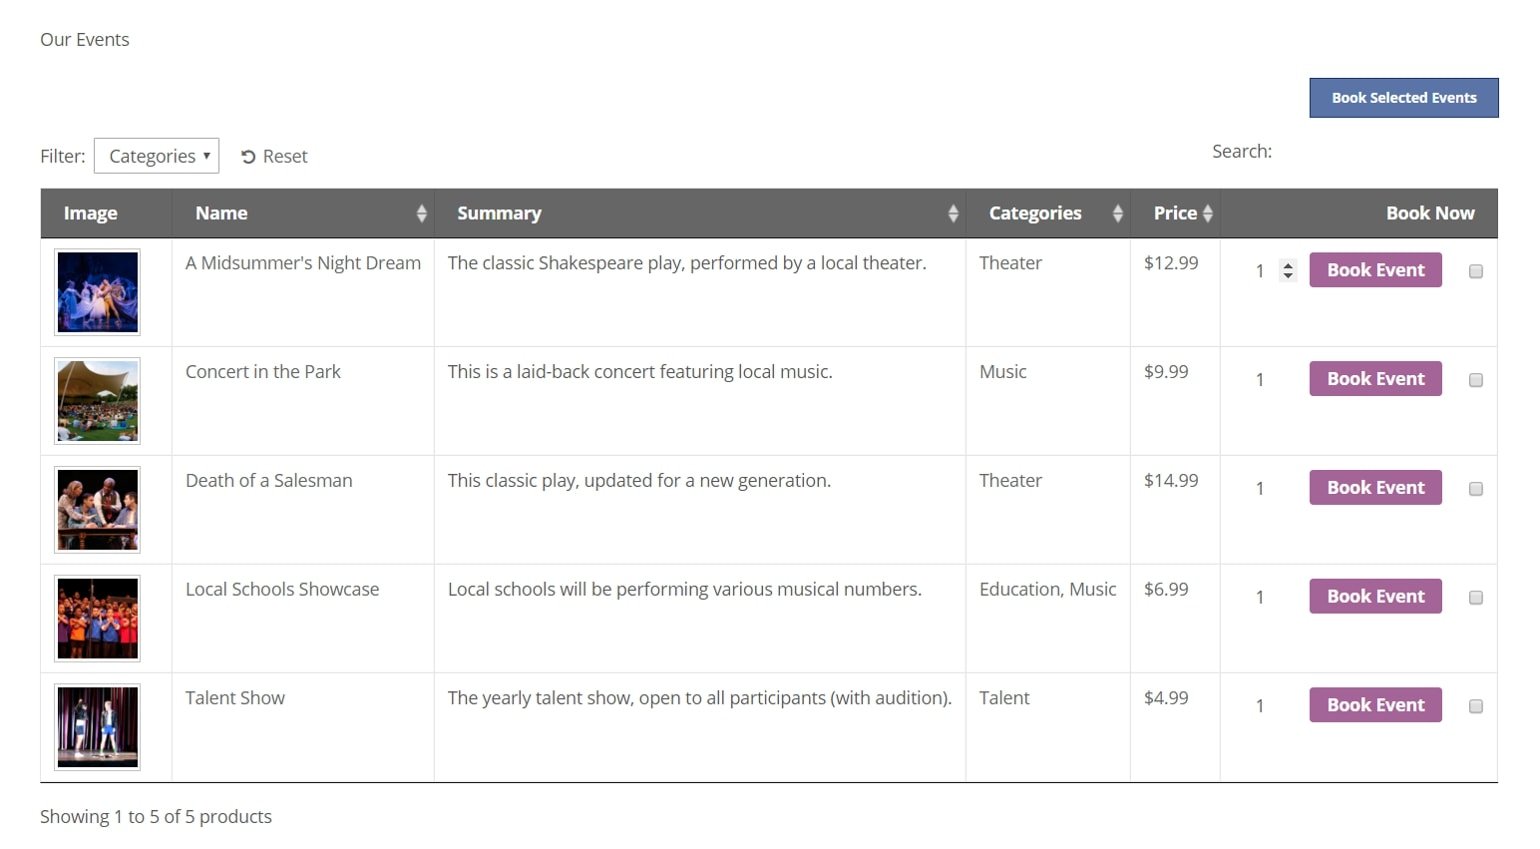
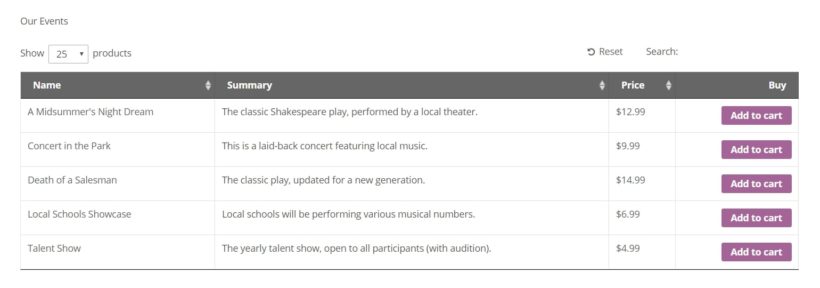
After that, view the page to see the WooCommerce events plugin in action:
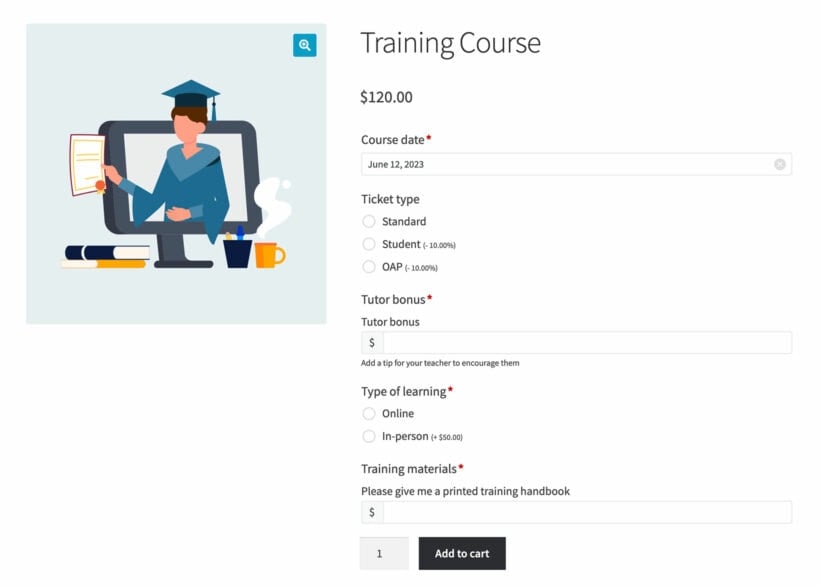
Or if you decided to keep things simple then it might look more like this:
Note: If you're using WooCommerce Product Table with the Events Calendar plugin, then these instructions will list your tickets in a table - not the actual events. If you want to list the events instead of the tickets then we have another tutorial on how to do that.
Step 5 (optional): Add quick view to the list of events
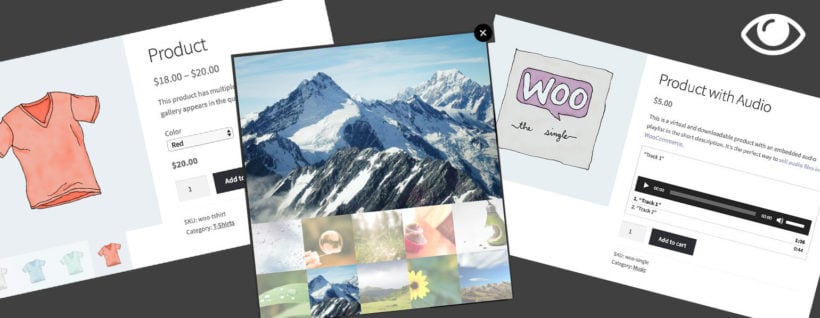
Quick view is a lightbox popup which displays detailed event information without needing to load a separate page. You can use the WooCommerce Quick View Pro plugin to add this feature to your WooCommerce event lists.
The plugin keeps the customer's focus on the main events page. They can view extra details in overlays rather than separate pages. This reduces friction in the booking process, keeping customers where you want them.
By using quick view, you can take advantage of advanced display options. For example, you can show image galleries from previous events in the popup. You can also display ticket variations and pricing tiers, along with extended descriptions and additional event details. All of this works together to increase booking confidence and conversion rates.
What types of event can I sell in WooCommerce?
WooCommerce events can accommodate any bookable occasion or time-based product. The flexible system adapts to diverse event types and industries. For example:
- Live in-person eventsAdmissions tickets, live music or comedy events, charity events, concerts, conferences, dating events, festivals, meet-ups, performances
- Online eventsLivestreams, live coaching, online conferences, webinars.
- CoursesBootcamps, classes, crash courses, test preparation or interview training, training courses, webinars.
Each event type benefits from being listed in a table layout. For example, it's ideal for showing multiple sessions at conferences. Course providers can display semester offerings in a table. It's also an excellent way of listing seasonable performances at entertainment venues.
Now let's see what a lightweight list of WooCommerce events looks like in action.
Case study: Using WooCommerce to sell event tickets
To get a taste for what you can accomplish using the WooCommerce Product Table plugin, check out Weave The Ring:
Weave The Ring is the perfect example of listing WooCommerce events in a table. Each row contains complete event information. The layout includes descriptions, categories, prices, and featured images. As a result, there's no need for customers to visit multiple pages to learn about each event.
The smart navigation features enhance user experience even further. Customers can use the category filters and search box to view events by type.
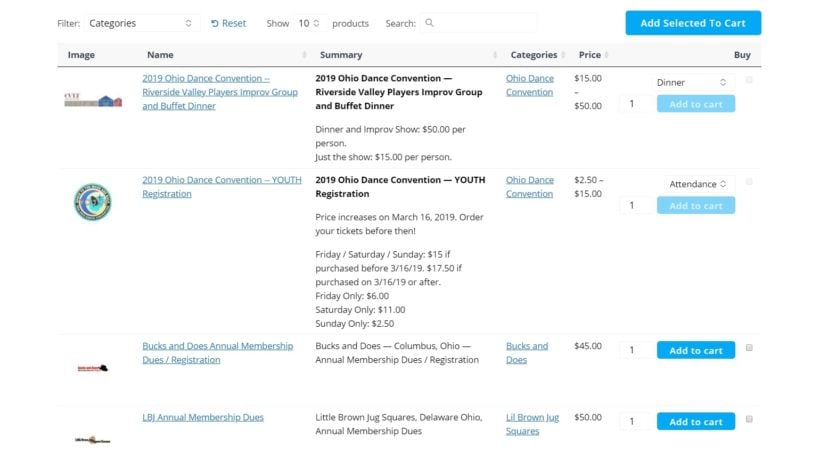
Case study - Selling WooCommerce events imported from Moodle
Tallahassee Christian College and Training Center integrates WooCommerce with their learning management system. The Edwiser Bridge plugin connects WooCommerce to Moodle. Courses automatically import into WordPress as WooCommerce products.
Once imported, WooCommerce Product Table displays the imported events in an organized format. Students can filter by category or tag to find relevant programs. They can also visit the sngle product pages to view detailed course information and registration forms.
Bonus: How to sell entry tickets in WooCommerce
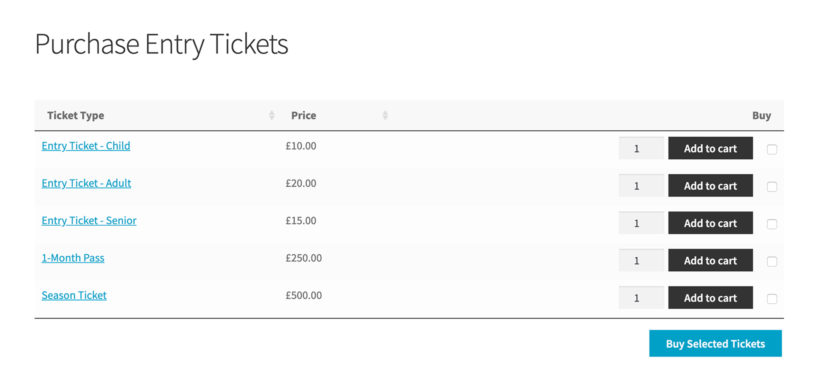
You can use the techniques discussed in this tutorial to sell entry tickets to a range of locations including museums, art galleries, tourist attractions, or events.
Enable the add to cart checkboxes in WooCommerce Product Table for family purchases. Parents can select multiple ticket types before adding to the cart. The system calculates totals automatically and processes all the entry tickets together.
Bonus: Set the default ticket quantity to zero
In WooCommerce, the default quantity for buying products is always 1. This applies to any type of products, including events and entrance tickets. However, a default quantity of 0 is actually more appropriate when selling tickets, seats for theatre shows, or places on courses or events.
You can easily change the default quantity to zero by installing the WooCommerce Quantity Manager plugin. That way, shoppers can change the required quantity for each ticket to any number they choose before adding them to the cart.
Where to get the plugins
In conclusion, creating a dynamic and engaging events page for your WooCommerce store doesn't have to be a daunting task. This guide has outlined two primary methods to achieve this goal:
- Using the WooCommerce Product Options plugin to add a date picker field to your products, or;
- Opting for a traditional WooCommerce events plugin like Events Calendar with the Tickets add-on.
To further enhance your events page, you can use the WooCommerce Product Table plugin for a searchable and user-friendly event listing experience.
By carefully considering the pros and cons of each option and assessing your specific needs, you can make an informed decision that best suits your website. Whichever method you choose, remember that the ultimate goal is to create an events page that is both visually appealing and functional. It must make it easy for your customers to discover and book your events. With the right tools and strategies, your WooCommerce events page can become a valuable asset for promoting your upcoming events and driving sales.
Do you have any questions about how to set up the perfect WooCommerce events page? Ask away in the comments section below!
7 Comments
We have used the Events Calendar and Events Tickets... however we've had several issues that with the Events Tickets Plus plugin from that company. We are looking to move away from using it, especially now with the new High Performance Order Storage HPOS woocommerce is moving to. we're in the middle of gettign support for one site now that is in peak sales season and losing sales due to a bug with Events Tickets Plus.
Barn2Media plugins have been solid. Was doing a Google search on alternative live events type of products and came across this blog post. Thanks.
Hi, John. Thanks for your comments and the kind words for our plugins. I'm glad you found our tutorial via Google search. All our plugins, such as WooCommerce Product Options and WooCommerce Product Table mentioned here, have been HPOS compatible since last year. You can see exactly when this was declared for each plugin in our Changelogs.
I hope the information here is helpful for your use case. Should you have any questions, you can get in touch via our dedicated Support Center. Cheers.
Hi - We run a lot of culinary workshops. In order to run a session we need a minimum of 10 participants and we can not afford running the event for less. Is there a way to set up registration, and ticket sales to ensure the minimum revenue is met?
Hello David, thank you for your comment! I believe that the functionality you're seeking extends beyond the intended design of WooCommerce Product Options. In this case, I would recommend visiting https://theeventscalendar.com/ for the specific feature you're looking for. I've heard that The Events Calendar has another plugin called the "Event Tickets" that can assist you in setting minimum participant requirements. This add-on may provide the functionality you're looking for, allowing you to manage and enforce minimum participant numbers for events.
See: https://theeventscalendar.com/knowledgebase/k/how-event-tickets-calculates-availability/
I hope this makes sense and helps. If you have any more questions about our plugins, you can get in touch via our Support Center, and we would be delighted to discuss this with you in more detail. Many thanks!
I would like to use your technique for people to register and pay for religious retreats. However, I only want to list upcoming retreats (events). Will this technique using just woocommerce work, or would I need to use The Events Calendar/Event Tickets Plus in conjunction with woocommerce?
Thanks,
Mark
Hi
Talking about events the date is one of the most important things to know and people want to see the upcoming ones first
So I think it makes sense to use the product data table if events are.shown in a chronological order starting from the closest one.
Now the question is:
How are the products /events listed? Do they follow a.chronological order
Thank you!
Hi Alex, the plugin comes with 'Sort by' and 'Sort order' options which let you choose to order the table by date or any other field.