How to set up conditional fields on the WooCommerce checkout page

Do you want to improve your online store's checkout experience? One easy way to achieve this is to add WooCommerce conditional checkout fields. They can help you reduce your cart abandonment rate and keep more customers satisfied. I'll show you how to make this work with a powerful WordPress plugin, YITH WooCommerce Checkout Manager.
The checkout page is a critical part of every online store's buying process. It can either land you more sales or lose you a good number of customers. Today, most online shoppers expect a smooth hitch-free checkout experience with fewer steps and more relevant options.
But most ecommerce stores serve multiple audiences. Not all customers need to see the same set of product options. Showing your store visitors irrelevant or confusing checkout fields can increase your cart abandonment rate. To avoid this, I recommend using conditional checkout fields for WooCommerce.
Conditional checkout fields allow you to show or hide product options from the checkout page based on specific criteria. This can be conditions like order details, the value in the buyer's shipping address fields (e.g. state field), or previously selected options. It could even be the payment method, shipping method, or order notes. This way, customers enjoy a simpler, faster, and more personalized checkout experience.
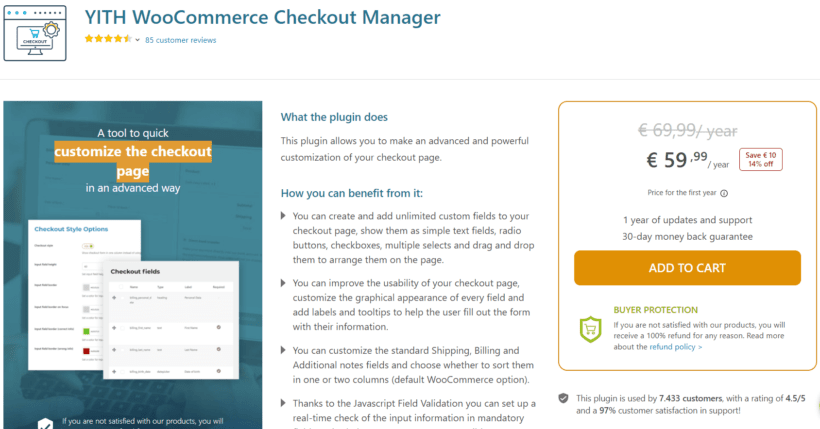
In this article, I'll show you how to set up WooCommerce conditional fields with YITH WooCommerce Checkout Manager. This plugin not only helps you configure display rules for custom checkout fields. It also helps you to create advanced custom fields and improve your checkout page's look.
But first, let's explain what conditional checkout fields are in more detail. Then I'll also explore the benefits of using them.
What are WooCommerce conditional checkout fields?
In certain online stores, customers require a unique checkout process to get the best shopping experience possible. For example, a print shop that sells business cards may allow customers to either choose a design template or create their design. Displaying all available options to both customer groups can impact their experience negatively. This will most likely result in a slower checkout and increased cart abandonment.
To fix this, it's important to show or hide certain information fields on the product page and during checkout. This is where WooCommerce conditional checkout fields come in. They display checkout fields based on certain factors like a customer's previous selections. This way, your store's checkout experience will be tailored to meet each buyer's specific needs.
A couple of use cases
You can use WooCommerce conditional checkout fields to show or hide product options in different ways. This means the conditional field will only appear depending on a different field value. For example, a buyer may want to wrap the items they purchase in a gift store. On the other hand, other shoppers might want to buy the gift item only.
For the best experience, you may want to offer the buyer an option to wrap the item on the checkout page. In this case, it then makes sense to display the gift-wrapping options only when the customers select the option to wrap the item.
Another good example is any store or site that supports a charity cause or organization. You can choose to accept donations o the checkout page. This is most appropriate at the bottom of the checkout page. When the buyer is done filling out the regular checkout fields, you can ask if they'd like to make a donation with an optional checkbox field. If they check the box as a form of validation, you can then roll out the donation options.
Similarly, you can use WooCommerce conditional checkout fields when collecting customer information during checkout. For example, you can choose to display a required field for entering a company name when a customer selects a business account. Jewelry shops can also show a field for custom engraving when a customer selects an item that can be engraved.
Overall, WooCommerce conditional checkout fields are a must-have feature for certain types of ecommerce stores. As a store owner, they can help you deliver a more personalized shopping experience to your store visitors.
Benefits of using conditional checkout fields
The primary idea behind adding WooCommerce conditional checkout fields to your store is to improve its overall customer experience. Conditional fields achieve this by basically hiding unnecessary fields that make checkout more stressful.
By showing only the necessary fields, the checkout process becomes more efficient and streamlined for each customer. Let's look at some of the key benefits of using WooCommerce conditional checkout fields.
1. Faster checkout and increased customer satisfaction
The first benefit of WooCommerce conditional checkout fields is the elimination of unnecessary checkout steps. As earlier mentioned, modern online shoppers expect to face as few bottlenecks as possible. Imagine losing a customer because you overwhelmed them with a long list of irrelevant checkout fields. Conditional checkout fields help you to avoid this and meet your customer's expectations easily. This generally boosts customer satisfaction. And with high customer satisfaction, your store gets to benefit in several other ways.
2. More sales, lower cart abandonment rate, and higher conversion rate
Satisfied customers who don't have to go through a long checkout process end up buying more. Faster checkout often equals more revenue for almost any type of online business. Baymard Institute's studies reveal that long complicated checkout accounts for 17% of cart abandonment. Eliminating this factor results in less friction during checkout and impacts your conversion rate positively. This can be a game changer for the majority of ecommerce stores.
3. More accurate customer information for business insights
One easy way to boost a customer's chances of giving away information is to ask only relevant questions. With WooCommerce conditional checkout fields, you can use logic to determine which information fields to display to different groups of customers. Collecting accurate information helps you to build very strong customer relationships. It also means you have all the insight you need to optimize your business operations and land even more sales.
There are lots more benefits you stand to enjoy with WooCommerce conditional checkout fields. Whether you're a large-scale merchant or small ecommerce retailer, they can help improve your overall bottom line.
The good thing is adding them to your store is super easy and straightforward. All you need to do is use a WordPress plugin. This eliminates the need to hire a developer or write lines of code. Now, let's explore how to set up conditional rules for checkout fields with my #1 plugin pick, YITH WooCommerce Checkout Manager.
Installing YITH WooCommerce Checkout Manager
Ready to add WooCommerce conditional checkout fields to your ecommerce store? I highly recommend YITH WooCommerce Checkout Manager. The plugin makes it very easy to show or hide checkout fields using conditional logic.
Apart from setting up conditional checkout fields, the checkout field editor also helps you manage your entire checkout process in other interesting ways. Let's take a look at some key features.
WooCommerce Checkout Manager features
Here are a few key features of this checkout plugin you get to enjoy:
- Logic-based WooCommerce conditional checkout fields Use logic and other customer-specific factors to decide which fields to show different customers on the checkout page. WooCommerce Checkout Manager allows you to display specific fields based on the answers buyers provide in previous fields. For example, if a customer chooses a specific product or service, extra fields may appear for that specific product or service. This generally gives them a more personalized experience.
- Customize checkout page design Your checkout page's design and layout also affect your conversion and cart abandonment rates significantly. This WooCommerce plugin allows you to change the position of each field, the font size and color, and also set their width. Doing this creates a more cohesive and visually pleasing experience across your site.
- Product-based and category-based checkout Automatically create a unique checkout experience for specific products and product categories. All you need to do is enable or disable certain fields for these products and categories only in the back end. This makes streamlining individual checkout pages super easy. You can also set which checkout fields are required for a buyer to complete their purchase.
You can start enjoying these features and more. Simply get your copy of YITH WooCommerce Checkout Manager here. You'll receive a ZIP file and activation key in your email in the process.
Next, install and activate it on your WooCommerce website. You'll need to first go to Plugins → Add New → Upload Plugin. Upload the plugin's ZIP file to your WordPress website and click Install.
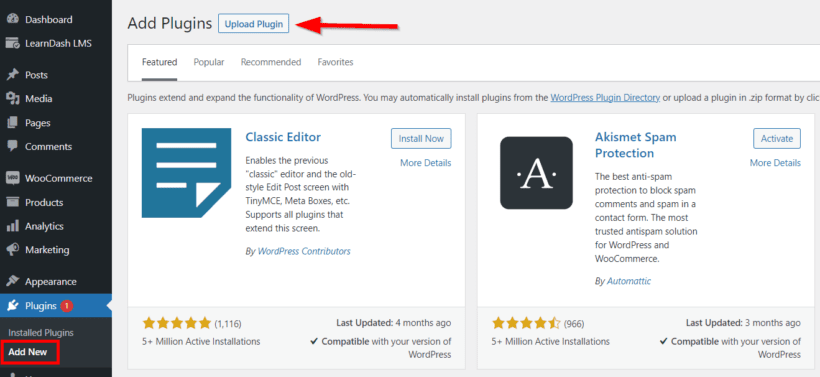
Once the installation is complete, enter the license key to activate the plugin. This allows you to receive automatic updates from the developers. You'll also gain access to the support platform to get help whenever you need it.
Setting up WooCommerce conditional checkout fields
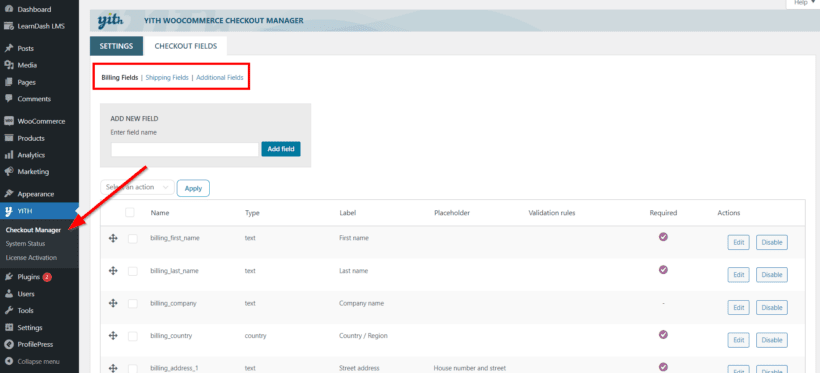
Congratulations, you've successfully activated the plugin. Next, access the plugin settings by going to YITH → Checkout Manager. Here, click on the CHECKOUT FIELDS tab. The fields are divided into Billing Fields, Shipping Fields, and Additional Fields.
Creating a new WooCommerce conditional checkout field
Here, you can either create a new field or edit the default Woocommerce checkout fields. To create a new one, enter the field name under ADD NEW FIELD. Let's create a field to request the type of entity a new customer wants to register. I'll then use this field to either hide or show the 'VAT number' field.
On the next page, select the Type of field you want it to be. I'll choose the Radio field. Then enter the necessary values in the Options field. Separate each option with the '|' sign. In the label field, I'll enter 'Are you purchasing as a private or company?'
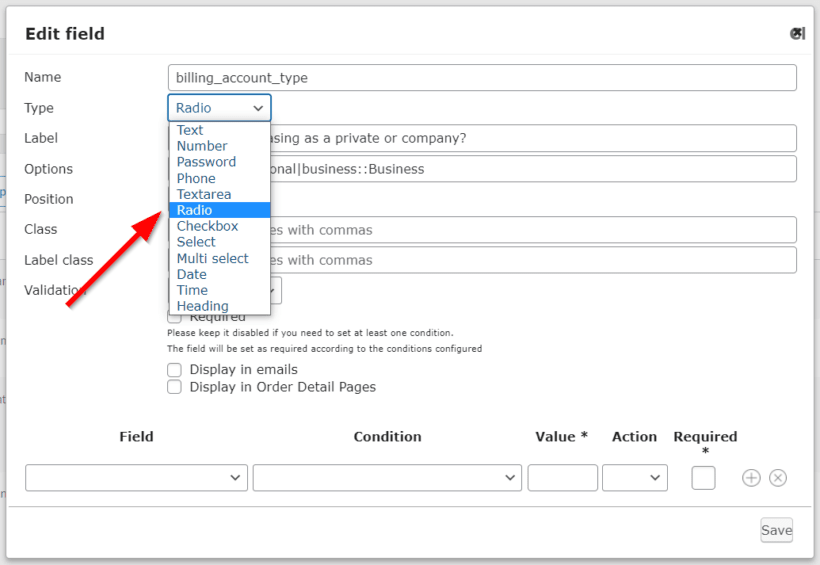
This will appear on the front end. Once you're done, click Save.
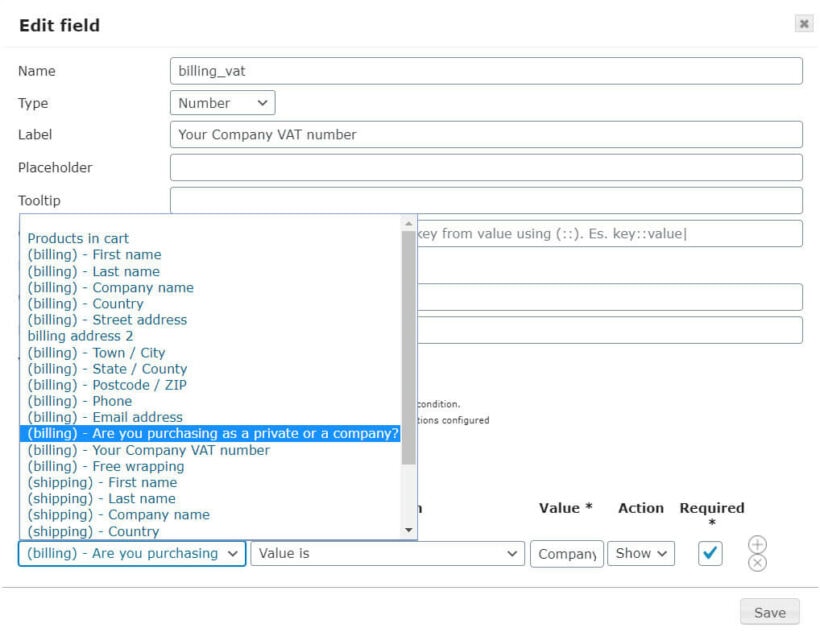
Then create another field. I'll name this one 'VAT'. This is the WooCommerce checkout field I'll apply conditional logic to. I'll set the Type as Number. Then, in the label field, I'll enter 'Your Company VAT Number'.
Next, I'll set all the necessary parameters in the condition fields. Something like the values below.
Make sure you click Save changes at the bottom left corner of the page when you're done with everything.
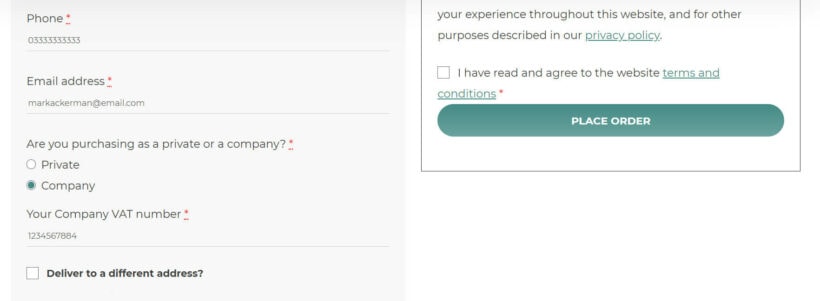
Now, I'll navigate to the checkout page on the front end. You'll notice that the VAT field only appears when the customer opts for the 'Company' option.
Editing an existing field
What if you want to add conditional logic to an existing checkout field? Simply click Edit next to the field you want to tweak. You can also drag and drop checkout fields to reposition them on the checkout page. I'll talk more about tweaking the page layout later in this tutorial.
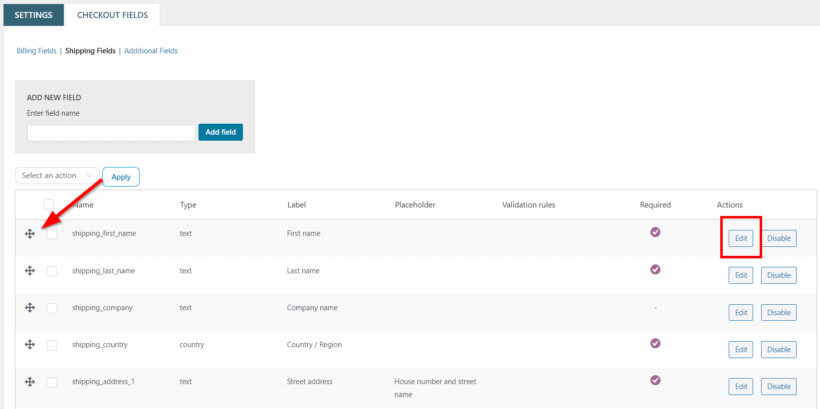
You may want to create a WooCommerce conditional billing address field or shipping field. You can edit any of the existing fields under the first two tabs. For example, you can decide to request the customer's zip code in certain countries only.
To do this, click Edit next to the shipping_postcode field. Next, select (shipping) - Country/Region in the Field dropdown.

Then set the other conditions like Value, Action, and Required.
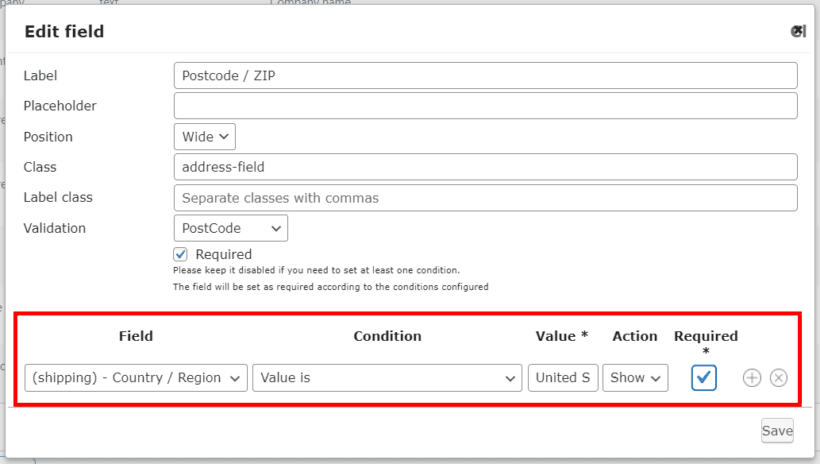
Once you're done, click Save and then Save changes. That's it! You've successfully configured your first WooCommerce conditional checkout field.
Remember I talked about some other YITH WooCommerce Checkout Manager features? Let's explore how you can use it to further optimize your checkout page.
Customizing the checkout page
There are several ways you can use WooCommerce Checkout Manager to customize your checkout page. Each of these customization ideas improves the page's design and boosts the success of your store.
For starters, you can change the color of the checkout field border and other layout options. To do this, navigate to YITH → Checkout Manager → SETTINGS. Then scroll down to the Style options.

Here are the design options you can configure:
- Checkout style Choose whether to show the checkout form in one column instead of using the default two-column layout.
- Input field height Set the height of the checkout field. The default value is 40px
- Input field border Set a color for the input field border.
- Input field border on focus Set a color for the border of the input field on focus.
- Field border (correct info) Set a color for the input field border when the info entered is correct.
- Input field border (wrong info) Set a color for the input field border when the info entered is wrong.
- Error message colorSet a color for error messages.
You can also rearrange both new and existing checkout fields. All you need is to drag and drop the field to where you want it to be.

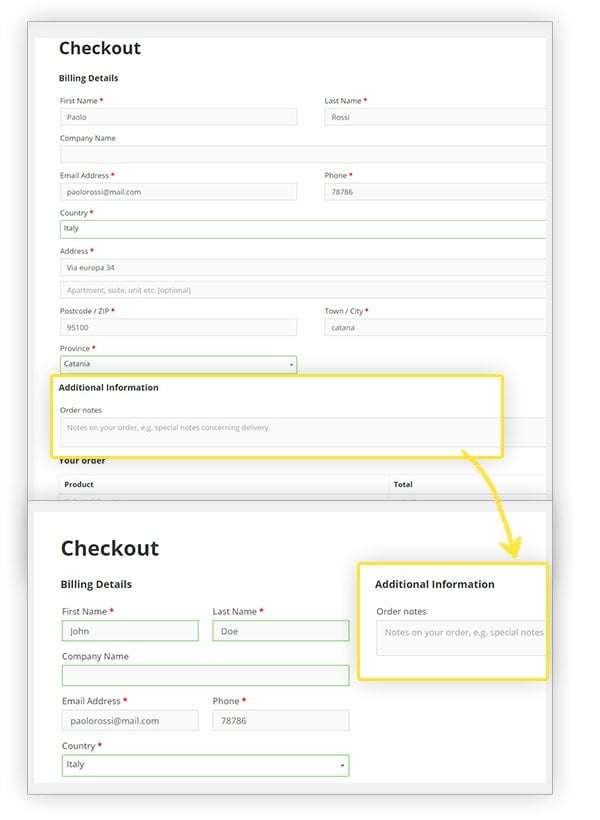
You can choose to assign a unique layout to specific fields too. You can set one field to occupy one column. Similarly, you can set it to appear first or last in a two-column setup.
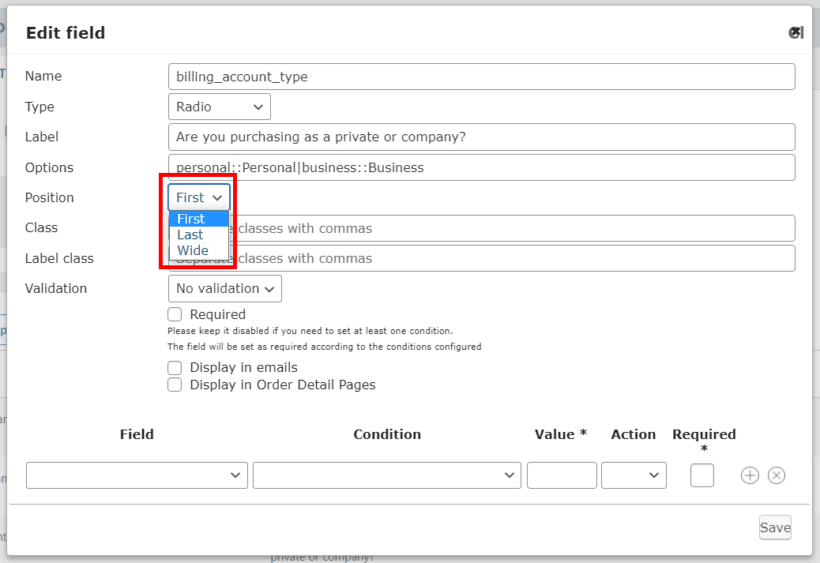
Here's what the difference between both options looks like.
When creating checkout fields, you can also select from different field types. Among other types, you can create a text area or text field, multi-select or select field, radio button, and date picker fields. Overall, these customization options help you to enhance the checkout experience significantly.
Enhancing your WooCommerce store with conditional checkout fields
Setting up conditional fields on the WooCommerce checkout page offers a rare opportunity to enhance your store's customer experience significantly. It offers you the chance to increase conversions and streamline the checkout process.
By using YITH WooCommerce Checkout Manager, users can easily add or remove fields based on specific conditions. This reduces clutter and improves the overall checkout experience. The plugin is easy-to-use and comes with a wide range of customization options.
You can use it to add custom fields, modify existing fields, set conditional logic, and modify the checkout page's layout and design.
Ready to create your own WooCommerce conditional checkout fields? Then I highly recommend trying out YITH WooCommerce Checkout Manager. You can experiment with the tool's multiple features to cater to your specific business needs.
If you have any questions, I’d love to hear from you in the comments section.