How to easily add custom fields to the WooCommerce checkout

Are you looking for a detailed guide on how to add WooCommerce checkout fields to your online store? This article is all you need. We’ll cover the benefits of additional checkout fields and how to create them in WooCommerce.
Custom WooCommerce checkout fields can greatly enhance the customer experience. They allow businesses to collect additional information that is relevant to their products or services. This can include personalization options, appointment details, or information about a business's size or industry. Additionally, collecting this information can provide valuable insights. Businesses often use these insights to improve their operations and implement better and more targeted marketing campaigns.
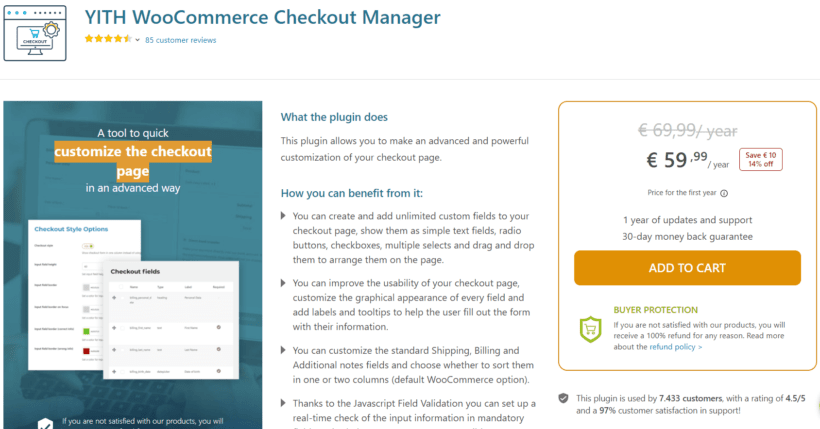
Adding custom fields to WooCommerce checkout is simple when you use the right checkout plugin. Wondering how to add additional custom fields into WooCommerce checkout page? An excellent plugin to use is YITH's WooCommerce Checkout Manager. This plugin is a great solution for businesses looking to add custom fields to their checkout page. This plugin allows businesses to easily add, remove, and customize fields on the checkout page without any coding knowledge.
Additionally, the plugin offers a variety of features. This includes setting required fields, enabling or disabling fields based on product or category, and conditional logic for fields.
In this article, we'll explain why you should add custom WooCommerce checkout fields to your online store. We'll also show you the main features of YITH's WooCommerce Checkout Manager. This is our top recommended plugin for this purpose. You’ll then learn how to use it.
Why you should add extra fields to WooCommerce checkout
Many businesses use WooCommerce custom checkout fields to collect additional information for various purposes. Here are a few examples.
- E-commerce businesses selling custom-made or personalized productsEcommerce businesses use custom fields, including fields for personalization options, such as engraving or monogramming, or fields for requesting specific measurements or sizes. Additionally, businesses can use WooCommerce custom fields to collect information about special requests or instructions for the product.
- Service-based businesses collecting additional information for appointments or reservationsService-based businesses, such as salons or rental companies, can greatly benefit from custom fields in the checkout process. This can include fields for collecting information about appointment or reservation times or for requesting specific services or equipment. These businesses can also use custom fields to collect information about special requests or instructions for the service.
- B2B businesses collecting information about company size or industryB2B businesses use custom fields to collect information about a business's size or industry. This can be used to target marketing efforts and optimize sales strategies. Also, businesses can use custom fields on the order page to collect information about special requests, order instructions, or any other order notes.
Benefits of custom WooCommerce checkout fields for ecommerce businesses
There are several benefits you stand to enjoy by adding extra fields to the checkout of your WooCommerce store. Let's take a look at some of them.
- Better customization and personalization of the checkout processAdding custom fields to the checkout process can improve the customer experience. This is because it allows businesses to collect additional information relevant to their products or services. This can include personalization options, appointment details, or information about a business's size or industry. It also helps to make the checkout process feel more personalized and tailored to the customer. In turn, you get to enjoy increased customer satisfaction and loyalty.
- Ability to collect additional customer informationCustom fields in the checkout process can also provide businesses with valuable insights about their customers. This can include information about their preferences, needs, and demographics. As a store owner, you can use this to improve your products, services, and marketing efforts. Additionally, collecting this information can help your business to identify patterns and trends that you can use to optimize your operations.
- Improved data collection for business insightsCustom fields in the checkout process can also provide businesses with valuable insights about their customers. This can include information about their preferences, needs, and demographics, which can be used to improve products, services, and marketing efforts. Additionally, collecting this information can help businesses to identify patterns and trends they can use to optimize their operations.
Add WooCommerce custom checkout fields with YITH's WooCommerce Checkout Manager
YITH's WooCommerce Checkout Manager allows you to add, edit, or remove fields in the checkout process of a WooCommerce store. With this plugin, you can customize the checkout process to suit your business needs. It also provides various customization options.
You can display WooCommerce checkout fields based on specific conditions. YITH's WooCommerce Checkout Manager can help improve the checkout process and customer experience in a WooCommerce store.
Features
- Add and remove fields from the checkout page YITH's WooCommerce Checkout Manager plugin allows businesses to add and remove fields from the checkout page easily. This can include fields for personalization options, appointment details, or information about a business's size or industry. This feature allows businesses to easily customize the checkout process to fit their specific needs.
- Customize the layout of the fields The plugin also allows businesses to customize the layout of the fields on the checkout page. This can include adjusting the position of the fields, changing the font size and color, and setting the width of the fields. This feature allows businesses to create a cohesive and visually pleasing customer checkout experience.
- Set required fields The plugin allows businesses to set required fields on the checkout page. This means that customers will not be able to complete the checkout process until they have filled out all the required fields. This feature can help ensure that businesses collect all of the information they need from customers.
- Enable or disable fields based on product or category The plugin allows businesses to enable or disable fields based on specific products or categories. This means that businesses can choose which fields are relevant for certain products or categories and only display those fields on the checkout page. This feature can help streamline the checkout process and make it more relevant for customers.
- Conditional logic for fields The plugin also allows businesses to use conditional logic for fields. This means that certain display fields will only appear on the checkout page based on the answers provided in previous fields. For example, if a customer chooses a specific product or service, additional fields may appear for that specific product or service. This feature can provide a more relevant and personalized checkout experience for customers.
- Translation ready This WooCommerce plugin is fully translation ready, which means that the plugin can be easily translated into different languages, allowing businesses to serve customers in different languages.
How WooCommerce checkout fields work in Checkout Manager
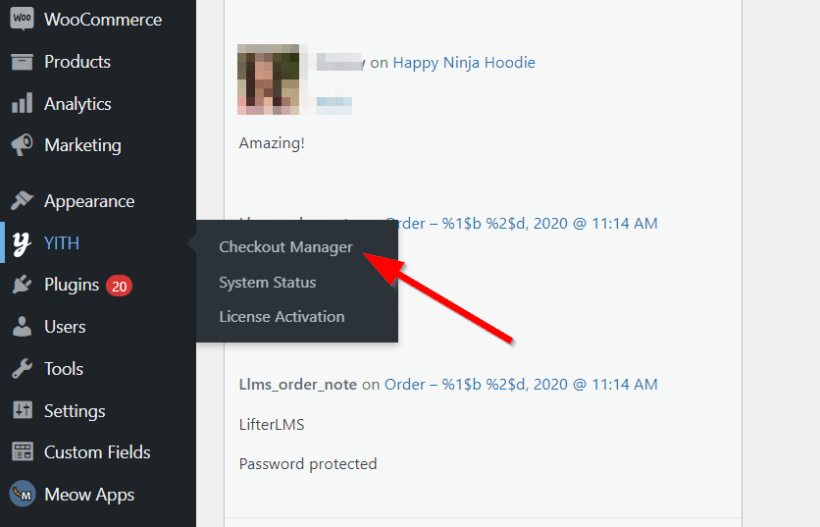
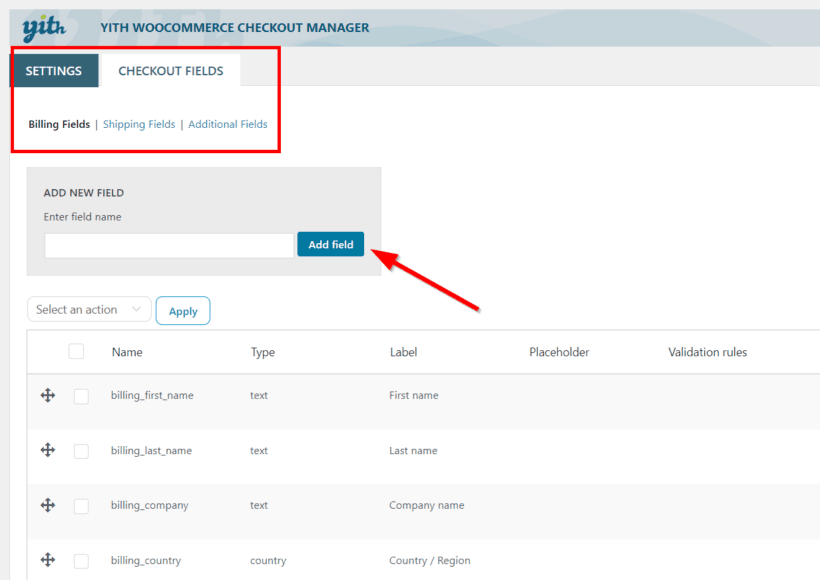
So you're probably thinking; how can I edit the checkout fields in WooCommerce? You can enhance the WooCommerce checkout field editor with a checkout fields plugin like YITH’s WooCommerce Checkout Manager. To do this, go to YITH → Checkout Manager → Checkout fields.
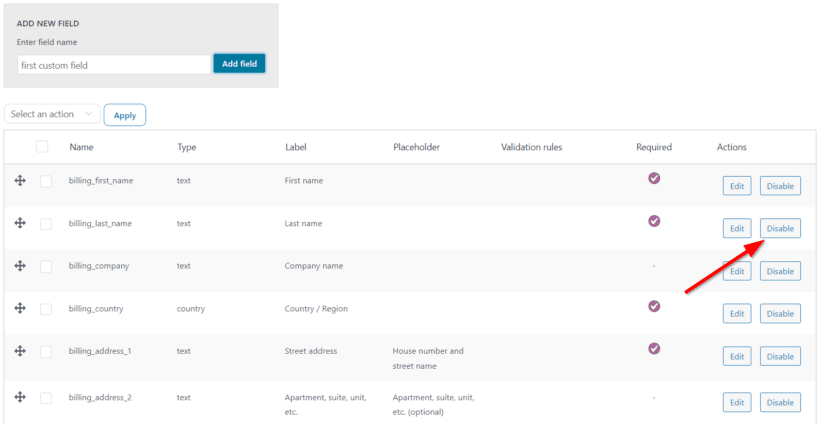
The checkout fields are grouped into Billing Fields, Shipping Fields, and Additional Fields. You'll also see the field names, field types, and other important information.
You can edit the input fields by clicking on the field you want to edit and then making the changes you want. You can also add new fields by clicking on the Add Field button. Once you have made your changes, remember to save them.
Let’s now talk about how to change WooCommerce checkout fields in detail. Note that you can’t delete the default fields in WooCommerce checkout. You can only edit, enable or disable them.
WooCommerce checkout fields options
Once you click on the Edit button beside the checkout field you want to change, the Edit Field panel will be displayed. On this form, you’ll find the options to modify the various settings like:
- Label: Choose the title related to a specific field.
- Placeholder: Choose the text customers will see on the field.
- Tooltip: Choose the text that will be displayed in the field tooltip. You have to enable this on the Settings page to use this feature.
- Position: Select the position of the field based on the part of the line it's inserted. Choose First to set it on the left, last to set it on the right, and Wide if you want it to occupy the entire line space.
- Class: This lets you set graphical CSS rules related to the field.
- Label Class: Allows you to set graphical CSS rules related to the label.
- Validation: Choose whether the field requires any kind of validation since it may require information such as phone number, VAT, country, email, or zip code.
Repeat the process for any other fields you want to change and save your changes by clicking the Save button at the bottom of the page.
Some modifications may require custom codes or plugins. If you're not comfortable with coding, consider hiring a WooCommerce developer to help customize your checkout fields.
Tutorial: How do I add custom fields to checkout in WooCommerce?
Let's quickly walk you through the process of adding custom WooCommerce checkout fields. We'll be using our recommended plugin, YITH WooCommerce Checkout Manager.
Step 1: Installation and activation of the plugin
The first step in using YITH's WooCommerce Checkout Manager plugin is to get your copy of the plugin. You'll receive a ZIP file and activation key in your email in the process.
Next, install and activate it on your WooCommerce website. You'll need to first go to Plugins → Add New → Upload Plugin. Upload the plugin's ZIP file to your WordPress website and click Install.
Once the installation is complete, enter the license key to activate the plugin. This allows you to receive automatic updates from the developers. You'll also gain access to the support platform to get help whenever you need it.
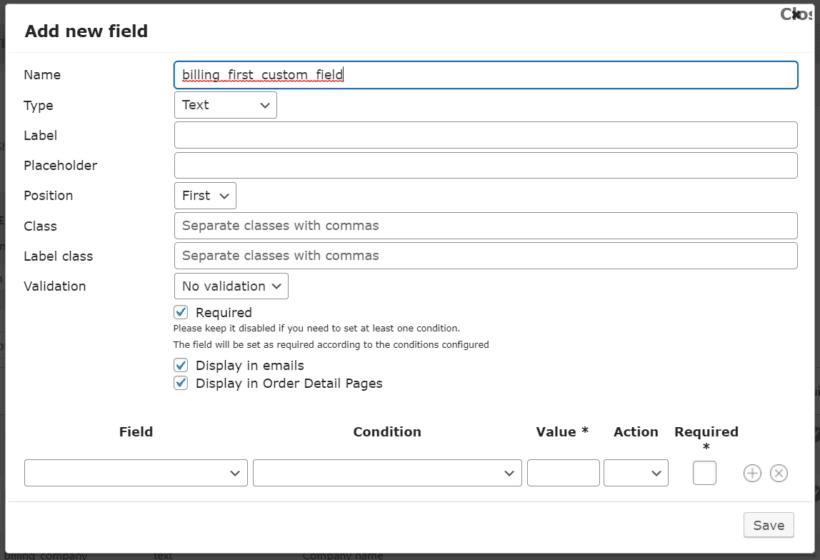
Step 2: Adding and customizing fields on the checkout page
Once the plugin is activated, you can access the plugin settings by going to YITH → Checkout Manager. This is the plugin's settings section of your WordPress dashboard. Here, you want to click on the Checkout fields tabs.
From there, you can add new fields to the checkout page and customize them as needed. This can include adjusting the position of the fields, changing the type of field, and placeholder text. The newly created WooCommerce form fields are the same as the ones on the editing form, with a few extra fields like:
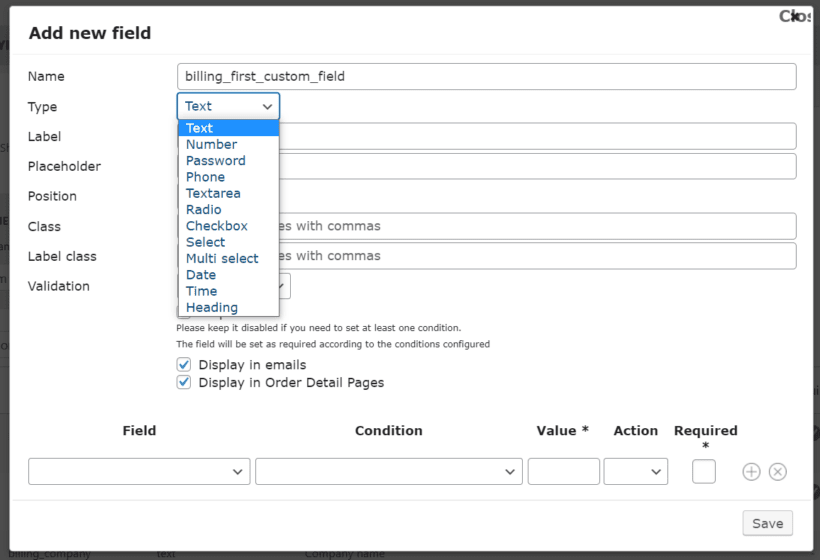
- Type: choose whether you want to create a text field or other field types like number, password, phone number, text area, radio button, checkbox, select (dropdown), multi-select, date picker, time, and heading.
- Display in emails: Choose whether or not you wish to display a created field in the order email.
- Display in Order detail pages: Choose whether to display the field on the summary page.
The first thing you'll need to do is select the type of WooCommerce checkout field you want.
Let's examine the other important configuration settings.
Step 3: Setting required fields and enabling/disabling fields
Once you've added and customized the fields, you can set which fields are required for customers to complete the checkout process. You can also enable or disable fields based on specific products or categories.
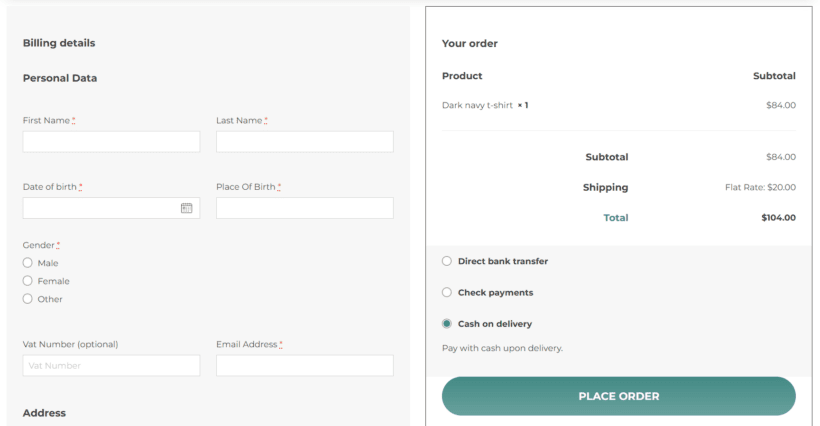
Standard fields on a typical checkout form viewed on the front end of your store are:
- Name fields
- Address fields (like shipping address or billing address)
- Postcode
- Date, etc.
To disable an existing field, simply click Disable next to it on the Checkout Fields page.
Step 4: Using conditional logic for fields
You can also use conditional logic for fields. This means that certain fields will only be displayed on the checkout page based on the answers provided in previous fields. For example, if a customer selects a specific product or service, additional fields may appear for that specific product or service.
Here you can choose the following settings:
- Field: Select here the field that will work as a condition.
- Condition: Select the condition for the field to show.
- Value: Enter the field value to trigger the conditional logic.
- Action: Choose whether to show or hide the current field if the condition is fulfilled.
- Required: Check if the current field has to be set as Required only if the condition is fulfilled.
You can also set up more than one condition for the same field. Simply click on the + (plus) sign to add more or on the x to remove some.
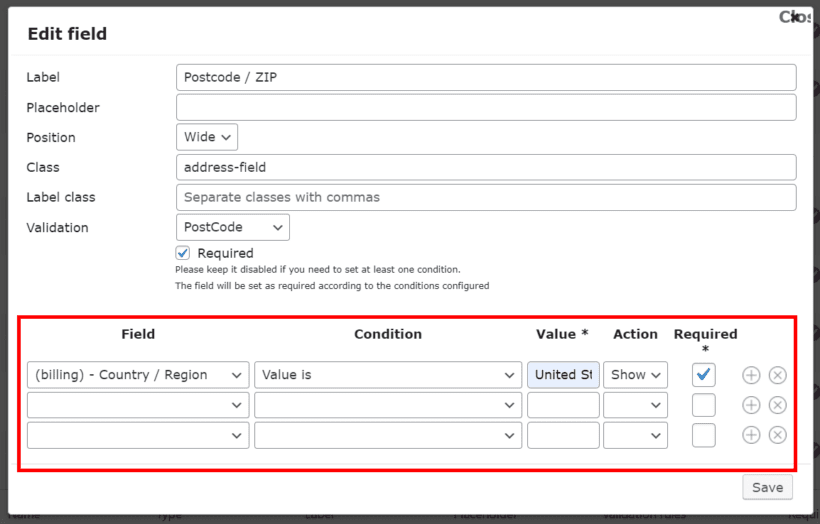
Once you're done, click Save and you've just successfully created your first custom WooCommerce checkout field.
Start adding custom WooCommerce checkout fields
By following these steps above, you should now be able to easily add custom fields to the WooCommerce checkout page. Our recommended plugin, YITH WooCommerce Checkout Manager has all features you need.
You can continue to customize and optimize the WooCommerce checkout process by experimenting. You can continue optimizing the different field layouts, required fields, and conditional logic till you get the desired results.
So how do I customize my WooCommerce checkout? There are different ways to customize your WooCommerce checkout depending on the number of products you want to list. For more information, you can check out this guide on WooCommerce checkout page customization.
You can also use the data collected from the custom fields to gain valuable insights and improve your business operations.
Ready to start using WooCommerce checkout fields in your store? Get your copy of YITH WooCommerce Checkout Manager today!
2 Comments
Thanks for the info. Is there a way with this plugin to have a "confirm e-mail" field, which validates comparing its value to the main e-mail field and only lets the user order when the two addresses match? Thanks.
Hi, Andres. Thanks for asking. For the best advice about the YITH WooCommerce Checkout Manager plugin, I suggest that you please get in touch with YITH Support. I hope this helps point you in the right direction. Cheers.