Earn WooCommerce Amazon affiliates commission with your product reviews site: The complete guide
Passive income is the holy grail for modern online entrepreneurs. The term conjures up images of the successful web store owner reclining in a hammock on some golden-sanded beach, cocktail in one hand, while a sales counter on a nearby laptop slowly ticks upward. A WooCommerce Amazon affiliates website is one of the best ways of achieving this holy grail of online marketing.
The internet – and WordPress (with WooCommerce) in particular – has created unique opportunities to earn money online without having to work for each sale. And one of the most effective, not to mention simplest, ways of doing this is by creating a WooCommerce product reviews website. It works by comparing and reviewing products from Amazon, utilizing the Amazon affiliates program.
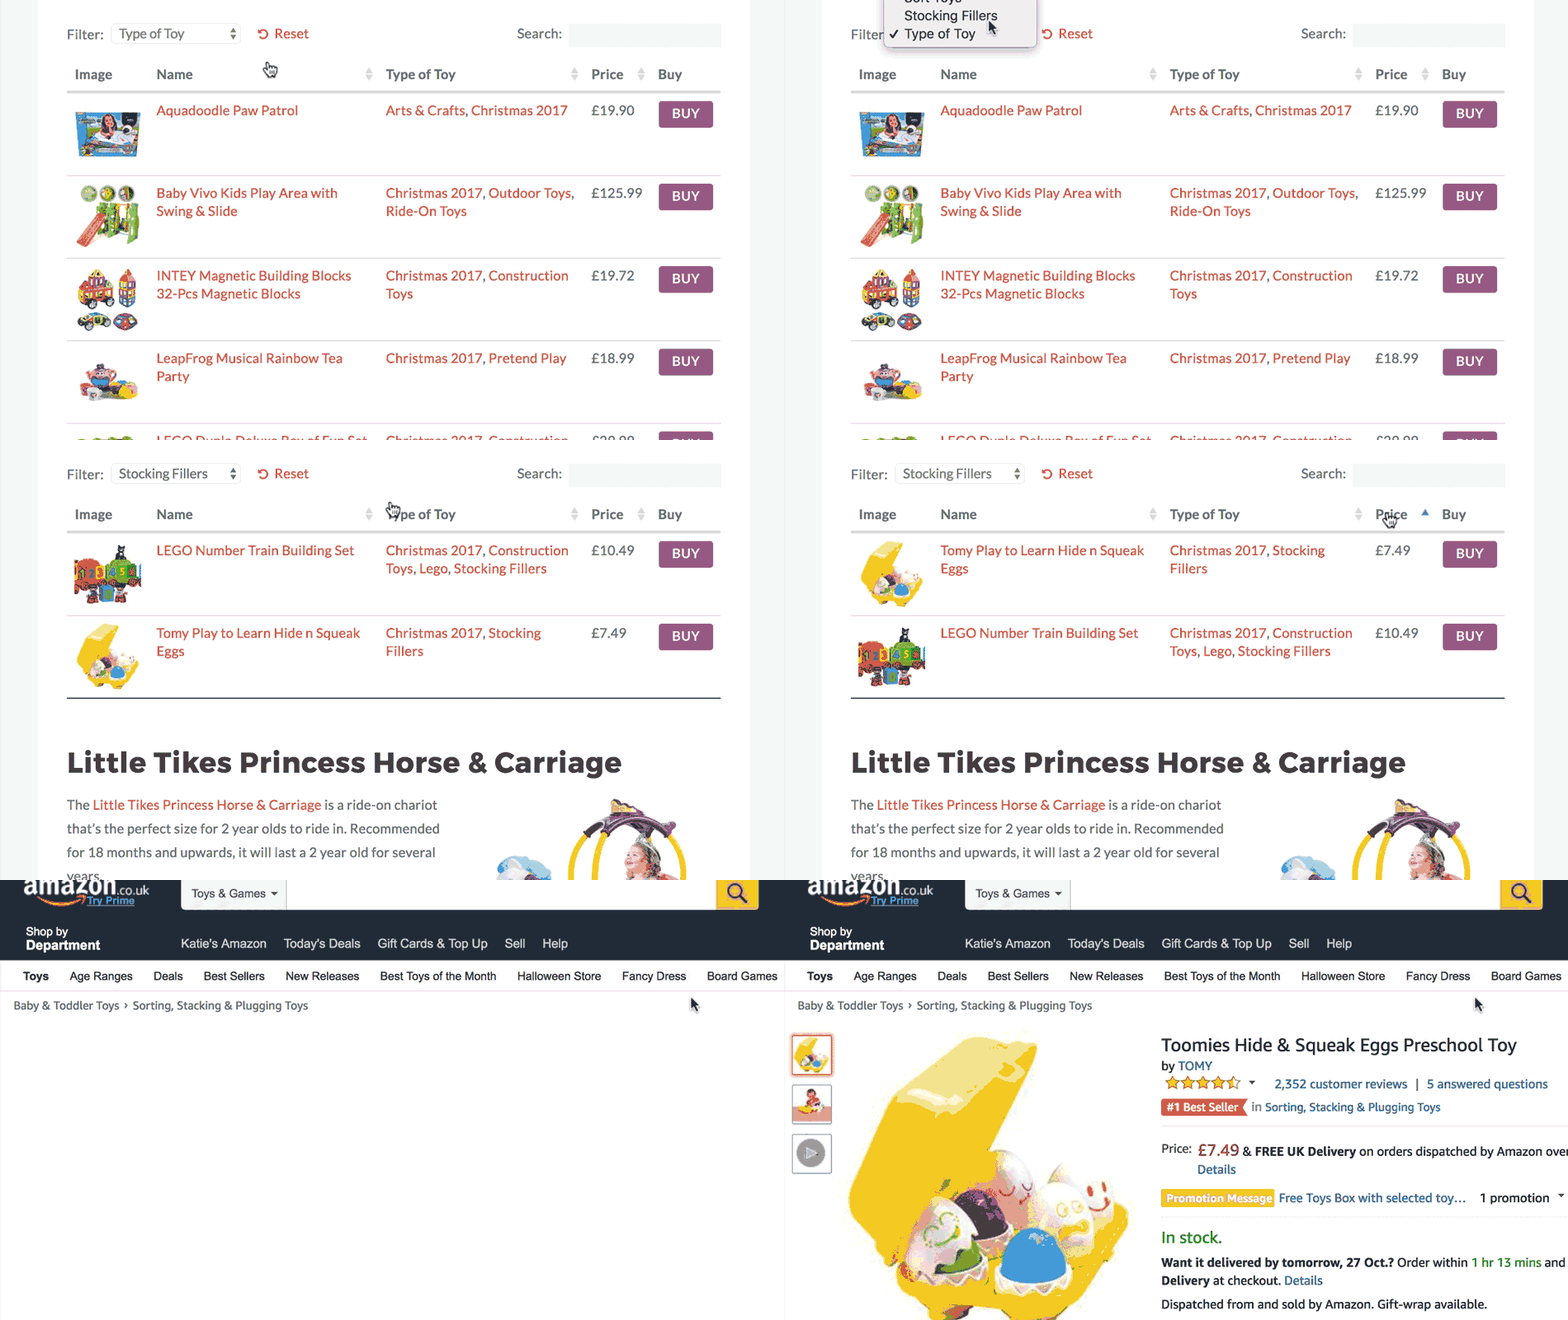
You can start a WooCommerce product reviews website on a shoestring budget (under $200) and gain substantial rewards. With that in mind, this guide will show you how to build a WordPress website that can earn Amazon affiliates commissions by publishing product reviews and comparisons. We’ll focus on free tools and plugins where possible. I will only recommend paid options if there’s no free alternative.
You'll build your WooCommerce amazon affiliates site using WordPress, which is free. We’ll bolt-on to WordPress the similarly free WooCommerce plugin, which powers over 41% of all online shops worldwide. This means you’re in good company :)
We’ll also be looking at how to use the WooCommerce Product Table plugin to list products and reviews in a user-friendly product comparison table, with extra features such as search, sort, and filter. This will make it easier for customers to compare the products you’ve reviewed at a glance, make quick buying decisions. And – most importantly – click on your Amazon affiliate links.
What is the Amazon affiliates program and how does it work?
We’ve been discussing the Amazon affiliates program. But what is it, exactly, and how does it work? Well, it’s very simple. Here are the three steps involved:
- You develop a genuinely useful website with comparisons and reviews of other companies’ products. These might be reviews you have added yourself and/or reviews that other visitors to your website have written.
- Consumers find your website and use the information to decide what to purchase. You’ll list the products on your website using the WooCommerce plugin. But instead of selling the products directly on your site, the Buy button will take the visitor directly to the Amazon listing. This is your affiliate link.
- The consumer decides to buy! They’ll do this on Amazon as usual, but since they came to Amazon via your site, and you used your Amazon affiliates link, Amazon will share roughly 5% of the value of the sale with you. (This varies depending on the specific product). This is your affiliate commission.
The great thing about this system is that everyone wins: readers find helpful information and reviews about products they’re interested in, Amazon gets more sales, and you take a share of the proceeds.
If it’s that easy, why isn’t everyone doing it?

The key phrase you should have picked up on in the previous section is that your website needs to be genuinely useful. Your WooCommerce Amazon affiliates website will only be truly successful if you offer meaningful, engaging content that provides value for consumers.
A key part of the strategy of getting visitors to your Amazon affiliates website will be ranking your site well for relevant search terms. (We’ll discuss this later.) Thus, you have to make sure Google is happy. Here’s a tweet from a Google employee that summarizes Google’s position:
DYK there's no inherent problem with affiliate links? The problem is when a site's sole purpose is to be a shallow container for aff links pic.twitter.com/y149XZ0JP6
— Gary 鯨理/경리 Illyes (so official, trust me) (@methode) March 14, 2017
You must publish quality reviews and comparisons that aren’t already available elsewhere. If you don’t get this part right, search engines (rightly) won’t think highly of your site. Consumers won’t have a reason to visit your site, and you won’t earn any Amazon affiliates commission.
However, if you work hard at finding a niche and spend time adding and promoting unique content, then the obvious appeal of passive income can work well for you. The quality content point is especially important, so be sure to get that right. Now, we’ll move on to look at how to select the niche of your WooCommerce Amazon affiliates website.
Which niche should your WooCommerce Amazon affiliates target?
If you can earn a commission for each sale you refer to Amazon, your site should just list as many Amazon products as possible, and you’ll get more commission – right? Unfortunately, no. Your WooCommerce Amazon affiliates website must focus on a niche.
Search engines will respect the authority of a site that clearly focusses on one thing. Here are some examples of good niches for a WooCommerce Amazon affiliates store:
- guitars
- office supplies
- televisions
- hot tubs (!)
These examples are fairly disparate, but they all have a couple of features in common:
- Customers have a lot of choice, with no obvious “best” product. Furthermore, all the products are fairly similar in outcomes. A consumer wanting to buy a guitar is plausibly confused and will search for reviews – this is where you come in.
- Each item is relatively expensive. You earn a fixed commission from Amazon, so the higher the price of the product, the higher your commission.
- Amazon offers a good selection of all these products. To run a WooCommerce Amazon affiliates website you must, obviously, be able to link to Amazon products.
How to choose the right niche
When selecting your niche, you should also consider your expertise or personal experience. If you happen to be an expert (or at the very least an enthusiast) in electric guitars, you’ll find it a lot easier to comprehensively review and compare guitars.
Finally, consider the competition. Who else is already reviewing the product you’re considering? If a potential niche is particularly crowded – such as guitar reviews – then get more specific! Guitar reviews may be a well-covered market, but what about the best guitars for teenage girls? Television reviews will be well-covered, but what about the best televisions for small apartments? Get creative and find a space within your niche that is under-served. Search the relevant terms your potential visitors will use to get a sense of what is well-covered and where there is a gap in information.
Take a pen and some time now to work out your niche. You may need to go through a couple of ideas before you hit on the right one, but that’s fine! It’s incredibly important to get this section right, as it will directly impact how much affiliate commission your site will drive later.
Search engines will reward the websites and content that are demonstrably the best in their given field. The vast majority of search clicks go to the top couple of search results, so make sure your chosen niche is specific or under-competed enough, so that you can produce the best content, and take those top search rankings.
Case Study – Best Toys for 2 Year Olds WooCommerce Amazon Affiliates Site
Just to prove that I’m not afraid to put my money where my mouth is, let’s take my own Amazon affiliates site Best Toys for 2 Year Olds as an example. This site is powered by WooCommerce and uses precisely the same formula as you’ll find here.
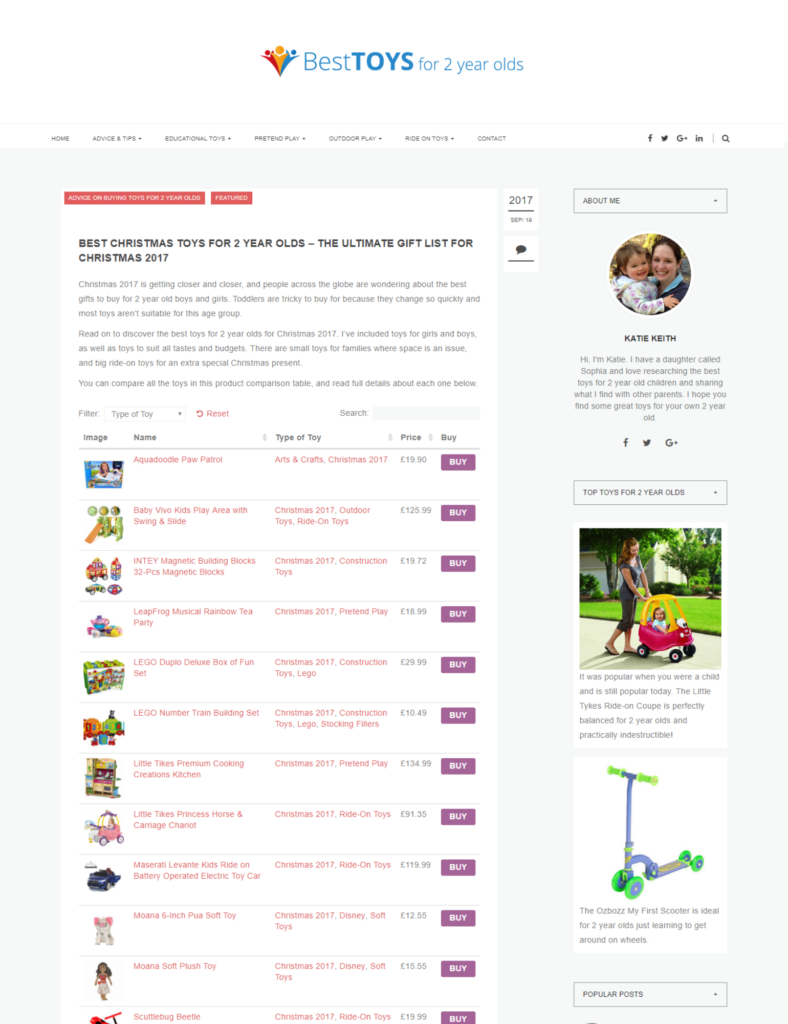
I founded the site because at the time, I had a daughter this age and had been struggling to find developmentally age-appropriate toys. It occupies a niche about which, thanks to my personal experience, I felt I could speak with some authority, giving value to readers.
It’s a very simple website that provides parent-friendly advice and reviews on the best toys for 2 year old children. It’s intentionally non-corporate and speaks from one parent to another. Parents can read the advice and then click through to buy the products on Amazon, which generates the affiliate commissions.
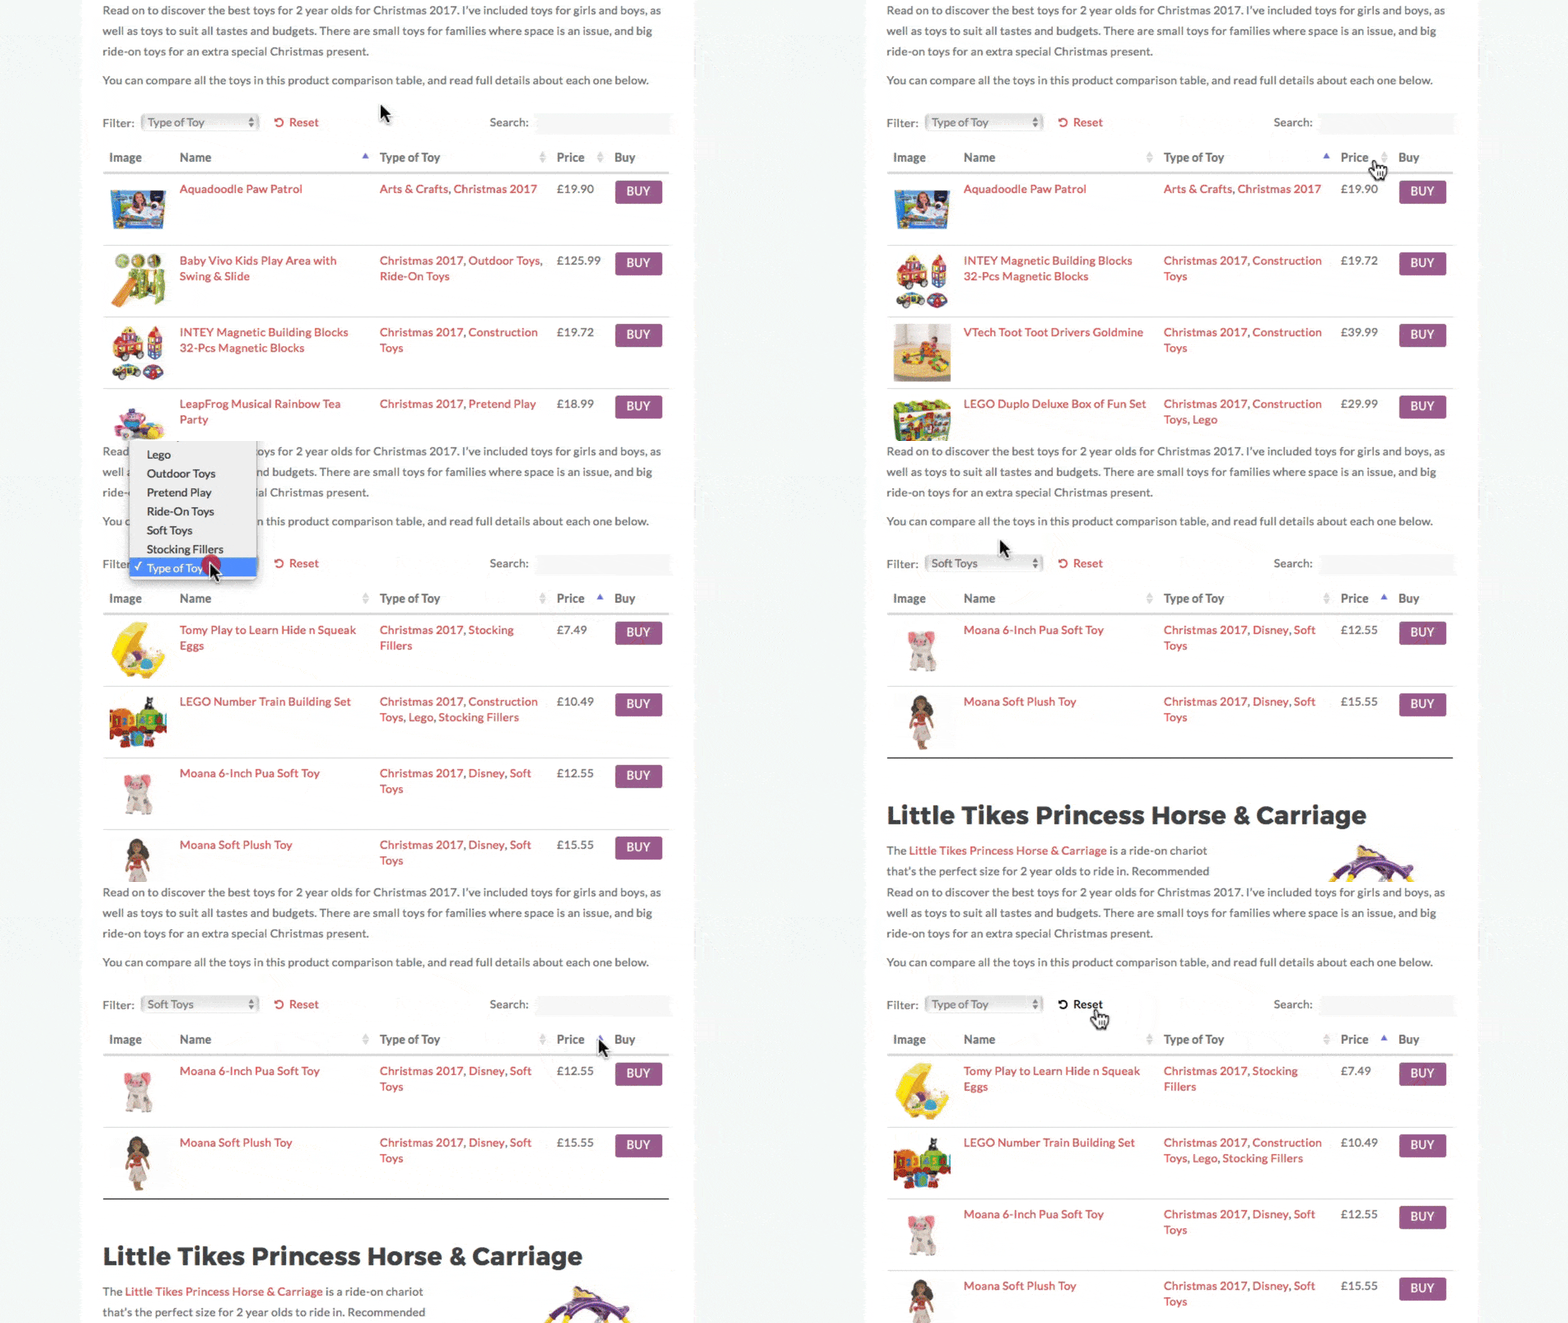
On posts such as the Best Christmas Toys for 2 Year Olds, I’ve used the WooCommerce Product Table plugin in order to display the products in very convenient, sortable tables. This lets parents generate personalized comparison lists, specific to their own criteria. If, for example, they are focused on price, they can find the cheapest toys; if they want toys from a specific category, they can also sort by these. This is the kind of genuine, added value that has made my WooCommerce Amazon affiliates site successful, and it can do the same for you.
Now that you’ve seen what can be done, let’s get on to the specific detail and step-by-step instructions you need to get started.
How much does a WooCommerce Amazon affiliates site cost?
As we’ve mentioned already, there are a handful of costs involved when setting up your WooCommerce Amazon affiliates website. The good news is that this is not expensive to set up, and a successful site will have no problem making this upfront money back in no time.
Remember, thanks to the magic of passive income, once you’ve done the work, each additional sale is pure profit, so the upside is very large!
Here are the three costs involved in setting up your site
- NameCheap This is the name of your website (for example, barn2.com). You’ll need to choose a name (i.e., barn2) and an extension (i.e., .com or .co.uk). You should choose a name relevant to the niche you’ve selected, but keep in mind that millions of domains have already been registered, so you may need to get a little creative. You can use a tool such as NameMesh to make the process of finding an available domain easier and a registrar such as NameCheap for your registration.
- Web hosting This is how your website is powered. As such, it’s incredibly important! Good hosting will make sure your website is fast, secure, and reliable (all this is very important for keeping and retaining visitors, and making search engines happy). We recommend WP Engine, an excellent WordPress-specialist host that does everything for you. You can get cheaper hosting elsewhere (if you have to do this, choose SiteGround), but you’ll find excellent hosting is money very well spent.
- WooCommerce Product Table plugin This is the only paid plugin for WooCommerce needed for this tutorial. You need it to display your products, ratings, and affiliate buttons in a nice, user-friendly comparison table or grid, which can maximize your affiliate income. This is made by our development team at Barn2, so you can be confident of the quality.
The costs come to the low hundreds of dollars; it’s cheap to set this up, and the main investment, therefore, is your time. The setup itself won’t take long, but you will need to spend time on your content. We’ll talk more about this later on.
How to set up a successful WooCommerce Amazon affiliates website in 5 easy steps
With the prerequisites taken care of, let’s turn our attention to the specific steps you need to set up a successful WooCommerce Amazon affiliates website. You’ll want to take the time to methodically follow each of these, and once you’re at the end, you’ll have your new site live! Let’s make a start.
Step 1 – Sign up to the Amazon affiliates program
The obvious first step is to sign up for the Amazon affiliate program. You can do this from the Amazon Associates page: follow the prompts, agree to the terms, and you’ll be good to go.
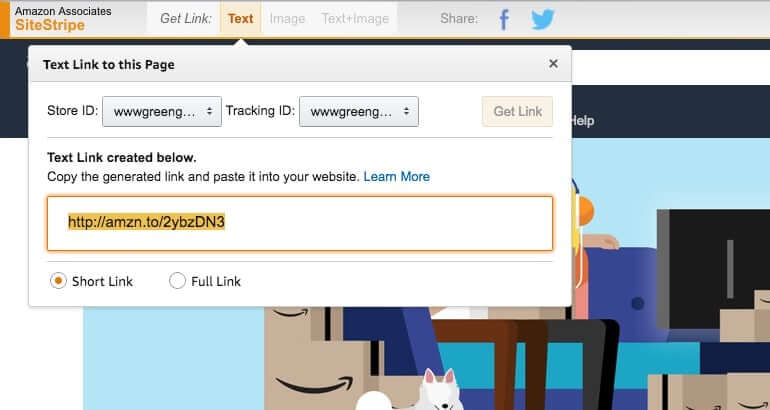
Once signed up, it’s easy to get Amazon affiliate links for any product: your Amazon account will have an “Amazon Associates SiteStripe” added across the top of the site, and you just need to click Get Link → Text to get personalized affiliate links from any page on Amazon. This is what you’ll use later when linking products from your website, instead of regular Amazon links.
You can make things easier for yourself later on by selecting ten products that you want to review or compare on your site, and getting their affiliate links now. You might find it useful to save them in a spreadsheet for easy reference.
It’s worth mentioning that while this guide is focused on creating a WooCommerce Amazon affiliates website, you don’t have to use Amazon. The method here will work for any affiliate program; we’re focusing on Amazon as it’s the easiest and most convenient. You could, for example, choose to join our WordPress plugins affiliate scheme, and earn a 30% commission on the sales you refer to us :)
Step 2 – Set up WordPress with WooCommerce
It’s now time to get started with your WordPress website
If you’ve chosen WordPress hosting with WPEngine (as we recommended), you’ll find everything set up for you. If you went with SiteGround, the cheaper, option, you’ll need to follow a couple of simple steps, but it’s all self-explanatory.
You’ll need to connect your domain name to your hosting. This needs to be done manually: WPEngine has video instructions here, and SiteGround has instructions here.
Once WordPress is setup, head to your new WordPress Dashboard (available at yoursite.com/wp-admin). You’ll want to take a minute to get familiar with how WordPress works: click around to get a feel.
Install a WooCommerce-ready theme
The first thing we’ll do is install a WordPress theme. This is a pre-built, professionally-made website design that can be dropped onto any WordPress site – including yours! Here, we’ll be using a free WordPress theme specifically designed for WooCommerce called Storefront.
Storefront is really easy to install: from the WordPress Dashboard, head to Appearance → Themes, search for Storefront, find the theme, then click Install > Activate.
If you don’t like the design, you can use one of the Storefront child themes, which provide a nice choice of skins. The child theme designs are either free or $39. They all come with full instructions and documentation on how to set them up.
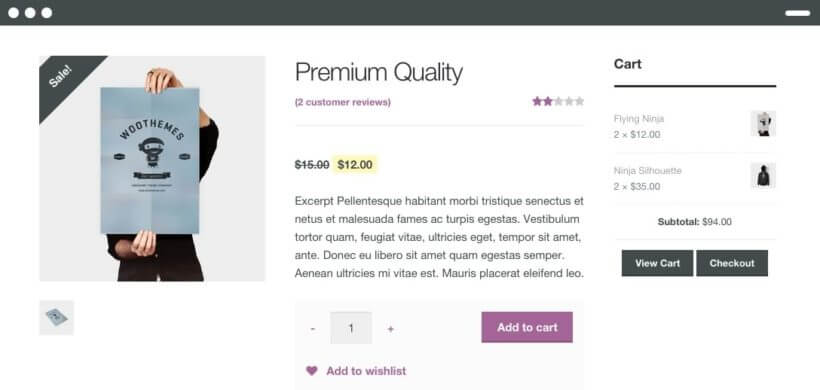
If you want a more versatile theme, there are plenty of WooCommerce-ready themes on ThemeForest. These typically have significantly more features than Storefront and its child themes, but take a lot more work to set up. There’s also a greater potential for things to go wrong, due to the extra complexity. You should only choose a more flexible/complex theme if you’re sure you know what you’re doing and can see that there are definite benefits in doing so.
WordPress makes it remarkably simple to install a theme (it’s just the setup that can take longer), so whichever you go with, you’ll find you very quickly have a great design on your site.
Step 3 – Install WooCommerce
Next, we’ll install WooCommerce. As we’ve touched on, this is the leading ecommerce platform that we’ll use to list and sort the products you’re reviewing. WooCommerce is normally used for selling products, but it can equally be used to power affiliate websites. We’ll get to this later on.
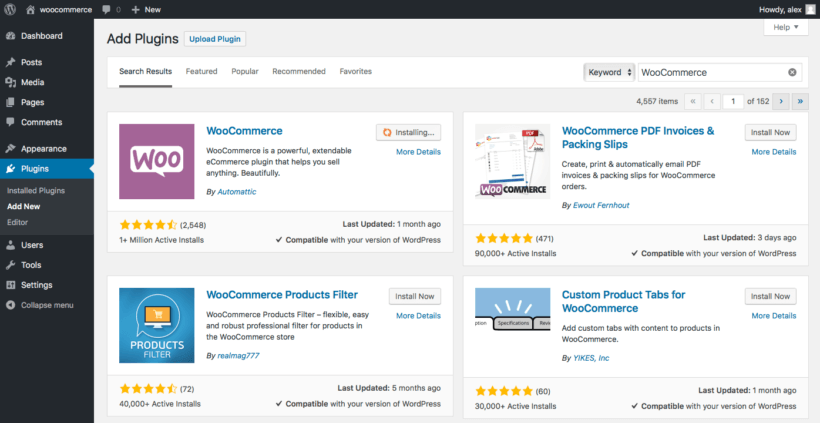
WooCommerce is free and incredibly easy to install. Head to the WordPress Dashboard, then Plugins → Add New. Search WooCommerce, and then install and activate the plugin.
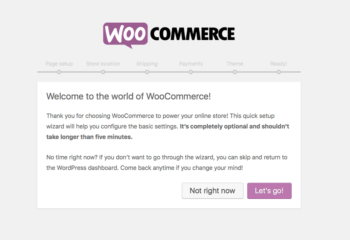
Now you're all set up with WooCommerce!
Nice work: you now have a website, a professional design, and the world’s leading ecommerce platform. Next up, it’s time to add your products.
Step 4 – Add your Amazon affiliate products, with descriptions or reviews
This has all been fairly straightforward so far - technical, perhaps, but straightforward nonetheless. Here we get to the part that requires your personal skills: adding your products and writing the descriptions and reviews.
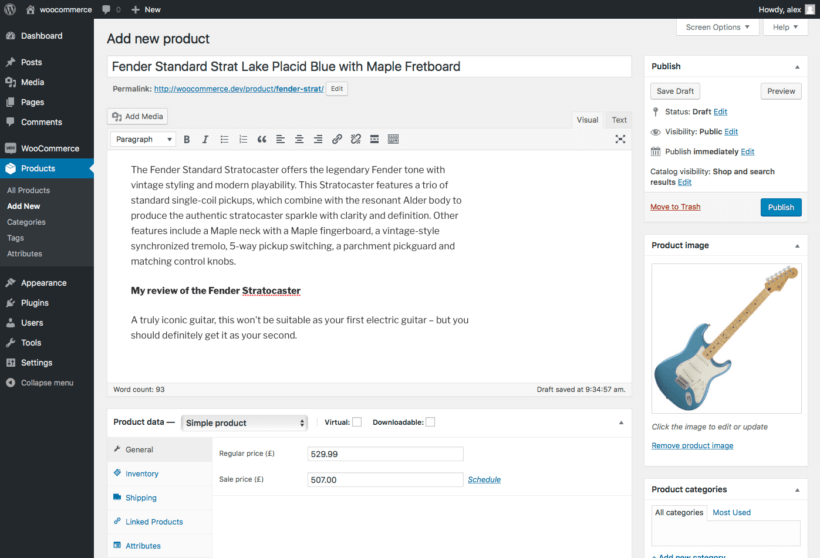
You can add your first product by heading to Products → Add New, and filling in the fields:
- Add all the information for the product, starting with the title. Some info, such as categories or tags won’t be relevant, but make sure to add everything that is. You can copy this from the Amazon listing.
- Add a product image. Images ensure that your reviews are more engaging. You can also copy these from the Amazon listing, and add them under the Product Image box.
- Add the main description! Now we’re getting into the fun part. You’ll need to describe the product in your own words; do not just copy from the Amazon listing, as visitors and search engines will want to see original content here. Remember, visitors need a good reason to come to your website, so add value here by adding extra information or by displaying the information in a more accessible format.
- Add your review of the product. If you decide to add product reviews rather than just comparisons, then add your review below the main description! Make it easy for the reader by highlighting the key information they need to know, answering the questions they’re likely to have, and making a recommendation on whether the product is right for them.
Now add your WooCommerce Amazon affiliates product info
This section is where your site can really add value – something that makes or breaks the success of a WooCommerce Amazon affiliates site – so take the time to get this right. With this section complete, you can turn to add the product data. Again, there are a couple of steps to follow:

- Select External/Affiliate product from the dropdown list in the Product Data section. Add your Amazon affiliate link for the product under Product URL, and add the text you want to appear on the button under Button text. “Buy on Amazon” or similar will be appropriate.
- You may wish to add the product price and sale price. This makes it more convenient for the reader by displaying the product price before they click through – but lines you up to have to update the price regularly. If you’re okay keeping this up to date, you’ll find readers appreciate the extra information.
- Reader-generated content is some of the best content you can have. Why? Because it adds value and you don’t have to write it! Under the Advanced tab, you can tick “Enable reviews” to let visitors leave their own reviews. This has the added benefit of adding “social proof” to your site, which can in turn make your own reviews more credible. WooCommerce will collate the product ratings, and you can display these as a column in your comparison tables (we’ll get to this in the next section).
- Finally, click the blue ‘Publish’ button to set your product live!
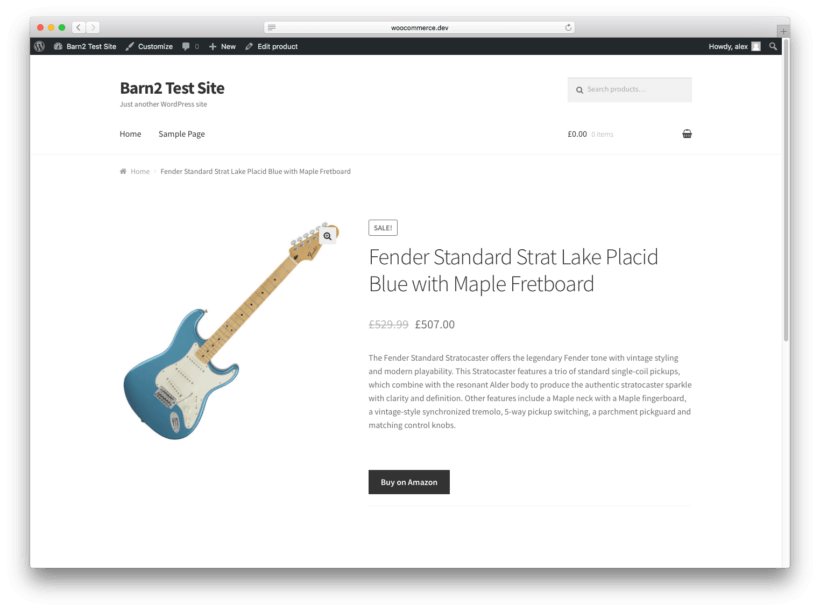
Now add your other Amazon affiliate products in WooCommerce
It’s now just a case of repeating the steps for all of the products you want to add. This will take you some time, but do make sure to do a thorough job: these reviews will be the backbone of your site!
Once you’ve got your content added, we’ll move onto making their display look nice.
Step 5 – Setup the WooCommerce Product Table
A site filled with excellent products and reviews is no use if nobody can find them! Your next task is to lay out your products and reviews into an easily-accessible format, so that visitors can both browse and find what they’re looking for more effectively.
To do this, you’re going to need the WooCommerce Product Table plugin we mentioned earlier. Buy yourself the plugin (this is the only plugin you’ll have to pay for in this guide). Follow the included instructions to install, and then enter the license key.
You can now add a neat table of your products to any post or page on your site! Earlier, we mentioned the advantages of having this in practice on Best Toys for 2 Year Olds. Readers can take the available information and sort it according to the criteria most important to them. This makes your site much more valuable!
The product table also lets you collate products for specific events and dates. On our case study site, birthdays and Christmas would be great examples.
Add your WooCommerce affiliate product tables
- First, go to Products → Product Tables → Add New and create a table listing the products you want to include in the affiliate review blog post.
- Create a new post by heading to Posts → Add New. You’ll need to flesh the post out with a title, introduction, categories, images, and so on, but you can come back to these later.
- The process for adding the list of affiliate products to the blog post depends on whether you use the WordPress block editor to create your posts:
- Block editor - Add a 'Product Table' block and select the table you created a minute ago.
- All other editors - Get the shortcode from Products → Product Tables and add it to the page wherever you want the products to appear.
An example
Here’s an example to get you started. This product table is suitable for most WooCommerce Amazon affiliates or review websites:

This table will list products from a category called “clothes” with their image, name, full description, overall star rating, and affiliate link buttons. Replace “clothes” with the slug of the category you want to list in the table.
The description may be the full review that you have written or simply your description of the product.
If you prefer, you can reduce the description length to show an excerpt, and customers can click through to the read the rest on the single product page.
Or, if you don’t want customers to be able to access the single product page, then edit your table (Products → Product Tables) and click the pencil next to each column to view the option to disable the links. This means that the only action that people will be able to take is to click your affiliate links!
The product reviews column will contain the average star rating, based on reviews that other visitors to your website have added. (The stars will be empty or colorless at first, as there are no reviews yet.)
You can now click Publish in order to set your post live, or continue reading for extra WooCommerce Product Table tricks :)
Table Tricks 1: Replace the single product page with quick view
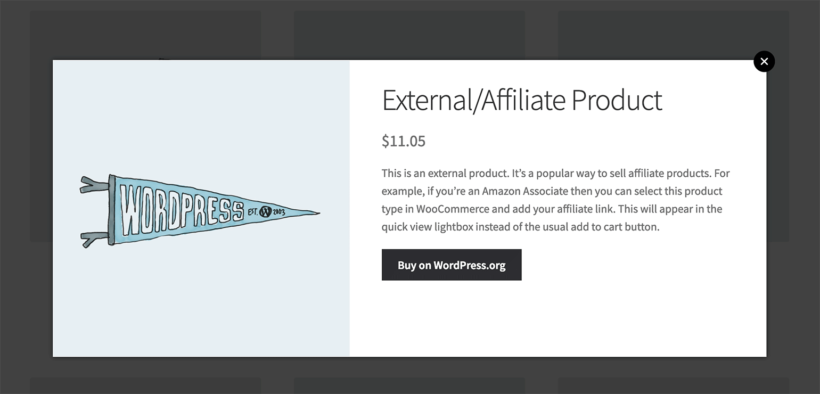
The faster customers can complete a purchase, the less likely they are to give up and go elsewhere. As a result, you need to ensure that customers can buy as quickly as possible. This involves minimising the number of pages that the customer has to visit.
If you're building an Amazon affiliate website then by definition, customers have to load an extra page in order to buy. That's because they have to visit your website first, and then click through to the affiliate site to buy the product.
By default, WooCommerce creates a separate page for each product. This includes affiliate products.
If you want to show extra product images or a short description directly on your WordPress Amazon affiliate website, then you can do this on the single product page. Customers can view products in the comparison table layout, and click on one to access the individual product page. However, this involves loading an additional page for each product.
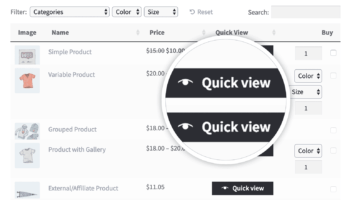
Customers use the quick view to speedily learn more about each product. When they're ready, they click on your affiliate link to complete their purchase on Amazon.
To add quick view buttons to the product table, make sure both WooCommerce Product Table and WooCommerce Quick View Pro are installed. You can then edit the table at Products → Product Tables and add a 'Quick View' column.
Tip: If you're using WooCommerce quick view, then you might want to disable the links to the single product page completely. This is an option on the WooCommerce Product Table plugin settings page.
Table Tricks 2: Add extra product data to the comparison table
When we added our products earlier, we added various types of data such as title, description, price, categories and tags. You can display all of this in the WooCommerce product comparison table.
If you need to store and display even more data about the products, then you can do this by creating WooCommerce custom fields and taxonomies. Add them as columns in the table. You could, for example, add extra technical data to your televisions review site. This will help visitors filter which products are right for them.
Remember that you need to add value with your site. Adding extra information to your comparison table is a great way of doing this.
Table Tricks 3: Add filters to the WooCommerce Amazon Affiliates product table
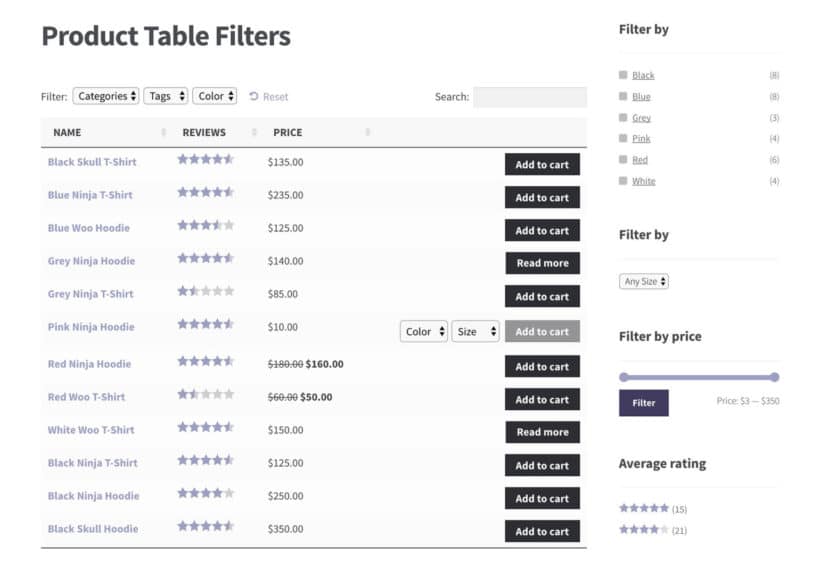
If you’re comparing lots of products, then filters can make it easier for visitors to find the products they’re looking for.
WooCommerce Product Table has 2 types of filters: dropdown lists above the comparison table, plus sidebar widgets. Customers can use these to filter by various types of product data, price, or average rating.
These are just additional ways of adding extra information, sortability, and value to your site. This won’t be appropriate for all WooCommerce Amazon affiliates sites, but think about whether it works for yours.
Note: If you’re just comparing a couple of products, then there’s no need to worry about filters. This is because everything will be on one page regardless.
You’re now ready to enjoy your passive income
That wraps up our guide to earning Amazon affiliates commission – and that sweet passive income – by starting a WooCommerce product reviews website. We’ve shown you the step-by-step details (and a real life case study). So you’ve got all the information you need to make your website a success.
The most effective product review websites will continue to receive attention after launch, with new reviews and comparisons added. You don’t have to spend a lot of time on these. However, do spend some time on them in order to keep visitors and search engines happy.
If you’d prefer, we can take some of the pain out of dealing with search engines with our WordPress SEO packages. Take a look, and discover how we can promote your website for you.
We’ve also got some more tips to help you take your site to the next level. Read this next: Make your store more successful with our top 10 Tips for using product tables to increase your WooCommerce conversion rate optimisation.
Thanks for reading, and we hope we’ve helped set you on the way to enjoying passive income! Now over to you: do you already earn affiliate income by publishing product reviews and comparisons in WordPress and WooCommerce? Let us know your thoughts and experiences in the comments below :)
11 Comments
Too bad that you violate many of the rules Amazon has for displaying products with Woocommerce. You can't download the image directly from Amazon or use additional images.