How to add a custom checkbox field to the WooCommerce checkout

While WooCommerce provides default options for payment and shipping, adding custom features such as checkboxes can enhance the checkout process for both customers and store owners. Now, let’s explore how you can easily add a custom checkbox to the WooCommerce checkout page.
If you run an e-commerce store using WooCommerce, you know how important it is to have a seamless checkout process. However, sometimes you might need to add a custom checkbox to your checkout page for specific purposes. Purposes like asking customers to opt-in to receive promotional emails or agreeing to your terms and conditions.
While WooCommerce offers a range of checkout fields, adding a custom checkbox can be a bit tricky. Fortunately, there are two main ways to achieve this: using a plugin for a quick, code-free solution or adding the checkbox programmatically for greater control.
In this blog post, we'll guide you through a step-by-step tutorial on adding a custom checkbox to your WooCommerce checkout page, whether you prefer using a plugin or coding it manually. If you're comfortable working with PHP and want a fully customizable approach, check out the section on how to add a custom checkbox programmatically.
The benefits of custom checkout checkbox fields
Adding custom checkbox fields to your WooCommerce checkout page improves both user experience (UX) and checkout flow, making the process smoother for customers and more efficient for store owners.
From a UX perspective, checkboxes provide a clear, simple way for customers to make selections without disrupting their purchase journey. Whether it’s opting in for newsletters, agreeing to terms and conditions, or adding special order requests, checkboxes ensure that customers can make informed choices with just one click.
For the checkout flow, checkboxes help streamline decision-making. Instead of navigating away from the checkout page for additional steps or confirmations, customers can quickly acknowledge policies or select preferences without interruption. This reduces friction and helps prevent abandoned carts.
Additionally, custom checkbox fields allow store owners to gather essential customer information. For example, a checkbox asking if a purchase is a gift can trigger additional fields for gift messages, while a checkbox for agreeing to return policies can help reduce disputes and chargebacks.
By integrating the right checkboxes into your checkout process, you create a more user-friendly, transparent, and efficient experience - leading to higher conversions and improved customer satisfaction.
How do I add a custom checkbox to the WooCommerce checkout page?
To add a custom checkbox to the WooCommerce checkout page, we recommend using YITH's WooCommerce Checkout Manager plugin. With this add-on, you can add custom checkout fields, modify existing fields, and rearrange the layout of the checkout page.
The plugin can help you add custom checkboxes and many other types of custom fields to the checkout page, such as text fields, radio buttons, and dropdown menus.
Here are the steps to install and activate the plugin on your WordPress site:
- Log in to your WordPress admin dashboard and go to the Plugins section.
- Click on the "Add New" button at the top of the page.
- In the search bar, type "WooCommerce Checkout Manager" and press Enter.
- The plugin should appear as the first result. Click on the "Install Now" button.
- Once the plugin is installed, click on the "Activate" button to activate it.
Adding a new custom checkbox field
To a new custom checkbox field in the woo-commerce checkout page, you add specific requirements for your customers to check before completing their purchase. Here is a step-by-step guide on how to add checkbox field using the YITH plugin:
- Go to Home → Settings → Create a new field
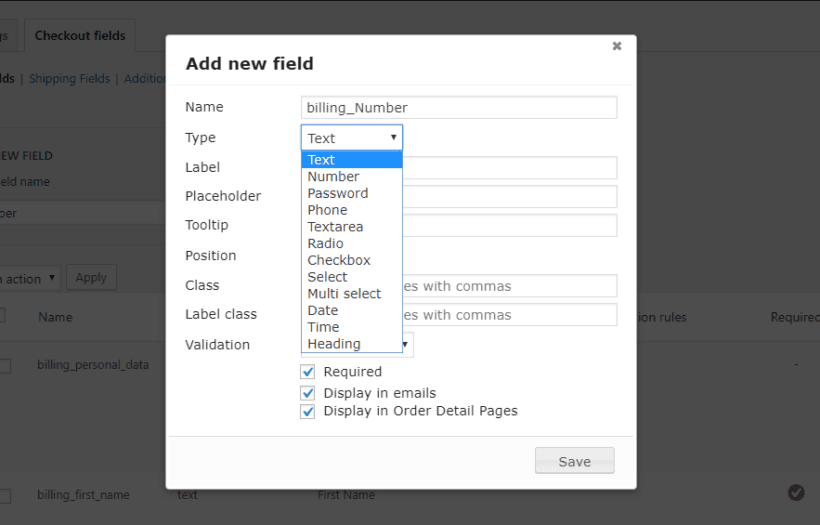
2. Enter a label for your checkbox field, for example, "Billing number"
The newly created form will have the same features as the editing form, but with a few extra fields:
- Type: Allows you to pick the type of field you want to create: text, number, password, phone, text area, radio button, checkbox, select (dropdown), multi-select, date, time, and heading.
- Display in emails: This lets you select whether you want the field you're making to appear in the order email as well.
- Display in Order Detail Pages: This lets you choose whether you want the field you're making to appear on the summary page as well.
Further reading: Speed up ordering by adding direct checkout to your WooCommerce store.
Styling the custom checkbox field
You can customize a custom checkbox field using YITH WooCommerce Checkout Manager. You can change the look of the checkout field including changing the frame color of a checkout field when either wrong or right data has been entered by your customer.
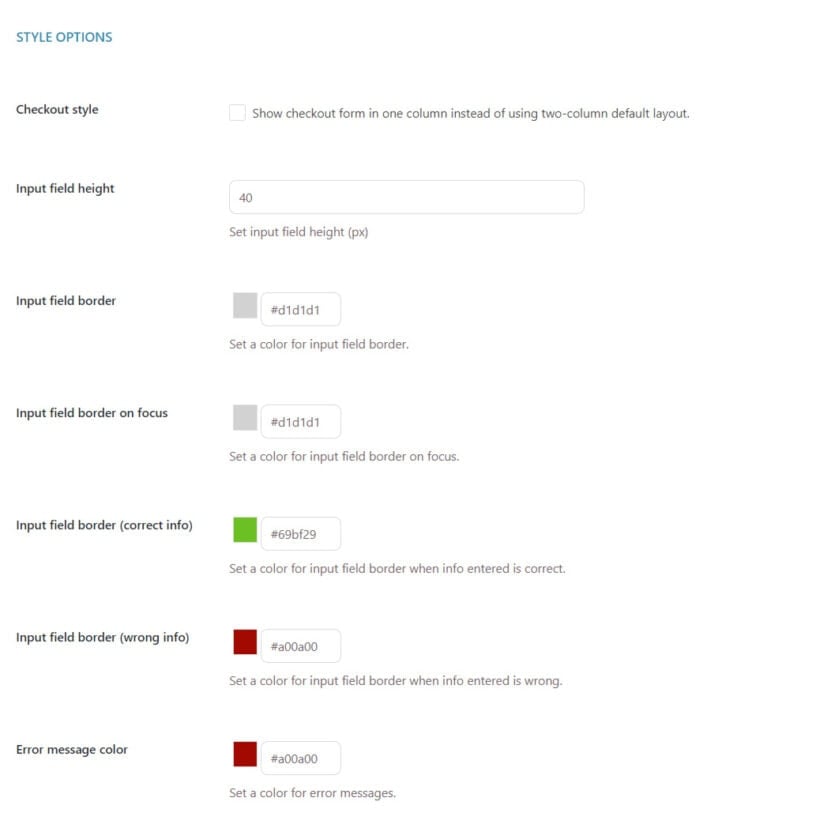
To do this, click on YITH Checkout Manager → General Settings.
Using the Checkout Style option, you have the option of choosing if you want the checkout to be arranged in a single column or two columns (as set by default on WooCommerce).

Testing the custom checkbox field
To test the custom checkbox field and ensure it is functioning correctly and storing data accurately in the WooCommerce database, follow these steps:
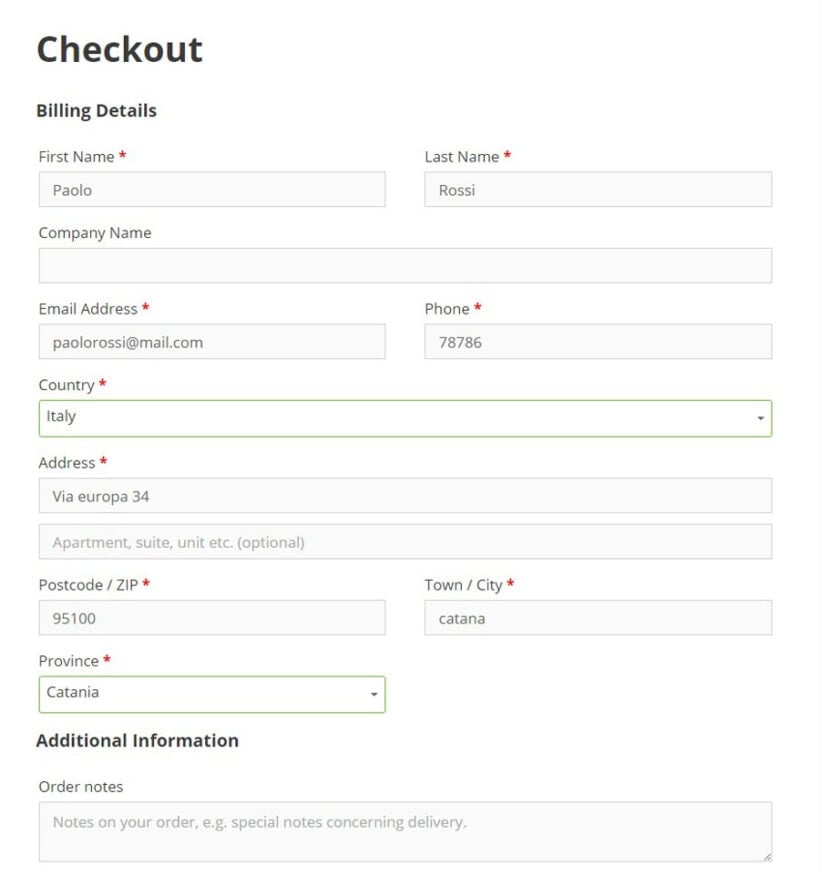
- Add the custom checkbox field to your checkout page and complete a test purchase, making sure to enter data into the custom checkbox field.
- After the purchase, navigate to the WooCommerce orders page and locate the order you just created.
- Check the order details to ensure that the data from the custom checkbox field has been saved correctly.
- Review the code for the custom checkbox field in the woo-commerce checkout page and make any necessary modifications.
- Verify that any error messages are being generated correctly if the checkbox field is left empty or contains invalid data.
- Test the checkout process on different devices and browsers to ensure that the custom checkbox field type works correctly across all platforms.
By testing the custom checkbox fields thoroughly, you can ensure that it functions as expected and that the data is being stored accurately in your WooCommerce database.
Further reading: Reduce abandoned carts by adding a popup checkout to WooCommerce.
How to add a terms and conditions Checkbox to the checkout page in WooCommerce
Did you know that 79% of consumers consider privacy compliance a buying factor when making purchasing decisions?
To add a terms and conditions checkbox to the checkout page in WooCommerce, you have two options: using the built-in WooCommerce settings or using a plugin like YITH WooCommerce Terms & Conditions Popup.
Method 1: Using the built-in WooCommerce settings (for block themes):
These settings are entirely dependent on your site's theme, and may change in future software versions. At the time of writing, if you have a block theme installed, it's possible to add a new block to the checkout template.
- In your WordPress dashboard, go to Theme → Editor.
- Click on "Templates" then find and open your checkout template from the list.
- Open up the list of blocks that make up the checkout page, and add a new block right before the "Actions" block.
- Find "Terms and Conditions" and add it as the content of the new block you created. This will add clickable links to your Terms and Conditions and Privacy Policy pages.
- Don't forget to save your changes!

Note that this does not add a checkbox, but customers will be able to see the T&C's before they place their order.
Method 2: Using YITH WooCommerce terms & conditions popup
If the built-in WooCommerce settings do not meet your needs, you can use the YITH WooCommerce Terms & Conditions Popup plugin to add a terms and conditions checkbox to the checkout page. Here's how to do it:
- Install and activate the YITH WooCommerce Terms & Conditions Popup plugin. Go
- Go to WooCommerce →Settings →YITH Plugins → Terms and Conditions.
- Check the box next to the "Enable terms and conditions popup."
- Enter your terms and conditions text in the editor.
- Customize the appearance of the popup by changing the colors, fonts, and other settings as desired.
- Save your changes.
Once you have completed these steps, the terms and conditions checkbox will appear on the checkout page. After this, customers will need to check the box before they can place their order. Additionally, clicking on the terms and conditions link will open a popup window that displays your terms and conditions text.
How to add a custom checkbox programmatically
If you prefer full control over your checkout fields, adding a custom checkbox programmatically is the best approach. This method allows you to define the field exactly how you need it, ensuring it integrates seamlessly with your store’s workflow.
Step 1: Add the checkbox field to the checkout page
To insert a custom checkbox, you need to use the woocommerce_form_field function within WooCommerce’s checkout fields filter. Add the following code to your theme’s functions.php file:
This will display the checkbox on the checkout page above the "Place Order" button.
Step 2: Validate the checkbox input
To ensure the customer checks the box before completing their purchase, add the following validation rule:
If the customer tries to place an order without checking the box, they’ll see an error message prompting them to do so.
Step 3: Save the checkbox selection to order meta
Finally, store the checkbox selection in the order meta so it can be accessed later:
This saves the checkbox value as order metadata, allowing you to retrieve it later if needed.
By adding a custom checkbox programmatically, you gain full control over its behavior, validation, and storage, making it a flexible and scalable solution for your WooCommerce store.
Upgrade your WooCommerce checkout experience with a dedicated checkout manager solution
YITH WooCommerce Checkout Manager is a user-friendly plugin that enables you to add a checkbox to woo-commerce checkout with ease.
With this plugin, you can create a checkout page that is tailored to your specific needs. It also allows you to collect additional information from customers and improve their overall shopping experience.
The benefits of using YITH WooCommerce Checkout Manager are many. You can customize the checkout page without any coding knowledge, add custom fields, and create conditional fields.
The plugin also provides options for rearranging and grouping fields, adding labels and placeholders, and enabling field value validation to ensure accurate data collection.
YITH WooCommerce Checkout Manager is a versatile plugin that can help you streamline your checkout process, increase customer satisfaction, and ultimately boost your sales. You can experiment with the different options available in the plugin to create a checkout product page that is tailored to your specific needs and maximizes the potential of your WooCommerce store.