Uber eats alternative: Create your own restaurant ordering system
Uber Eats is certainly a convenient way for restaurants to offer online delivery... but it also charges 20-30% of every order! In this post, you'll learn how to get the best of both worlds by using WordPress and WooCommerce to create your own restaurant ordering system to act as an Uber Eats alternative (or a Just Eat alternative, Gloriafood alternative, Deliveroo alternative, GrubHub alternative... it's up to you!).
The techniques in this article will let you create a seamless restaurant ordering system that you 100% own yourself. It will be user-friendly and work on any device (even smartphones), but you can cut out those pesky middlemen and stop letting your already thin margins get eaten up by commissions. Instead, your entire system can cost as little as ~$34 per month no matter how many orders you get.
Here's an example of what you'll be able to build without requiring any special technical knowledge:
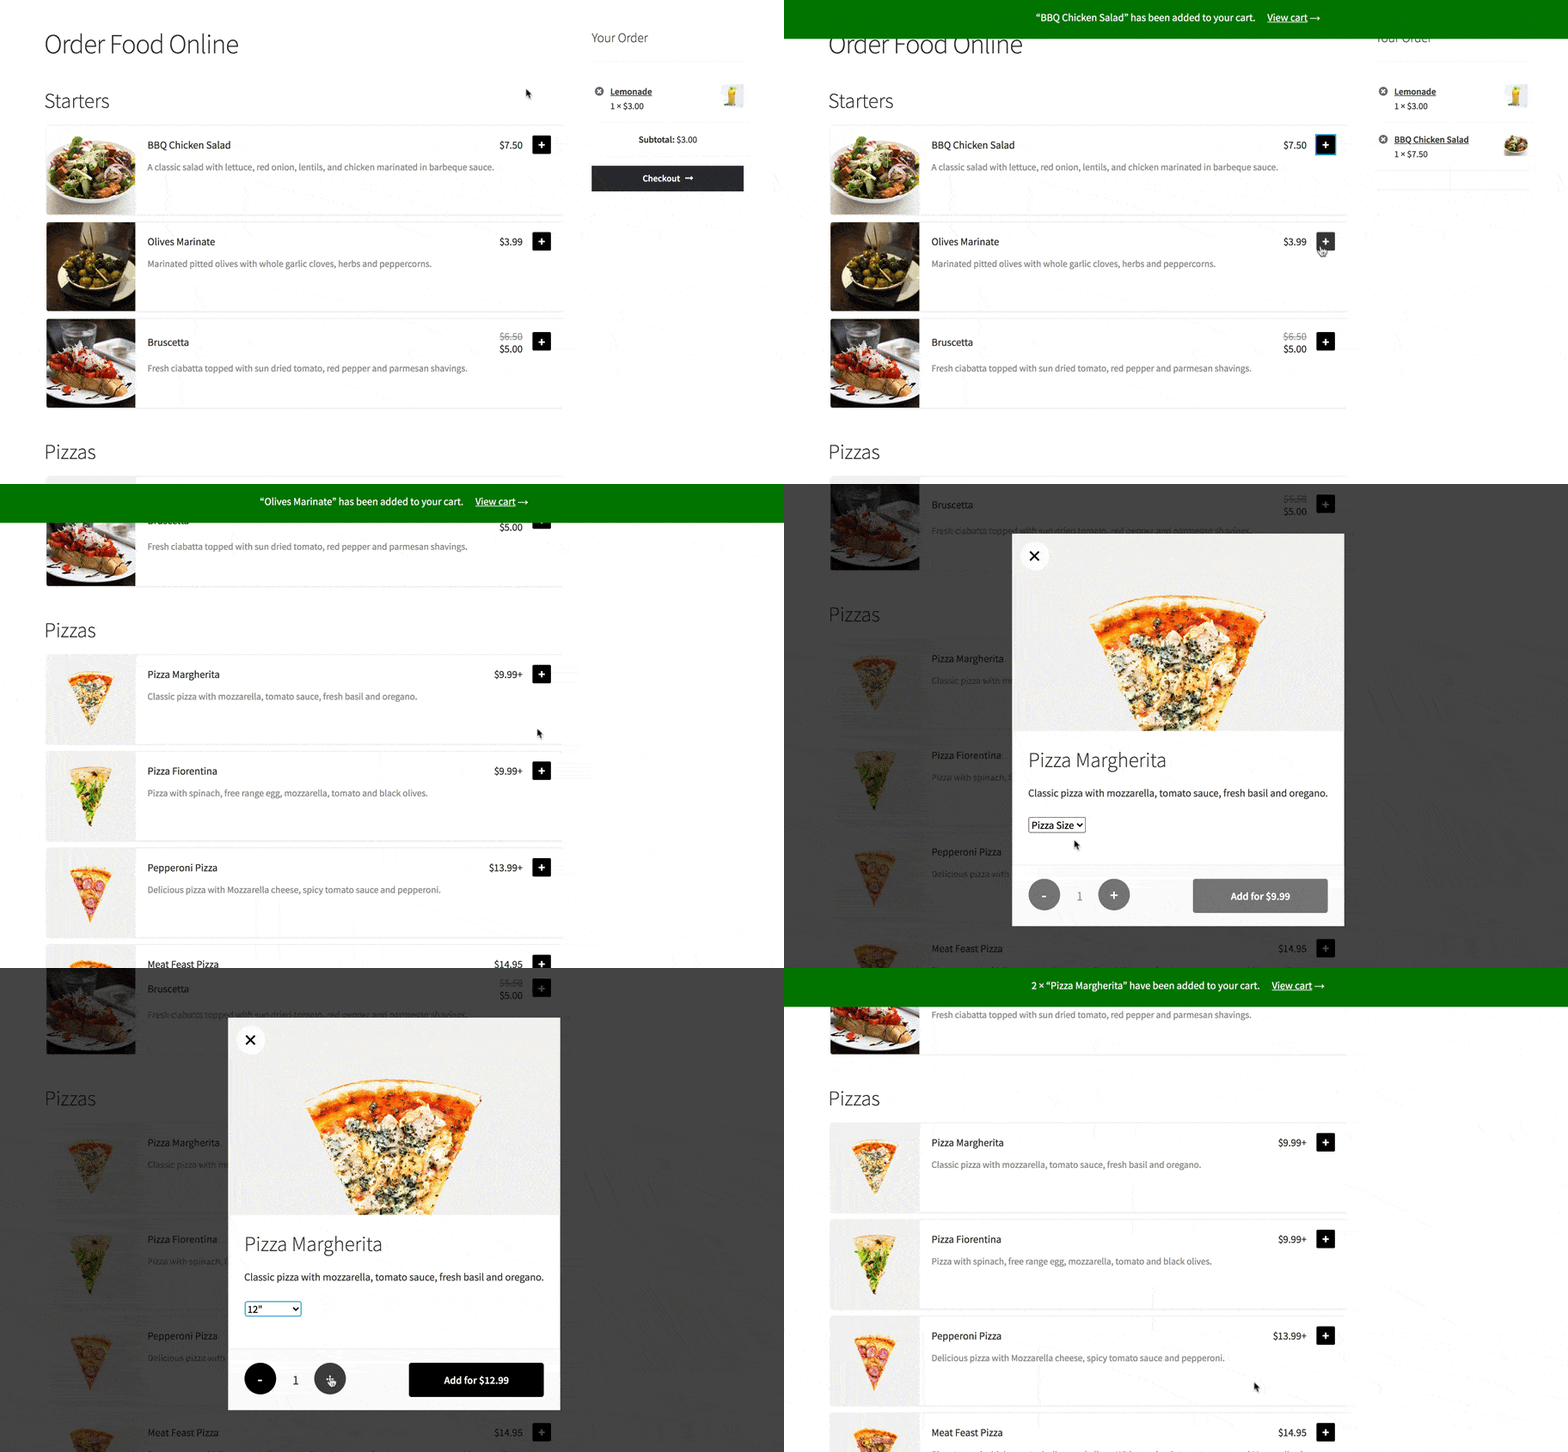
Your customers will be able to browse your entire menu and order food for delivery or for takeout.
Ready to build your own Uber Eats alternative with WordPress and WooCommerce? Let's dig in…
Why WordPress + WooCommerce make a great restaurant ordering system
If you're not familiar with WordPress and WooCommerce, here's a quick introduction:
WordPress is 100% free, open-source software that's by far the most popular way to make a website. According to W3Techs, WordPress powers over a third of all websites.
WooCommerce is a free extension for WordPress that adds full-service ecommerce features to WordPress. WooCommerce is the most popular way to make an ecommerce store.
While you won't be using WooCommerce to create a "traditional" ecommerce store, all of the features that it adds are also what you need to create your own Uber Eats alternative for free online ordering. You can also use other extensions to customize it to meet your restaurant's needs.
The important thing about this combination is that you 100% own everything. As a restaurant owner, you're not beholden to someone else's audience and you won't have to pay any commissions.
You can run your own promotions, grow your own email and marketing lists...you get the idea - it's yours.
Additionally, your online ordering platform will work on any device - laptop, tablet, smartphone, etc.
While the biggest benefit is avoiding those 20-30% commissions that other online ordering software charges, there's also a ton of value in owning your own platform.
For example, this New York Times article does a great job illustrating how Grubhub and other delivery companies can cannibalize existing local restaurants' own delivery business - so an order that would've been commission-free in the past suddenly comes with a commission.
What you need to use WordPress as an Uber Eats alternative
To create your own restaurant ordering system and Uber Eats alternative with WordPress, you won't need any technical knowledge, but you will need a few tools to help you get the job done:
- Hosting + Domain Name - this is what powers your Uber Eats alternative. (We recommend Kinsta hosting.)
- WordPress - the free open-source software that powers 34%+ of all the websites on the Internet.
- WooCommerce - the free open-source ecommerce extension that's the most popular way to create an ecommerce store.
- WooCommerce Restaurant Ordering - an easy-to-use plugin that extends WooCommerce to create a food menu and restaurant ordering system.
We'll also mention some other optional extensions that you might want to use to enhance your food ordering website.
How much does an Uber Eats Alternative cost?
Your online ordering system will not be free, but the important thing to remember is that it's a flat cost. Whether you have 100 orders or 500 orders, you're never going to pay any more.
Here's the bare minimum cost:
- Hosting - ~$300 year (paid annually)
- Domain name - ~$10 per year
- WooCommerce Restaurant Ordering - $99 per year
So at the very low end, you can get by for ~$400 per year, or just ~$38 per month. Compared to Uber Eats' 20-30% service fee, that's incredibly cheap for your entire online food ordering system!
What about mobile ordering apps? Do you need a mobile app?
The restaurant ordering system that you'll build in this tutorial is 100% responsive. Essentially, that term means that your Uber Eats alternative will automatically adapt based on each visitor's device and allow for mobile ordering.
So whether your visitors are on their smartphone, tablet, desktop, or other mobile device, your restaurant ordering system will still work great. And it also means your visitors won't have to install yet another food delivery app just to order from your restaurant.
How to create your own Uber Eats alternative: Step-by-Step
In this video, watch Sam from Barn2 create a food ordering system in just 25 minutes. There are written instructions below, or you can sign up to our free e-course for even more advice and tips.
1. Purchase hosting/domain and install WordPress/WooCommerce
To power your restaurant ordering system and the WordPress software, you need web hosting and a domain name.
For web hosting, we recommend Kinsta, which offers affordable managed WordPress/WooCommerce hosting.
If you're only hosting a restaurant ordering system for a single restaurant, you should be fine with the cheapest Starter plan, which will cost you just $30 per month.
You'll also need a domain name, which you probably just want to make your restaurant name. Search for an easy-to-remember domain name that closely fits the name of your restaurant, such as myrestaurant.com. You can purchase your domain name from a domain registrar like Namecheap or Google Domains and follow Kinsta's instructions to point your domain name to your new Kinsta hosting.
Once you create your hosting account, Kinsta will help you automatically install both WordPress and WooCommerce to help you get up and running.
Once you've done that, you can log in to your WordPress dashboard by going to yoursite.com/wp-admin.
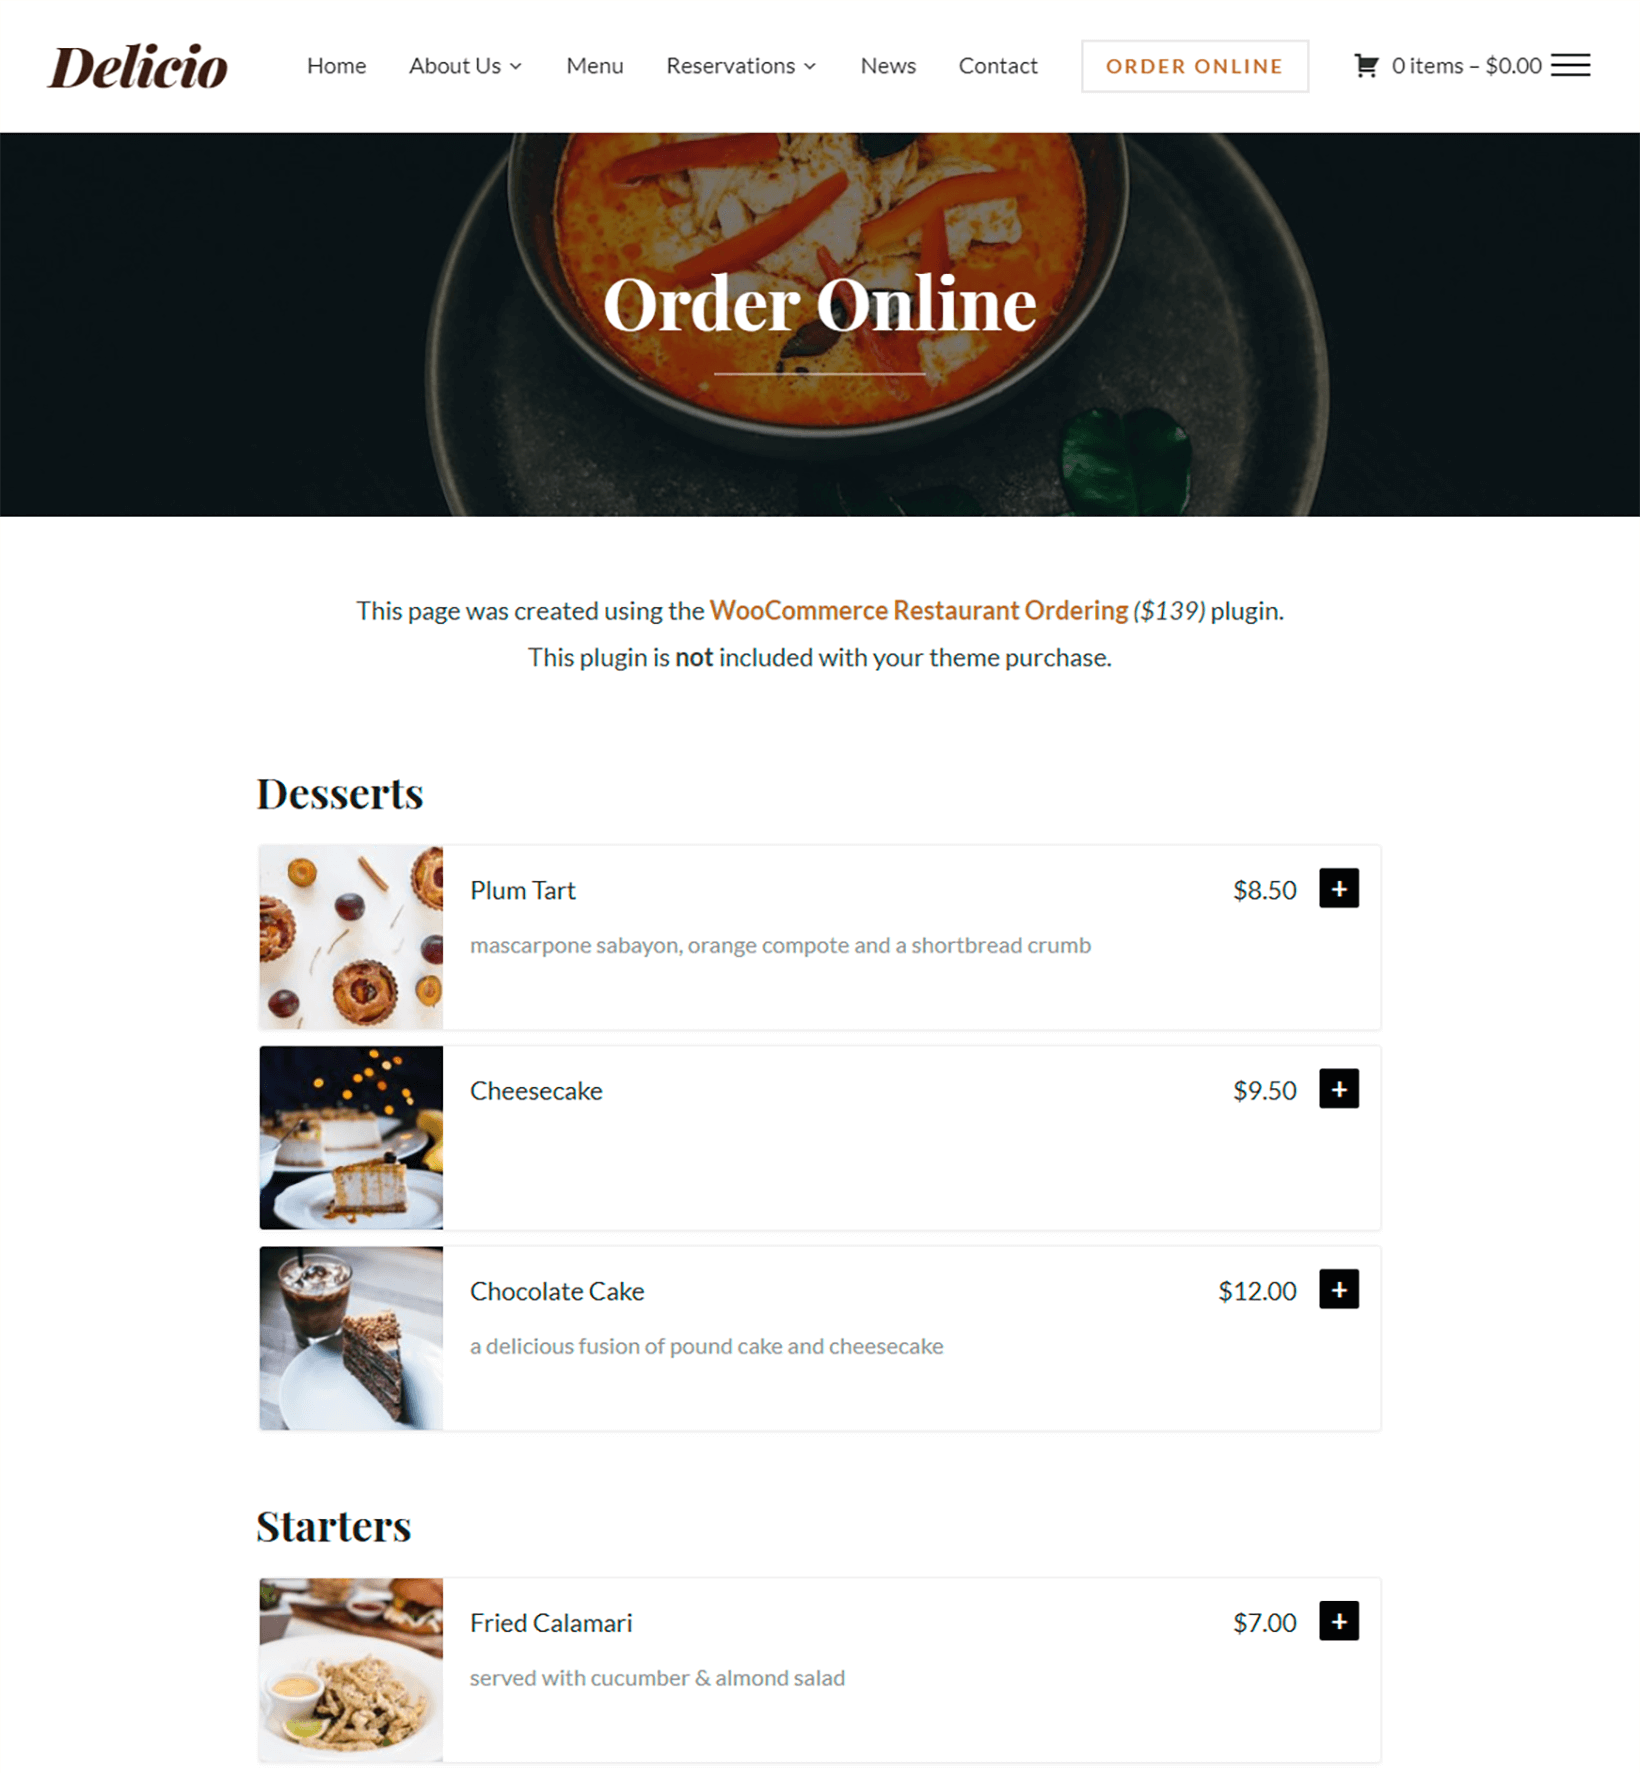
To control how the basic design of your site looks, we recommend that you use a WooCommerce restaurant in theme like Delicio.
2. Run WooCommerce setup wizard
Once you log in to WordPress for the first time, you should see a prompt to run the WooCommerce setup wizard, which helps you configure the basics for your online ordering system:
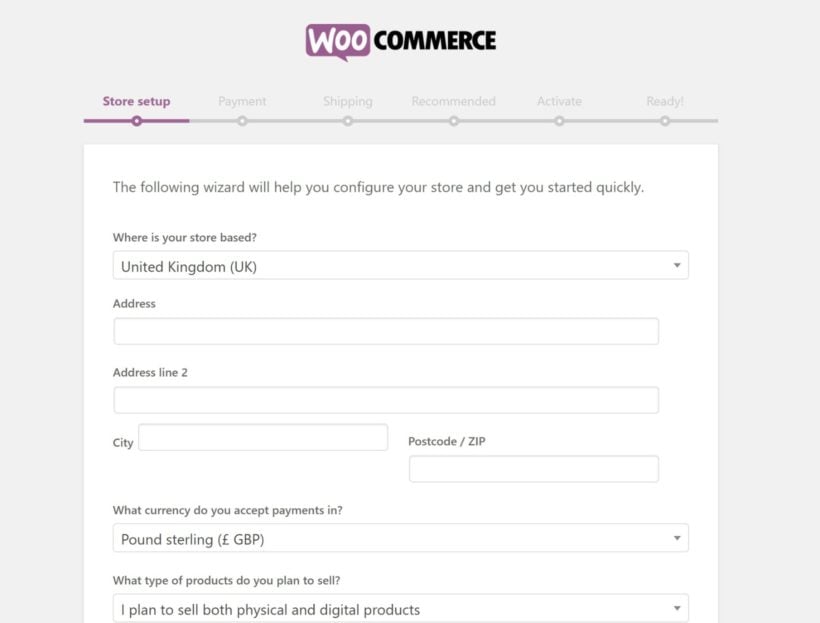
If you want to accept payments for online orders via credit card, you can set up a payment method like Stripe, PayPal, or Amazon Payments in the Payment tab. But if you want to handle payments in person, you can just choose Cash on delivery.
If you want to charge for delivery, you can add a flat-rate or percentage charge in the Shipping tab. We'll talk more about shipping in a second.
You don't need to install the recommended plugins - so feel free to skip those steps.
3. Add food menu items as WooCommerce products
To add your individual menu items, you'll use separate WooCommerce products for each menu item.
To get started, go to Products → Add New. There, you'll want to:
- Enter the title of the dish.
- Add a short description (optional). You can describe the dish here, and also add information such as calorie count, "Vegan" or "Gluten-free".
- Upload an image to use on the menu page (optional).
- Choose categories to organize menu items (optional). For example, a category might be "Sandwiches" or "Desserts".
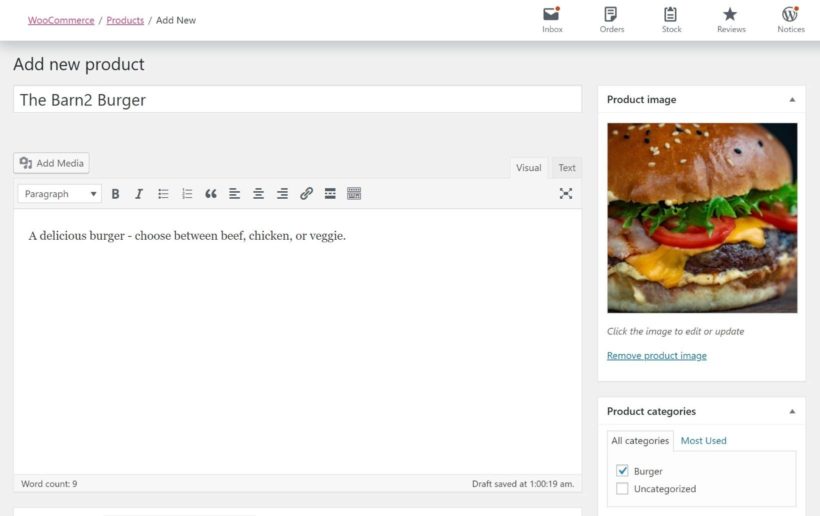
Then, find the Product data box and add basic details like price:
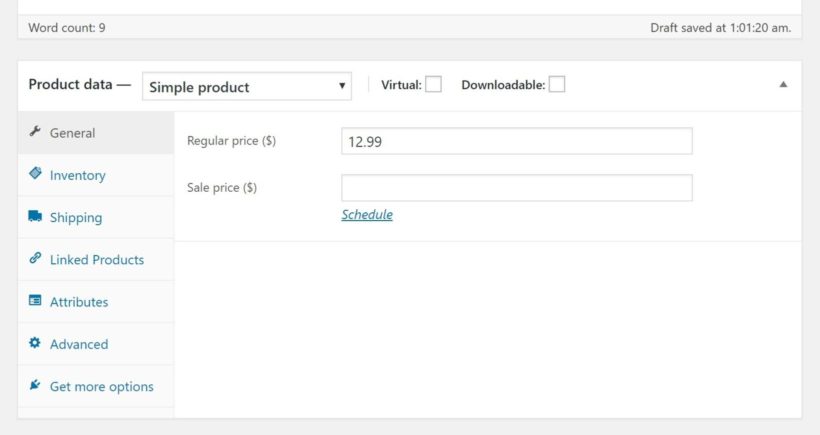
For a simple dish, this might be all you need. But you'll also probably have menu items where people can customize the dish, like choosing the size and toppings of a pizza.
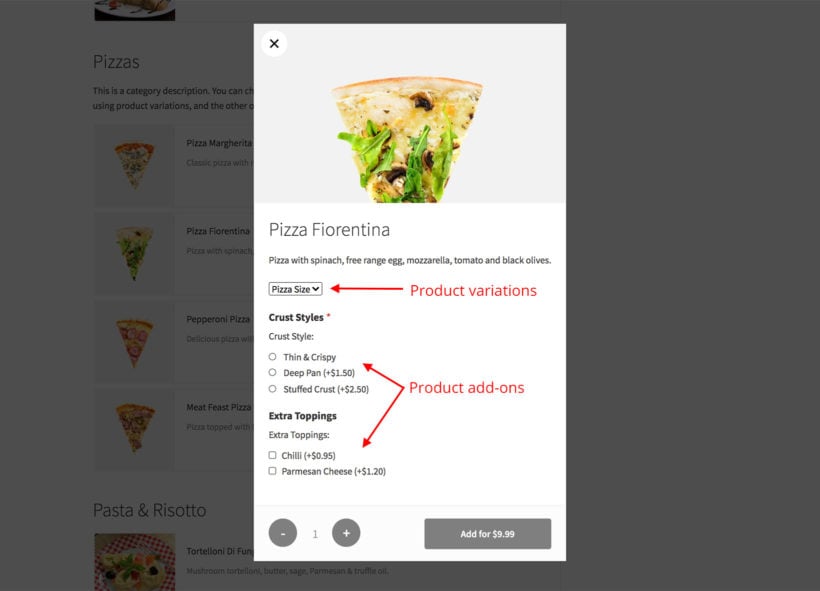
If that's the case, you can use either product variations or product add-ons:
- Variation - use variations when a customer can only choose one option, like the size of a pizza. Choose Variable product from the Product data drop-down to set these up.
- Add-on - use extra product option fields when a customer can choose multiple options, like the toppings on a pizza. You'll need the Product Options plugin to set these up.
For example, here's what it looks like to create a burger where people can choose between beef, chicken, or veggie, with each option getting a different price. For this situation, you would want to use variations:
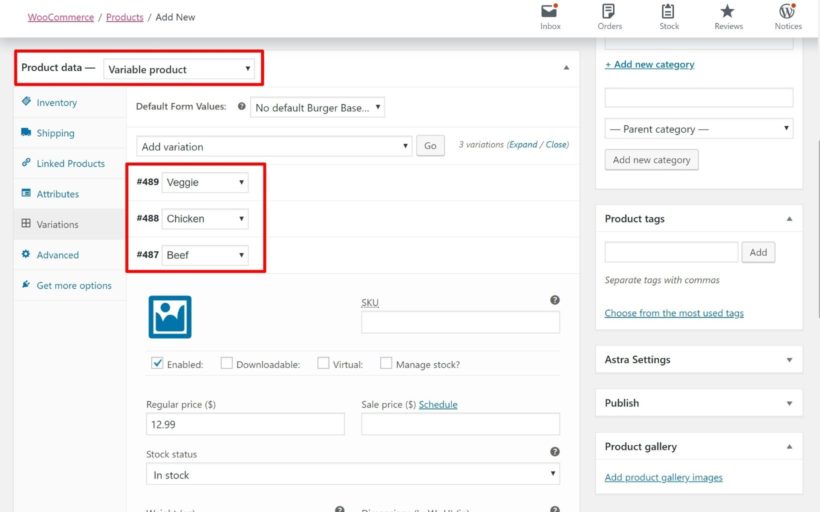
Make sure to Publish your product. Then, repeat the process for all the menu items that you want to include in your online restaurant ordering system.
4. Restrict shipping areas
While an ecommerce store might ship nationwide or globally, your restaurant probably only delivers to a few specific zip codes.
To set this up, you can use WooCommerce's built-in shipping zones feature:
- Go to WooCommerce → Settings → Shipping.
- Click Add shipping zone.
- In the shipping zone interface, click the link to Limit to specific ZIP/postcodes
- Enter the postcodes that your restaurant delivers to
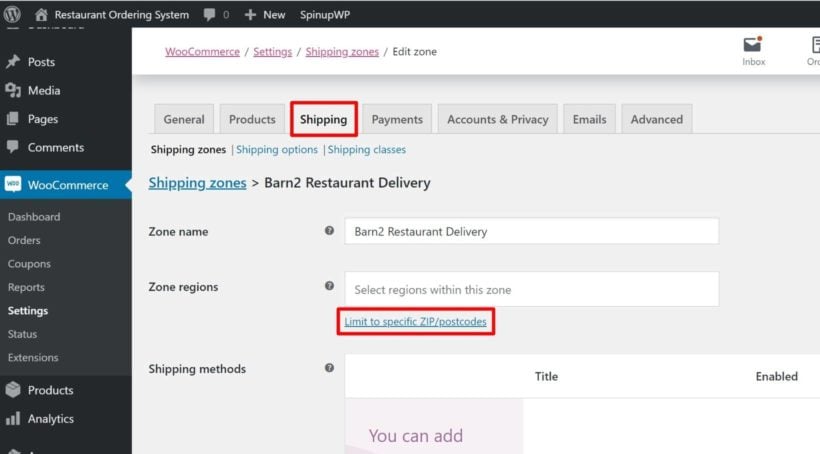
As long as you don't add any other methods, shoppers will only be able to ship to one of those zip codes.
You can also opt to charge a delivery fee or offer free delivery according to your preferences.
If you want to let visitors check if you deliver to their area, you can use the WooCommerce Delivery Area Pro plugin to add a "Check Delivery" feature.
5. Create your front-end restaurant ordering system
Once you've added all your menu items, you're ready to create the front-end ordering menu for your Uber Eats alternative.
To do this, you'll use the WooCommerce Restaurant Ordering plugin, which lets you list all of your menu items in a convenient food order form:
Once you install and activate the plugin, go to WooCommerce → Settings → Restaurant. Activate your license key, and customize the content and layout of your food order forms. Add your opening hours too.
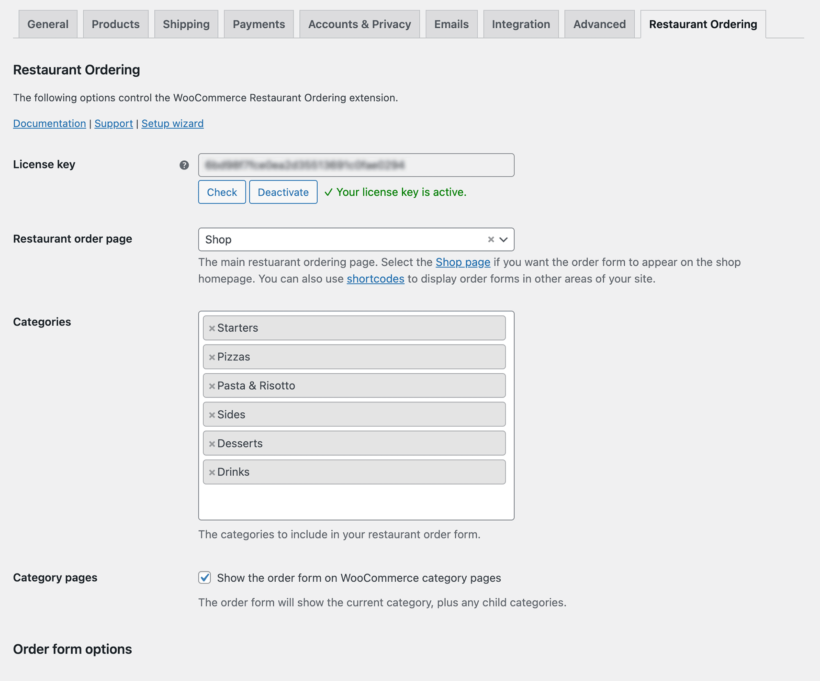
Once you've configured the plugin, find the page called 'Restaurant Ordering' from the Pages section of the WordPress admin. The WooCommerce Restaurant Ordering plugin has created this for you automatically. Rename it to whatever you like. View the page to see your foods listed in a neat order form, divided by category. This is the online menu for your Uber Eats alternative:
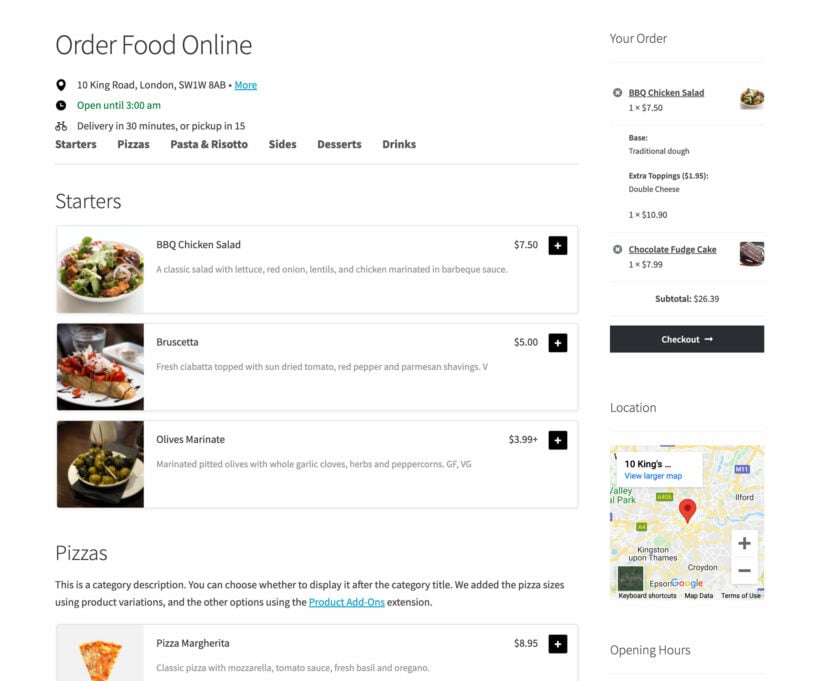
Tip: Add a cart to the food ordering page by selecting a page layout that has a sidebar, going to Appearance → Widgets, and adding the 'Cart' widget.
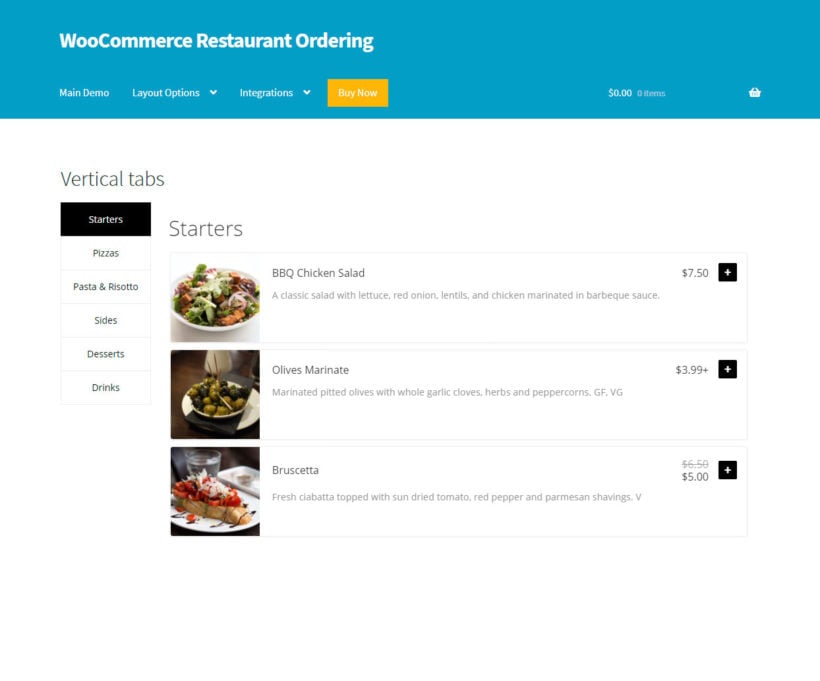
You can also create additional food order forms using the restaurant ordering shortcode. This lets you create more complex layouts, such as displaying each category within a different tab or toggle. You can also list different foods on different pages.
6. Set up backend processes for order notifications
By default, WooCommerce will send real-time email notifications when a new takeout or delivery order comes in.
However, because of the importance of getting started on orders right away, you might prefer a different method that's more attention-grabbing so you can ensure fast delivery. Here are some good options:
- Official WooCommerce apps - WooCommerce has free apps for iOS and Android that can send push notifications for new orders. If you use an iPad or other tablet for your POS, you can install the app directly on your restaurant POS system.
- WooSMS - receive text messages when new orders come in. It also lets you send text messages to customers to let them know the status of their order (like when your delivery person is on the way).
- WooCommerce Automatic Order Printing - lets you automatically print orders as they come in.
- YITH Desktop Notifications for WooCommerce - get desktop notifications for new orders. This is great if you use a computer as your restaurant point of sale (POS) system.
7. Enhance your restaurant ordering system (delivery slots, popup cart, etc.)
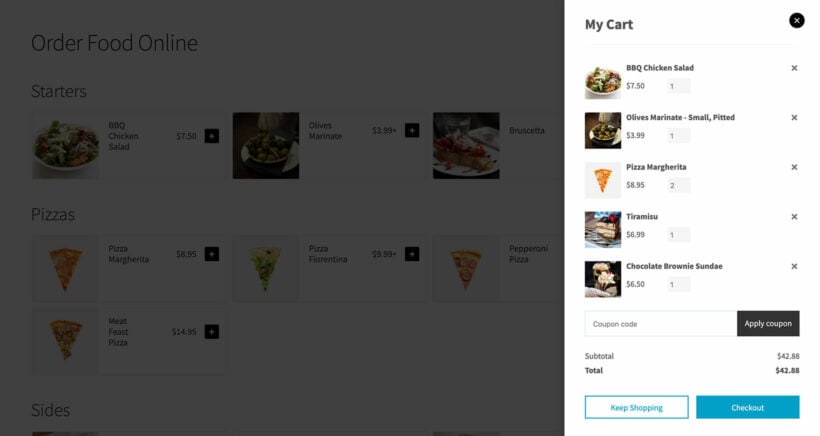
At this point, your WooCommerce food ordering system is all set up to function as an Uber Eats alternative. However, there are a few other tweaks you might want to make depending on your business.
- Add a popup cart and checkoutWooCommerce Restaurant Ordering is designed to work with the WooCommerce Fast Cart plugin so that customers can complete their order from a popup cart and checkout, directly on the food ordering page.
- Add restaurant opening times and delivery slotsWant to allow customers to choose an exact delivery time, or and restrict the number of deliveries within each time slot. You can do this with the WooCommerce Delivery Slots plugin. Customers can choose an available delivery slot, ensuring that your delivery drivers can cope with the number of food orders.
- Manage your delivery driversUse the free Delivery Drivers for WooCommerce plugin to avoid the manual work of managing your local delivery drivers.
- Add a minimum order valueLots of restaurant menu websites only want to take online orders above a certain value. Set minimum order rules with the WooCommerce Quantity Manager plugin.
- Offer special deals To run promotions, like buy one get one free, you can use the WooCommerce Dynamic Pricing plugin.
- Accept takeaway ordersIf you want to let shoppers pick up their orders (rather than delivering them), you can create a "Local pickup" shipping option for takeout.
- Accept tipsIf you want to accept tips, you can use the WooCommerce Donation Or Tip On Cart And Checkout plugin.
Get started with your Uber Eats alternative
If you're looking for a more flexible, cheaper Uber Eats alternative, creating your own WooCommerce food delivery platform cuts out the middlemen and gives you full ownership of your online platform. This approach also makes a great Just Eat alternative, Deliveroo alternative, Grubhub alternative, DoorDash alternative, PostMates alternative, Caviar alternative, etc.
It only takes slightly longer to set up your own food delivery service platform with a WordPress restaurant plugin, but the benefits are permanent. Not only can you stop giving up 20-30% of your orders as commission to Uber Eats, but you'll also be able to grow your own audience and build an evergreen marketing asset for your restaurant.
Choose your WordPress hosting, install WooCommerce and WooCommerce Restaurant Ordering, and create your Uber Eats alternative for online ordering today.
Do you have any questions about using a WooCommerce restaurant ordering system as an Uber Eats alternative? Leave a comment and we'll do our best to help.
19 Comments
Can this be extended to multivendor like store where order vendors can add their products
Hi, Destiny. Thanks for your interest in WooCommerce Restaurant Ordering! Certainly. Please see how you can Use a multivendor plugin to allow food vendors to register and add products.
I hope this helps. Let me know if you have any more questions. You can also get in touch and discuss your requirements in more detail via our dedicated Support Center. We have a full 30-day money back guarantee, that allows you to try the plugin on your site completely risk-free. Cheers!