Start selling food online from home in no time

By the end of this article, you’ll walk away knowing exactly how to sell food online from home.
It’s no secret that the online food industry is booming. You might be thinking of starting your own food business to sell food online from home. For this, you’ll need a website that lets customers browse your menu and place their orders.
If you’re in a similar situation, then don’t worry! This in-depth guide will teach you how to sell food online from home in a few simple steps:
- Set up your small startup food business website using WordPress and WooCommerce.
- Use the WooCommerce Restaurant Ordering plugin to sell food online.
- Offer your customers home delivery options.
And the best part? We’ll show you step-by-step how to sell food online from home. It’s incredibly quick and easy and there is absolutely no technical knowledge required to follow this tutorial. This means that you can set everything up and start selling food online from home today!
Introducing WooCommerce Restaurant Ordering
WooCommerce Restaurant Ordering is a WordPress plugin that makes it easy for small food businesses and mom and pop style shops to start selling food online from home. The plugin lets you create an intuitive, front-end food order system complete with a food order form. It’s the easiest way to start selling food online from home.
You can add simple food products or add variations and extra product options to your food ordering system. For example, if you sell pizzas, you might want to give customers the option to select the size or extra toppings. You can also add text boxes for dietary requirements or allergens, or for letting customers add notes like Hold the pickles!.
In addition to this, you can add a sidebar to your food ordering page that contains information about the customer’s cart. This is a great way to give patrons and customers a quick overview of their order before they proceed to the checkout page.

The WooCommerce Restaurant Ordering plugin is designed to help small food businesses deliver an exceptional user experience through their website and better manage customer orders in WooCommerce.
How to sell food online from home using WooCommerce Restaurant Ordering
Here, we’ll walk you through a step-by-step tutorial on how to sell food online from home. You might also like to sign up to our free online course, which has even more advice and tips:
Step #1: Set up WordPress and WooCommerce
If you’re just getting started then chances are you don’t already have a website set up. So, the first step is to choose a hosting provider for your food business website. Our best advice is to go with Kinsta, but you can use any hosting provider.
Next, you’ll need to install WordPress and WooCommerce (an e-commerce platform to set up your online store) on your website. If you choose to go with Kinsta, the team will install the WordPress content management system for you. However, if you’d like to take the DIY approach, we recommend checking out these helpful articles:
Once you’ve set up your basic WooCommerce-powered food business website, you can set up your basic food ordering website by installing a WordPress theme. And once your basic website is set up, come back to this tutorial for details on how to start selling food online from home.
Step #2: Add food items as WooCommerce products
Now that your WordPress site is set up, it’s time to add food items to it as WooCommerce products. To do this, head over to Products → All Products from the WordPress admin panel and click the Add New button.
Next, enter the following information for each food item you want to sell through your food business website:
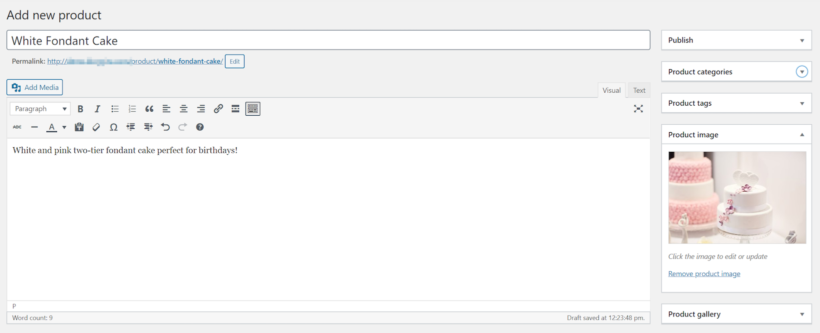
- Name of the food item
- A product image
- Brief description
- Product categories (e.g. desserts, cupcakes, snack bars, sweets)
- Price
Click the Publish button to proceed. Add all of the food items to your food website in the same way. You can also add food variations and extra options.
Step #3: Get the WooCommerce Restaurant Ordering plugin
Get the WooCommerce Restaurant Ordering plugin and install and activate it on your WordPress website. You’ll receive the plugin’s license key in an order confirmation email.
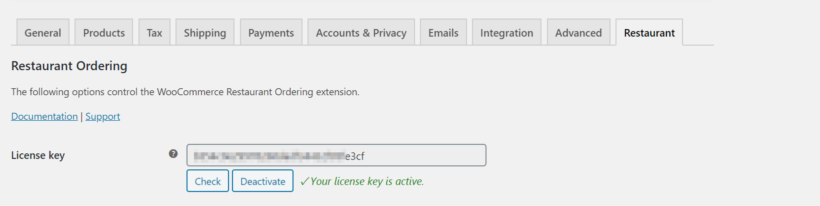
From the WordPress dashboard, head over to WooCommerce → Settings → Restaurant and enter the license key in the License key field. Click the Save changes button at the bottom of the screen to continue.
Once you activate the license key, the WooCommerce Restaurant Ordering plugin automatically creates a Restaurant Order page for you. You can access this by going to Pages → All Pages from the WordPress dashboard.
If you preview the page on the front-end of your website, it should look something like this:
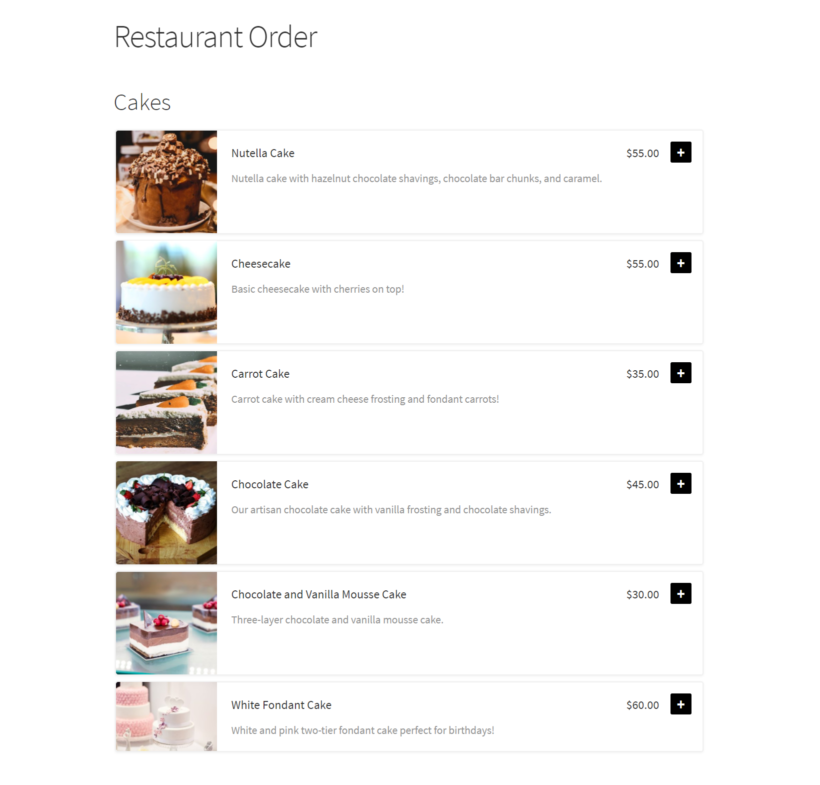
Next, we’ll show you how you can configure the plugin’s settings to customize the food ordering page.
Step #4: Configure the plugin’s settings
To configure the WooCommerce Restaurant Ordering plugin’s settings, head over to WooCommerce → Settings → Restaurant from the admin area.
Food order page
The Restaurant order page dropdown lets you choose the page to display the food order form on.
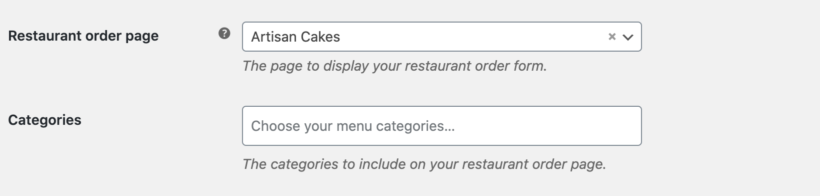
You can leave it as is or select a new page if required. The WooCommerce Restaurant Ordering plugin adds the shortcode [restaurant_ordering] to whichever page you select.
Categories
By default, the food ordering plugin lists products from all of your product categories on the food ordering form. You can use the Categories option to add the product categories you’d like to include in your food order form.
You can organize different types of food under a separate category. If you have multiple product categories selected, you can drag and drop them to change the order in which they’re listed on the front-end.
The Order form options setting lets you select the information you’d like to display in your food order forms. You can choose to display:
- Category titles
- Category descriptions
- Product images
- Product descriptions
- Buy button
Order form options
If you’re selling products from a single category (e.g. only Cakes), you can untick the checkbox next to the Show category titles and Show category descriptions option.

However, if you’re selling products from multiple product categories, we recommend leaving all of the checkboxes ticked.
Number of columns
The Number of columns option lets you choose how many columns to display food items in on the front-end. This is particularly useful for online food businesses that sell a variety of food items.

It’s also a great way to enhance the look and feel of your food order form and make it more like a real-world menu.
Order method
We recommend going with the Quick order method option to let customers quickly add food items to their cart and place their order.
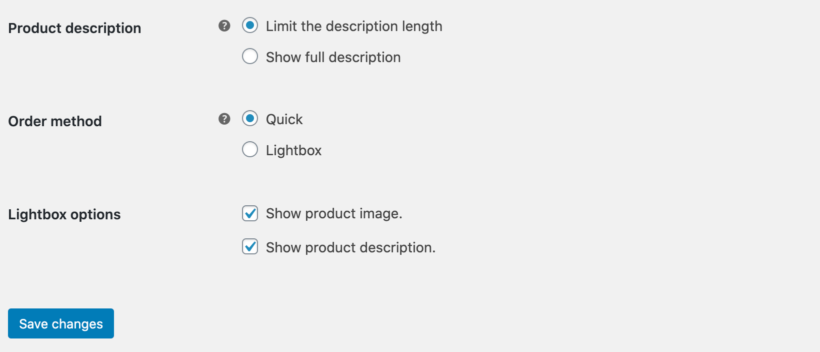
If you’re selling food items with variations or extra product options, the WooCommerce Restaurant Ordering plugin will automatically display a lightbox to let customers select options.
Lightbox options
Ideally, you want to display both the product image and full product description in the lightbox. We recommend leaving both checkboxes ticked.
Step #5: Preview the food ordering system
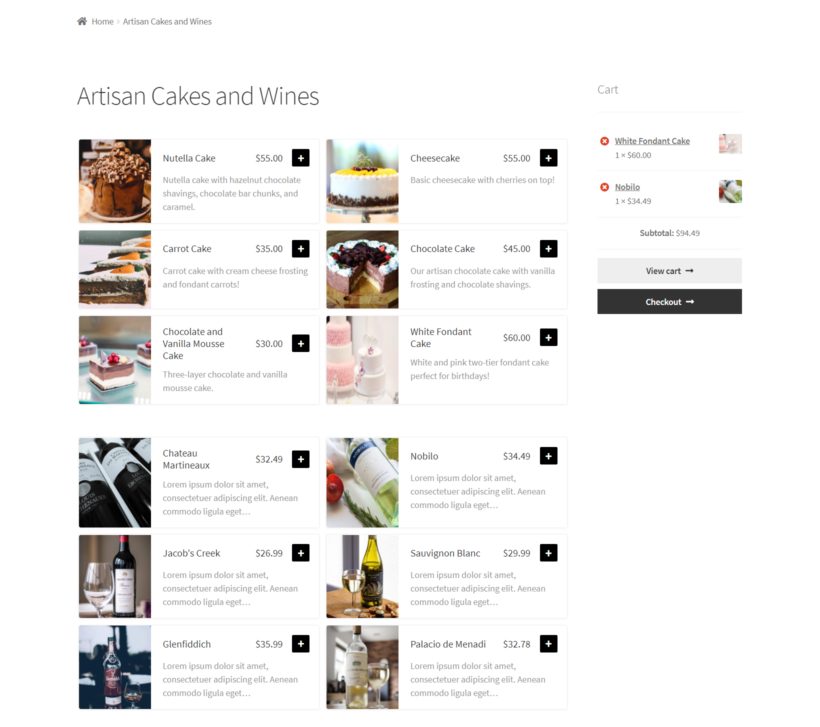
Once you’ve configured the WooCommerce Restaurant Ordering plugin’s settings, you can preview the food ordering system on the front-end. It should look something like this:

To further enhance the customer’s shopping experience, we’ve added the WooCommerce cart widget to the sidebar. This way, customers can preview their orders before proceeding to the checkout page.
Here are three different ways to add a sidebar or cart to your food ordering pages.
Step #6: Set up home delivery options (optional)
The WooCommerce Restaurant Ordering plugin lets you list products in a quick, one-page food ordering form. The rest of the checkout process is provided by WooCommerce. This means that you can use WooCommerce’s built-in options to let customers order food for home delivery.
We recommend setting up WooCommerce delivery zones to offer food delivery options within a specific area only. This is much easier to manage (especially when you’re just getting started) than offering country-wide shipping options.
To take things further, you can set up a free delivery area and multiple paid delivery areas. All of this is possible with WooCommerce Shipping Zones.
Check out the documentation for instructions on how to set up home delivery options.
Selling food gifts
Lots of small food businesses sell foods that are also perfect as gifts. Some examples of food gifts include chocolate brownies, food hampers, or gourmet marshmallows.
These are equally perfect for special occasions like Mother’s Day, Father’s Day, Valentine’s Day, and birthdays as well as for situations where you’re looking for a gift that isn’t too personal, for example, for a coworker.
To sell food gifts through your small food business website, you can use the WooCommerce Opening Hours & Chosen Times plugin to allow customers to choose an exact delivery date. This helps them rest assured that the food gift arrives at the exact right time!
You can also use the Checkout Field Editor plugin to add a Gift message field to the WooCommerce checkout. To take things further, you can create any additional fields such as a checkbox to let customers mark the order as a gift so that you don’t include any price information with their order.
Bonus tips
As a new food business owner, there are many things you’ll need to think about before you can start selling food from home.
For example, it’s a good idea to check out your local legislation (e.g. the FDA) and cottage food laws to see whether you need to apply for a business license, food licensing, or a food hygiene certificate. Food safety and kitchen inspection laws vary from state to state. You should be able to find out most of this information through Google.
In addition, we recommend checking out shipping rules (e.g. labeling requirements) for perishable items. For example, let’s say you’re based in New York, United States, and want to accept cross-border orders. You might want to check to see if you’re allowed to send gourmet marshmallows to your patrons and customers in Toronto, Canada.
Sell food online from home in less than 30 minutes!
Selling food online from your home kitchen or commercial kitchen is a great way to launch a small business and generate income through food sales. All you have to do is set up your small food business website, create a menu, and start accepting orders!
The WooCommerce Restaurant Ordering plugin can help you sell food online from home by creating a one-page food order form. You can then promote your food store on social media to spread the word. We encourage you to try it out for yourself!
You get a:
- Plug-and-play setup for the plugin.
- In-depth documentation (absolutely no way to get it wrong).
- Technical support is available if you need any help.
- 30-day money-back guarantee. Love it or get a full refund, 0 risk!
Get the WooCommerce Restaurant Ordering plugin today to start selling food online!