Link management in WordPress - a beginner’s guide to ClickWhale

Managing links on your website is critical for staying organized, tracking data, and also improving your SEO efforts. Yet, from our experience, most websites neglect link management – or don’t even use it at all.
Unfortunately, this might lead to several problems.
- No data. You can’t see how many users clicked on your links (so you've known clue which links are powering traffic through to your website, and which are languishing unloved).
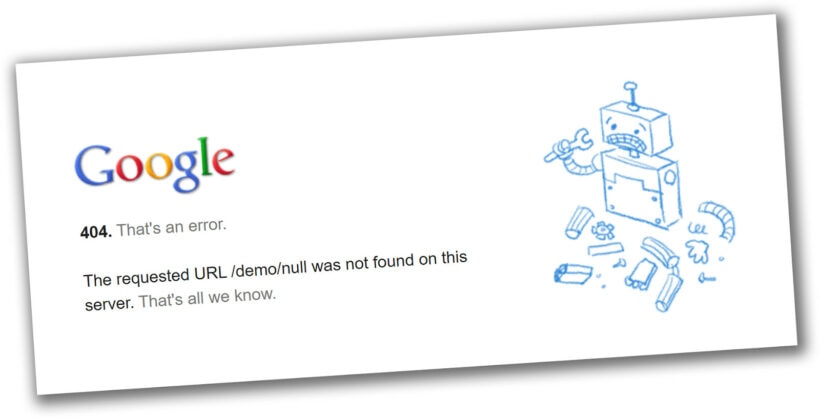
- Dead links. Your links might not work, or worse – lead users to the dreaded 404 Not Found pages (without you even realizing).
- No custom URLs. You’re stuck with a generic URL, which might look suspicious and lead to no clicks from the users (and even harm your branding image).
Experiencing these issues might prevent you from being able to make data-driven decisions that could help you move ahead faster – and significantly boost your profitability.
In this post, you’ll learn all about how to manage your WordPress links quickly and simply with ClickWhale.
What is link management?
There are a lot of links you’ll use throughout your WordPress website, such as:
- Links in blog posts
- Interlinked CTA buttons
- Links in the navigation bar
Yet, if you don’t manage all of your links, you’re in the dark…
They might not work properly, redirecting your visitors to 404 Not Found pages. You also can’t see the traffic data, or create custom URL slugs.
Having proper link management allows you to prevent these issues.
Why GREAT link management is critical
Link management can lead to a massive increase in traffic, clicks, and also the overall trust of your audience.
Let’s learn how.
Here are the most critical reasons why you need to manage your links properly.
Track the impact of your links
It’s essential to make data-driven decisions to stay ahead of competitors.
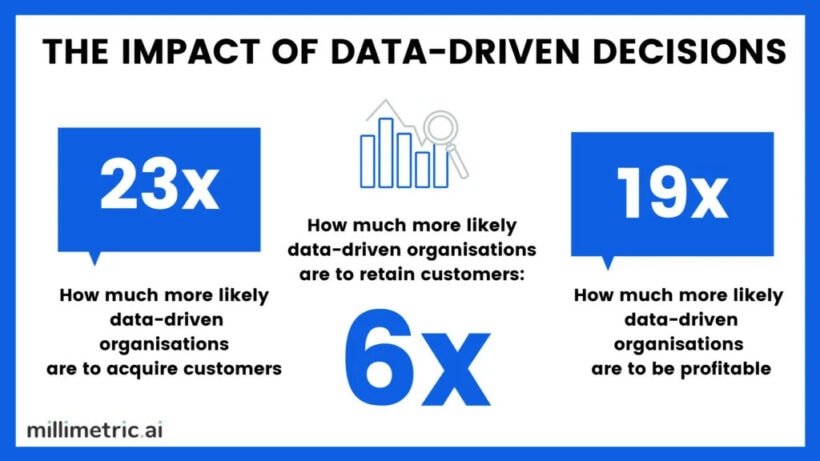
Source: Millimetric
Yet, if you don’t use a link manager, you have no way of knowing how much impact each of your links has.
You could only rely on luck, or a guess – which won’t get you far in any business.
Tracking clicks on each of your links will allow you to see how effective your links are, which ones need changing, and begin to learn what factors encourage your customers to click.
Shorten & simplify links
Using super-complex, overwhelming links isn’t a good look.
It will only make your business and WordPress website look messy and unprofessional. Fortunately, a link manager can help you solve this issue and:
- Increase trust. People don’t trust long URLs since they look suspicious. Short and branded URLs show that the brand has taken the time to improve their links.
- Improve engagement. On most social media sites it simply isn't possible to add long URLs. A URL displayed as text superimposed on an image or video needs to be short, as well as links in bios. Also, short and branded URLs can boost engagement on social media as they seem legit and trustworthy.
Just compare the two links shown below (both of which point to exactly the same page):
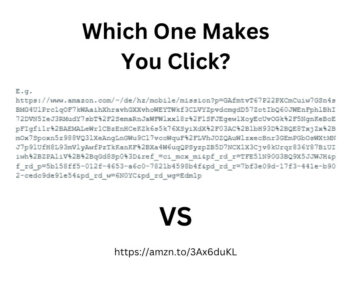
The second link is clearly much more trustworthy, which makes it much more likely to be clicked – further improving your clicks, traffic, and overall first impression.
Better SEO
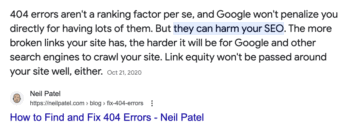
Any links that don’t work (or point at 404 Not Found) will almost certainly hurt your SEO. They completely destroy the user experience and make your website look unprofessional.
A link manager tool or plugin will allow you to find these links and fix them – improving your SEO in a reliable and proactive way.
How to manage links in WordPress: a step-by-step process
Managing links in WordPress might seem slightly challenging at first.
But, as you come to read in this section, you’ll quickly realize that it’s super-easy. Here is the step-by-step process for managing links in WordPress with ClickWhale.
1. Install the ClickWhale plugin
Install the FREE ClickWhale plugin from either the WP plugins page, or directly from https://clickwhale.pro/free-download.
2. Add your link
It’s super-easy to add any link or tracking code with ClickWhale.
We’ll take a look at an example of adding an Amazon affiliate link to ClickWhale. However, you can do the same thing with any link on your website, whether it’s internal or coming from an external source such as Amazon.
First, you’ll need to find your affiliate link for any Amazon product by searching the Amazon store whilst logged in with your Amazon Associates account.
On the Amazon Associates SiteStripe header, choose ‘Text’ to grab the link.
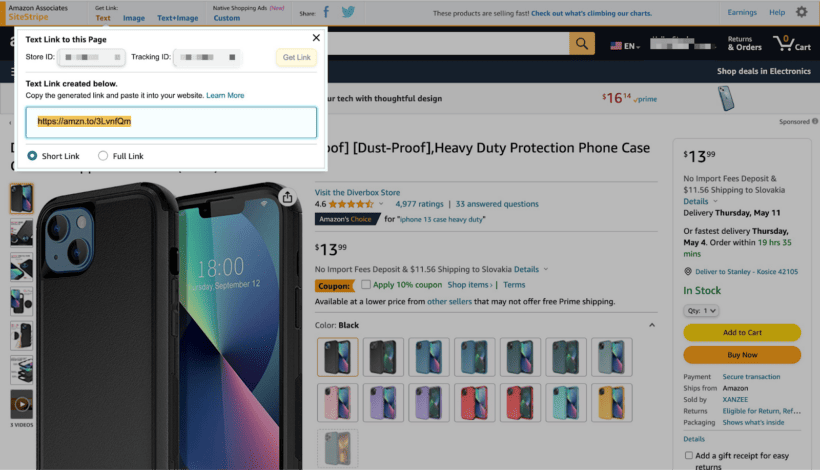
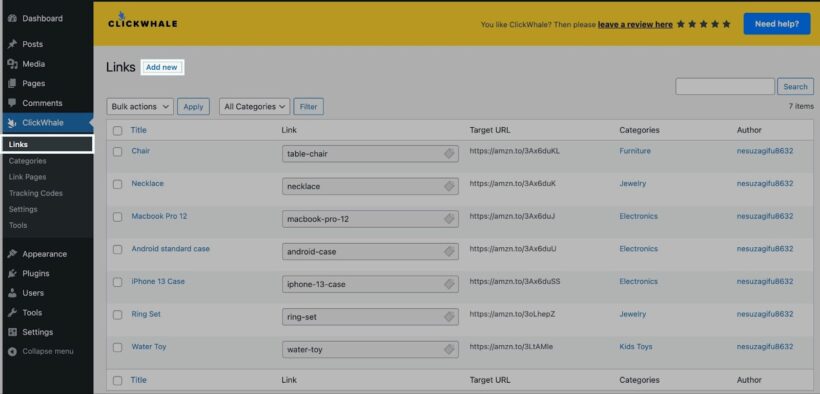
Once you grab a link, you’ll need to go to the ClickWhale plugin. From there, you’ll need to navigate to the Links section, and click on the ‘Add new’ button.
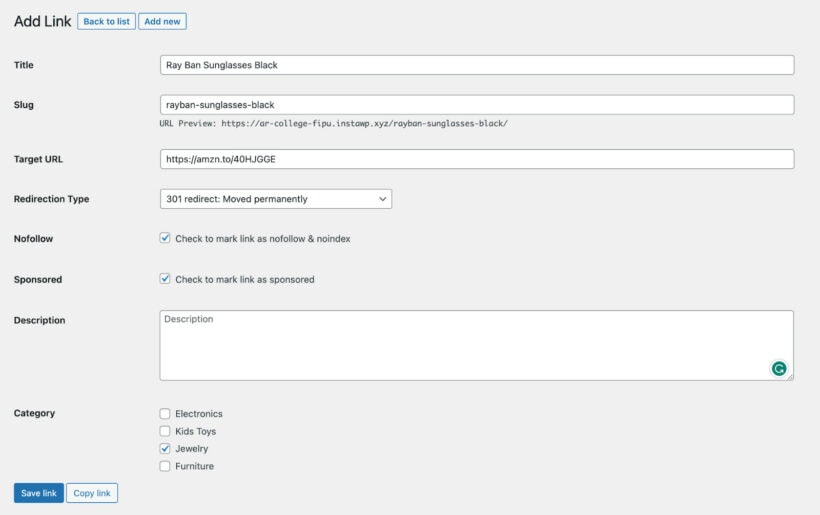
There, you’ll fill in all the important information – the link name, URL, description, and category (more on categories later in the article).
I highly recommend you also include keywords (search terms that users type into Google) inside the link title and slug – and keep it concise for the best results.
That’s it. Hit the ‘Save link’ button, and the link will be added to ClickWhale.
You can then copy the link you’ve just created and share it either on your page, social media, or anywhere else. Simply go back to the Links section, select your product/link, and copy it from the Link column.
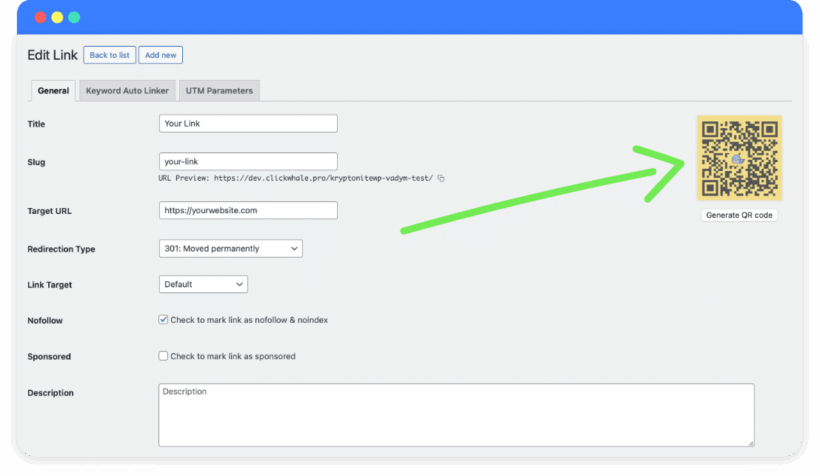
2.1 QR Codes for easy sharing
Generate scannable QR codes in seconds for any link, making it seamless to bridge your offline audience with your online content. Whether you’re hosting an event, printing marketing materials, or adding inserts to shipped products, ClickWhale ensures every scan leads exactly where you want it to.
Open any link inside ClickWhale and select “Generate QR Code.” Then download the file or embed it wherever you’re promoting your content offline.
Looking to share multiple links on social media?
You can also use ClickWhale to create link pages, where you can add as many of your links as you want.
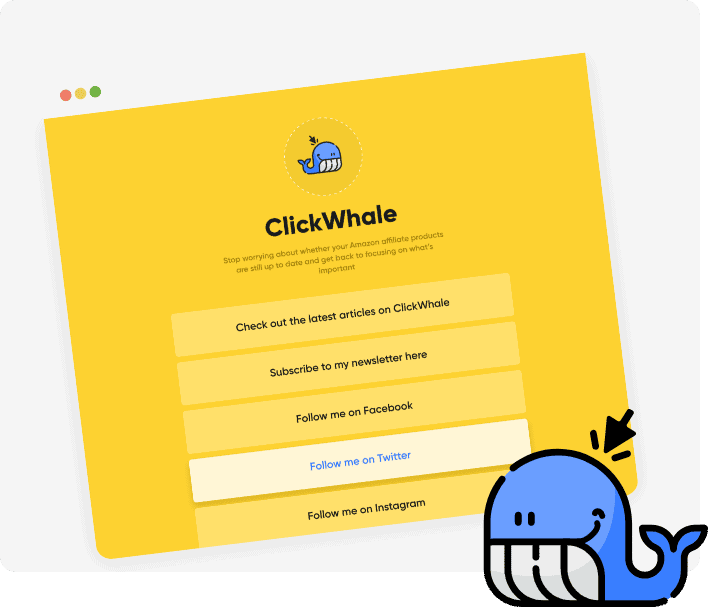
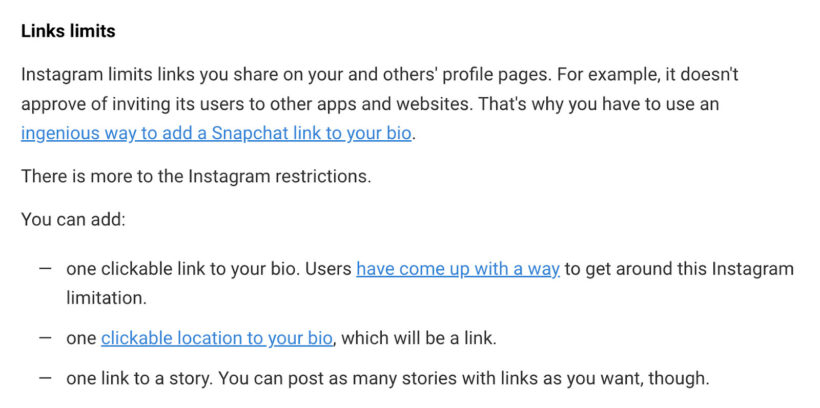
This is super-useful when you’re trying to share multiple links on your social media accounts, but you’re limited because of the bio or post link limits.
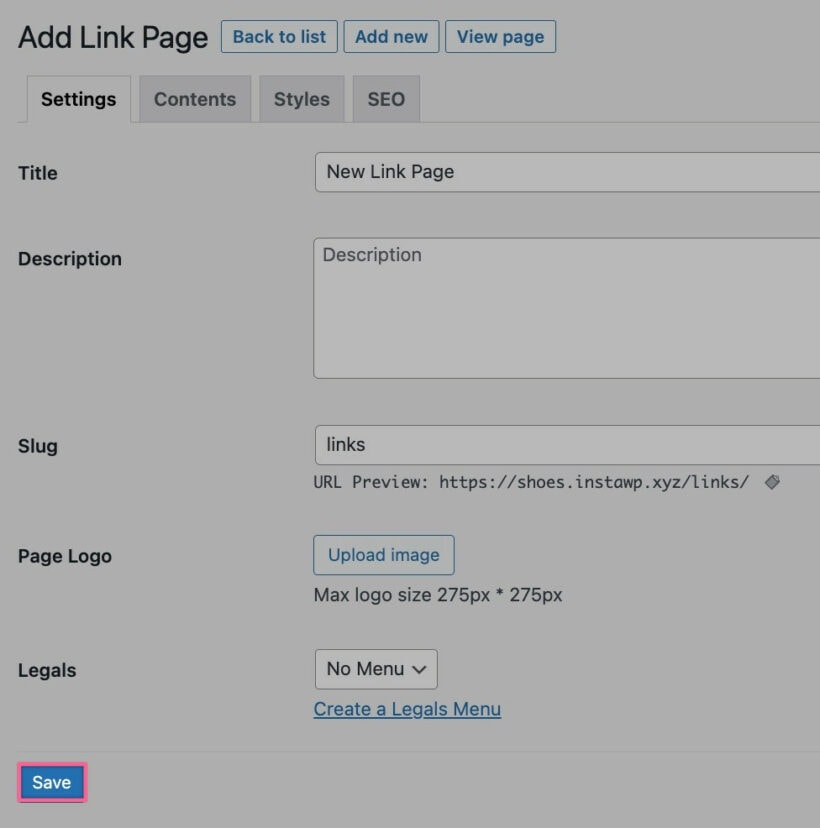
To create link pages, head over to the ClickWhale plugin page in WordPress, select ‘Link Pages’, and click on the ‘Add new’ button.
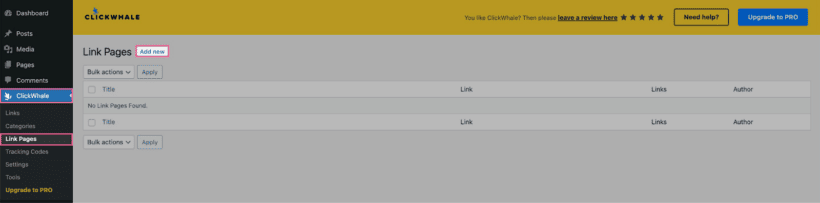
From there, fill in all the important information, and add your links via drag-and-drop editor in the ‘Contents’ tab.
After you’re done, click on the ‘Save’ button at the bottom.
3. Categorize links for better organization
You can take advantage of the ‘Categories’ feature to better organize your links.
Grouping your links/products by categories, such as the type of product, makes it much easier to access the necessary links quickly. For instance, if you sell books, you can create categories, such as:
- Fiction
- Romance
- Non-fiction
You can then filter the links/products and access them a lot quicker.
For example, you can create categories for different types of Amazon affiliate products such as electronics, kids toys, and jewelry.
- To begin, you need to create all of the necessary categories for your links. Open the ClickWhale plugin page in WordPress, and in the menu on the left, open the ‘Categories’ tab.
- To create a new category, click the ‘Add new’ button at the top, and then fill in the details such as the category name/title, the slug, and (optionally) a description.
- Once you have created your categories, you can go ahead and add a category to each of your products. You can do this by clicking on the ‘Edit’ option on any of your products. After that, you’ll get redirected to the ‘Edit Link’ page.
- Scroll down, choose a category, and hit the ‘Save Link’ button.
Once you’ve completed this process, you will then be able to filter your products by the categories to access the appropriate links faster.
4. Track your links
ClickWhale lets you track your links directly on WordPress without relying on external tracking tools such as Google Analytics.
It helps you track one of the most important metrics of your links – the number of clicks.
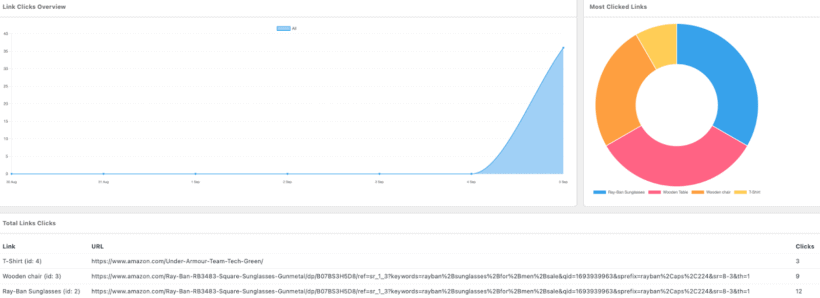
As a result, you won’t need to worry about discrepancies in data between those external services and your WordPress site, any of which may use different tracking methods.
Note: This feature is only available to premium users.
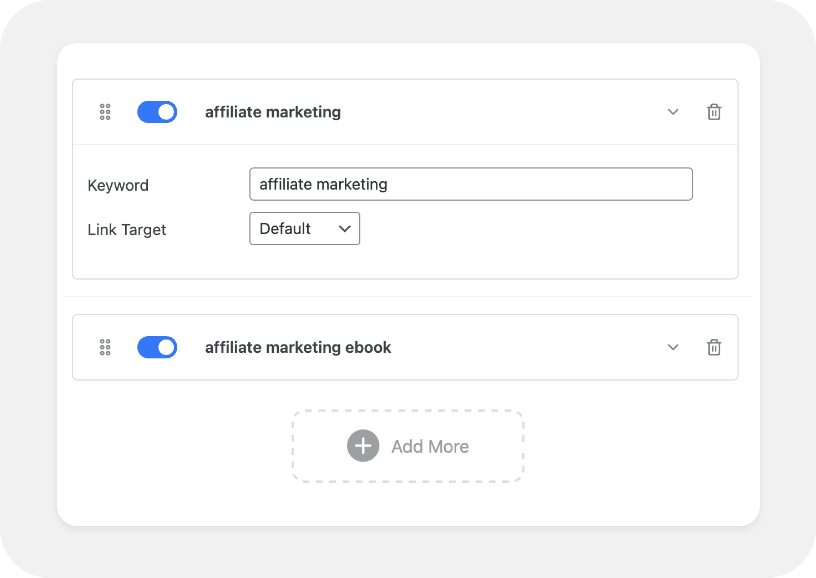
5. Automated Keyword Linking
ClickWhale’s Automated Keyword Linking helps you monetize your content effortlessly by automatically converting selected keywords into affiliate or internal links across your site. Instead of manually inserting links into every post, you can define target keywords once and let ClickWhale handle the rest.
To get started, navigate to the ClickWhale dashboard in WordPress, open the Automated Keyword Linking settings, define your target keywords and destination URLs, and activate the feature. From there, ClickWhale will automatically insert and manage the links across your content - helping you maximize visibility and conversions with minimal effort.
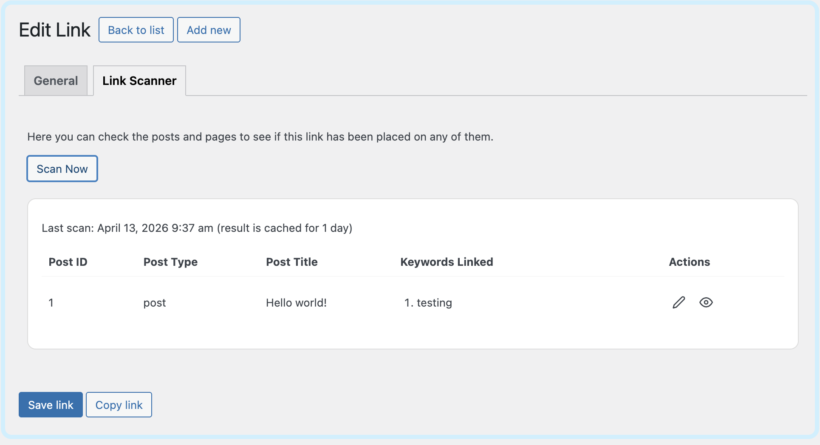
6. Link Scanning
The integrated link scanner continuously checks your URLs for errors, redirects, or failures so you can fix issues before visitors encounter them. This protects your credibility, preserves SEO equity, and prevents lost commissions.
Run a scan from the dashboard to review flagged links. ClickWhale highlights affected URLs so you can update, replace, or remove them in seconds.
7. Integrating with Third Party (REST API)
ClickWhale’s API gives creators and affiliate marketers direct, programmatic access to links, analytics, and settings, making it easy to connect your link management workflow with external tools, automation platforms, and reporting dashboards.
Generate your API credentials in the settings, connect your external system, and send secure requests to automatically create, update, or retrieve link data whenever you need it.
Already using a link manager?
ClickWhale makes it easy to migrate your existing links and tracking scripts from other link management solutions, such as PrettyLinks, ThirstyAffiliates, or BetterLinks. This is particularly valuable if you’re switching tools but want to retain your current link structure while centralizing advanced script management in one place.
With ClickWhale’s migration and script management features, you can seamlessly transfer and organize:
- Detailed link data and existing redirects
- Tracking and retargeting scripts
- Global and page-level script placements
If you’re ready to migrate your links and manage your scripts more efficiently, head over to the ClickWhale section in WordPress. From there, open the ‘Tools’ menu and navigate to the ‘Migration’ tab at the top.
Click the ‘Start migration’ button to begin the process. Once completed, your links and associated scripts will be successfully imported, and you’ll see a confirmation message indicating everything is set up and ready to go.
Manage your links in WordPress the right way
Having a clear picture of what makes your visitors choose to click on a link is critical. It’s one of the best ways to guide you through crafting your strategy for content on your website, and on social media.
The only way to achieve this reliably is to have access to meaningful data. There are a lot of things you can measure – and one of these things is the impact of your pages and links.
And that’s precisely what ClickWhale helps you achieve.
ClickWhale is, in our opinion, the best link management plugin for WordPress. It’s super quick and easy to install on your existing personal or business websites. You can add links and tracking codes – and set up everything in just a few clicks.
Plus, it provides you with accurate data and a great way to organize all your links into categories that you can filter.