How to build an instant quote calculator in WooCommerce


An online quote calculator works out a price from what the customer selects or enters. You can either let customers submit quotes to you, or fully automate it so they can order and pay online.
If you sell made-to-measure products or services priced by the job, you may want shoppers to see a price without emailing for one. An online quote calculator helps when your pricing depends on dimensions, choices or job details. Barn2 used to sell web design services, and our web design quote calculator was the most visited page on the site.
Choose between these two routes based on whether the customer can order immediately or needs a reply.
- WooCommerce Product Options calculates the price from the shopper's choices and measurements, shows it on the product page, and lets them add to cart and order right away.
- Gravity Forms collects the details in a form and sends you a quote request, so you reply with a price.
Which quote calculator method suits your store?
Before you build an online quote calculator, decide what should happen after the shopper enters their details. A price formula shows the price changing on the product page, and the shopper can add the product to the cart immediately. A form sends you a quote request, and the shopper waits for your reply.
Our analysis of 693 stores using WooCommerce Product Options shows store owners often need prices tied to customer choices. Product configurators account for 30% of those stores, and custom and personalized products account for 38%. Across 103 audited sites, the price formula appears on 20% of them, which is about one in five.
| Method | Customer sees a price | Customer can order | Best for |
|---|---|---|---|
| WooCommerce Product Options | Yes, the price updates on the product page. | Yes, the shopper can add to cart and pay. | Made-to-measure products, configurators, custom printing and products priced from measurements. |
| Gravity Forms | No, the form sends the details to you. | No, you reply with the quote. | Bespoke services, site visits, complex scoping and jobs that need review before pricing. |
I would pick WooCommerce Product Options whenever your pricing rules can be turned into a formula. I would still pick Gravity Forms when the final price needs a person to check the brief, inspect the site or confirm the scope. If you want the quote request route across your whole catalog instead of one product, a dedicated WooCommerce request a quote setup is the fuller version of it.
How to build a WooCommerce quote calculator with Product Options
This method creates a product page where the customer picks options or enters measurements. The price updates as they go, and they can add the product to the cart and pay without waiting for a reply.

1. Install WooCommerce Product Options
Get WooCommerce Product Options, then install and activate the plugin in WordPress. Enter your license key when prompted. If this is your first install, follow the WooCommerce Product Options setup docs.
2. Create an option group for your product
Go to Products → Product Options and add a new option group. Give the group a clear name, then choose which products or categories should use the calculator fields. For example, you might apply one group to a made-to-measure curtains category and keep standard products unchanged.
3. Add the options your customers choose from
Add a field for each thing the customer picks or enters. Product Options has 14 field types, including checkboxes, radio buttons, dropdown select, text input, paragraph, number, file upload, image buttons and products. The field types also include color swatches, text labels, customer defined price, date and other extra product options.
Use number fields for measurements such as width and length. For example, a made-to-measure blind calculator might have one number field for width and another for drop.
4. Set a price for each option
Most quote calculators need nothing more than option prices. You give each choice a price, and Product Options adds it to the product price automatically as the customer selects things. You can also enter a negative amount to reduce the price.
This is the simpler of the two pricing routes. A price formula is only needed when your pricing has more complex rules, which I'll cover in the next step. Product Options gives you these price types.
- 'No cost'Selecting the choice does not change the price.
- 'One-time fee'A flat amount added once, whatever quantity the customer orders.
- 'Quantity-based fee'A flat amount multiplied by the quantity ordered.
- 'Percentage increase'Raises the product price by a percentage.
- 'Percentage decrease'Lowers the product price by a percentage.
- 'File count'Charges per file uploaded, on File Upload fields.
- 'Character count'Charges per character entered, on Text Input and Paragraph fields.
5. Add a price formula for more complex pricing
A price formula is optional, and you only need it when per-option prices cannot express your pricing. Use it for area or volume pricing, pricing that depends on more than one field at once, or quantity-based discounts. To use this route, start by adding the field.
Add a 'Price formula' field to the option group. Use the buttons under the 'Formula' box to insert 'Product price', 'Quantity in cart', 'Weight', 'Width', 'Length' and 'Height'. You will also see a button for each option you created, plus +, -, *, / and brackets.
For a simple area-based product, use the formula ( [Width] * [Length] ) * 25. For a pair of made-to-measure curtains priced by the meter, where the customer enters centimeters and fabric costs $25 per square meter, use [Width] * [Length] / 10000 * 25 * 2 + [product_price] to include the base product price.
Use 'Price display suffix' if you need text after the price, such as 'per square meter'. Enable 'Ignore main product price' if the formula result should be the full price, rather than adding to the product's own price.
The price formula AI bot can write a formula from a plain English description. The full price formula documentation covers math functions, logical functions, BulkRate and BulkPrice quantity discounts.

6. Add conditional logic for options that depend on each other
Use conditional logic when one option should appear only after another choice. The shopper ticks a 'Gift wrap' checkbox on the product page, and the gift wrapping paper choices appear only then, with the extra charge shown on the option. The conditional logic product add-ons documentation covers the setup.

7. Test every combination
Open the product page as a shopper and test each number field, choice field and checkbox combination. Check the live price, the cart, the checkout and the order details. If your formula includes quantity discounts, test several quantities as well.
The most common price formula problem we see in support is a formula that compares a choice's text label. We saw this with a made-to-measure window product, where the price needed width plus a projection dropdown. The fix is quick once you know it: Reference each choice's numeric 'Formula value' instead of its label.
Native WooCommerce product attributes still cannot be picked from the formula dropdown. It is limited to core product properties such as price, weight and dimensions. Complex builds take some setup, but the formula editor does the math for you.
Let customers generate and submit a quote via Gravity Forms
I would use the form-based route when the calculator needs to send you a quote request instead of taking an order. This is the right choice when a person must confirm the final price before the customer pays.
We built our instant quote calculator with a widely available WordPress plugin. With over a million users, Gravity Forms is the world's most successful WordPress forms plugin. Most people use Gravity Forms for straightforward enquiry forms like the ones in our own support center. However, you can also use it to create instant online quote calculators. Gravity Forms also has a large add-on library for extending your forms.
This is how we did it.
First, you'll need to buy Gravity Forms. Install and activate it on your WordPress website.
To create an instant quote calculator like ours, their Personal License will be fine. If you want to sign people up to MailChimp when they submit the form, you'll need the Business License. Or if you want to take payment from people who submit the form (e.g. a PayPal deposit), you'll need their Developer License. Check out the Gravity Forms extensions to decide which license you need.
How to create an instant quote calculator with Gravity Forms
Gravity Forms provide excellent documentation on how to get started with creating online forms in WordPress.
I'll talk you through the specifics of using Gravity Forms to create an instant online quote calculator for your website. We'll base this on our own quote calculator. If you want something different then you can follow these steps in conjunction with the official documentation.
I've added a screenshot of our own price calculator so you can see how it looks in the WordPress admin. You can also download it directly here.

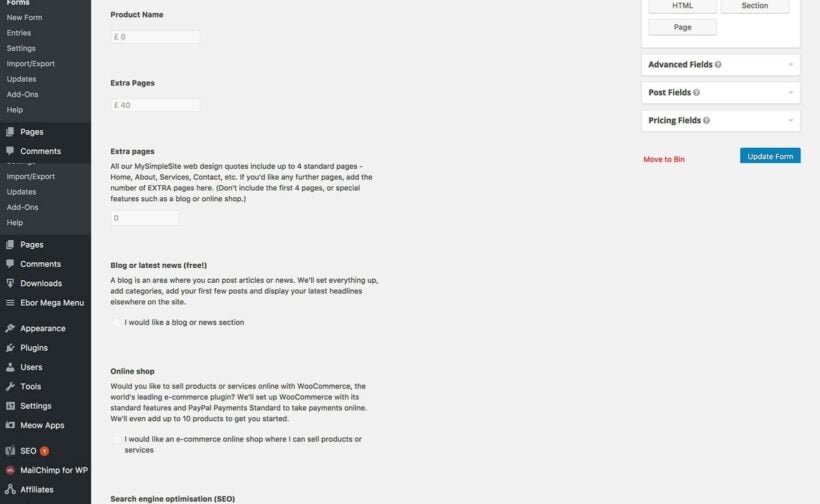
1. Add the quote calculator title and description
First, create a new form in the 'Forms' section of the WordPress admin. Add the form title and description. When you add the form to the page, you can choose to show or hide these. On our quote calculator, we show them at the top of the page.
2. Add headings
You can make your price calculator more user-friendly by adding sub-headings to divide up the form.
To do this, drag an HTML element from the right to the left - one for each heading. Add your heading content and format it as needed. This uses HTML which is a bit confusing for some people, so leave your headings as plain text if needed.
HTML elements are a good opportunity to add static information to your form which won't be part of the price calculations. So use it for headings, explanatory information, etc.
3. Add products
 Now it starts to get a bit tricky!
Open up the Pricing Section Fields section on the right of the form editor screen. Drag a 'Product' from the right to your form on the left.
Choose 'Hidden' field as the product will just be used as a base price for your calculations.
In our calculator, we set the product price to £0 because we offer a free web design option and only charge for extras. You may want to add a base price here which will be added to all prices, even if your customers don't select any other options.
Most online quote calculators will just need 1 product, which is used for the base price.
We used two Product fields: One for the base price and one for extra pages. Our standard web design cost included 4 pages, with a price per page for additional pages.
The second 'Product' field in Gravity Forms set the price per page. When adding the other options (see step 4), we selected the Base Price product for most fields and the Price Per Page product for the extra pages field.
4. Add extra options
Next, drag some 'Option' fields from the Pricing Section Fields section on the right to your form on the left. Add one Option for each of the options you want to include in your instant quote calculator.
We added Option fields for:
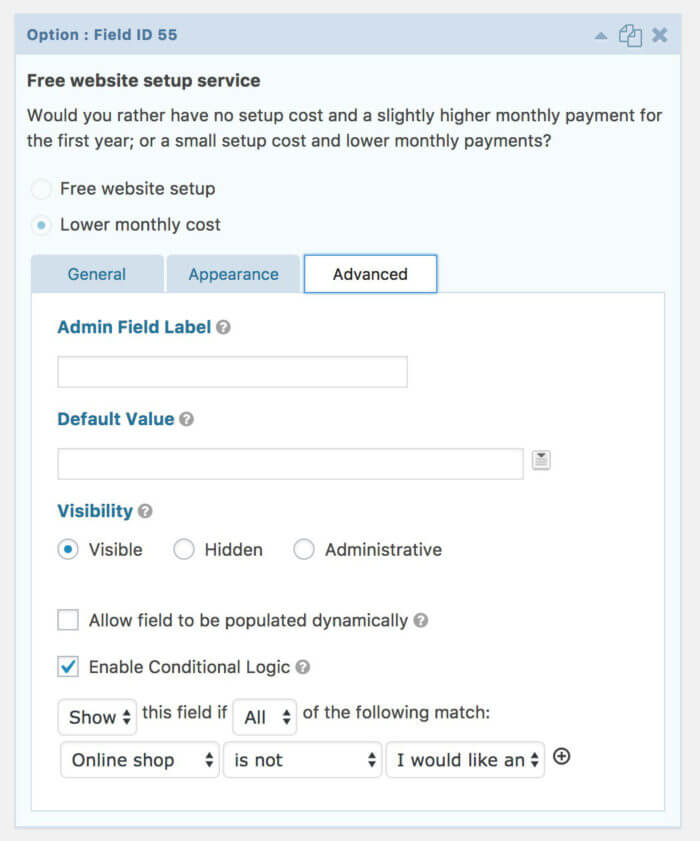 Blog or latest news - this doesn't affect the cost so we set the price to £0
- Online shop
- Search engine optimization (SEO)
- Mailing list signup form
- SSL certificate
- Free website setup service - this is a bit more complicated because we have different prices depending on whether or not people want an online shop. To achieve this, we added 2 Options for 'Free website setup service', and used Conditional Logic to display the correct one depending on whether they have ticked the 'Online shop' Option. To use conditional logic, click the 'Advanced' tab when you edit the Option. You can show or hide the Option depending on which other Options have been selected. Have a play - it's really clever once you figure it out!


We also added extra pages as a Quantity field associated with a different Product (see step 3, above). This let us add an extra price depending on the number of extra pages people wanted for their website.
5. Display the total price quoted
Next, drag a 'Total' field from the Pricing Section Fields section into your form. This will automatically calculate all the other fields to create the total.
6. Bonus tip - monthly costs
Our requirements for the instant quote calculator are a bit complex as our quotes consist of one-off setup fees PLUS ongoing monthly pricing.
We used the 'Total' field (see step 5) for the one-off quote, which was fairly straightforward. We added a static HTML element to display the monthly pricing.
The monthly pricing changes depending on which options are selected in the form. To achieve this, we used conditional logic to display different HTML elements depending on the options selected. This is a bit of a workaround, but suited our purposes and is the only way to do it in Gravity Forms.
7. Add a 'Submit my quote' section
Once someone has calculated an instant quote on your website, you presumably want them to submit the quote to you and place an order!
You can do this by adding more fields to the end of the form - either on the same page or a different one. (To divide your form into multiple pages, drag a 'Pages' element from the 'Standard Fields' section on the right.)
Add fields for name, email address, phone number etc. A Submit button will automatically be added to the bottom, which you can reword in the form settings tab.
8. Configure the form settings
Now go back to the top of the page and go through all the settings and notifications. Make sure the quotes will be sent to the correct address, the 'Success' message is relevant and professional, etc.
9. Add the form to a page
Finally, go to edit any page or create a new one via Pages → Add New. You'll see an 'Add Form' button above the toolbar. Click this and insert your form into the page.
Save the page and start testing your form!
10. Test, test, test!
Online price calculators are complicated, with lots of possible options. Spend a long time testing every combination and make sure your sums are all correct. Make any tweaks to get it just right.
The Gravity Forms documentation is the first place to go for field types, calculations and conditional logic. You can also contact Gravity Forms support when the form does not behave as expected.
Final thoughts on instant quote calculators
A WooCommerce quote calculator is only useful if it matches the way you price the work. If your price can come from fields, measurements and choice values, I would use WooCommerce Product Options because the shopper can see the price and order without waiting.
If the job needs a person to check the details first, Gravity Forms is still a good route. The customer submits the information, and you reply with a price when you have enough context.
Have you built an instant quote calculator for your own website? Please tell me in the comments which method you used.
20 Comments
Please, just a question about your instant online quote calculator and Gravity Form.
I wanted to ask to Gravity support but i have to already be customer so i ask it to you.
Your instant online quote calculator is almost perfect. I thought it would be so if the total price quoted was permanently displayed at the top right of the form (or any elsewhere) despite scrolling down the form.
According to you is this possible or planned with Gravity Form?
You could ask Gravity Forms if they're likely to add this in future. Somehow I doubt they will do, because their plugin is designed to create any type of form and this feature is very specific to pricing quotes, which is just one of their many use cases. You will probably need to hire a developer to add this as a bespoke feature. If you don't have a developer who can do this for you, then I recommend that you post a job on Codeable where their pre-approved WordPress experts will send you a quote. This is a good way to find someone to add specific features/customizations like this.
Hi,
I'm probably going to buy this plugin because it's so handy/useful! Although, I just had one question before I purchase it, is there any way to hide the additional charges that show up next to the pricing field options? For example, I want it to look like this:
Question here
O Yes
O No
Instead of this:
Question here
O Yes
O No +$100.00
Thanks!
Hi Danielle, I don't think there's an option to hide these prices in Gravity Forms but you could hide them by adding some custom CSS.
Hey there,
Thanks for this great article, gave me some insights. I have a question about monthly pricing:
I'm working on a online course and I'd like to offer a one time payment or installment payments. After trying and trying I can't figure out when someone chooses for monthly payments the 'total' field doesn't show the monthly price but only the total price from the product.
It's a bit confusing for the customers. Any ideas how to get this work?
Thanks in advance!
Hmm, I don't think it's possible to show 2 different Total fields in that way. We have done it differently to that. On our own quote calculator form, the monthly cost fields are actually HTML fields in Gravity Forms. Each one uses conditional logic to display a different monthly cost depending on the options selected earlier in the form. So it's a bit of a workaround, but does the job!
Thanks for the quick reply! I did try some more setups and have done it this way now:
Made a € 0 base product, one normal dropdown list and 3 price option fields, one for each product. Each option field contains two options: One-time payment or monthly payments.
The dropdown list is to choose the package.
The option fields show by conditional logic based on the dropdown. Each option field contains two options: One-time payment (full amount) or monthly payment (part to monthly fee).
I have now 6 Total fields, 2 for each product which I show with conditional logic.
One with the one-time price and the other one with the monthly fee, based on the selection of the customer.
Seems like a solid method to me for now :)
Sounds good! Well done for figuring it out.
I decided to use Gravity Forms to set up a quote form for a client and I hadn't used it before. This tutorial really helped me me out with the process. Thanks for sharing!
At first, for some reason, Gravity Forms seemed a bit confusing to me, although then I figured it out. But now I do not use it, I decided to try the uCalc plug-in for calculators. It was given to me immediately with ease, now I use it on my sites.
Comments on this post are closed