How to create a nonprofit website (step-by-step build guide)

A nonprofit website needs to do more than just sit there. It has to inform donors, accept donations, and host the documents your supporters and board members rely on. Here's how to build one in nine steps, using WordPress and a small set of proven plugins.
Many nonprofits don't have a developer on staff. They have a programme director who's been told the website needs replacing, a board that wants to look more professional, and a budget that won't stretch to a custom build. The good news is that a modern WordPress setup gets you 80% of the way without writing a line of code. WordPress is your foundation, and the right plugins get you to 100% by handling the parts that matter most (donations, document management, accessibility).
This guide walks through every stage of building a nonprofit website that works for fundraising as well as storytelling. Each step is sequenced so the next one builds on the previous one. By the end you'll have a live site with a working donation form, a searchable resource library for supporters and board members, and the SEO basics in place.
If you haven't decided whether WordPress is right for your organization yet, our pros-and-cons breakdown of WordPress for nonprofits covers the platform-evaluation decision before you start. Otherwise, let's get into the build.
Why your nonprofit needs more than just a website
A nonprofit website needs to do three things at once. It tells a public-facing story about your cause, accepts donations and volunteer signups, and hosts the documents that board members, donors and partner organizations need to access.
Most small-nonprofit websites only do the first job well. The donation flow is clunky, the resource library lives in a Google Drive folder somewhere, and supporters can't find anything without emailing the comms lead. The build below addresses all three from the start, so the site scales as the organization grows.
Step 1: Choose a platform
WordPress.org (self-hosted) is the right choice for most nonprofits. Around 43% of all websites run on it, the core software is free, the plugin ecosystem is the largest of any CMS, and almost every web developer (paid or volunteer) knows it.
Avoid WordPress.com (the hosted variant) unless your nonprofit is tiny and you'll never need a custom plugin. The free tier doesn't allow most of what this guide covers, and the paid tiers cost more than a comparable self-hosted setup. Squarespace, Wix and Shopify are simpler to start with but harder to extend as the organization grows. Joomla and Drupal are powerful but the developer pool is smaller.
The rest of this guide assumes WordPress.org. If you're still weighing the trade-offs of cost, security and accessibility, our WordPress for nonprofits guide covers them in depth.
Step 2: Set up your domain and hosting
Your domain is the address supporters will type, share and remember. Two practical decisions matter here.
Domain extension: .org vs .com
For nonprofits, the `.org` extension carries trust. Donors associate it with charitable status, and search engines treat it as a credible signal. Register the `.com` variant too if it's available, and point it at the same site to catch traffic from people who guess wrong.
Hosting choice
Two reasonable paths:
- Managed WordPress hosting (Kinsta (our recommendation), WP Engine, Pressable). The host handles backups, security, updates and performance. Costs more, but you'll never spend a Saturday morning fixing a broken plugin update.
- Standard shared hosting with a one-click WordPress installer (SiteGround, Bluehost, GreenGeeks). Cheaper, but you take on more of the maintenance yourself.
For nonprofits without a dedicated technical volunteer, managed hosting is worth the extra cost. Most managed hosts also offer nonprofit discounts on application. Our discounted software for nonprofits roundup covers similar discounts across the rest of the stack.
Once you've signed up for hosting, the host will usually install WordPress for you in one click. If they don't, the official WordPress installation guide covers the manual process.
Step 3: Plan your site structure
A nonprofit website usually needs the following pages, give or take:
- Home. Mission in one sentence, primary CTA (usually Donate), three or four high-level "what we do" panels, links to deeper content.
- About. The story, the team, the financials, the board.
- Donate. Donation form, recurring donation option, impact statements ("$25 funds X").
- Programmes or impact. What the organization does day to day, with real outcomes.
- Events. Upcoming events, past events, signup forms.
- Volunteer. What roles exist, how to apply, what's expected.
- Resources. The searchable document library (see Step 7). Annual reports, board minutes, policy documents, donor packs.
- Blog or News. Regular updates, impact stories, fundraising appeals.
- Contact. Phone, email, physical address, contact form.
To create each page in WordPress:
- Go to Pages → Add New in the WordPress dashboard.
- Give the page a title (e.g. "About").
- Add a short paragraph of placeholder content so the page isn't empty.
- Click Publish. The page is live, ready to be filled in properly later.
Then build the main navigation:
- Go to Appearance → Menus (classic themes) or Appearance → Editor for block themes.
- Create a new menu, name it "Main Menu", and tick "Primary navigation" as the location.
- Add the pages above in the order Donate-first or Donate-prominent.
- Save the menu.
The five-second rule applies to the donate button: a first-time visitor should be able to spot the Donate CTA within five seconds of landing on the homepage. Put it in the main nav, make it a contrasting colour, and don't bury it under a slider.
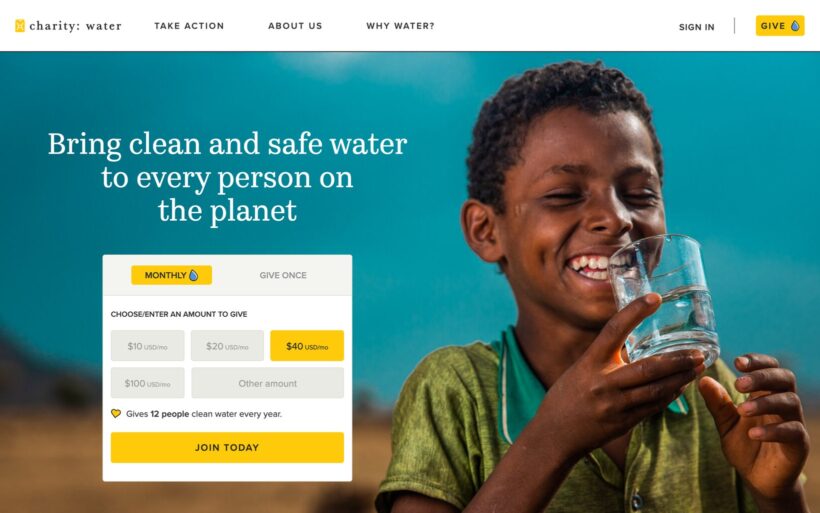
The charity: water homepage above is a good real-world reference. The main navigation is short (Take Action, About Us, Why Water?), the Give button sits prominently in the top-right corner of every page, and the donation form is inline on the homepage so a first-time visitor can give without an extra click.
Step 4: Choose a theme
A WordPress theme controls how the site looks. For a nonprofit, look for:
- Mobile-responsive design. Most donations come from phones now. The theme must render the donate page correctly at every screen width.
- Fast page load. Heavy themes with animation libraries kill conversion rates on slow connections. Aim for sub-3-second load times.
- Accessibility-friendly markup. Many countries require nonprofit websites to meet accessibility standards (WCAG 2.1 AA is the common benchmark). Themes that advertise accessibility compliance save you a lot of remediation work later.
- Block-editor compatibility. WordPress is moving toward block-based themes with `theme.json`. Picking a block-friendly theme now avoids a migration in two years.
Free themes from the WordPress.org directory work well for most nonprofits. Good starting points: Astra, Kadence, and the default Twenty Twenty-Five. Premium themes like GeneratePress Premium and Blocksy Pro add design flexibility for the cost of a one-off licence. Skip themes from marketplaces like ThemeForest where ongoing support is patchy.
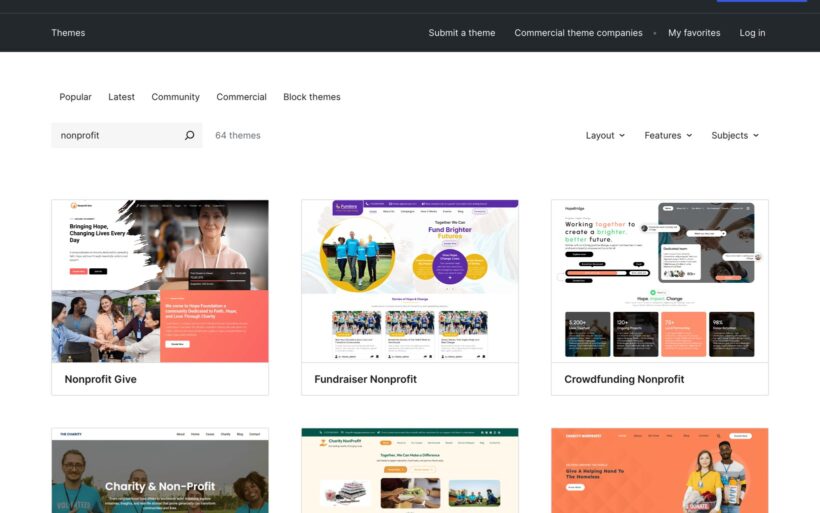
If you want a theme built specifically for nonprofits, the WordPress.org themes directory has 60+ themes tagged "nonprofit" that range from donation-focused single-pagers to multi-section campaign sites.
To install and activate your chosen theme:
- Go to Appearance → Themes → Add New Theme in the WordPress dashboard.
- Search for the theme by name (e.g. "Astra"), hover over it, and click Install.
- Once installed, click Activate.
- Use the theme's own onboarding flow (most modern themes include a guided setup wizard) to import a starter template that's close to what you want.
Step 5: Customize your branding
The branding work is where a small nonprofit can punch above its weight. The three things that matter:
- Logo. If you don't have one, the Canva for Nonprofits programme gives qualifying organizations the full Pro tier free. Use it.
- Brand colours. Pick three. One primary (used for the Donate button and other CTAs), one secondary (used for accents), one neutral (used for backgrounds and text). Stick to these everywhere.
- Real photography. Authentic photos of beneficiaries, volunteers and programme work outperform stock images by a wide margin. If you don't have a backlog, prioritise getting some during the next event or programme visit.
To apply the branding in WordPress:
- Upload your logo via Appearance → Customize → Site Identity (classic themes) or Appearance → Editor → Styles (block themes).
- Set your brand colours under Customize → Colors or in the block-theme Styles panel.
- Upload your hero photography to the Media Library (Media → Add New) so it's ready to drop into pages.
Accessibility is part of branding too. Check colour contrast (any text on coloured backgrounds needs a 4.5:1 contrast ratio for body copy), include alt text on every image, and avoid relying on colour alone to convey information.
Step 6: Optimize for SEO
A nonprofit website that doesn't rank for its own name and cause is invisible. Three SEO basics cover most of the territory:
- Install Yoast SEO (the free version is enough). It handles page titles, meta descriptions, sitemaps and structured data. Set a clear, keyword-rich title and meta description for every page.
- Internal linking. Every blog post and content page should link to two or three related pages on your site. This helps both readers and search engines navigate the content.
- Image compression. Compress every image before uploading (TinyPNG for one-off compression, ShortPixel for an automated WordPress plugin). Faster pages rank better and convert better.
To install Yoast SEO:
- Go to Plugins → Add New Plugin.
- Search for "Yoast SEO", click Install Now, then Activate.
- Run the configuration wizard at Yoast SEO → First-time configuration, which sets up the basics (site representation, social profiles, sitemap).
- For each new page, scroll down to the Yoast SEO panel below the content editor and fill in the focus keyphrase, SEO title and meta description.
If your nonprofit qualifies for the Google for Nonprofits programme, the Ad Grants component gives you up to $10,000/month of free Google Ads spend. It takes some work to set up and maintain (the campaigns have to meet activity thresholds) but for many nonprofits it's the largest single source of inbound traffic.
Step 7: Build a donation form and a resource library
This is the step that does the most work for the organization. The donation form takes money in. The resource library makes documents available to the people who need them. Most nonprofits set up the donation form and stop there, which leaves a lot of the website's value unrealised.
7a. Add a donation form with WooCommerce Product Options
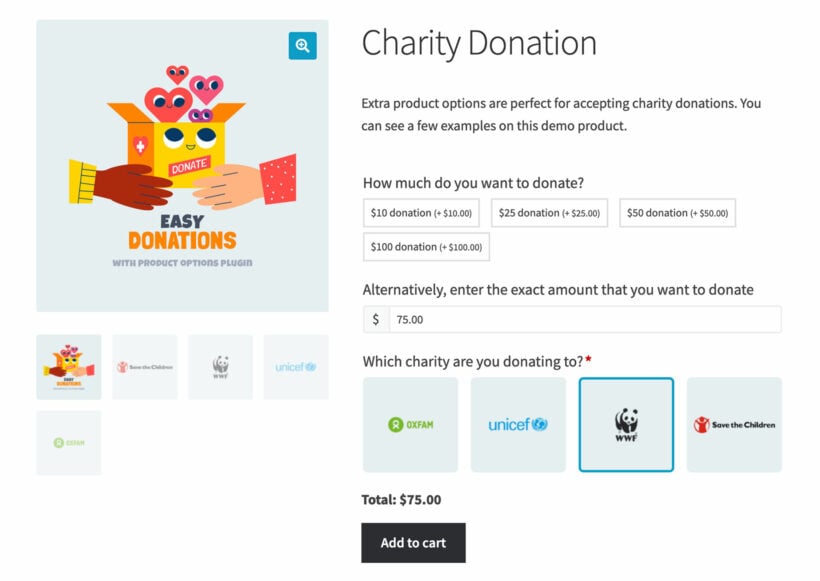
A modern donation form gives donors three things: a few suggested amounts, a custom amount field for donors who want to give a different sum, and a recurring option so they can convert to a monthly supporter with one click.
The most flexible way to build this on a WordPress site is with WooCommerce plus WooCommerce Product Options (WPO). WooCommerce handles the payments, the order records and the receipts. WPO turns a standard product into a tailored donation form with suggested amounts, a custom amount field, recurring options and even a cause selector if you support multiple campaigns. You can see this exact pattern on the WPO charity donation demo.
To set this up:
- Install WooCommerce. Go to Plugins → Add New Plugin, search for "WooCommerce", install and activate. Run the WooCommerce setup wizard to add your nonprofit's address, currency and payment methods.
- Install WPO. Buy the plugin from the WooCommerce Product Options page, download the zip, then go to Plugins → Add New Plugin → Upload Plugin to install. Add your licence key to activate updates. Full instructions are in our knowledge base article on installing WooCommerce Product Options.
- Create the donation product. Go to Products → Add New, name it "Donation", set the price to 0, and publish.
- Add the donation options. Open the new product and scroll to the WooCommerce Product Options panel. Add a radio button field with options $25, $50, $100, $250, $500 (each with the matching price adjustment). Add a text field for custom amounts with a per-unit price adjustment of 1. Optionally add a radio button for "Donate monthly" if you've installed a subscriptions extension. See creating product options for the full walkthrough.
- Place the donation form on your Donate page. Edit the Donate page, drop in a WooCommerce product block, select the donation product, and publish. See displaying product options for layout options.
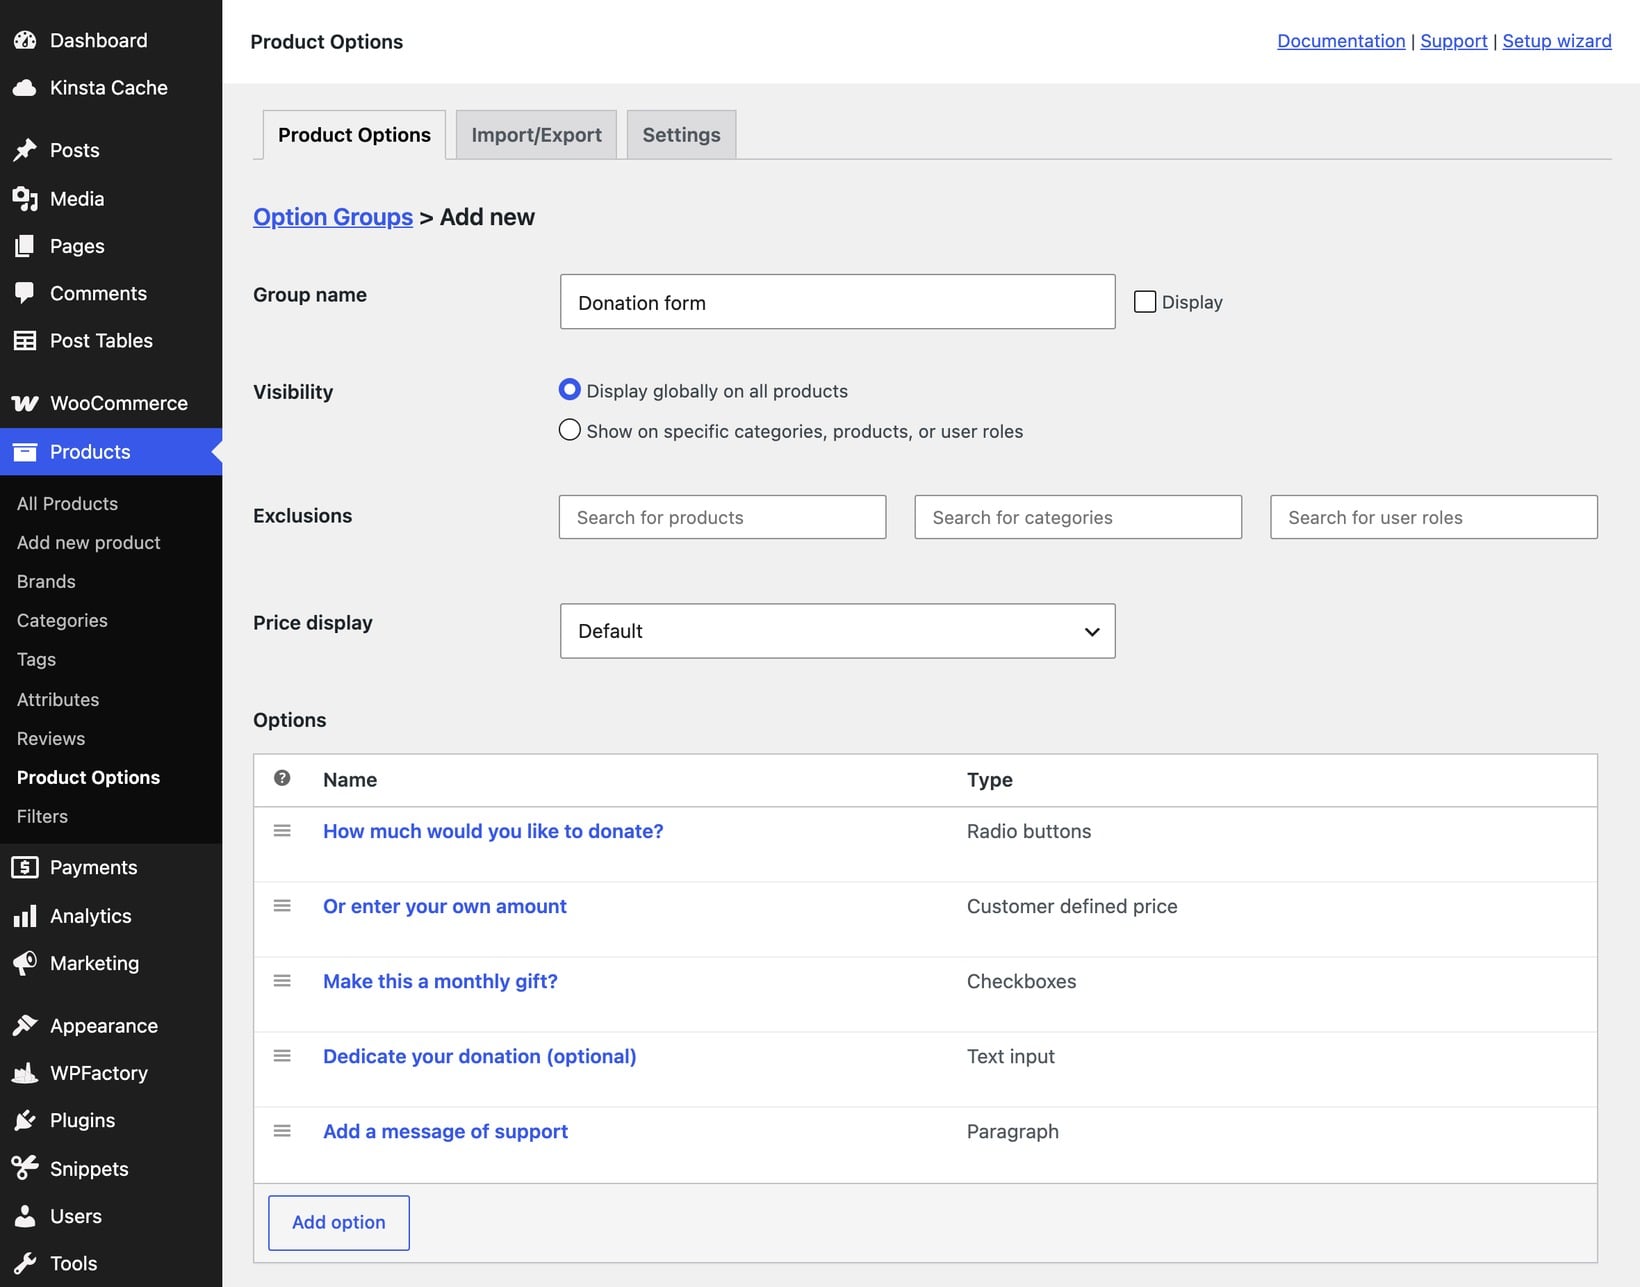
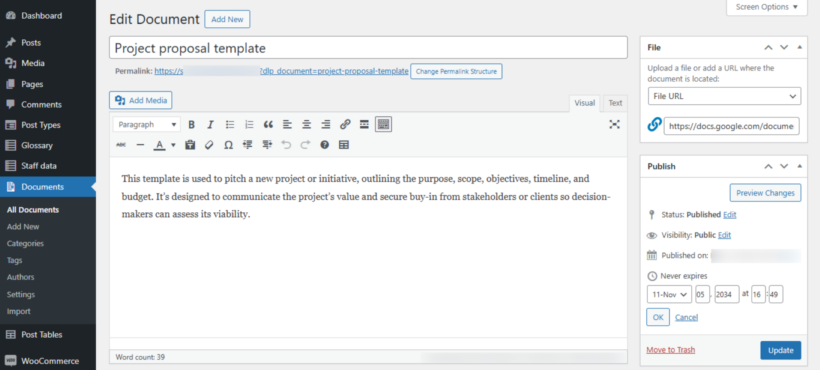
The screenshot below shows the donation form set up in the WooCommerce Product Options backend. Each row is one field the donor sees, and the Type column shows the field type. I used radio buttons for the suggested amounts, a customer-defined price field for custom amounts, and a checkbox for recurring monthly gifts.
Compared to standalone donation plugins, the WooCommerce route gives you donor records, repeat-buyer reports and tax-receipt automation for free. If you'd rather use a dedicated donation plugin, our GiveWP alternatives roundup compares the current options.
7b. Set up a resource library with Document Library Pro
Every nonprofit accumulates a steady pile of documents that supporters, donors, board members and the public all need access to. Policies, annual reports, white papers, board meeting minutes, grant applications, sponsorship packs, brand assets, volunteer handbooks.
A WordPress document library plugin turns the Resources page into a searchable, filterable archive. The most popular layout is a sortable table with columns for the document title, category, date and a download link, which is what most readers will expect to see. If your nonprofit landed on Squarespace, Wix or Shopify rather than WordPress, you can still add the same library: Document Library Pro also comes as a cloud version you build once and embed on any website, plus a Shopify app for stores.
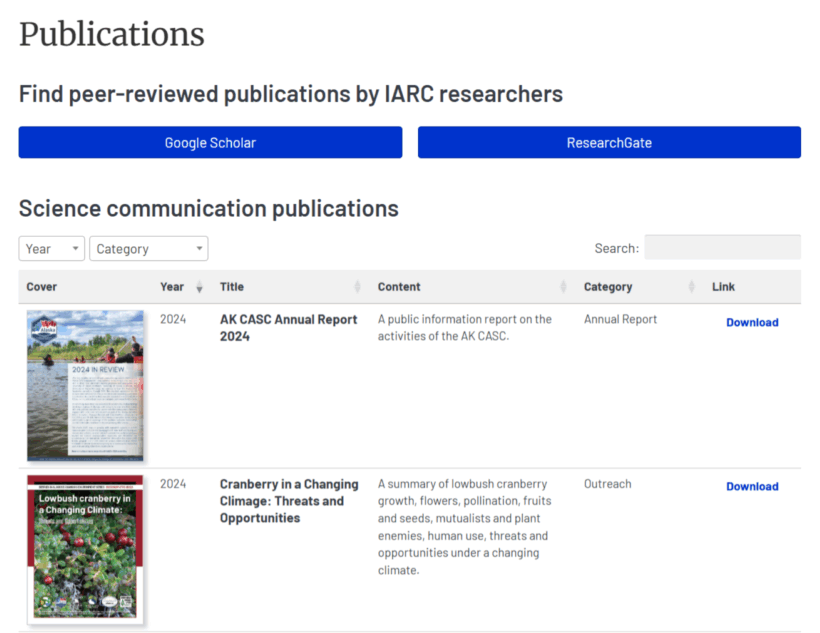
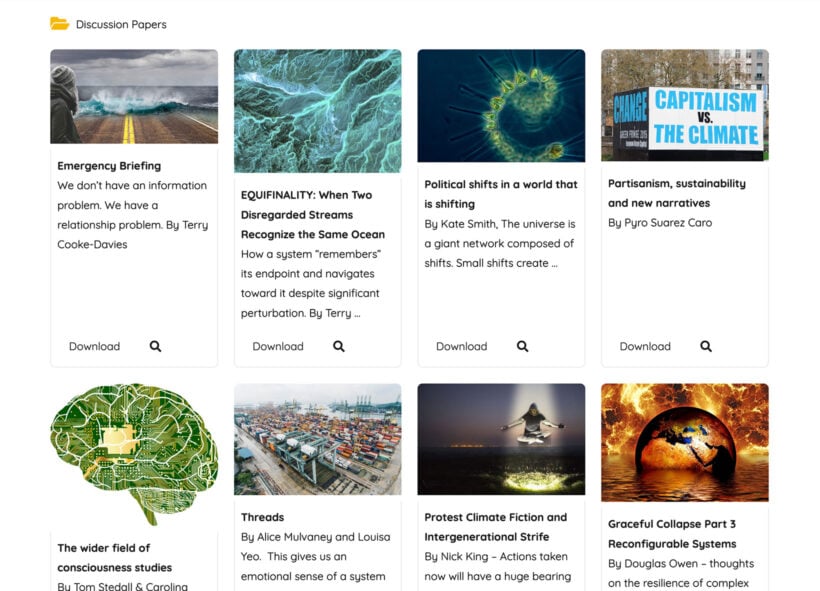
You can also display the library as a card-style grid with folder navigation, which works well for visual asset libraries (logos, brand graphics, photo collections) where the thumbnails carry information.
To set this up:
- Install Document Library Pro. Buy from the Document Library Pro page, then upload the zip via Plugins → Add New Plugin → Upload Plugin and activate. Add your licence key. Full setup instructions are in installing and setting up Document Library Pro.
- Add your documents. Go to Documents → Add New, give the document a title, upload the file, fill in the categories and any custom fields. Repeat for each document, or bulk import a folder using the CSV/folder import tools described in adding and importing documents.
- Create the library page. Add a new page called "Resources" (Pages → Add New), then insert the Document Library block or shortcode. The plugin defaults to a table layout. To switch to a grid or folders layout, configure the display settings as described in displaying documents.
- Set access rules where needed. Public-facing materials (annual reports, brand assets, supporter packs) stay open to anyone. Donor-only documents (named-gift letters, major-donor briefings) sit behind gated content rules tied to user roles.
Five real organizations show how they built libraries like this in our WordPress nonprofit resource library examples roundup.
The donation form and the resource library together cover the two transactional surfaces a nonprofit website needs. Most templates and tutorials only address the donation half; the document library is the differentiator.
Step 8: Add essential pages and content
With the structural plumbing in place, the content side becomes the focus. Open each page from Step 3 in turn (Pages → All Pages → Edit) and fill it in. A few priorities:
- About / mission. Tell the story of why the organization exists, what it does, and who it serves. Real photos, real names, real outcomes wherever possible.
- Impact stories. Two or three short case studies of people or projects the organization has helped. Donors give again when they see the impact of their first gift.
- Events. Upcoming fundraisers, volunteer days, awareness events. A simple events plugin handles the calendar; the donation form handles the ticket sales.
- Volunteer signup. A short form (name, email, areas of interest, availability) and a quick description of how the team handles new volunteers.
- Blog or news. Regular content (one post a fortnight is a sustainable rhythm for most small nonprofits) covering impact stories, fundraising appeals, and updates from the team. Each post pulls double duty as SEO content and as material for the social media toolkit you'll share with supporters.
To add a blog post, go to Posts → Add New, write the post, set a featured image and a category, then publish. The official working with posts documentation covers the full editor.
For ongoing fundraising ideas to fill the content calendar, our easy fundraising ideas and cheap fundraising ideas guides cover formats that work well for small teams. Our donor gifts guide covers the post-donation retention side.
Step 9: Test and launch
Before going live, run through a short checklist:
- Test the donation form with a real (refundable) transaction. Make a $1 donation through every payment method you support. Confirm the receipt email arrives and the donation shows up in your admin.
- Check every link on the homepage and main pages. Broken links are the most common preventable launch-day embarrassment.
- Test on mobile. Open the site on at least two different phones. Check the donate flow, the resource library and the main navigation.
- Run an accessibility scan. Free tools like WAVE or Lighthouse catch most common issues. Use the free Accessibility Checker plugin to make sure each part of your nonprofit website is fully accessible. Fix the AA-level ones before launch; treat AAA issues as ongoing work.
- Set up a backup. Automated daily backups with off-site storage. Free options include UpdraftPlus; managed hosts usually include backups in the plan.
- Install a security plugin. Wordfence or Sucuri's free tier handles the basics: login lockouts, malware scans, firewall rules.
Once the site is live, announce the launch through every channel you have. Email the supporter list, post on every social platform, and ask the board to share with their networks. The first week's traffic is the best chance you'll have to capture early donations from people who are already familiar with the cause.
Frequently asked questions about building a nonprofit website
How much does it cost to build a nonprofit website?
On WordPress with a free theme and free plugins, the running cost is just the domain ($10-15/year) and hosting ($120-500/year depending on managed vs shared). Add $69-$300/year for premium plugins (donation form, resource library, security) if you want the full feature set. Total: most small nonprofits can run a capable site for under $500/year.
How long does it take to build a nonprofit website?
Working through this guide sequentially, a single person with no prior WordPress experience can have a working site live in two to three weekends. Adding all the content and polish typically takes another two to three weeks of evening work. A nonprofit with a small volunteer team can do it in less.
Do I need a developer?
For the build covered here, no. WordPress with a modern theme and a small set of plugins covers everything in the steps above without writing code. You only need a developer if you want custom design work, custom integrations, or major theme modifications.
Can I migrate my existing nonprofit website to WordPress?
Yes. Content migration tools handle imports from most major platforms (Squarespace, Wix, Joomla). The donation history won't migrate cleanly (donor records typically need to be exported and reimported manually), so plan that side of the move carefully.
Should I use WordPress.com or WordPress.org?
WordPress.org (self-hosted) for almost any serious nonprofit website. WordPress.com's free and lower-paid tiers don't support most of the plugins covered in this guide. Our WordPress for nonprofits guide covers the differences in detail.
What if I'm a membership-based nonprofit or association?
The structure is similar, but you'll also need a members area, recurring billing, and member-only resources. Our WordPress for associations guide covers that variant of the build.
Final thoughts
A nonprofit website is one of the highest-leverage investments a small organization can make. The setup work is real, but the running cost is low and the payoff compounds for years. Donations, volunteer signups, document distribution, brand reach: all of it flows through the site you build now.
The combination that distinguishes a Barn2-style build from the typical template-driven approach is the resource library alongside the donation form. Most nonprofits leave that half of the equation on someone's Google Drive. Putting it on the live site, properly searchable and access-controlled, turns the website into a genuine operational tool rather than just a brochure.
Still deciding between platforms? Read our pros-and-cons breakdown of WordPress for nonprofits before you start. Ready to build? Pick the donation form and resource library plugins below and start with Step 1.