How to create a document gallery in WordPress

Do you want to display documents in an organized manner on your WordPress website? In this step-by-step tutorial, I'll show you how to create a functional and visually appealing document gallery within a few minutes using the best document gallery WordPress plugin — even if you don't have any technical expertise.
Are you looking to add a document gallery to your WordPress website?
Creating a WordPress document gallery is an effective way to showcase PDFs, Excel files, docs, images, audio, videos, and other file types in an organized and easy-to-browse format on your website.
The best way to add a document gallery to WordPress is to use the Document Library Pro plugin. This is a lightweight and user-friendly yet advanced plugin that lets you create feature-rich document galleries that look like this:
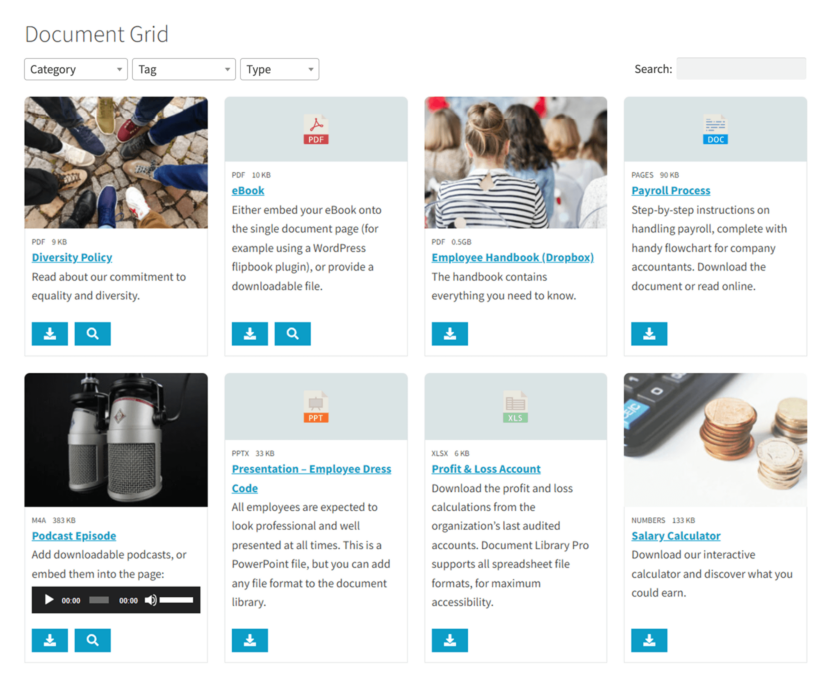
The plugin is is super easy to use, even if you're a WordPress newbie with no technical skills. In addition, it works for various use cases, so you can use it to add the document gallery functionality to any type of WordPress site.
Later in this tutorial, I'll walk you through the steps to configure and tweak the plugin from scratch and create a fully-fledged document gallery on your WordPress site.
Do I need a WordPress document gallery plugin?
Now, you may be wondering: can't I upload files to my WordPress website without using a document library plugin? Yes, you can.
WordPress is a robust and powerful content management system that enables website owners to create and publish content easily. However, it doesn't include a built-in feature that lets you create galleries and display documents in an organized manner.
There are some limitations to uploading files directly to WordPress without using a document gallery plugin:
- By default, WordPress doesn't accept some file formats. If your file isn't in an accepted file type or format, you won't be able to upload it to your site.
- Files may be scattered throughout your website, making it difficult to find the ones you need quickly and easily.
- The files may not be displayed in a visually appealing way; if you're uploading files to a business website, this may look unprofessional.
That's exactly why we built Document Library Pro, the best WordPress document management plugin.
Why is Document Library Pro the best document gallery WordPress plugin?
There are several document library plugin options with lots of great features to choose from. So, what makes Document Library Pro the absolute best document gallery WordPress plugin? Three major reasons:
- We custom-built this plugin based on specific feedback, guidance, and requests from thousands of customers. This means we packed it with all the crucial features a great WordPress document management plugin should have from day one.
- We launched the first version of the plugin a couple of years ago, and we've been fine-tuning it to perfection since then. We regularly add new features based on customer requests to enhance it even further.
- While the plugin is easy to use, there's plenty of detailed documentation to guide you on how to make the most of it. And in case you get stuck at any point, our world-class support team will happily assist you.
Curious to know more about Document Library Pro? Here are the top features customers requested that we build into this document library plugin:
Support for any file type
One of the most significant features of Document Library Pro is its file management capabilities. It supports an endless number of file types. So, whether you need to create an audio library or video gallery, upload or embed WordPress PDFs, docs, Word documents, Excel spreadsheets, PowerPoints, images, templates, digital assets, this document library plugin can handle it all.
You can host your files in the WordPress Media Library or on external sites like Dropbox and Google Drive, giving you the flexibility to create galleries and manage your content the way you want.
Versatile display options with table and grid layouts
The plugin lets you create a main WordPress page to showcase the document gallery or list documents anywhere on your site (for example, on the side bar or footer) using a shortcode. You can choose between two layouts — table and grid — to showcase your files.
The table layout provides a tabular view of multiple columns of information, while the grid layout displays files and thumbnails in a tile-based view. Both layouts include sorting and filtering options that look great on your website's front end and can be further customized to match your brand's style.
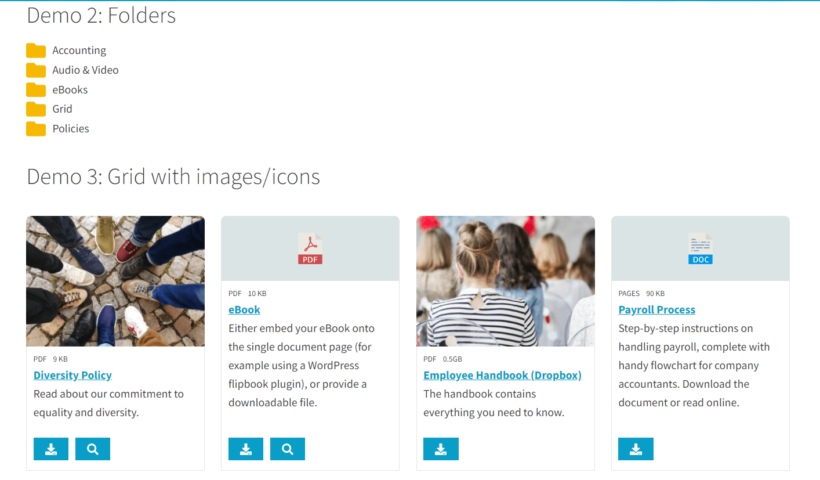
Multiple "view" types
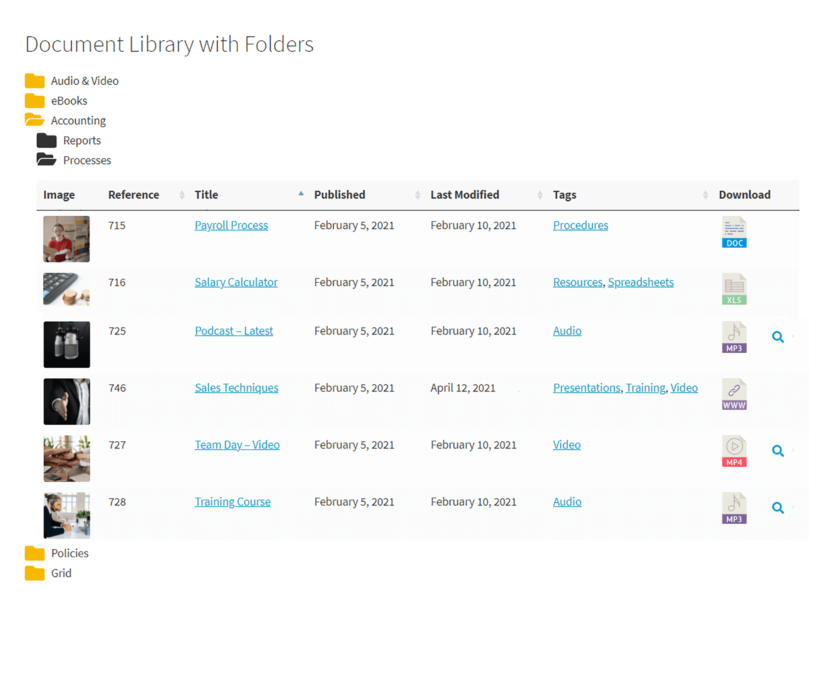
Document Library Pro offers a range of display options to organize and view your files on the front end of your website. For instance, you can display files in a single list or create collapsible folders with nested sub-folders in a collapsible category-based tree layout. This makes it easy for users to sort through and find the information they need.
Here's a snapshot of the collapsible category-based tree layout (using the table view):
Extensive filters and options
Organizing documents in a user-friendly, efficient, and accessible way is essential to document management. Document Library Pro's extensive filtering options let you easily categorize, tag, and filter documents. It includes an instant search box above each document list to quickly find specific files by entering keywords or phrases.
In addition, you can add multiple filter dropdown lists, categorize files based on tags, categories, or custom taxonomy, and filter documents based on specific criteria to ensure that you quickly locate what you need.
Customizable appearance to match website design
Document Library Pro plugin is a highly responsive gallery plugin, and easily adjusts to fit your website's appearance and design. It's compatible with any WordPress theme, adapts to your brand's style, and includes flexible styling options to ensure your document library looks fantastic. Furthermore, it can be used on any type of website — blogs, portfolios, and e-commerce sites, etc.
Lots of advanced features for adding and managing documents in the gallery
Document Library Pro is a powerful WordPress document management plugin packed with more than 50 useful features, such as:
- Buttons with download links so users can view and download files from the document gallery
- Preview buttons that allow users to view gallery items in a lightbox without downloading them
- Bulk import options, including dragging and dropping files straight into the gallery
- Version control to help you keep track of changes to documents.
- Many more
Note: Head to the dedicated plugin page to check out the complete document gallery feature list and demo.
How do I create a document gallery in WordPress?
Let's look at the steps to create a WordPress gallery from scratch:
Installing the Document Library Pro plugin
The installation steps are similar to any other premium WordPress plugin:
- Get the Document Library Pro plugin.
- Download the plugin's zip files from the order confirmation page or email.
- Navigate to "Plugins" → "Add New" within your WordPress admin dashboard.
- Upload the plugin's zip file you just downloaded. Select "Install" → "Activate".
Configuring the plugin's general settings
We created Document Library Pro to work for virtually any use case. The settings you choose will vary depending on your preferences and use case. So, I won't give you specific instructions on options to select while configuring it. Check the plugin configuration knowledge base for a detailed explanation of what each option means.
After you've installed and activated the plugin, it's time to configure its general settings before you can create galleries. There are two ways to do this:
Method 1: Via the setup wizard
The setup wizard opens up as soon as you activate the plugin. The wizard includes a series of screens with step-by-step instructions to guide you with the setup process and configure the plugin's main settings. To relaunch the setup wizard after closing it, go to "Documents" → "Settings" → "General" → "Setup Wizard".
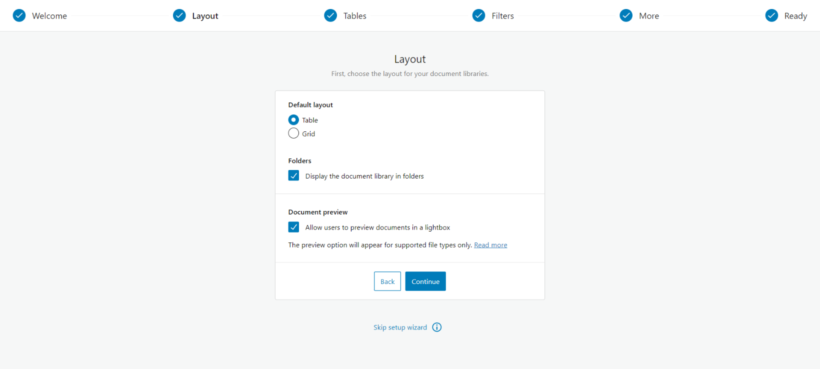
Method 2: Via the plugin settings page
If you choose not to use the setup wizard, you can navigate to "Documents" → "Settings" → "Document Library Pro" → "General" to tweak the plugin settings as you prefer. Follow the plugin configuration knowledge base for a detailed explanation of each option.
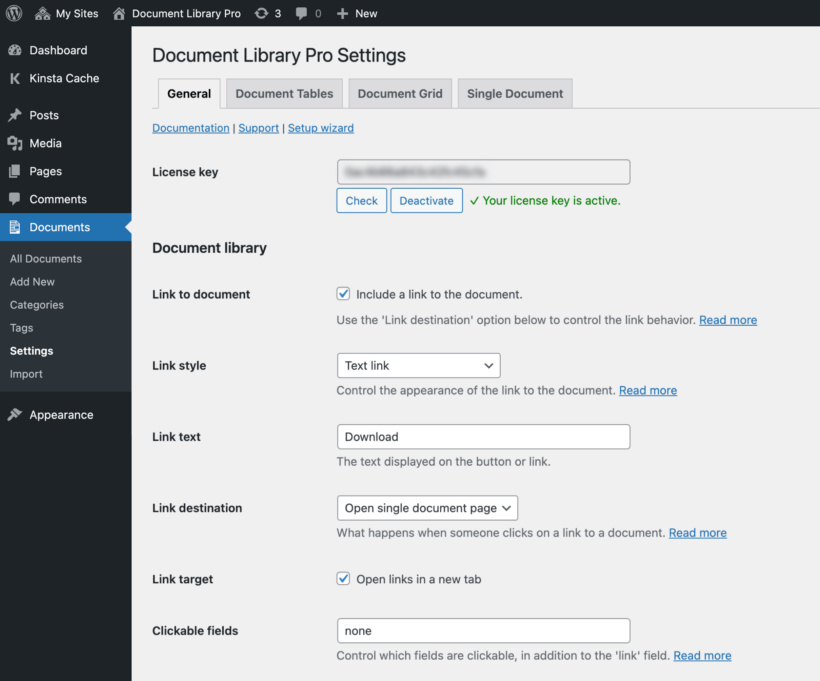
Setting up the Document Library Pro plugin
I'll cover how to add files to your new gallery in the next section. First, let's discuss how to structure your documents in an organized system so that it's easy to find them when needed.
There are two fundamental options to structure and organize files using the plugin: document categories and document tags. Let's look at these options in more detail:
Document categories
The document category option is similar to the post categories in WordPress, which lets you create parent and child categories for various post types. You can create categories, and nest subcategories within them using a hierarchical structure.
Here are the steps to create a new document category
- Navigate to "Documents" → "Categories" within your WordPress dashboard.
- Type in the category name, URL slug, and a short description.
- Click on the "Add New Category" button.
- Repeat the same steps as needed.
To create a new document subcategory
- Navigate to "Documents" → "Categories" in your WordPress admin dashboard.
- Type in the category name and URL slug.
- Select the parent category to assign the subcategory from the dropdown list.
- Type in a short description.
- Click on the "Add New Category" button.
- Repeat the steps as needed.
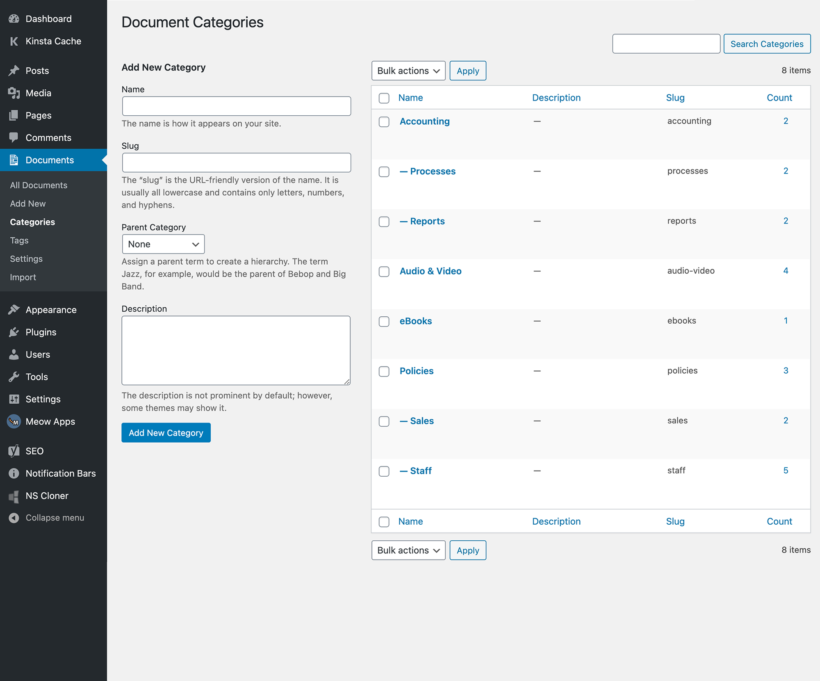
Document tags
The "document tags" option is similar to the "blog posts tag" option, which lets you add labels to files. You can add various tags, such as document year, publisher, topic, type, and anything else, etc., to help you find them quickly when needed.
Here are the steps to create a new document tag
- Navigate to "Documents" → "Categories" within your WordPress dashboard.
- Type in the tag name, slug, and description.
- Click on "Add New Tag".
- Repeat the same steps as needed.
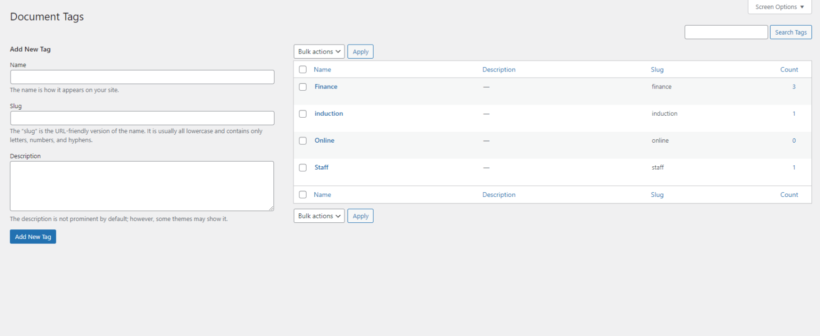
Uploading and adding documents to the library
After you've configured the Document Library Pro's settings, it's time to start adding files to your WordPress gallery. You can choose to simply display the files, or add a download link.
There are five key ways to add documents using Document Library Pro. You can:
- Upload documents manually
- Drag and drop documents
- Add files from your Media Library
- Link to files hosted externally
- Bulk CSV import
I've covered each method with step-by-step tutorials below. Check out the knowledgebase documentation guide for more information, if needed.
Method 1: Upload documents manually
If you want to upload files one at a time, this method is for you. Here's the step-by-step guide on how to manually upload documents to be displayed on a WordPress page:
- Head to "Documents" → "Add New" in your WordPress admin dashboard.
- Add the file name, media, description, slug, and other required details.
- Select the appropriate categories and tags from the bottom right corner.
- Select "File Upload" from the "Document Link" tab in the top right-hand corner.
- Select "Add File".
- From the page pop-up, click "Upload Files" → "Select Files".
- Choose the document you want to upload and select "Add File".
Method 2: Drag and drop documents
Use this method if you want to upload multiple files at a time to your WordPress site:
- Navigate to "Documents → Import" within your admin dashboard.
- Drag and drop files within the "Drag and drop file upload" section.
- Go to the "All Documents" section to individually update file name and other details for the uploaded documents.
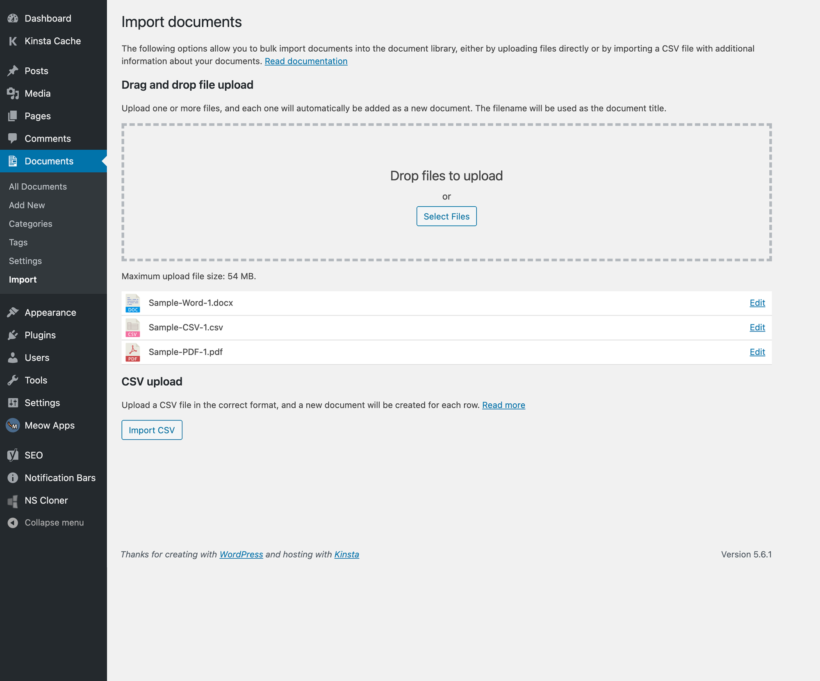
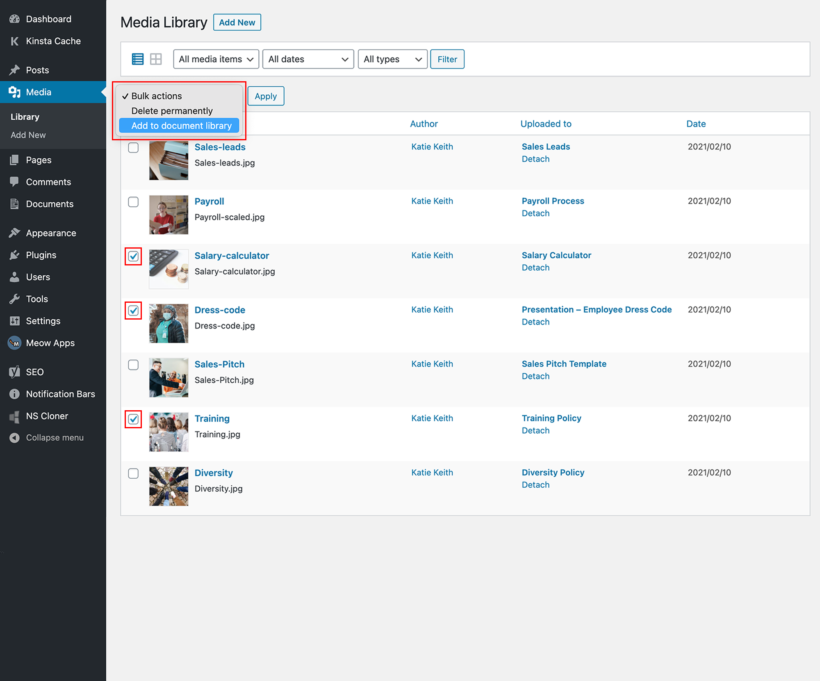
Method 3: Add files from your WordPress Media Library
Use this method if you've previously uploaded files to your Media Library and want to add a document gallery to a WordPress page:
- Navigate to your WordPress Media Library within your WordPress admin dashboard.
- Change the view from "grid" to "list" in the top left corner.
- Select the media files you want to add to your document gallery.
- Open the "Bulk actions" dropdown, select "Add to document library", and click "Apply".
- Click on the link within the Success message popup to add details such as categories, tags, and so on.
Method 4: Link to files hosted externally
Use this method to embed and display files hosted on external platforms like Google and Dropbox on a web page on your website:
- Go to "Documents" → "Add New" within your WordPress admin dashboard.
- Add the document name, media, description, slug, categories, tags, and other required details.
- From the "Document Link" tab in the top right corner of the page, click on "a custom URL".
- Enter the link and click on the "Add File" button.
Note: Your website visitors won't be able to preview files hosted externally before downloading them.
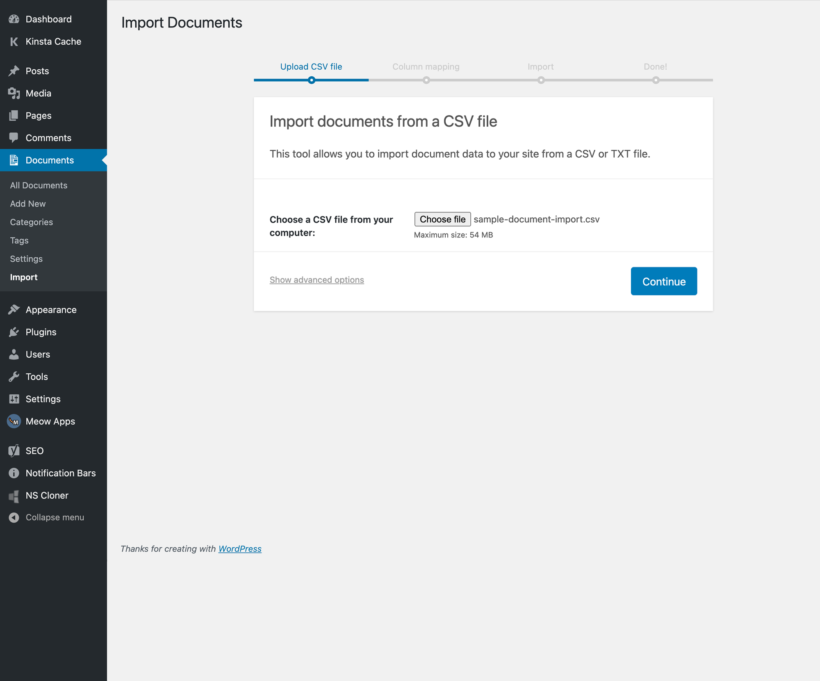
Method 5: Bulk CSV import
This method is a bit complicated, so I've added a link to the knowledgebase article with more details if needed. Here's the step-by-step guide to bulk-import CSV files:
- Add all the document details, such as URL, category, tags, document authors, etc., to a new CSV file.
- Go to "Documents" → "Import" → "Import CSV" within your WordPress dashboard.
- Click on "Choose file" → "Continue".
- Match the columns from the CSV file to the custom post-type fields on the "Map CSV fields to documents" page.
- Click on the "Run the importer" button.
- After the documents are imported, you'll see a success message popup with a link to edit the documents if needed.
Choosing the right layout for your WordPress document gallery
Document Library Pro lets you choose from two user-friendly layout options to control how your documents are displayed on the web page: grid and table. You can select the global default layout on the settings page. Although, if you create galleries using shortcodes, you can choose different layouts for each gallery while setting it up.
I'll cover both layouts in more detail in a bit. But first, let's look at how to decide between the two options.
Factors to consider when selecting a layout
When creating a document gallery on your WordPress site, selecting the right layout can make all the difference in the user experience (UX). Here's what to consider before choosing between the grid and table designs:
- The number of documents: A grid layout may be more visually appealing if you want to display a smaller number of documents. However, if you have a large number of documents, I recommend using a table layout as it allows users to view multiple files at once without having to scroll through a long list — making it more efficient.
- Type of documents: If you have documents with images or visual elements, a grid layout better showcases those elements. On the other hand, a table layout may be more effective if you have files with multiple columns of information.
- Target audience preferences: A table layout may be the best choice if your website users are more data-driven and prefer a structured design. A grid layout may be more appropriate if your audience is visually oriented and prefers a more intuitive interface.
- Website design and theme: Your document library should look like a natural extension of your site rather than an add-on that seems out of place. Choose the layout that fits most seamlessly with your website's overall look and feel.
Grid
The grid layout displays documents in a tile format, similar to a Kanban board.
Here's a screenshot of how the grid layout looks like:

Benefits of using the grid layout
- Visually appealing presentation: This layout is excellent for showcasing thumbnails and visually-driven content, such as design portfolios or image-heavy catalogs.
- Focus on document images and titles: The grid layout emphasizes the document's featured image and title and showcases a fixed number of fields for each file.
- Suitable for smaller collections or specific categories: This layout is perfect for displaying a small number of files. Also, you can structure the document gallery into categories using the "Folders" option, so your website visitors can only see documents from one category at a time.
Table
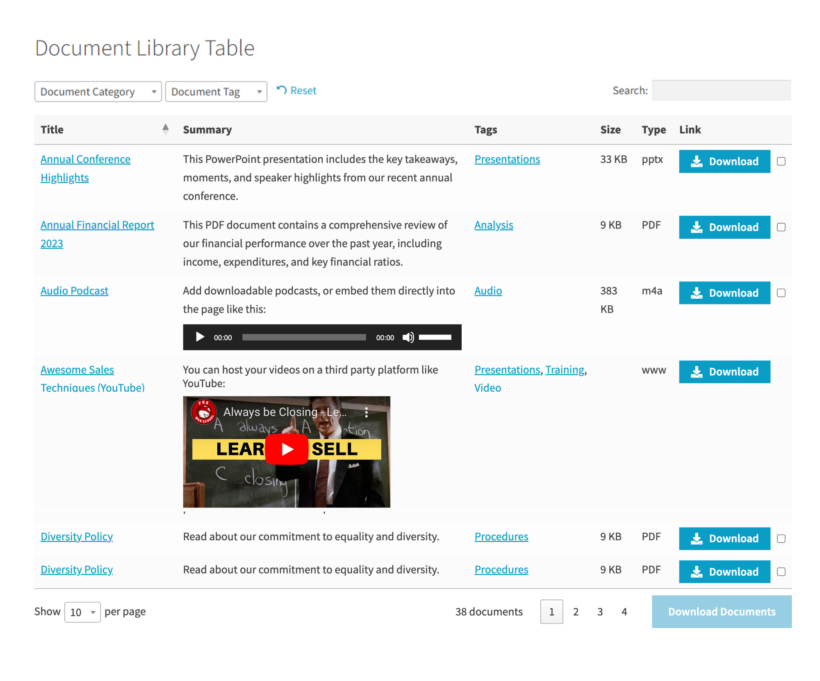
The table layout is the default setting for WordPress galleries created with Document Library Pro. It displays documents in a searchable table format.
Here's a screenshot of how the table layout looks like:
Benefits of using the table layout
- Easiest navigation for users: The table layout displays documents in a tabular format with multiple columns of information, making it easy to view important details at a glance.
- Searchable and sortable columns: You can use a variety of sorting options to control the order in which files are displayed. Also, you can add clickable column headings to make it easy for your site's visitors to sort the document gallery.
- Filter dropdowns above the document gallery: You can add advanced search options and filter dropdowns for categories and tags to help visitors to find specific documents quickly and easily.
- Display of detailed document information: This layout is perfect for listing many files. Plus, you can easily add and display advanced data about each document, such as custom fields and taxonomies.
Ready to build your WordPress document gallery?
Whether you want to display media files such as audio, videos, PDFs, Word docs, or any other type of document, creating a WordPress document gallery is an effective way to organize and showcase content on your website's front end.
Document Library Pro is the best document gallery WordPress plugin to help you quickly and easily create a beautiful and functional document gallery, even without technical expertise.
It's packed with tons of essential features, such as the ability to upload various file formats, organize documents with versatile layouts, categorize and filter files, allow your site's visitors to view documents in a lightbox without downloading them, and much more, making it the top choice for enhancing your WordPress website.
Document Library Pro comes with grid and table layouts which are great for showcasing files in a user-friendly way while allowing users to sort and filter through them. Try out both formats to find the best fit for your website.