Building a dynamic directory: How to display WS Form entries in WordPress

WS Form is quickly growing into one of the most popular WordPress form plugins. That's not surprising given the great team behind it, and the plugin's overall quality and ease-of-use. Today I'll be showing you a neat way to display WS Form entries on the front end of your website.
What you need to know:
- There's a straightforward no-code method to display WS Form entries on your website.
- It's perfect for displaying any type of user-submitted information, such as directories, galleries and events.
- Create a form using WS Form, use a plugin like Advanced Custom Fields or Easy Post Types to store the data in the WordPress database, and then use Posts Table Pro to display WS Form entries in a searchable table.
WS Form is an incredible WordPress form plugin that does a whole lot. It allows you to build all sorts of forms, from the simplest sign-up forms to intricate ecommerce forms and surveys, without needing to hire a developer. It's highly flexible, user-friendly, and packed with customization options, making it a firm favorite among WordPress users.
But today, we'll be exploring a new way to use WS Form. You'll learn how to display form entries in a searchable table on your WordPress site. To make this possible, we'll be teaming up WS Form with the Posts Table Pro plugin.
We'll use a real-life example, WP Speakers' searchable library. This is a free-to-use database of speakers for WordPress meetups, WordCamps, and other WordPress-centric events:
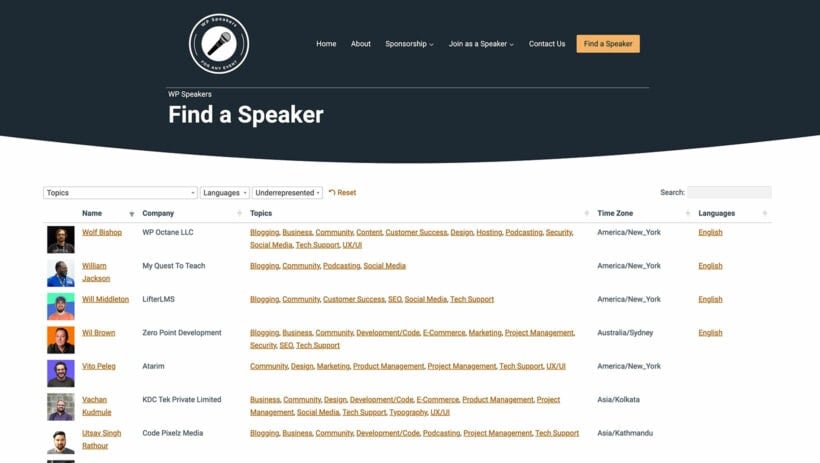
The folks behind WP Speakers followed the steps in this guide to a T, and you'll be able to do the same. Ready to get started? Great, let's dive in.
What type of WS Form data can I display on the front end?
In this tutorial, we'll be looking at how WP Speakers display WS Form data on their website. However, the possibilities are much wider than this one use case.
Here are some more examples about the types of WS Form data you can display:
1. Testimonials and reviews
Collecting and showcasing testimonials or product/service reviews is an excellent way to build credibility and trust. Using WS Form, you could create a form for users to submit their experiences and then display them on the front end using Posts Table Pro.
2. User-generated content galleries
In a creative community, a gallery showcasing user-submitted artwork, photos, or other creative projects could be a vibrant addition to your website. WS Form could be used to gather these submissions, and then you could display them in a dynamic, searchable gallery.
3. Community forums and discussion boards
If you host a forum or discussion board on your WordPress site, using WS Form to gather user-generated content is an excellent choice. Displaying these submissions can help stimulate conversation and community engagement.
4. Crowd-sourced databases
Do you have a crowd-sourced project in mind? Maybe a list of the best local restaurants, hiking trails, or pet-friendly parks? WS Form can collect submissions, and Posts Table Pro can display them as a searchable, sortable database.
5. Event calendars
If your site hosts or promotes events, WS Form could be used to collect event submissions from users. These could be displayed in a searchable calendar or list, helping visitors find events that interest them.
These are just a selection of the ways that you can collect user data and display it on the front end. So why not start exploring the possibilities?
Displaying WS Form entries: Your plugin stack
Before we dive into the specifics, let's quickly go over what plugins you'll need and why you need them.
- Firstly, we have WS Form. It's a versatile form builder plugin that's going to let you create an online form to gather data from the users on your site. Using our case study, WP Speakers, as an example, this is the form that their site visitors fill out to be displayed in the searchable library.
- Next, we have Advanced Custom Fields, also known as ACF. This popular plugin gives your WordPress website the ability to handle extra content fields. It helps you create custom posts and fields that store additional information within your WordPress site. To create custom post types like "Speakers", you'll need the premium version of ACF. If you're looking for a free alternative, you can use the Easy Post Types and Fields plugin instead.
- Lastly, you'll need the Posts Table Pro plugin. This plugin automatically generates and displays dynamic tables listing posts, products, and other custom post types on the front end of your WordPress site.
In case you're wondering why you need both ACF and WS Form, here's the answer: WS Form manages the creation and display of the form fields, while ACF takes care of storing the data submitted by your website users in the backend of your WordPress site. In simple terms, ACF links WS Form and Posts Table Pro, creating a custom post type to save the data collected via the form in your WordPress database.
An example
Continuing with our WP Speakers example, they used the ACF plugin to create a custom post type called "Speakers". Every time a new speaker registers on their site, ACF saves the speaker's data as a draft post in the "Speakers" section of the WordPress admin.
Posts Table Pro then displays the Speakers posts in a searchable directory on the WP Speakers website.
Alright, now that we know what plugins we'll need, let's delve into the steps to set up your searchable directory to display WS Form entries.
Step 1. Use ACF to store the data submitted by users
ACF is a really handy plugin that allows you to add custom fields to your WordPress site. It's super useful when you want to store types of data that don't come as standard with WordPress.
Let's illustrate this by looking at why WP Speakers needed it. They could have used normal WordPress pages or posts to store the information about their speakers. That cuts out a step of the process, as you don't need to create a custom post type. However, that would be messy and the speakers would have been mixed up with their other website content. It's better to have a dedicated 'Speakers' section within the WordPress Dashboard.
Whatever type of user data you're planning to display, it's generally better to create a dedicated custom post type for it.
Related tutorial: How to create custom post types in WordPress (step-by-step)
First, create a custom post type
To do this:
- First, install and activate the premium version of the ACF plugin.
- Go to ACF → Post Types and click 'Add Post Type'.
- Enter a plural and singular label for the post type (e.g. "Speakers" and "Speaker").
- Set the post type to 'Public' and save your changes.
- Select "Save changes" from the top right-hand menu.
Next, you need to create custom meta fields to collect general data about each speaker.
Secondly, create custom fields
Custom fields are extra pieces of data which your users submit. Use these for collecting unique data, such as the person's name and contact details. (Don't use custom fields for data that you want users to be able to sort by, such as their language or location - I'll show you how to do that using taxonomies in a minute.)
- Navigate to ACF → Field Groups.
- Click 'Add New'.
- Enter a name for the field group, for example "Speaker data".
- Now add as many fields as you want to create. For each one, add a label and name, and choose a field type. For example, you would use a Text field to collect basic text-based information.
- Lower down the screen, find the Location Rules tab and select the post type you created a minute ago. This tells ACF to display the new fields on the relevant post type.
You'll also need to create custom fields corresponding to the data you want to collect from the users, like 'Name', 'Topic', 'Bio', and 'Image'. These fields will then be available when creating a new 'Speakers' post.
Create custom taxonomies for storing filterable data
Now, it's time to create taxonomies to categorize and group the user-submitted data. For this tutorial, we want our speakers to be grouped based on the topics and languages they can present in:
- Go to ACF → Taxonomies.
- Click 'Add New'.
- Enter a plural and singular label for each taxonomy.
- Remember to choose the correct post type from the 'Post Type' dropdown.
- Set the taxonomy to 'Public'.
Step 2. Use WS Form to create a form
Next up, we need a way to collect data from users, and that's where WS Form comes in. This plugin lets you create responsive forms that are easy for users to fill out. You need the premium version in order to save the user-submitted data to your custom post type.
- Go to WS Form → Add New.
- Find the 'Post Management' tab and choose the 'Post' template. (Make sure you install the Post Management add-on before doing this.) This automatically creates a form with the essential fields for posts, as well as fields you created with ACF.
- Next, go to WS Form's layout editor and click on the 'Actions' icon.
- Find the 'Post Management' action and click the little gear icon.
- Find the 'Field Mapping → ACF Field Mapping' section and match the form fields to the correct custom field. You should create checkbox options in the WS Form editor for each of the taxonomy terms. For example, if you will have a 'Regions' taxonomy then you must create a checkbox for each region.
- Save your form.
Learn more about how to create and edit new forms using WS Form in this video!
Step 3. Use Posts Table Pro to display WS Form entries
Now we need to take the WS Form entries and display them in a nice, user-friendly format. This is where Posts Table Pro comes in. This plugin allows you to create tables from your posts, and you can customize them to fit your needs.
- When you first install Posts Table Pro, a table builder will open. This takes you through each stage of creating your searchable directory of WS Form entries.
- On the 'Content type' page, select the post type that you created in Step 1.
- On the 'Columns' page, choose which columns you want to display in the directory. For example, you might create columns for an image, name, company, country, and so on. For each column, choose the type of data that you set up in Step 1. For example, you should select custom fields or taxonomies depending on the type of data.
- Use the other pages of the table builder to choose how you want the table to work.
Step 4. Display WS Form entries on your site
With everything set up, it's time to display WS Form entries. The last page of the table generator gives you a shortcode which you can use to insert the table anywhere on your site. Alternatively, use the Gutenberg block editor to insert a 'Posts Table' widget where you can select the table you just created.
Either way, this will insert a sortable table onto your site. It will display the data which is stored in the custom post type which you set up in Step 1. Test out your WS Form, submit a test post, and see how it is shown on the front end of your WordPress site.
Remember, when someone submits the form, a new 'Speakers' post is created as a draft. Depending on your needs, you may want to review these posts before publishing them.
And there you go! You've successfully created a searchable table to display WS Form entries. Now, your visitors can fill out the form, and their details will be stored as a post in your custom post type. Then, it'll be neatly displayed in a table on your website.
Start displaying WS Form entries today!
Like WP Speakers, you too can create an interactive, user-friendly directory of form entries that adds value to your website and improves the overall user experience. It's a neat way to collect and display information in a way that's engaging for your site visitors.
By combining ACF, WS Form and Posts Table Pro, you can create a powerful, interactive directory on your WordPress site. Not only does this automate the process of collecting and displaying WS Form entries, but it also provides a platform for user engagement.
While there's a learning curve involved, the flexibility and control these plugins offer are worth the time invested. It's all about making the experience better for your users. Happy form-making and table-creating!
I hope this guide has been helpful. Now it's time for you to take the reins and give it a shot! It might seem like a lot at first, but take it step by step, and you'll have your searchable WS Form entries table up and running in no time.