How to set up conditional discounts in WooCommerce [Comprehensive guide]

Discount conditions are the criteria that control how discounts work in an online store. In this guide, I'll show you how to create conditional discounts for WooCommerce in ten minutes or less.
In this detailed tutorial, I’ll show you how to set up conditional discounts for WooCommerce using the popular WooCommerce Discount Manager plugin. Here's an overview of what we'll cover:
- What conditional discounts are and their benefits.
- Popular types of conditional discount rules.
- A step-by-step walkthrough (with screenshots) showing how to add conditional discounts to WooCommerce.
- Top tips to make the most of discount conditions in your online store.
Let’s dive right in.
What are conditional discounts for WooCommerce?

In WooCommerce, conditional discounts are the specific criteria - such as cart contents, WooCommerce user roles, purchase history, and other factors - that must be met for discount rules to apply.
There are plenty of benefits of adding conditions to discounts. They allow you to tailor how discounts work so you can boost sales, protect margins, and keep your customers happy.
Let's say you run an online clothing store. You could set up a conditional discount that offers 10 percent off on all jackets for customers whose cart subtotals exceed $100. This encourages customers to spend more (which increases the average order value) and rewards them with a discount.
Another example is offering a discount only to customers who have previously purchased from your store. You can create a discount condition that knocks 15 percent off product prices for returning customers as a way to incentivize them to make another purchase. This is the opposite of a new customer discount.
What are the different types of conditional discount rules?

The conditions you set for each discount will vary depending on your specific business goals and offers of the promotional campaign.
Here are some common types of conditional discounts you can use, regardless of the type of online business you run:
- Cart conditions: These conditions are based on the contents of the customer's shopping cart, such as the number of items or total order amount. For instance, a discount offer giving ten percent off to customers who add more than three items to their carts.
- Product-specific and category-specific conditions: Conditional discounts can also be tied to specific categories and products. This helps boost sales of selected items. For instance, you can offer a 15 percent discount on T-shirts or hoodies to clear excess stock.
- User role conditions: You can offer user-role based discounts. This is perfect for hybrid wholesale and retail stores, membership sites, and other sites that sell to distinct customer groups. You can even offer pricing discounts for new customers only, logged-in users with a specific role, give custom discounts to specific user accounts, and more.
- Time-sensitive conditions: Setting start and end dates for discounts is a great way to create urgency and drive sales in your store. For example, creating a storewide sale offering 5 percent off all products during the Black Friday Cyber Monday (BCFM) sale.
Introducing the best WooCommerce conditional discounts plugin
WooCommerce provides an excellent platform for any type of e-commerce store. But it's severely lacking when it comes to setting up dynamic discount rules and conditions.
To offer discounts using WooCommerce's built-in features, you'll have to update the regular price and sale price fields on the edit product page for each item. Although this works for basic discount offers, there are several fundamental problems with this approach:
- There is no default way to configure WooCommerce to offer advanced discount types and conditions, such as product-specific discounts, cart discounts, quantity-based discounts, buy one get one free discounts, and so on.
- It lacks the option to set start dates and end dates for each discount, so you can't schedule promotion campaigns.
- Setting up discounts is an extremely time-consuming process. There's no way to apply discount conditions to multiple products at once. You must manually reduce the price of each simple and variable product! 😒
That's where WooCommerce Discount Manager comes in.
WooCommerce Discount Manager is a powerful plugin that lets you create a wide range of discount conditions and offers to keep online shoppers engaged, create loyalty, and drive revenue in your WooCommerce store.
As the name implies, it lets you manage all types of discounts, from simple percentage and fixed discounts to complex quantity-based and free product discounts.
Best of all, you can automate key steps on the back and front end. On the backend, simply create the discount rule, add conditions, and select the products or categories that are eligible for the discount offer. On the front end, you can display custom messages to promote the offers and automatically apply them to eligible customers' purchases - no coupon codes needed.
Let's take a closer look at its top features.
WooCommerce Discount Manager's key features
- It lets you create conditions and add pricing rules for virtually any type of discount offer: percentage-based, fixed amount, bulk quantity, free products, order total discounts, user roles, etc.
- You can set up time-based discounts, i.e., set start and end dates for each conditional discount.
- It lets you add easily conditions to multiple products and product categories (and exclude selected products and categories). So you can discount selected products, product categories, and even all products in your store with just a few clicks. This saves a lot of time and manual effort.
- It has built-in options to add custom messages to specify the conditions and promote discounts throughout your website: on the product detail and cart pages.
Note: WooCommerce Discount Manager is a comprehensive plugin. Check out the rest of its features here.
How to add conditional discounts to WooCommerce
Follow these simple steps to create conditional discounts using WooCommerce Discount Manager:
1. Add WooCommerce Discount Manager to your site
Similar to any other premium WooCommerce plugin, you need to:
- Buy WooCommerce Discount Manager (pro version only).
- Download it to your computer.
- Log into your WordPress site's backend and go to the "Plugins" section.
- Next, click on Add New → Upload Plugin to upload the plugin file you downloaded on your computer in the previous step.
- Click on Install Now → Activate.
- Lastly, type the license key into the plugin's setup wizard to activate it. You'll find this in the purchase confirmation email or your account on Barn2's website.
2. Add a new discount rule
WooCommerce Discount Manager adds a separate section to your WordPress admin from where you can manage discounts. We'll create a rule to which we can add discount conditions:
- Go to Marketing → Discounts within your WordPress admin.
- Click on the "Add New" button to create a new discount offer.
- Name the new discount offer.
- Choose the discount type from the options in the modal menu. The types of discounts you can create are:
- Simple discount: To give shoppers a fixed percentage or fixed amount discount.
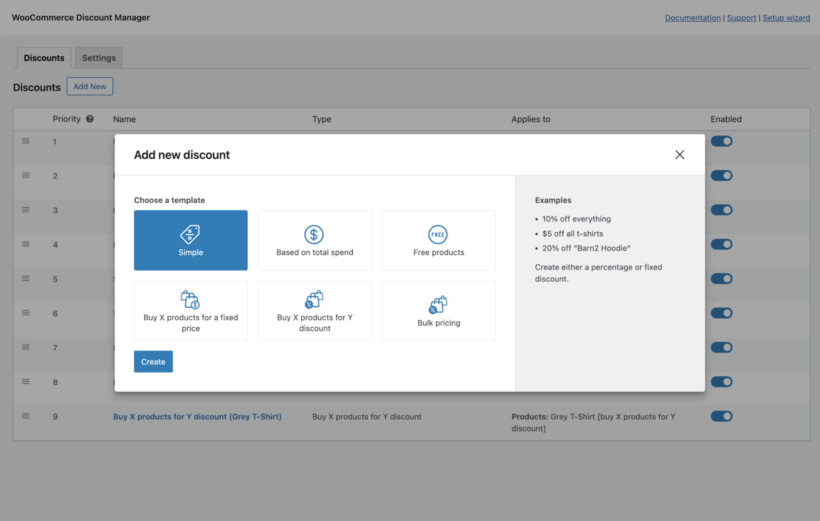
- Based on total spend: To add a minimum threshold amount shoppers must spend to be eligible for the discount offer.
- Free products: With this discount type, customers get a specific number of free products when they buy a minimum number of products. To keep each sale profitable, the free product will either be worth the same as their cart items or the lowest-priced item(s) in their carts. An example of when you can use this is for buy-one-get-one offers.
- Buy X products for a fixed price: This lets you offer multiple items for a fixed amount - perfect for bundle promotions and WooCommerce combo offers. For example, a store that sells skincare and beauty products can create a "Buy 3 sunscreens for $90" offer.
- Buy X products for Y discount: This discount type lets you offer either a fixed amount or percentage off specific products or the entire cart total.
- Bulk pricing: To give shoppers discounts based on the quantity of products - either a percentage or a fixed amount off. This can apply only to specific products or the entire cart.
- Simple discount: To give shoppers a fixed percentage or fixed amount discount.
3. Set up conditions for the discount
After you've created a new discount type, it's time to add specific conditions to it. For this tutorial, I selected the "Based on Total Spend" discount rule above. Note that some of the options at this stage will vary based on the discount type you select.
- "Which products?" - Specify the products that are eligible for the discount offer. You can apply the discount to every product in your store, selected products, or selected categories.

- If you chose "Selected products" or "Selected categories" in the previous step, you'll now get to specify the products the discount applies to.
- Add the conditional logic for this discount offer. Continuing with the above option, I selected the "Based on total spend" rule above. So I can now enter the total spend required for the discount to apply.
- Next, choose whether to apply a percentage or fixed amount discount and define the discount amount or percentage in the text area.
- The "Applies to" section is where you specify which customer roles are eligible for the discount offer. You can offer this to everyone, selected roles, and selected users.
- "Availability" - You can offer the discount indefinitely or for a specific period. Select "Always available" to offer it indefinitely and "Specific dates" to add start dates and end dates.
4. Displaying discount information on the front end
Many e-commerce stores invest a lot of time in creating discounts and promoting the offers on social media and in email campaigns. However, your website, specifically, the product and cart pages, are arguably the most important place to promote the discount offers.
Steps to display discount information on the front end
Here's how to add messages to advertise the discount offers and their conditions with WooCommerce Discount Manager:
- Head to Marketing → Discounts, and edit the discount offer you created earlier.
- Scroll to the end of the page and update the following settings:
- "Product page content" - Here, you can add a custom message to promote the discount offer and specify conditions on the individual product pages of products that qualify for the promotion. Feel free to use images, shortcodes, and even HTML codes to make the messages "pop". An example message to use is, "Add 3 T-shirts to get $50 off 👕!".

- "Content location" - You can specify where on the product detail page to display the custom promotional message: before the product page content, product title, short description, add-to-cart button, meta information, or tabs.
- "Cart notice" - Here, you can add another custom message to promote the discount and reassure customers that they qualify for it. This will be added right at the top of the cart so that it's highly visible before customers proceed to the checkout page. To continue with the example above, this can be something like, "Congrats 🎉! You're eligible for the 'Add 3 T-shirts to get $50 off" offer 🛒!"
- "Product page content" - Here, you can add a custom message to promote the discount offer and specify conditions on the individual product pages of products that qualify for the promotion. Feel free to use images, shortcodes, and even HTML codes to make the messages "pop". An example message to use is, "Add 3 T-shirts to get $50 off 👕!".
- Save your settings at the bottom of the page.
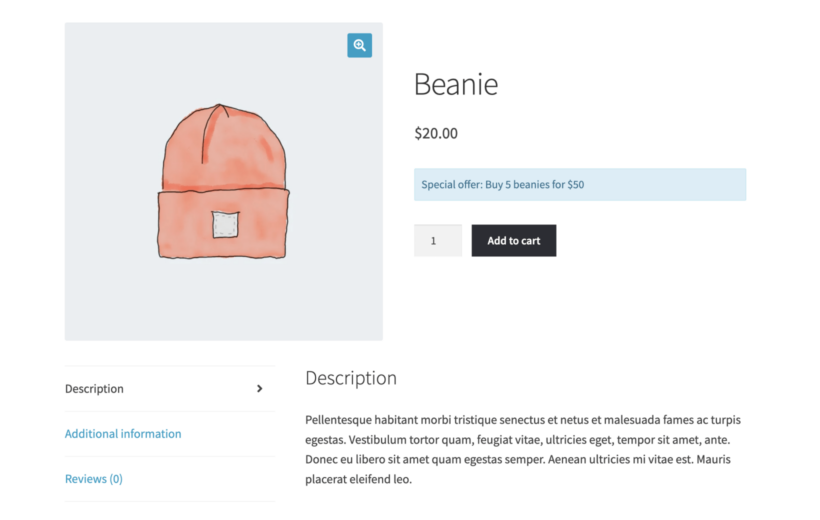
That's it. You can now go to the product page on your site's front end to check it out. Here's a preview of the conditional discount on the single WooCommerce product page of a demo site.
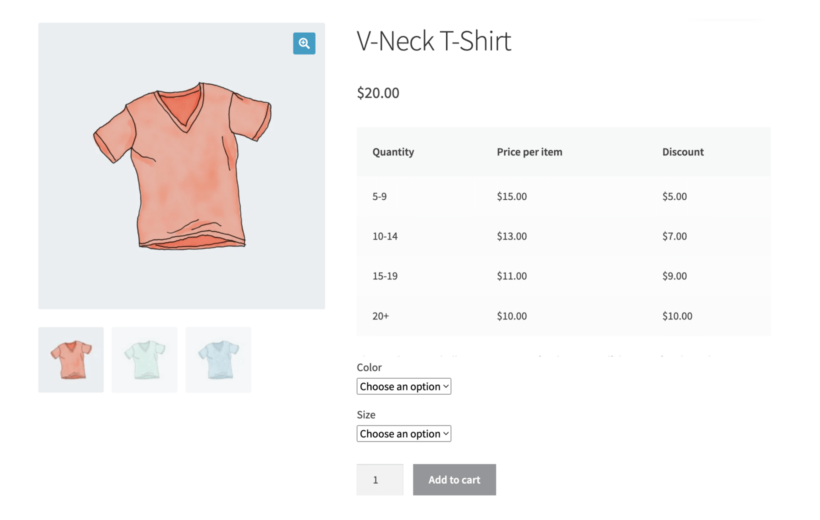
Here's another preview showing the tiered price table for the bulk discount on the product page:
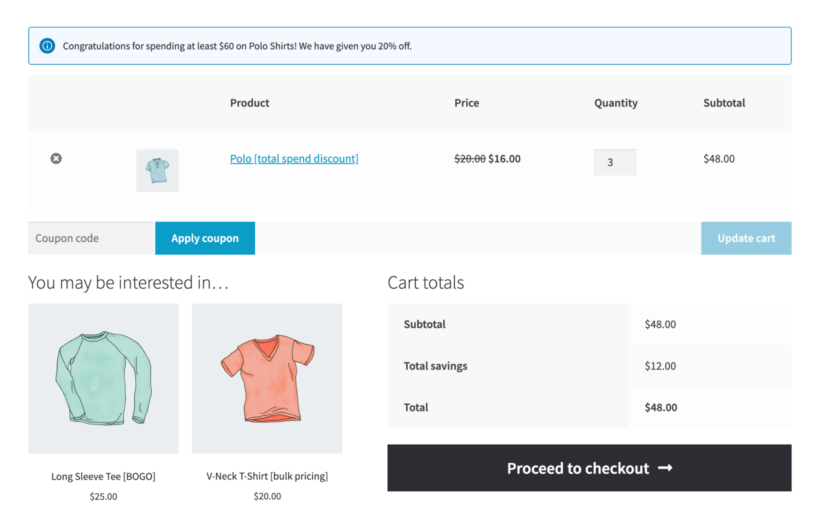
And here's the cart page with the custom promotional message for the discount:
5. Using different discount rules at once
It's pretty standard for WooCommerce stores to offer multiple types of discounts at the same time. For example, a hybrid wholesale and retail clothing and accessories site might offer:
- Flat 30% off on all products for wholesale customers.
- Flat 15% off on belts and shoes for retail customers.
- A buy three get two free (BOGO) offer on hoodies and jackets.
- A buy three sweatshirts for $75 offer.
Some customers might qualify for more than one type of discount. There might also be multiple products that fall under more than one discount type.
To avoid losses from more than one discount rule being applied at a time, WooCommerce Discount Manager lets you assign priority levels to all discounts. This prevents conflicts on the backend and ensures that every sale is profitable.
Here's how to set this up on your site:
- Go to Marketing → Discounts within your WordPress admin.
- Drag and drop the options to reorder the discount types based on priority. Note that the first condition is the number one priority.
And that's it! No matter how many active discount offers you have, WooCommerce Discount Manager will apply the discount logic to ensure that only one is applied to each order.
Tips to effectively set up conditional discounts on your WooCommerce site
These tips will help you make the most of conditional discounts in your store:
- Make sure you follow the ethical and legal guidelines while creating discount offers.
- Test the implication of each discount's conditional logic thoroughly before you roll it out to customers. For instance, if you created a "Buy one get one" discount type, make sure you have been through all the options for this rule carefully. An example question to think about is: do you want the discount to be applied to all products in the deal or just additional ones beyond the qualifying amount?
- Use clear language to specify conditions or limitations for each discount upfront. For example, if a discount is only applicable on a minimum order value, mention it explicitly on the product detail page to set the right expectations with customers.
- Offer conditional discounts strategically. Too many offers can reduce their impact and make them less effective. Consider running promotions only during key shopping seasons, holidays, or special events.
- Regularly analyze how each discount performs and optimize it for better results. For example, if you find that percentage discounts work significantly better than fixed-amount discounts, adjust future offers accordingly.
Ready to set up conditional discounts for WooCommerce?
WooCommerce’s native functionality for creating discounts doesn't let you add discount conditions.
If you want to add conditional discounts for WooCommerce, you’ll need to use a plugin like WooCommerce Discount Manager.
WooCommerce Discount Manager is the best all-in-one discounts plugin for creating and managing discounts to drive customer engagement, loyalty, and revenue.
Whether you want to set a cart, product, category, quantity, or virtually any other type of conditional discount, WooCommerce Discount Manager lets you add conditions and promote them throughout your store in minutes. It's a dynamic pricing plugin, which means you can:
- Set up conditions for any kind of discount offer: cart, user roles, product-specific, category-specific, and more.
- Add start and end dates to schedule your discount offers or set them up indefinitely.
- Automate the process of adding discount conditions to multiple products. You can add them to all products, selected products, and selected categories with just a few clicks.
- Add tailored messages to advertise the discounts (and their conditions) throughout your site: on the individual product page and in the cart.
Get WooCommerce Discount Manager and start adding conditional discounts in minutes!