Simple ways to add conditional or fixed fees in WooCommerce

Learn how to add fees in WooCommerce, whether you need product-level charges for customizations or checkout-level fees for payment methods and cart conditions.
Adding fees helps stores recover costs for customization, offset payment processing, and encourage larger orders. Ecommerce margins are often thin, and fees provide a transparent way to cover costs that base prices don't include. If you've tried adding fees to WooCommerce and ended up confused about which plugin to use, you're not alone.
The confusion comes from treating two fundamentally different systems as one. Product-level fees modify item prices based on customer choices. Checkout-level fees add charges based on cart conditions. Many store owners install the wrong plugin and waste hours trying to make it work for their specific scenario.
This guide shows you exactly which type of fee you need and how to implement it correctly in WooCommerce. By the end, you'll know whether to use a product options plugin or a checkout fee plugin for your specific use case.
Why add fees in WooCommerce?
Fees serve three main purposes for a WooCommerce store.
- Recover costs. Some orders cost more to process than others. Payment surcharges, packaging fees and cash-on-delivery admin fees offset those costs. You don't have to price your products higher across the board.
- Charge for premium add-ons. Gift wrap, engraving, rush processing, and other optional extras are perfect candidates for fees. Customers who want them pay for them. Customers who don't, don't.
- Encourage specific customer behavior. A small order surcharge can nudge customers toward higher cart values. A reduced fee for a slower shipping method can lift adoption of cheaper options for your store.
Adding fees the right way keeps things transparent for the customer. It also adds revenue you'd otherwise have left on the table.
Product page fees vs checkout fees: Which fees go where
- Product-level fees are charges that modify line item prices. They travel with products through cart and checkout.
- In contrast, checkout-level fees appear as separate line items based on order-wide conditions.
This architectural difference determines which WooCommerce fee plugins solve which problems. Understanding this distinction saves you hours of troubleshooting with the wrong tools. I find that most store owners struggle because they install a checkout fee plugin when they actually need product-level fees. Once you understand where your fee belongs, implementation becomes straightforward.
Let's look at some examples:
Product page fees belong when the charge depends on customer selections:
- Engraving at $0.50 per character.
- $5 gift wrapping.
- 20% premium leather upgrade.
- $10 fragile handling.
- Custom measurements using price formulas.
Example: A jewelry store charges $0.50 per character for engraving, with the price updating live as customers type.
Checkout fees belong when the charge depends on cart or payment conditions:
- 2.9% + $0.30 credit card fee.
- $8 cash-on-delivery fee.
- $5 small order fee for carts under $50.
- Shipping method surcharges.
- User role-based fees.
Example: A store adds $3.50 handling fee to orders under $50 to cover packaging costs.
The wrong tool wastes time. Here's a quick decision guide to help you add fees in WooCommerce the right way:
- Does your fee depend on what customers select on the product page (size, color, customization)? → Product page fee.
- Does it depend on payment method, cart total, or shipping? → Checkout fee.
- Do you need both types? Many stores combine both approaches for complete coverage.
Adding fees to products with WooCommerce Product Options

WooCommerce Product Options excels at product-level fees by adding customizable fields directly to your products. When customers select options, prices update dynamically on the product page. The plugin integrates with WooCommerce's tax system, so fees are taxed correctly based on your store settings.
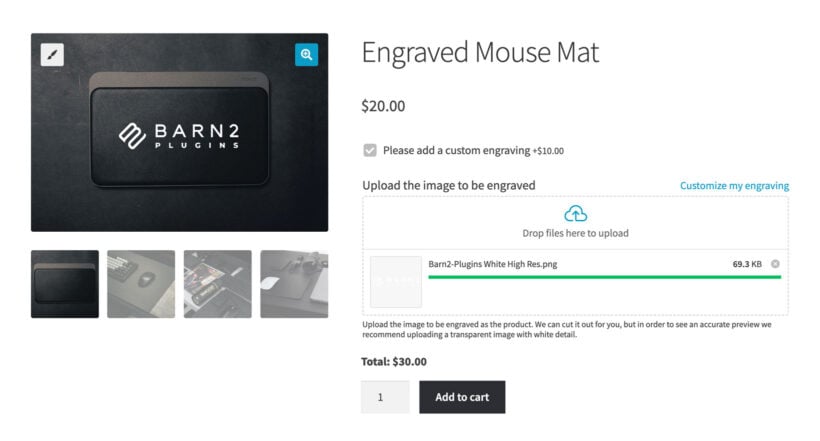
This plugin cannot add checkout-level fees because it operates at the product level only. If you need to add fees based on payment method or cart total, you'll need a different solution (covered later in this article). However, for product-based WooCommerce add fee scenarios, this is the best tool available. For example, this personalizable product charges extra fees for adding custom text to a product, uploading a photo, or for selecting a 'Rush charge' for priority service:

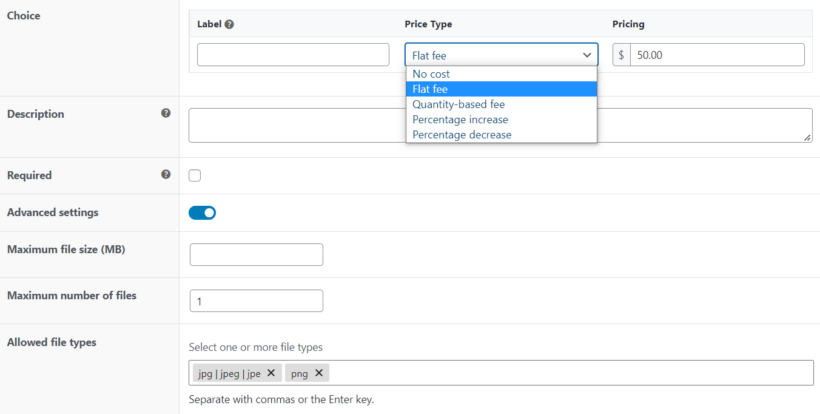
WooCommerce Product Options provides eight pricing mechanisms to add fees in WooCommerce:
- Flat feeFixed amount regardless of quantity. A $5 gift wrapping charge applies once per product.
- Quantity-basedMultiplies by product quantity. A $2 engraving fee means 3 items cost $6 extra.
- Percentage increaseRaises price by a percentage. 10% rush processing on a $100 item adds $10.
- Percentage decreaseReduces price for specific options. 15% off for kids' portions works well for restaurants.
- Character count$0.50 per letter means "SARAH" costs $2.50, while "ELIZABETH" costs $4.50.
- File countCharge fees per every uploaded file. $3 per design file means 4 files cost $12.
- Customer-defined priceCustomers enter their own amount. Perfect for donations or tips.
- Price formulaCalculates using mathematical formulas for complex pricing needs.
Example: A print shop charges $1.50 per custom card, so 25 cards add $37.50 to the order. The customer sees this calculation happen in real-time as they adjust quantities.
For best results, display price updates dynamically above the "Add to Cart" button. Add descriptions explaining why fees exist. Transparency builds trust and reduces cart abandonment.
Optional handling fees and conditional display
Optional handling fees let customers choose special services directly on the product page. This gives them control while transparently presenting the additional cost. Common examples include fragile item protection, gift wrapping, or rush processing.
The key benefit of optional fees is transparency. Customers see exactly what they're paying for before adding to cart. This builds trust and reduces disputes later.
To create an optional handling fee in WooCommerce Product Options:
- Go to Products → Product Options and create a new group.
- Add a checkbox or radio button field.
- Enter your label (e.g., "Premium Packaging").
- Set the fee type and amount.
- Add a description explaining the service.
Alternative approach: Use a dropdown showing "Standard Packaging (Free)" and "Premium Protection ($10)" to present the choice clearly.
Example: An electronics store displays an "Extended Warranty" option ($49 fee) only when customers select products from the "High-Value Items" category.
Adding conditionally displayed fields
Conditional logic keeps product pages clean by showing fee-related options only when contextually relevant. Without conditional logic, product pages can become cluttered with options that don't apply to every customer.
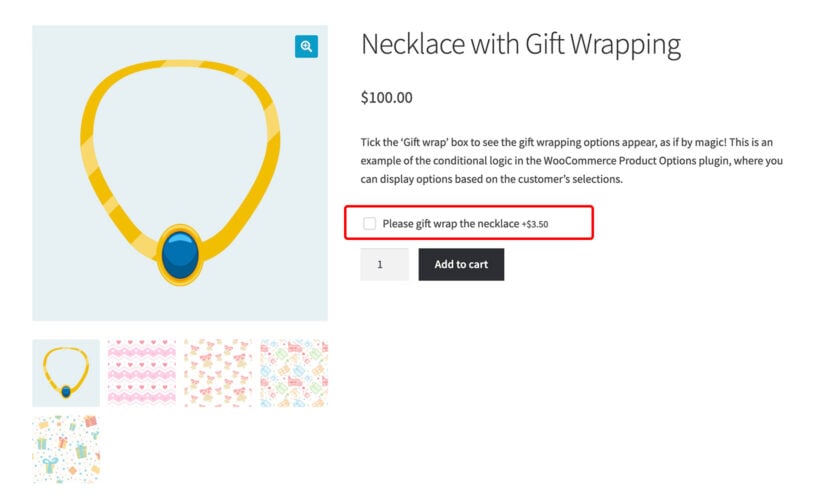
For example, the following product displays the gift wrap options and fees only when "Please gift wrap the necklace" is checked. This keeps the default experience simple while still offering customization to those who want it:
To set up conditional logic in WooCommerce Product Options:
- Create your fee-related field to WooCommerce as usual.
- Assign rules to the option using the conditional logic settings.
- Make it show or hide based on other field selections or variation choices.
- Use AND/OR operators for complex dependencies.
Example: A jewelry store shows engraving options ($15 fee) only after customers check the "Add Personalization" box. This keeps the default product page clean and focused.
Advanced multi-condition scenarios: Show options based on multiple combined conditions. For example, show engraving only when customers select the "Premium" variation AND check "Add Personalization."
User role-based display: Show wholesale-specific options (bulk packaging fee, freight shipping) only to wholesale customers. Retail shoppers see a simpler product page.
Nested dependencies: Express shipping selection reveals premium packaging options with associated fees. Choosing specific materials displays relevant finishing options.
Price formulas for complex calculations
WooCommerce price formulas create sophisticated calculations impossible with simple flat fees or percentages. This is where WooCommerce Product Options really shines for complex WooCommerce add fee scenarios.
I've seen stores use price formulas for everything from custom fabric orders to construction materials. The formula calculates the exact price based on customer inputs, eliminating manual quotes.

The price formula supports:
- Mathematical operators and brackets.
- References to product data (price, quantity, weight, dimensions).
- References to other fields on the product page.
- IF statements for conditional pricing.
- Bulk rate functions for tiered pricing.
Example: A curtain shop uses [Width] * [Length] / 10000 * 25 * 2 + [product_price]. This converts centimeters to square meters, multiplies by fabric cost, and doubles for a pair.

For businesses that sell products priced by measurements, weight, or volume, price formulas eliminate back-and-forth quotes. Customers get instant pricing, and you process orders and charge fees for WooCommerce products faster. Check out our detailed guide on measurement price calculators for more examples.
Adding fees at checkout based on cart conditions
As you can see, there are lots of reasons why you might want to charge extra fees on the WooCommerce product page. But that only makes sense if the fees relates to a specific product. You need a different solution to charge fees on entire WooCommerce orders.
Out of the box, WooCommerce lacks admin options for conditional cart-based fees. The built-in shipping zones can add basic shipping charges for heavy or fragile items, but options are limited. You need additional tools to add handling fees, or extra fees based on payment method or cart subtotal.
WooCommerce can add fees programmatically using the woocommerce_cart_calculate_fees hook. However, this requires custom PHP code and developer knowledge. Most store owners prefer plugins that provide visual interfaces for configuring fees.
Dedicated checkout fee plugins provide the solutions WooCommerce doesn't include natively. Use them to create rules that automatically apply fees when specific conditions are met at checkout.
A free plugin may handle basic payment method and shipping method fees with simple percentage or fixed amount calculations. Paid plugins offer multi-condition logic, user role restrictions, and dedicated support for complex implementations.
For this article, I'll focus on Checkout Add-Ons for WooCommerce by SkyVerge for the step-by-step example below. It provides solid features for the most common WooCommerce add fee scenarios.
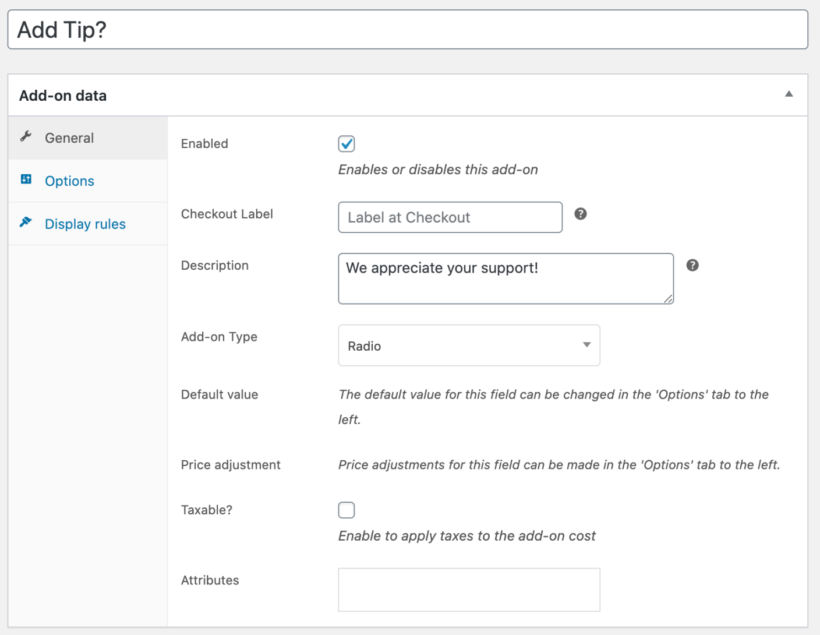
Setting up Checkout Add-Ons for WooCommerce
Checkout Add-Ons lets you add free or paid options directly to your checkout page. You can create text fields, dropdowns, radio buttons, checkboxes, multi-select lists, and file uploads. Each field can optionally include a fee.
General setup steps:
- Install and activate the plugin on your WooCommerce store.
- Navigate to WooCommerce → Checkout Add-ons.
- Click 'Add New' to create your first checkout field.
- Enter a name and label for the add-on (this displays to customers).
- Select the field type: text, text area, select, multi-select, radio, checkbox, multi-checkbox, or file upload.
- Set the cost type: choose 'Fixed' for a flat fee or 'Percentage' for a percentage of the cart total.
- Enter the fee amount if applicable.
- Configure conditional rules to show the add-on only when specific conditions are met (optional).
- Save your add-on.
The add-on option with fee appears on your WooCommerce checkout page immediately. Customers see selected add-ons in their order details, confirmation emails, and account pages.
Common checkout fee scenarios
Here's how to implement the most frequently needed WooCommerce add fee types at checkout. Each scenario uses the same general setup process but with different field types and fee configurations.
Payment-method surcharges: Add a fee based on the payment method the customer chooses. Cash on delivery is the classic case. Many stores add a small surcharge to cover the extra admin work. See our dedicated guide on WooCommerce cash on delivery fees for a full walkthrough.
Shipping-method fees: Add a surcharge tied to a specific shipping method. For example, add a packaging fee that only applies when customers choose express delivery. Or charge a fuel surcharge for couriers in specific zones.
Order handling fees (for small order scenarios): Create a checkbox add-on labelled "Small Order Handling Fee" and set a fixed cost. Use conditional rules to display it only when cart subtotal falls below your threshold. Customers see the fee clearly before completing checkout.
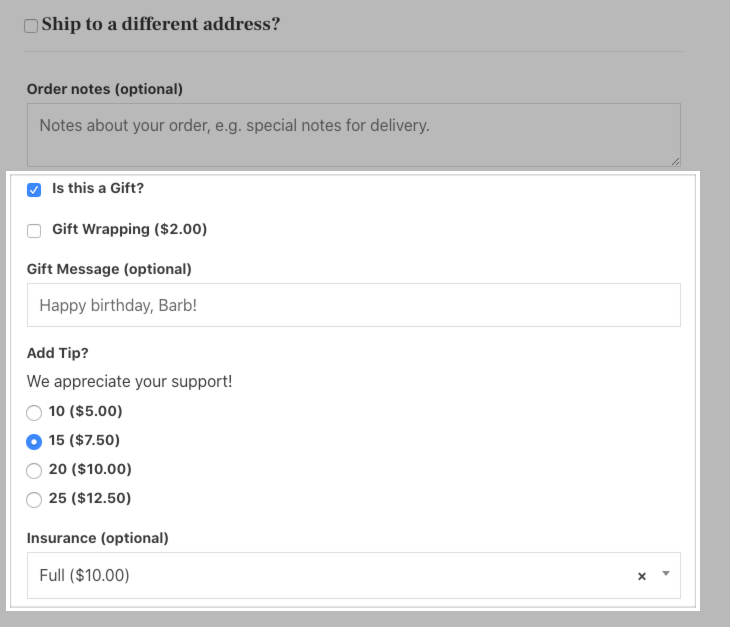
Tip or gratuity options: Create a radio button or select field with preset tip amounts. Use percentage-based costs like 10%, 15%, or 20% of the order total. This works well for restaurants, delivery services, or any business that accepts tips.
Rush handling or priority processing: Add a checkbox for "Rush Processing" with a fixed fee. You can also create a dropdown with multiple speed options at different price points. Customers choose their preferred processing speed and pay accordingly.
Gift options: Create a checkbox for "Gift Receipt" (free) and another for "Gift Wrapping" with a fixed fee. Add a text area field for "Gift Message" so customers can include personal notes with their orders.
The fee appears automatically at checkout when customers select the option. It displays as a separate line item with your custom label. The order total updates dynamically as customers make selections.
While you can add gift wrap at the checkout layout, consider whether it would make more sense to offer it per product instead. If customers are ordering multiple items then you should add gift wrap the product page with WooCommerce Product Options instead.
Frequently asked questions
Can I add a percentage fee in WooCommerce?
Yes. Most fee plugins let you choose between a fixed amount and a percentage of the cart total. That includes Checkout Add-Ons for WooCommerce. Percentage fees work well for payment surcharges, where banks charge a percentage of the transaction, and for tipping options. Fixed fees suit predictable costs like gift wrapping or rush processing.
How do I make a fee conditional?
Plugins like Checkout Add-Ons and WooCommerce Product Options both support conditional logic. You set the conditions under which the fee should appear, and the plugin hides it the rest of the time. Common conditions include cart subtotal, payment method, shipping method, user role, and which products are in the cart. The fee only shows when the customer's order matches.
Do WooCommerce fees apply before or after tax?
This depends on your tax settings and your plugin. By default, WooCommerce treats fees as taxable line items if you have tax enabled on your store. You can usually toggle this on a per-fee basis. If you're charging a fee for a non-taxable service, mark it as tax-exempt in the plugin's settings. If in doubt, run a test order and check the order totals match your accountant's expectation.
Choose your approach and implement with confidence
The key to adding fees to WooCommerce successfully is understanding the architectural split before choosing your tools. Product page fees and checkout fees serve different purposes and require different plugins.
Either way, transparency is key to avoiding cart abandonment. Shoppers accept fees more readily when displayed upfront with clear reasoning. Surprise fees at checkout are a major cause of abandoned carts. Display fees early and explain their purpose.
Product customizations and per-item charges belong on the product page with WooCommerce Product Options. This includes engraving fees, gift wrapping, material upgrades, rush processing, and any option that depends on customer selections. The plugin handles all the complexity of dynamic pricing and displays everything clearly to customers.
The best option I've found to create custom products and calculations in WordPress. Best support and help.
MC Global Fabrics SLMarch 28, 2025
Payment surcharges and cart-based fees belong at checkout with plugins like Checkout Add-Ons for WooCommerce. This includes credit card processing fees, small order charges, and shipping method surcharges. These fees apply based on order-wide conditions rather than individual product selections.
Ask yourself: Does this fee depend on what customers select on the product page, or what happens at checkout? That question determines which plugin to choose.
Once you've made the decision then install the plugin, configure your rules, and test thoroughly before going live.