List WordPress posts or pages in an interactive table with frontend editor
Our Posts Table Pro and Document Library Pro plugins display any type of information from a WordPress website in a searchable table. Our colleagues at WP Sheet Editor have integrated with our plugins to provide a user-friendly way to edit the contents of the table from the front end of your website. Keep reading to learn how to add a frontend editor to your tables.
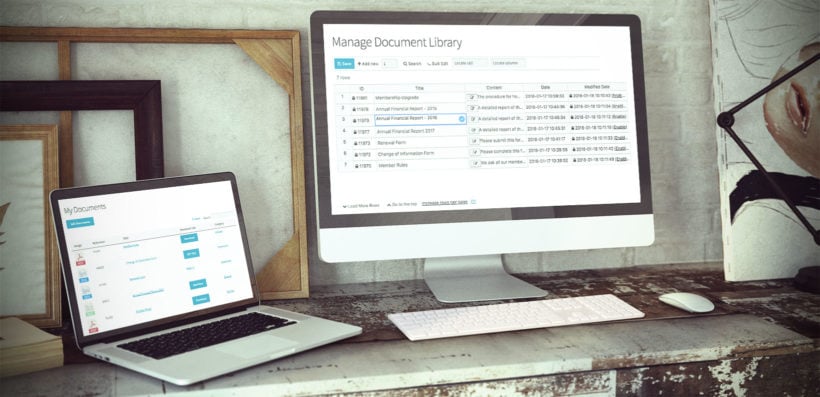
Posts Table Pro is popular for creating a blog post index, member directory, and more. Document Library Pro is popular for listing documents, publications, or other resources such as audio and video. Both plugins work by taking your posts (or any custom post type) and displaying them in an interactive table on the front end of your website. You can either add the content from the WordPress admin, or you can use it with a forms plugin to allow your users to submit information themselves.
However, until now, there was no way for your colleagues or users to edit the contents of the table directly. Thanks to the developer behind the Universal Frontend Editor plugin, this is now possible by adding a user-friendly front-end editor to your tables.
Whether you're using our table plugins to list posts, pages, products, documents, articles, courses or something else, keep reading to learn how to let your staff or users edit the contents of the table - all without using the WordPress back end.
1. Create a table using Posts Table Pro or Document Library Pro
Before adding the WordPress frontend editor, you must set up Posts Table Pro or Document Library Pro and use it to start listing information. Get whichever plugin best meets your needs and set it up using the instructions in the 'Getting Started' email. Add some posts/documents and list them in a table on your website.
Once you have done this, you need to follow these simple steps to add a front-end editor to the table(s). This means that your colleagues and/or users can edit information from the WP front end, without having to log into the WordPress admin. I'll tell you how to do that next.
2. Install WP Sheet Editor's Frontend Editor plugin
WP Sheet Editor is a collection of plugins that provide an easy-to-use table editor for any type of WordPress information. It comes with more than 11 plugins for editing posts, pages, custom post types, documents, WooCommerce products, WooCommerce coupons, posts, taxonomies, and more.
In this tutorial, we will use one plugin from WP Sheet Editor: The Frontend Editor plugin. Buy and install the plugin on your WordPress site, and then continue with this tutorial:
3. Create the frontend editor
Next, it's time to create a new frontend editor. Go to Frontend Sheet → All Spreadsheets.
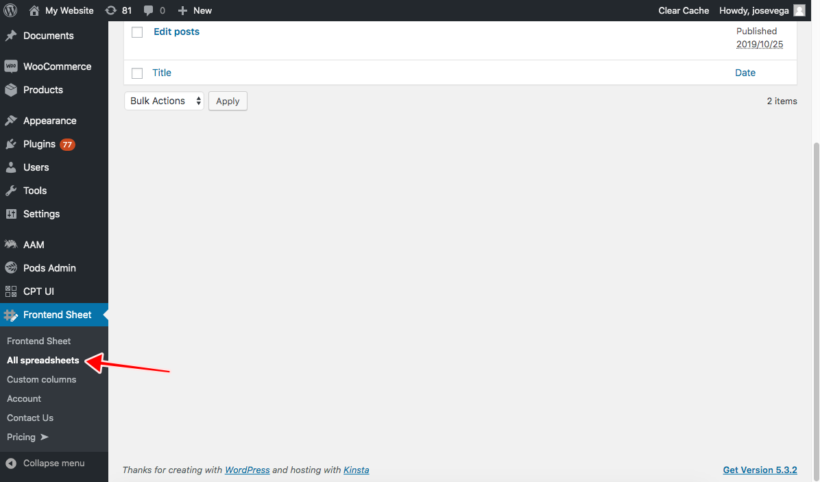
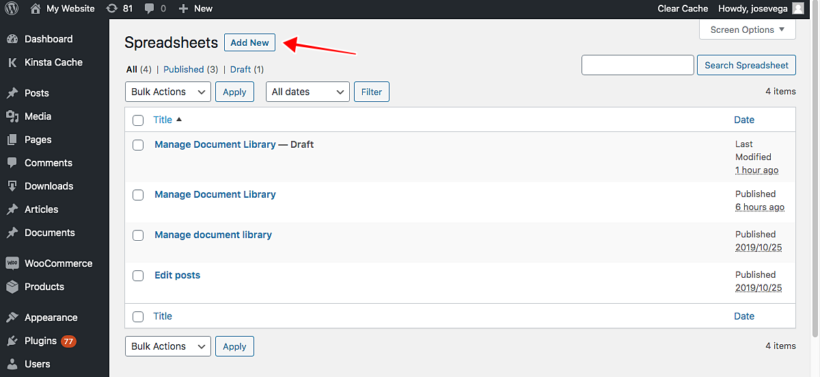
After that, click Add new to create a new spreadsheet:
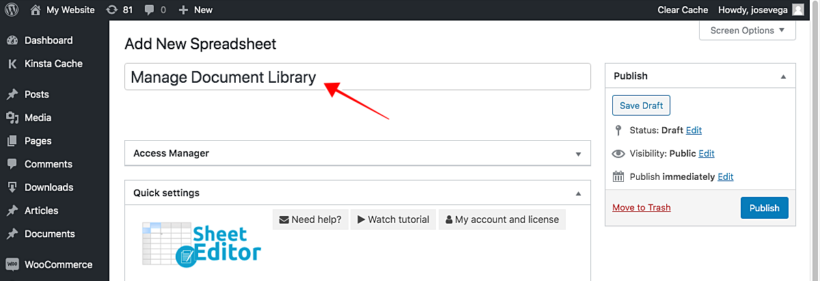
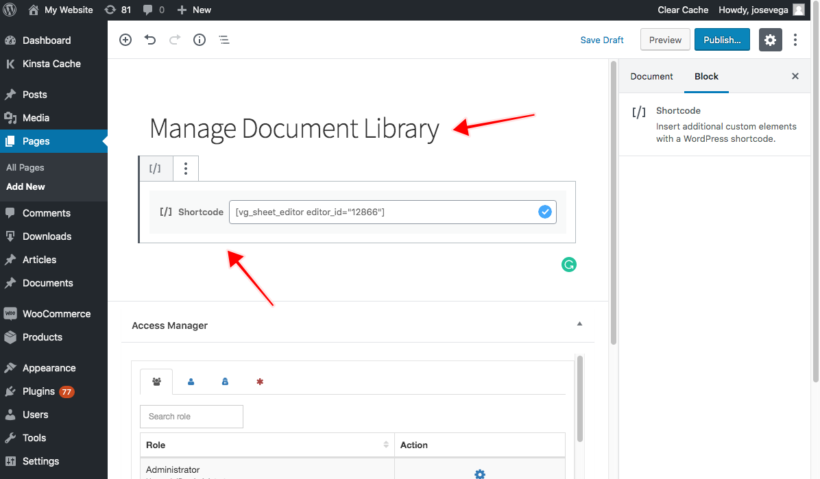
Now you need to add the spreadsheet name. This is private and used for identifying the frontend editors in the WordPress backend. You can use any name. In this example, we'll call it Manage Document Library:
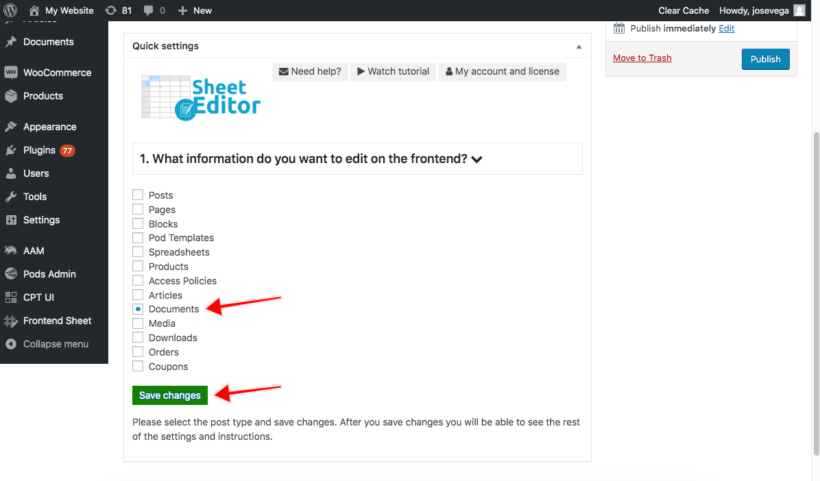
Next, you need to select which post type you'll edit using this new frontend editor. Go to the What information do you want to edit on the frontend? section.
Note: If you haven’t created your custom post type yet, then you can easily do so with the free Easy Post Types and Fields plugin. Check out this step-by-step custom post types tutorial
Here you'll see a list of all the post types on your WordPress site. In this case, we need to select Documents and then click on Save changes. You should select whichever post type you're listing in the table. If not, then you can just select posts or pages and use those instead.)

After that, a shortcode will appear below. Copy this to your clipboard - you need this for the next step:
Add the front end editor to a page
Next, you need to create the page where the editor will be displayed. Users will be taken to this page when they click the 'Edit' button above your Posts Table Pro or Document Library Pro table.
Go to Pages → Add New. Once there, add a page title and enter the shortcode in the content. Make sure the page uses a full-width template - this allows plenty of space for the editable table in the frontend.
Next, finish off this page as follows:
- Copy the URL of the page - you'll need to link to it in Step 5, later.
- Add a link or button back to the page where you've added the Posts Table Pro or Document Library Pro table. That way, users can easily return to the public-facing version of the table after editing the information within it.
- You might also want to mark this page as 'noindex' so that people won't access it directly from search results. You can do this using any WordPress SEO plugin such as Yoast.
4. Configure the frontend editor
Once you've created the page with the frontend editor, you can configure the visibility options. This controls who can access it and edit the contents of the table.
a) Select the toolbar tools
Decide which tools to include in the frontend editor. This will depend on how you plan to use it. For example:
- You can use it for clients to manage information from the WordPress front end editor. In this scenario, they need advanced options for searching and bulk editing.
- You can use it for employees or normal users to submit information (e.g. document, events or posts) from the front end. In this case, you need simpler options.
In the settings for your spreadsheet, select which tools to show on the Primary toolbar and the Secondary toolbar of the editor:
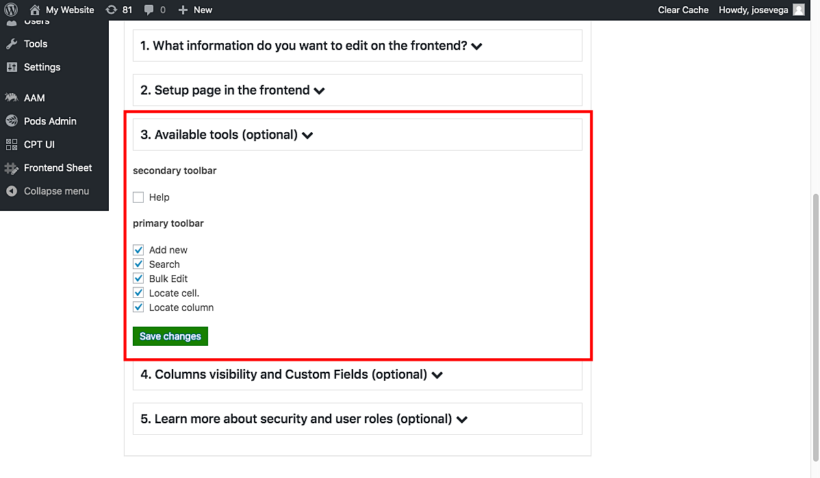
For the Secondary toolbar, you can display the Help options with links to tutorials on how to use the editor.
For the Primary toolbar, you'll be able to show or hide these options:
- Add new - Users can add new items using the spreadsheet.
- Search - Users can filter the items by keyword, status, category, tag, modified date, comment count, etc.
- Bulk Edit - Edit thousands of items in seconds. You deactivate it if you want users to edit items using the cells only.
- Locate cell - Locate the cell containing a value.
- Locate column - Locate columns quickly. Useful when you have many columns to avoid scrolling too much. Enter a name and the plugin will find the column.
For a simple editing experience, you can activate the "Search" and "Add new" options and deactivate the rest.
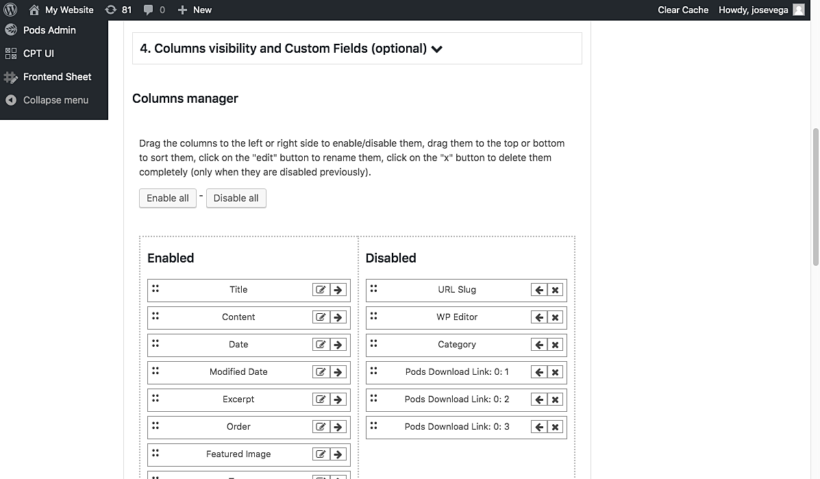
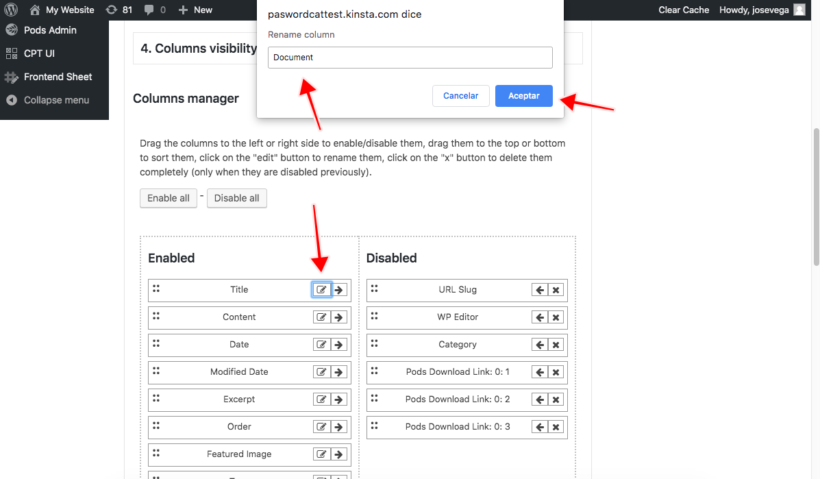
b) Select the columns you want to see on the editor
Use the Columns visibility and Custom Fields section to enable or disable the columns and sort them.
If this frontend editor is for high-level users like clients or employees managing full products or documents, you can let them edit all the fields.
If the frontend editor is for normal users or guests then you can limit the columns. You can just show the document name, content, and link columns.
Generally, you'll probably want to show the same columns that you selected when you set up your WordPress table in Posts Table Pro/Document Library Pro. That will be more intuitive for your users because they will view the main table first, and then click to access the inline spreadsheet editing view. They will therefore expect to see the same columns in both views.
The Columns manager will automatically detect all the fields from the post type (e.g. documents) that you're using for the front-end editor. You can view them in the list and enable, disable, sort, and rename them easily:
For example, if you're adding front end editing to a WordPress document library, then you might rename the Title column 'Document'. To do this, just click on the Edit button in each column, and you'll see the popup that will allow you to change the column name:
If there are any columns that you don't want users to be able to edit, simply don't include these in the frontend editor spreadsheet.
5. Integrate the WordPress frontend editor with the public document library
You can easily integrate the frontend editor with the table that you created using Posts Table Pro or Document Library Pro in Step 1.
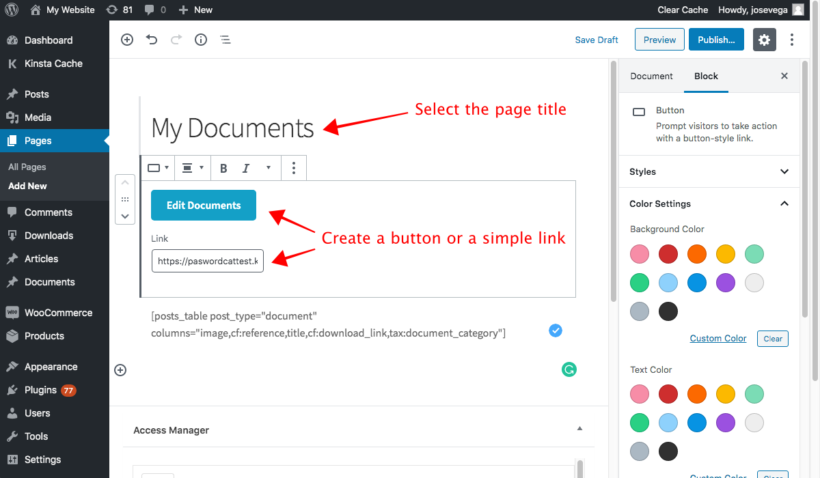
Simply add an 'Edit' link above or below the table. This should link to the front end editor page that you created in Step 3.
In this case, we've used the Gutenberg editor to create a button linking to the frontend editor page which we created in Step 3:
Bonus tip - Hide the 'Edit' link from public users
You might want everyone to be able to see the 'Edit' link, as it provides a handy way for guests to log into their account before editing the contents of the table. However, you might want to hide this so that only certain people see it.
There are several ways to do this:
- Of course, you don't have to include an 'Edit' link on the same page as your Posts Table Pro table. Instead, you can send your editors a direct link to the page where you added the front end inline spreadsheet editor. Alternatively, you can add the link to a more subtle location such as the footer.
- You can also install the Advanced Access Manager plugin and use its shortcodes to only show the button to logged in users with a specific role. That way, you can still have an 'Edit' button on the same page as your Posts Table Pro table, but only certain people will see it.
6. Use the frontend editor
When people view the table that you created using Posts Table Pro or Document Library Pro, they will see the button to edit the contents:

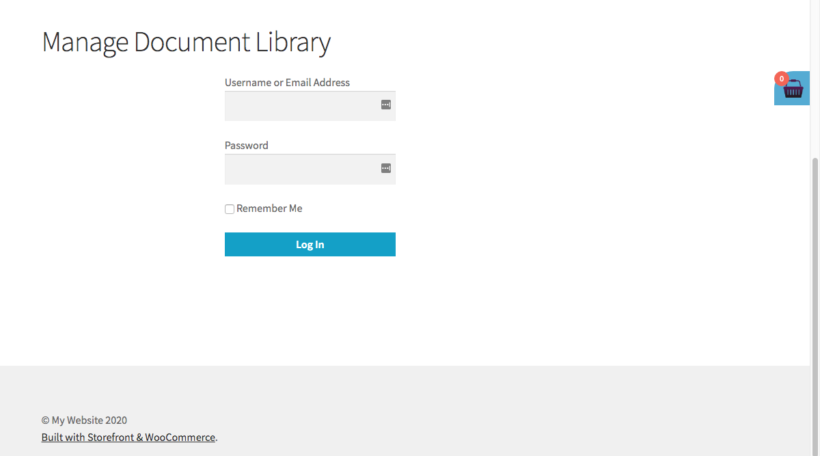
When they click on the Edit Documents button, they will be asked to log in in order to see and use the frontend editor (unless they're already logged into their account):
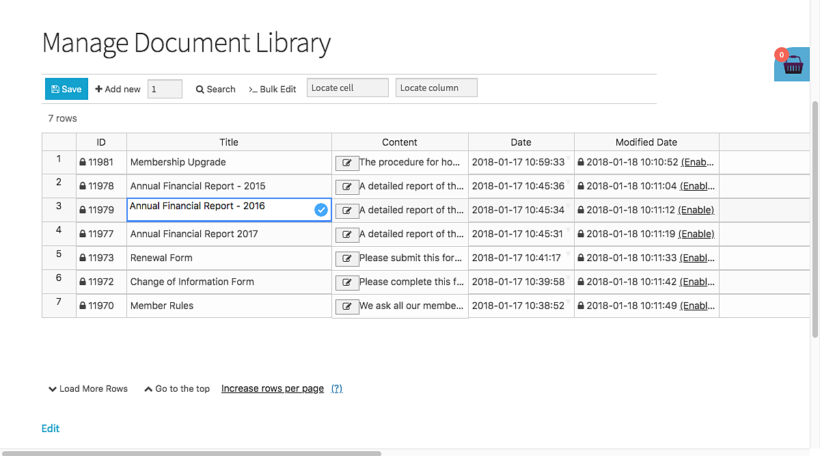
After they log in, they will see the frontend editor with the tools and columns that you selected. They can quickly edit the information using the spreadsheet interface right on the frontend. No need to access the WordPress backend!
7. Who can use the frontend editor?
The WordPress front end editor is available only for logged in users. Guests will see a login form when they click the 'Edit' button.
The Universal Frontend Editor plugin uses the standard user roles that come with WordPress. When you create accounts for your users, you should choose an appropriate role depending on how much you want them to edit:
- Subscriber and guest - Not allowed to use the editor.
- Contributor - Can view and edit their own posts only, but they can't upload images.
- Author - Can view and edit their own posts only, they can upload images.
- Editor - Can view and edit all posts and pages.
- Administrator - Can view and edit everything.
For example, a user with an 'Author' role can use the frontend editor and only edit the posts that they created. This is a good way to allow each user to manage their own information.
Where to get the plugins
You'll need 2 plugins to list information in a table with frontend editing capabilities:
- Either Posts Table Pro or Document Library Pro - creates the searchable table that your public visitors will see.
- Universal Frontend Editor - creates a spreadsheet-style editor so that logged in users with the correct role can edit the contents of the table.
Get the plugins today, and follow the steps in this tutorial to set it all up!