Step-by-step guide to building a WordPress member directory
A WordPress member directory plugin lets you create a list of your organisation's members. The member list will appear on a public or private page on your website.
Creating a member directory in WordPress can help you showcase your community and provide valuable resources for your users. In this tutorial, we'll walk you through how to set up a searchable table with user profile fields using the Posts Table Pro plugin. In addition, we'll cover how to allow members to sign up from the front end and sell access to the user directory using Gravity Forms payment extensions.
Members will be listed in a table with options to sort, search, or filter to find a particular member. When a user finds the member they're searching for in the members' directory, they can just click through to read their full profile. With the added ability to sign up for membership and pay for a directory listing, your member directory will become a valuable resource for your users and a source of revenue for your business.
A new type of WordPress member directory plugin
A WordPress member directory plugin is a tool that creates searchable, sortable lists of members. Unlike membership plugins that restrict access to content, member directories display information about your members in an organized format.
This is completely different from a WordPress membership plugin. While a membership plugin lets you create a private members-only area for your members to log into, this member directory plugin creates a directory of people or members that's sortable and filterable by the user.
It's also different from most WordPress user list plugins. These typically create a fairly basic directory listing all the users from your WordPress website (i.e. everyone from the Users section of the WordPress admin). While this might be fine for some membership site directories, what happens if your members are not WordPress admin users? Your directory of members might contain different people from your list of WordPress users.
This makes it tricky to find the best WordPress directory plugin for members. If you search for a WordPress user list plugin, you'll find membership plugins designed to create a protected members-only area of your website, or member directories listing all your WordPress users. However, don't give up!
This tutorial will show you how to build a different sort of WordPress member directory. We'll use the Posts Table Pro plugin, alongside other free WordPress plugins for creating member profiles. The members in your directory don't need to have logins for your website - your users are kept completely separate.
You may also like: How to Use Posts Table Pro to Create a WordPress Staff Directory
How others use the WordPress members directory
Check out these examples of WordPress websites with a searchable member directory with the profile. See what's possible and find inspiration to start building your own directory of members today.
Case study 1 - CEPPs members directory
CEPPs is a charity that supports mothers and early childhood. They use the Posts Table Pro plugin to create a WordPress member directory with profiles.
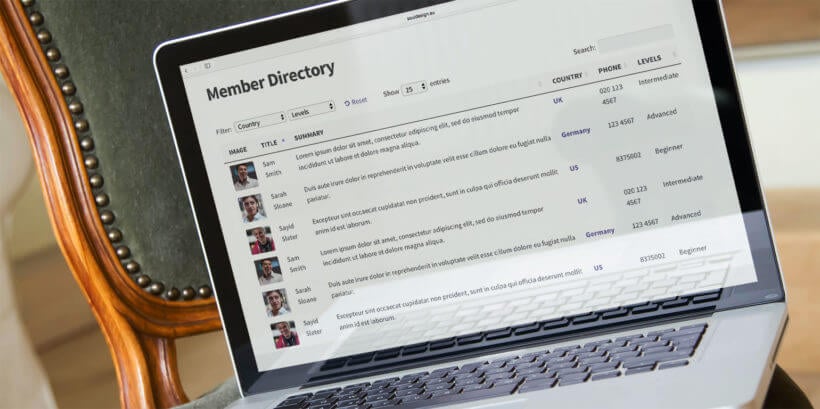
The CEPPS directory of members lists their supporters in a mobile-friendly, fully responsive WordPress table. Each supporter is listed within a custom post type in WordPress. Information about each member is stored as custom fields, categories, and taxonomies. Each piece of data is stored as a separate column in the table.
Visitors can sort the table by clicking on any column header. They can search for any keyword by typing it into the search box. They can also filter the WordPress member directory by clicking on country, city, type or tag. This makes the member directory really flexible and quick to use.
You can click on a logo, name, or 'Visit' link to view the individual member profile page. This contains further information about each member.
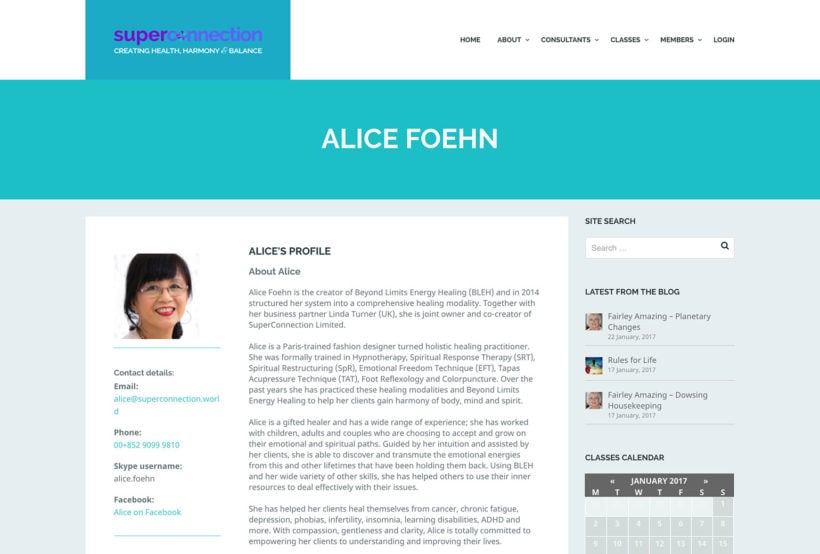
Case study 2 - SuperConnection consultants directory
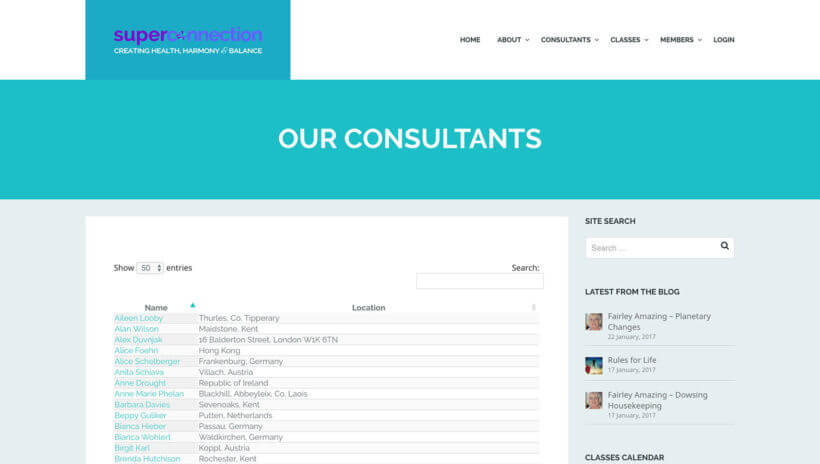
SuperConnection has a WordPress member directory, listing their expert consultants. Each consultant has attended their training and is available for consultation.
Consultants are listed in alphabetical order with their names and location. You can sort by either column or perform an instant search using the search box. This makes it easy to find a consultant in your area.
You can click from the directory to the individual member profile pages. These include various custom fields about each member including contact details, location map, and classes completed.
Consultants directory table:
Member profile page:
Case study 3 - Private members-only database of authors

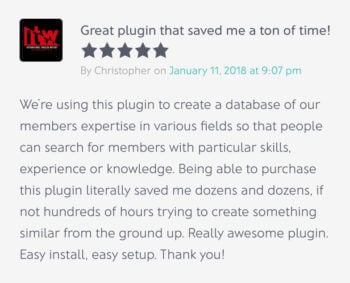
Christopher Graham uses our Posts Table Pro WordPress table plugin for his private members directory of thriller, mystery and crime fiction authors.
He was looking for an easily searchable members database that would allow the authors to search for other members with skills or knowledge in a particular area.
When one member finds another with the skills they are interested in, they can contact them, ask questions, or chat.
What are your requirements for a WordPress membership directory with profiles?
First, it's important to think about your requirements. What do you want to achieve from your WordPress member directory plugin? This will help you decide if the type of member directory covered in this tutorial is right for you.
Planning your member directory
- Will your WordPress member directory be publicly available or hidden from public view? I'll show you how to create a public member directory and how to password protect it. If you want to add further security - for example, by making it available to specific groups via a WordPress membership plugin - then we won't be covering this. However, techniques covered in this tutorial can be used anywhere on a WordPress site. This means that you can put it on a page that is restricted using another membership plugin, if you like.
- Can members create and manage their own profiles? This tutorial is about how to create a WordPress member directory with profiles that you will maintain as the website administrator. If you want members to be able to create their own profiles then you'll need to do some extra work outside of this tutorial. (Bonus tip: You could use Gravity Forms with the Gravity Forms + Custom Post Types plugin to let members submit their own profiles to the directory. You could even take payment via PayPal if required. New members would complete an online form with their profile information which would then be saved in the 'Members' custom post type to be displayed in the directory. Please see our tutorial on how to set this up.)
- Do your members have to be WordPress users? Unlike other membership directory WordPress plugins, you'll be adding the members as a custom post type in WordPress. The Posts Table Pro plugin we'll be using as our member directory plugin displays custom post types but NOT WordPress users or user roles. If your members are also WordPress users (i.e. they're listed in the Users section of the WordPress admin) then you can't list them in the directory. To do this, you'd need to add each member to the 'Members' custom post type we'll be creating in this tutorial.
What information will the WordPress member directory plugin contain?
You should also consider:
- What information do you want to display about each member? Write a list of the data you want to display using Posts Table Pro, the best WordPress member directory plugin. This can include various text fields (name, description, experience, etc.), one or more images, icons (e.g. linking to their social media profiles), etc. Basically, anything you like. You'll use this later in the tutorial when you create the custom fields for your WordPress directory of members with member profiles.
- How will you structure your WordPress directory of members? As well as the unique data about each member such as their name and email, you'll probably want to categorize your directory of members. Write a list of the different ways you want users to be able to sort and filter the member directory.
Armed with this information, you're ready to start building your WordPress member directory.
How to create a members directory in WordPress
1. Create a 'Members' custom post type
Part 1 covers the initial setup of creating a WordPress member directory. You can also read the full instructions below.
A custom post type is a way to store different types of content in WordPress. We'll create a 'Members' post type to store all your member profiles separately from your regular posts and pages.
Each WordPress member in your directory will be stored with their profile data in a WordPress custom post type called 'Members'. (Don't worry, you can call it something else if you prefer.) This will create a 'Members' section on the left of the WordPress admin. Each member will be added as a separate 'post' within this section.
If you're a developer, you can create a 'Members' custom post type the way you would usually. If not, you can do it using our free Easy Post Types and Fields WordPress plugin.
- Go to Plugins → Add New and search for 'Easy Post Types & Fields'.
- Install and activate the plugin.
- In the setup wizard, complete the following fields to create a new "Members" post type:
- Singular name - Add a singular label, e.g. 'Member'. This will appear when you add a new post in your Members post type, e.g. 'Add New Member'.
- Plural name - Add a plural label for your Members post type, e.g. 'Members'. This will appear in the left of the WordPress admin.
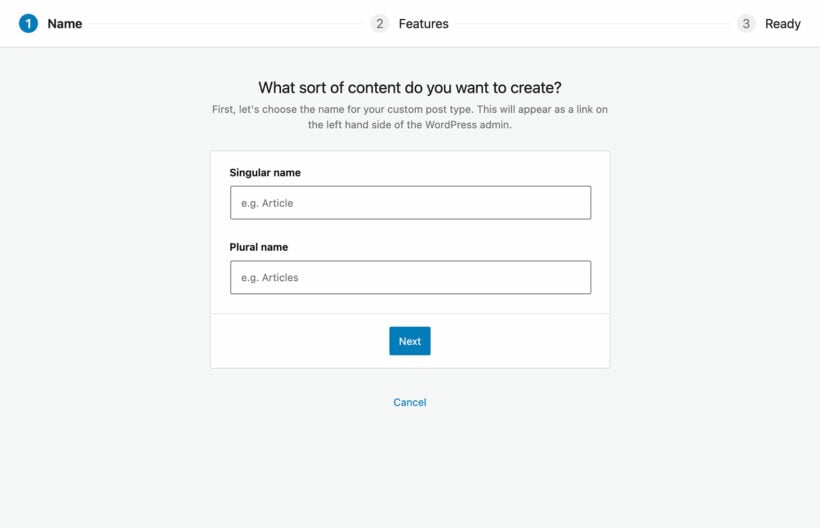
- At the end of the setup wizard, you'll see a new 'Members' link on the left of the WordPress admin. Use this to add your members to the directory.
2. Structure the member directory into categories, tags & custom taxonomies
Categories, tags, custom fields and custom taxonomies are ways to organize your members. They let people filter the directory to find specific types of members quickly.
Categories, tags, custom fields and custom taxonomies let you store information that will apply to multiple members in your directory. People viewing your members directory can filter the table to find all the members with a specific category/tag/taxonomy.
For example, you might want to categorize your WordPress member directory by local area. You could create a category, tag, or taxonomy for each geographical area. An 'Area' filter could appear above the member directory so that users can filter the table for members in a specific area.
These 3 ways of organizing content in WordPress are quite similar. To be honest, it's not that important which you use, but here are some tips to help you decide between them:
- Categories - Use WordPress categories as the primary way of organizing your member directory. All members should come under one or more categories.
- Tags - Tags are labels that provide extra information about your members. They're optional and members can have no tags or several.
- Custom Taxonomies - Use these for additional categorization that you want to use in the WordPress member directory. For example, if you're using your main categories for the geographical area then you might want custom taxonomies for any other ways you want to categorize your members.
Some examples
For example, you might use categories to record the geographical area of each member, e.g. 'England'. Each member might have some tags relating to their specific skills such as 'French speaking' or '5+ years experience'. You might have custom taxonomies for 'Level' (e.g. Junior, Intermediate, or Senior Consultant).
You can create tags when you add the members later, but you need to add the categories and custom taxonomies now.
2a. Create your categories
- Go to Members → Categories in the WordPress admin.
- On the left-hand side, add the name and slug (the end bit of the URL) for each category you want to create.
- Click 'Add New Category'.
- Repeat the process for all the categories you want to create.
Tip: You can create sub-categories by selecting another category as the 'parent'. However, your member directory will list all the categories and sub-categories on the same level, for example in the 'Categories' filter dropdown. If you want to list them separately then you should create a custom taxonomy instead. For example, you might be using your top-level categories to record each member's country. Instead of adding the regions within each country as sub-categories, you can create a custom taxonomy for 'Region'. This will let you list the regions as a separate dropdown filter above the members table, instead of combining the countries and regions in a single list of categories.
2b. Create custom taxonomies
Create custom taxonomies using the Easy Post Types & Fields plugin you used to create the 'Members' post type:
- Go to Easy Post Types → Post Types and click the 'Custom Taxonomies' button next to the Members post type.
- Enter the name for the taxonomy and click Save.
- This will then appear on the Add/Edit Member page.
2c. Create custom fields
Custom fields are extra pieces of information about each member that aren't covered by WordPress's standard fields. Examples include phone numbers, email addresses, or dates of birth.
Look at the list you wrote earlier about the data you need in the WordPress member directory. This probably includes things like member name, phone number, etc. Mark which items in the list correspond to the following WordPress fields:
- ID - This is the unique ID for the member which is stored in the WordPress database and will be created automatically when you add each member. The IDs will be non-sequential as they are used for other types of content in WordPress too. You may want to use this to store member ids. Or if you want to choose the ID, you should use a custom field instead.
- Title - Use this for the member's name.
- Content - Use this for the main description on the member profile.
- Excerpt - Use this if you want to display a brief introduction to the member on the main directory page. (If you prefer, you can leave this blank and just display the first few words of the main description instead.)
- Image - Use this for the member's photo or logo.
- Date - This is the date when the member was added to the website. You can change the date if needed.
Any fields that don't come under the above list and aren't suitable for categories, tags, or custom taxonomies (i.e. they're not unique to each member) should be added as custom fields. Examples of the sort of member data you'll need custom fields for include email address, phone number, and date of birth.
To create WordPress custom fields for your members:
- Go to Easy Post Types → Post Types and click the 'Custom Fields' button next to the Members post type.
- Enter the name for the custom field and click Save.
- This will then appear on the Add/Edit Member page.
3. Add members to the directory
Now you've finished creating the infrastructure for storing your member profiles in the directory. It's time to add all your members:
- Go to Members → Add New in the WordPress admin.
- Add the member profile using the standard WordPress fields, categories, tags, taxonomies, and custom fields you created earlier.
- Click the blue 'Publish' button.
- Repeat the process for all your other member profiles.

Pro tip: To add large numbers of members in bulk, use the Setary spreadsheet editor. This syncs with your WordPress site and will vastly speed up the process 🚀
4. Create your searchable member directory table
The next step is to add a members directory table to a page on your website. This will list all your members, with optional click-throughs to the individual member profile pages.
Here's Part 2 of my video tutorial on how to create a WordPress members directory with profiles. Or you can read the written instructions below.
- Buy the Posts Table Pro plugin, download the plugin files from the order confirmation page and copy your license key.
- Go to Posts → Add New in the WordPress admin.
- Click 'Upload' and upload the Posts Table Pro files.
- Activate the plugin.
- Activate your license key in the setup wizard, and follow the instructions to create your main member directory listing. This will take you through decisions such as which columns of member data to include.
- The final page of the wizard will give you a shortcode to insert the member directory onto your site. Use this to add it anywhere you like.
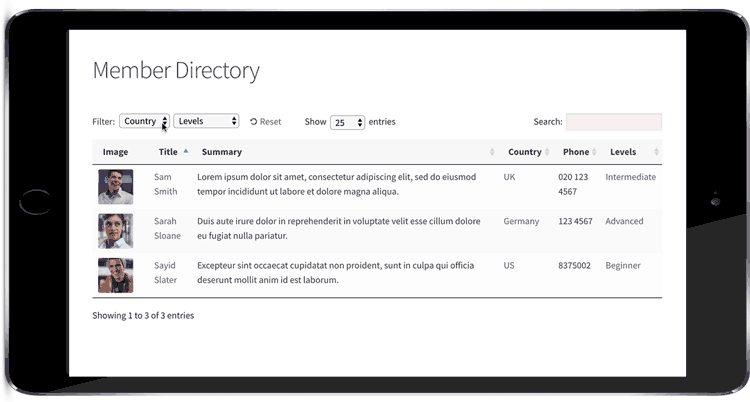
You will see all your members listed in a searchable directory:

5. Customize your WordPress member directory
The Posts Table Pro setup wizard will walk you through the main options. Here are some that are particularly useful for a WordPress member directory.
Add filter dropdowns
By default, the WordPress member directory includes a search box above the table. You can also add filter dropdowns to let users filter by category, tax, or custom taxonomy. Visitors can select several values at once, and each filtered view of the directory has its own URL they can bookmark or share.
Choose filters in the setup wizard or by editing your member directory in the Post Tables section of the WordPress admin.
Change the order of your members' list
Remember to change the sort order of your member directory to one that is most useful to your visitors. The default member directory lists members on the date they were added, with the most recent first. You can change it to sort by any column in the table or other options such as setting a custom order.
Most WordPress member directory plugins sort the list alphabetically.
Disable individual member profiles
In the default members table, you can click on a member's title or image to view their profile page. You can disable this by clicking the pencil icon next to each table column. All your members will still be listed in the directory table - but users won't be able to view separate profile pages for each member.
Create a directory listing specific members only
By default, the directory will list all members. If you prefer, you can create multiple tables - each listing different types of members. For example:
- You may want to list members with different skill levels on different pages of your website.
- Alternatively, you might want to divide your member directory page into multiple sections. You might have a 'Europe' subheading followed by a table of members in the Europe category. Then you could have an 'Asia' subheading and a table of members in the 'Asia' category. And so on.
You can add tables containing members with a specific category, tag, taxonomy, or custom field. (It's also possible to create tables with members who were added on a specific day, month or year but you're less likely to need this.) Simply choose which members you want to display in the wizard or by editing the table.
Create a 'Search members' page
A standalone search page lets users search for members without displaying the full directory. It's perfect for homepages or sidebars where you want a clean search interface.
The instructions above showed you how to create a WordPress member directory with an AJAX-powered search box above the list of members. You can also create a standalone page allowing people to search the member directory.

There are two ways to add a search box anywhere on your member directory website:
- Add the 'Posts Table Pro: Search Box' widget to any widgetized area. Change the widget name to something like "Find a Member".
- Insert the
[ptp_search placeholder="Find a Member"]shortcode into any page. If you're using a page builder such as Gutenberg, Divi or Elementor then insert this into a 'Shortcode' block.
The member directory search looks across every column in the table. For example, if you included a "City" column in the table then this will be searchable.
For an even more powerful member directory search, you can use Posts Table Pro alongside the SearchWP plugin. This supercharges the search by letting you control the logic of the search, view analytics on how people are using the search, and more.
How to password protect your WordPress member directory
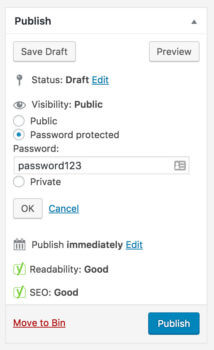
If you want your WordPress member directory and profiles to be publicly available then you've finished - well done! To create a private members directory, the easiest option is to password protect the relevant page in WordPress.
- Go to 'Pages' in the admin and click on the page used for your WordPress member directory table.
- Click the 'Edit' link next to 'Visibility' in the 'Publish' panel at the top right of the screen.
- Choose 'Password protected' and enter a password for the page.
- Click the blue Publish or Update button.
You can then give the password to everyone who needs access to the member directory.
For a more advanced solution, you can use a WordPress membership plugin to protect the page or to create a wider members area. The Groups WordPress plugin offers a simple, user-friendly way to create a protected members area.
Create a members sidebar widget
If your WordPress member directory website has a page sidebar, then it can be a good idea to list members in a widget. The best way to do this is to show the full member directory on the main page, and a simpler version in a sidebar widget.
This is how to add a simplified member directory to your website's sidebar:
- Go to Tables → Add New.
- Create a table listing the 'Members' post type you created earlier in this tutorial.
- On the 'Columns' page, just choose two or three columns. I would recommend something like "image, title, button". This will create a 3-column WordPress member directory containing the name of each member, plus their image and a button linking to their full member profile.
- If your page sidebar is created using the Gutenberg block editor, then use the 'Posts Table' widget to insert the new table. Alternatively, copy the shortcode from the last page of the table builder and paste it into a text widget.
How to allow members to sign up from the front end and sell access to the member directory
Front-end registration lets members sign up directly on your website. You can even charge for directory listings using payment gateways like PayPal or Stripe.
One of the best ways to make your member directory more valuable is to allow users to sign up for membership directly from the front end of your website. This can be done easily using Gravity Forms, a popular form builder plugin for WordPress.
The way it works is that you'll use Gravity Forms to create a membership signup form. You'll set this up so that when a new member registers, it will save their information to the 'Members' post type you created earlier in this tutorial. When you approve the new registration, the member will automatically appear in the member directory which you created using Posts Table Pro.
This is the fastest way to create an automated WordPress member directory. I recommend holding new member registrations for moderation, but you can automate it 100% by auto-publishing the new member posts instead of saving them as drafts and publishing them manually.
Step 1: Create a member's custom post type with Gravity Forms
Make sure you have followed the instructions above to create a members custom post type in WordPress. Once this is set up, you can use Gravity Forms to create a form that allows users to sign up for membership. To do this, you'll need to install the Gravity Forms add-on, which allows you to save the information submitted by the user to the member's custom post type.
To create a form, simply navigate to Forms → New Form in your WordPress dashboard and add the necessary fields. You can include fields for user information, such as name, email address, and a brief description, as well as any other relevant details you want to collect. Make you have created a field for each of the pieces of data that you added to your members custom post type.
Next, you need to use the Gravity Forms + Custom Post Types plugin to map the form fields to your members custom post type. This means that when a new member registers, their data will automatically be saved to the correct fields in your member directory. Gravity Wiz have a tutorial about how to save Gravity Forms submissions as custom posts. Do this, then come back finish the process of setting up the WordPress members directory plugin.
Once you've created your form, you can add it to a page on your website using the Gravity Forms shortcode. Name the page something like 'Member Registration' or 'Become a Member'.
Step 2: Use Gravity Forms payment extensions to sell access
To sell access to your member directory, you can use Gravity Forms payment extensions to create a payment gateway for users who want to be included in the directory. There are several payment gateway options available, including PayPal, Stripe, and Authorize.net, so you can choose the one that works best for your business.
To set up a payment gateway, you'll need to install and activate the appropriate Gravity Forms payment extension. Once this is done, you can create a new form and add the payment fields to it. This will allow users to pay for their membership directly from your website.
Create your own WordPress member directory with member profiles
Now it's your turn! I've given you all the information to create a fully functional member directory for your WordPress site. You know how to create a 'Members' custom post type with various fields of data about your members. I've told you how to use Posts Table Pro to create a searchable members directory. You know how to customize the members' table and where to get the resources to edit your member profile template. I've even shown you how to hide the member directory from public view.
Once you've finished your member directory, you can also use Posts Table Pro to present other types of content. For example, you can use it as a WordPress document library plugin or create a publications library. You can even use it as a WordPress audio library, video gallery, or events list.
Allowing users to sign up for membership directly from the front end of your website and selling access to your member directory can also greatly increase the value of your directory while generating revenue for your business. By following the steps outlined above, you can easily set up these features using Gravity Forms and WordPress. Don't forget to enable moderation to ensure your directory stays up-to-date and relevant.
I'd love to see a link to your own WordPress member directory after you've created it. How did you get on? Is there anything I can do to improve this WordPress tutorial? Please leave your comments below.
27 Comments
How do I change the color of the text in the fields that are not links?
Hi, Rayyan. Thanks for asking. The posts table inherits the styling that is applied to the page that it appears or is displayed on, and this usually comes from the theme you're using. That is, the text in the posts table gets its styling (e.g. color) from your theme. You can change this by setting the text color of your theme if it has Typography options in the Customizer (under Appearance > Customize). If not, you can change this via custom CSS also in the Customizer (under Additional CSS). For more details, see: Can I change the styling of the posts table?
My website needs to enable members to select which directory they want to be associated with, and be able to change that by (a publish/unpublish checkbox for each user) and the site will actually have multiple member listings.
Why?
A page will say, "We, the undersigned, believe in X, and wish to say so on the record, publicly." That will be one particular member directory.
Then another page will go further. And that page will be available publicly.
Then a third page will go even further.
Maybe up to a fifth page? Dunno. Never done this before. Each list is potentially independent. Each user can check the box and add themselves to the list. Or they can uncheck and remove themselves.
Is this possible with your (admittely wonderful) product? LMK.
Hi, Jose. Thanks for asking. You can implement this by adding/creating a custom taxonomy to list/store the names of the member directories on your site as its terms. Then use the Universal Frontend Editor plugin by WP Sheet Editor to allow your members to add/edit/remove which taxonomy terms (member directories) their member listing will appear or be displayed/included in when viewing it in the front-end of your site. For more details about this, please see our tutorial about how you can List WordPress posts or pages in an interactive table with frontend editor.
Please let me know if you have any more questions. You can also enquire in more detail via our dedicated Support Center. Cheers!