WooCommerce mix and match: Custom product bundles tutorial
WooCommerce is an incredibly powerful and flexible e-commerce platform. You can use it to create just about any type of online store and offer all kinds of online shopping experiences. You can even use it to create a WooCommerce mix and match products website.

Whether you’d like to start selling custom gift hampers, assorted donuts, and pastries, or bespoke food boxes, WooCommerce makes it incredibly easy to get started.
Paired with the right plugins, WooCommerce is the perfect solution for selling bespoke mix and match products and taking customized orders. After ensuring compatibility and setting everything up, your customers will have the ability to place personalized orders on your online store. They can view items in a user-friendly, catalog-like list, choose options and tick the items they’d like to add to their order and place their customized order. All from a one-page WooCommerce order form.
In this article, we’ll cover everything you need to know about WooCommerce mix and match products. You'll learn how to add products in WooCommerce, as well as how enabling customers to personalize their orders can benefit your online shop and how people are utilizing this feature. We’ll also step through a quick tutorial to help you create your own WooCommerce mix and match online store using the WooCommerce Product Table plugin.
Let’s get started!
Some examples of WooCommerce mix and match products
Mix and match products work by allowing customers to select individual products they’d like to purchase and add them to a gift hamper, product box, or bundle items. Let’s take a look at some of the most popular types of WooCommerce mix and match products that you can sell with WooCommerce.

Example #1: Pizza, sandwich, and salads
Customizable food items such as pizzas, sandwiches, and salads are often sold using a mix and match system. For instance, a WooCommerce-based restaurant that allows customers to place orders online usually allows customers to choose toppings and filings to put together their own meals. This is just one of many mix and match products examples, where WooCommerce can be utilized to offer personalized and customizable options to customers, such as selecting ingredients for their pizza, sandwich, or salad.
Your WooCommerce mix and match products offering may vary slightly depending on what you're selling. However, the core concept remains the same. Essentially, you allow your customers to build their own meals. For instance, if you were selling pizzas then you’d let customers choose their base, sauce, toppings, and dips. They mix and match the pizza options to create their own customized pizza - all using WordPress and WooCommerce.
Example #2: Gift hampers
Buying a hamper as a gift is always more special when you can select the individual items you’d like to add to it. Whether you’re selling face and body products, wines and candles, decadent chocolate, corporate gifts, or gourmet products, you can create a personal gift experience by letting customers mix and match their own selection of items.
Learning how to add products in WooCommerce opens up several avenues for offering WooCommerce mix and match products on your online store. Some companies, for instance, sell custom meat or vegetable deliveries to customers on a subscription basis. With WooCommerce, you can easily offer this option on your online store, in addition to selling custom meat or vegetable packages on a subscription basis and other mix and match products examples. Keep reading to learn how to do this and more.
How do customers mix and match products in WooCommerce?
Create WooCommerce mix and match products order forms to let customers build their own customized products or create-your-own combo offers. It will look something like this:
This is how the WooCommerce mix and match products system works:
- You have a page on your online store where you list all of the products (and variations or other options) that customers can choose from Generally, the products are divided into several categories, each listed separately on the mix and match page. The categories should be based on how the customer would actually put together their mix and match product order.
- The customer chooses items to create their own unique mix and match products Standalone items appear on individual rows of a table, whereas mutually exclusive items appear as dropdown lists within a single row of the table. The customer simply ticks a checkbox next to each item they’d like to add to their mix and match product.
- Once they’ve picked out all of the items they’d like to purchase, they click the Add Selected to Cart button This adds all the selected items to the WooCommerce shopping cart.
- The customer views their cart and can make changes to it, if necessary Once they’re happy with the order, they can proceed to the Woo checkout page and make a payment.
- As the store owner, you’ll receive an email with the order details You can then build the customer's mix and match product, add the products they selected to it, and ship it to them.
Which WordPress plugins will I need?
Under the hood, the mix and match products system uses WordPress to power your overall ecommerce website. It requires a free WooCommerce plugin to create products and manage the checkout process. You'll also need the WooCommerce Product Table plugin to list your inventory in a table layout on the mix and match product order form.
Next, I'll tell you how to set up your WooCommerce mix and match plugin. But first, let's look at a real-life case study of a website with this exact setup.
Case studies - How other WooCommerce websites sell mix and match products
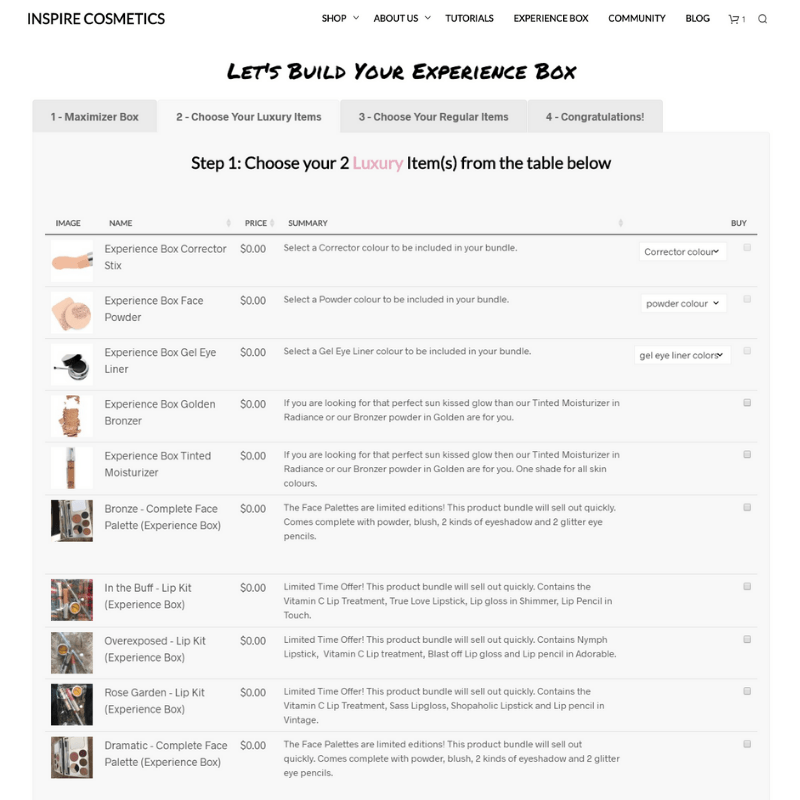
Inspire Cosmetics - selling mix and match cosmetics
Inspire Cosmetics has created a multi-step process for ordering mix and match make-up and cosmetics.
They used the Beaver Builder WordPress page builder plugin to create a series of four connected pages in tabbed layout options. Each tab contains a separate list of WooCommerce mix and match products, created using the WooCommerce Product Table plugin.
This makes it quick and easy for customers to choose a container, select the contents and place their order in WooCommerce.
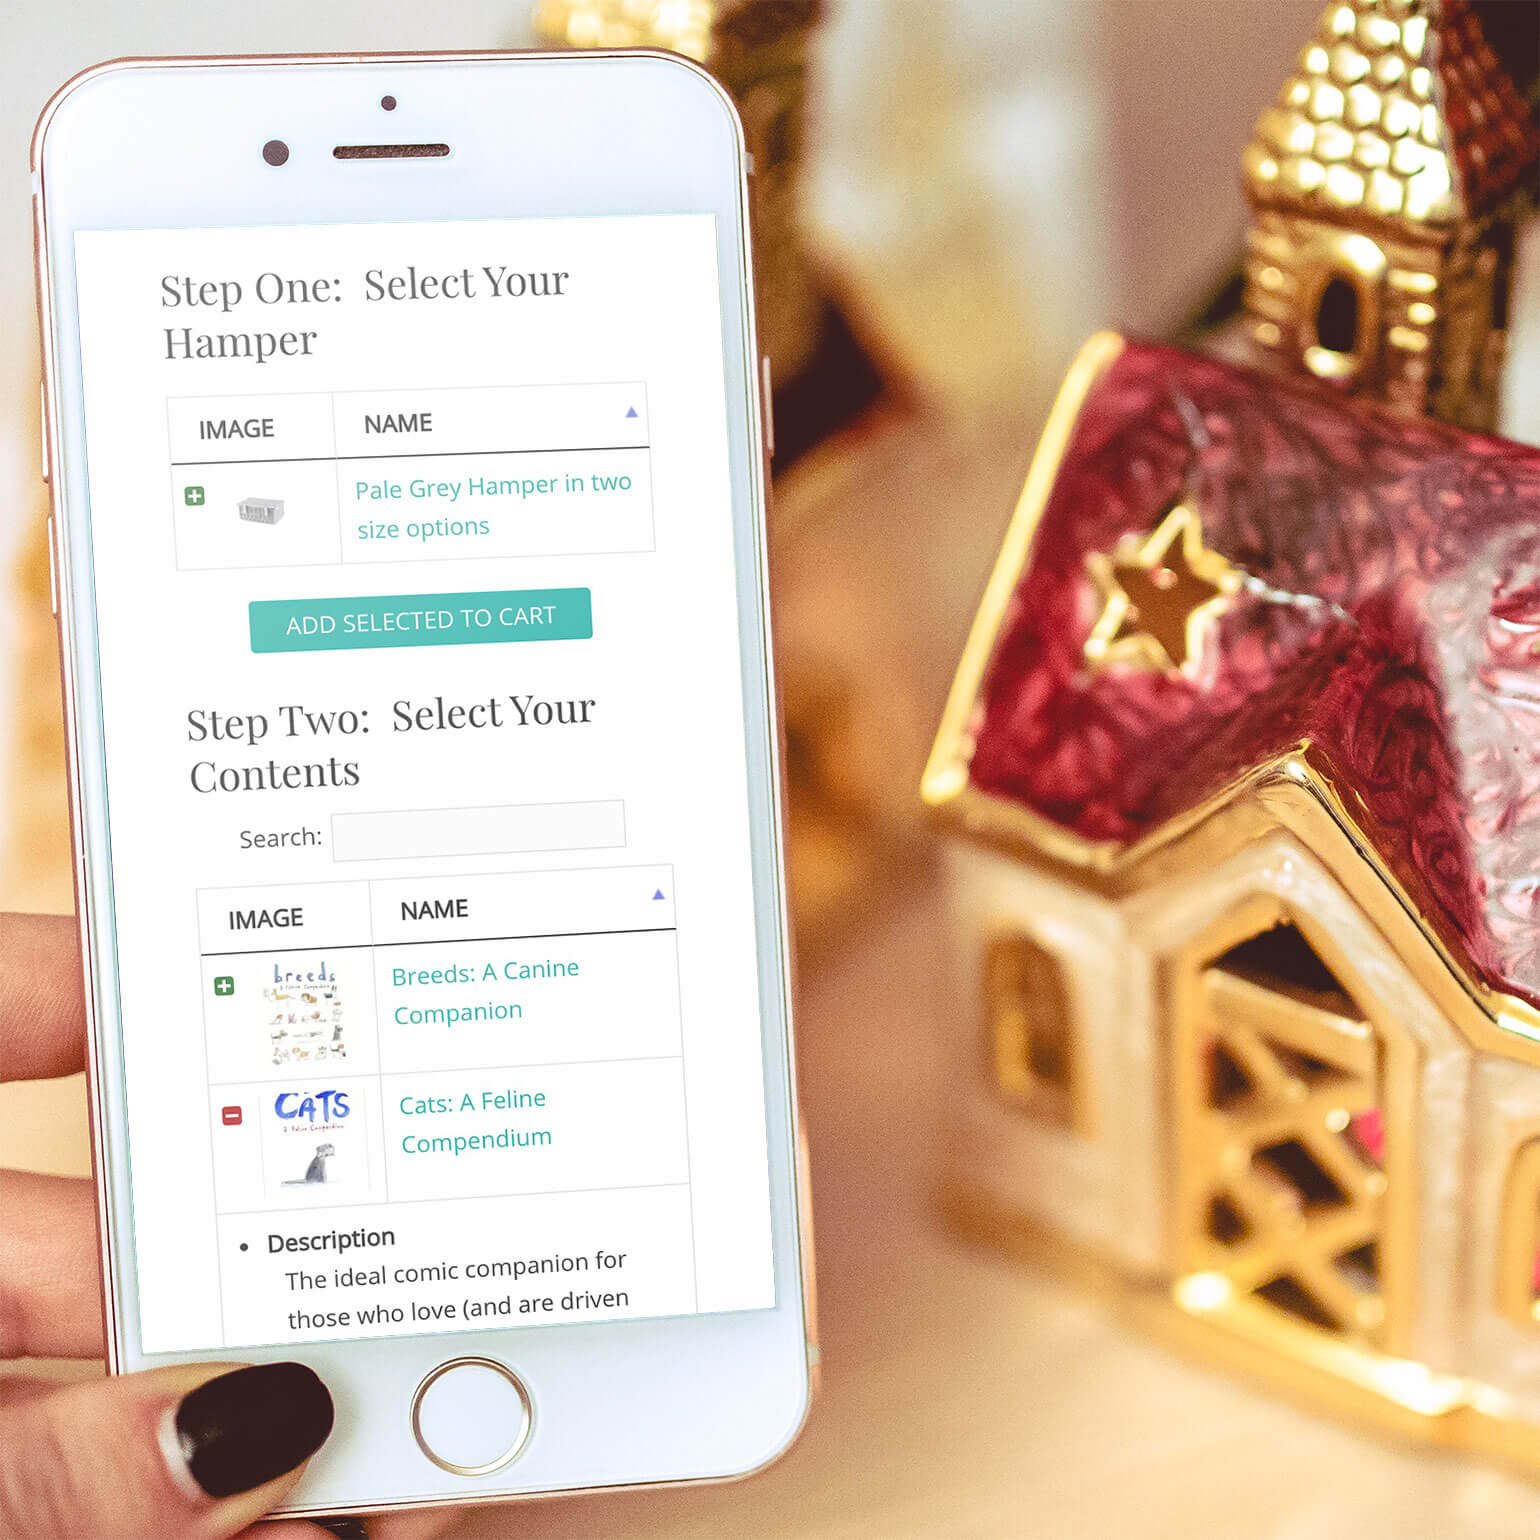
Barks & Squeaks - selling mix and match pet hampers

Barks & Squeaks use WooCommerce and WooCommerce Product Table to sell mix and match gift hampers for pets.
They list the items from each category on a single page. The customer chooses their container options first, then scrolls down to mix and match the contents.
Now you've learned all about how a WooCommerce mix and match plugin works. Next, I'll tell you how to set it up on your own WordPress website! Keep reading and we'll get started straight away.
How to create a WooCommerce mix and match products website
Letting customers put together their own product bundles using a product configurator can help you increase sales and make the customer feel special.
This tutorial assumes you already have WooCommerce installed on your WP website. If not, check out the fantastic guide on how to create a WooCommerce online store. When you're ready, continue this tutorial to transform it into a WooCommerce mix and match product configurator.
Here's a video on how to set it all up. You can also read our detailed written instructions below.
Step 1: Create the mix and match product categories
First, figure out how you’d like to design the mix and match products' user flow. Decide which categories you’d like to divide the WooCommerce mix and match ordering system into.
For example, if you wanted to let customers build their own gift hampers, you might consider creating a category for the container, the contents, and wrapping and filling:
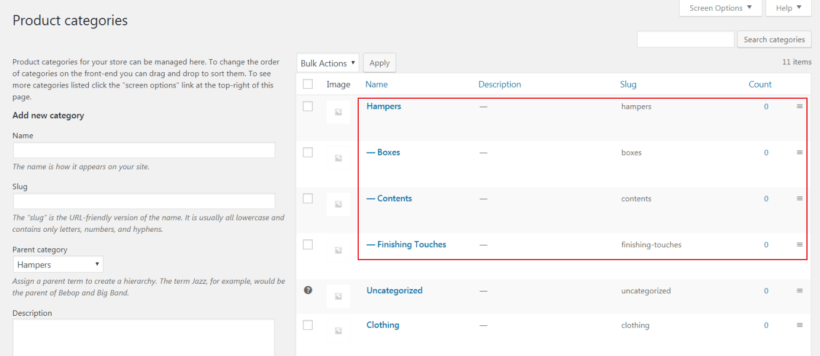
It’s a good idea to create a logical category structure that takes the customer on a journey and helps them put together their WooCommerce mix and match product in an intuitive and user-friendly way. In the above example, customers would order using a three-step process:
- Select a container.
- Choose the items they’d like to add to the container.
- Configure padding and wrapping options.
This way, your customers can mix and match their own bespoke gift hampers.
Once you’ve settled on which categories you’d like to create, head over to Products → Categories and create as many as you need.
Step 2: Plan out products and add them to your online store
Next, we’ll add the individual items we want to sell to our WC online store. The items that customers can mix and match to build their product should be added as WooCommerce products.
Following our example, here are some of the WooCommerce products you might add under each mix and match category:
Container/Hamper
- Hamper
- Box
Contents
- Candied Nuts
- Luxury Biscuits
- Decadent Chocolates
- Red Wine Bottle
- White Wine Bottle
Packaging
- Gift Wrap
- Ribbon
- Straw Filling
First, jot down all of the products you’d like to sell. Categorize them under one of the categories you created in the previous step. Once that’s done, you need to decide whether you’d like to create each item on your list as an individual product or group it into variations.
To decide whether a particular product needs to have variations, consider whether the customer would have to make an either/or choice. In the example outlined above, the customer would have to pick either the hamper or the container. Whereas in the second stage, they’d simply be asked to select all of the items they’d like to mix and match.
Add products and/or variations based on these principles:
- For 'or' choices where the customer can only choose one option, create a WooCommerce variable product. Add each option as a variation.
- For 'and' choices where the customer can choose multiple options, create a standalone WooCommerce product for each item.
Tip: If you want to add multi-select options to individual products, keep reading to learn how.
Step 3: Add products to WooCommerce
Once you’ve planned out your products, add them to your WooCommerce store by following these steps:
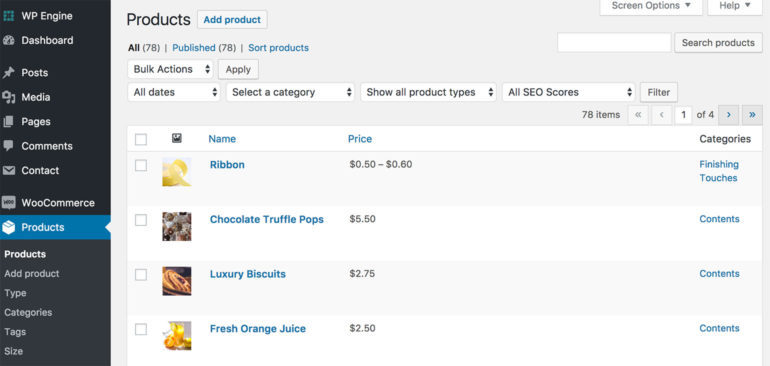
- Navigate to Products → Add New from the admin panel.
- Enter the WooCommerce mix and match the product’s details such as product title, description, and featured images.
- Assign categories and tags.
- From the Product Data section, choose a product type based on the format you’ve decided:
- Simple Product. For standalone products that customers can add to their mix and match product bundles without variations, select the Simple Product.
- Variable Product. Select Variable Product for all mutually exclusive items that customers can personalize before adding to their shopping carts. Follow these instructions to add variable products.
- Click the Publish button.
Follow these steps to add all of your products to your online store.
Step 4: Create a mix and match products page
Now we're getting to the fun part! This is where your WooCommerce mix and match products configurator comes to life.
By now we’ve added all of the products to our WooCommerce store and categorized them. Next, we'll list everything in a mix and match products order form. By doing so, customers will be able to mix and match products and build custom gift packages.
4a. First, create your mix and match product tables
- Purchase the WooCommerce Product Table plugin and install it on your WordPress website.
- Head over to Products → Product Tables → Add New.
- Use the table builder to create your first table of WooCommerce mix and match products as follows:
- On page 1 of the table builder, choose the option to

- Use the next page to choose which products to display in the order form. When creating a WooCommerce mix and match site, you'd normally create multiple tables, each listing specific products or items from a different category. That way, you can structure the order form into multiple sections.
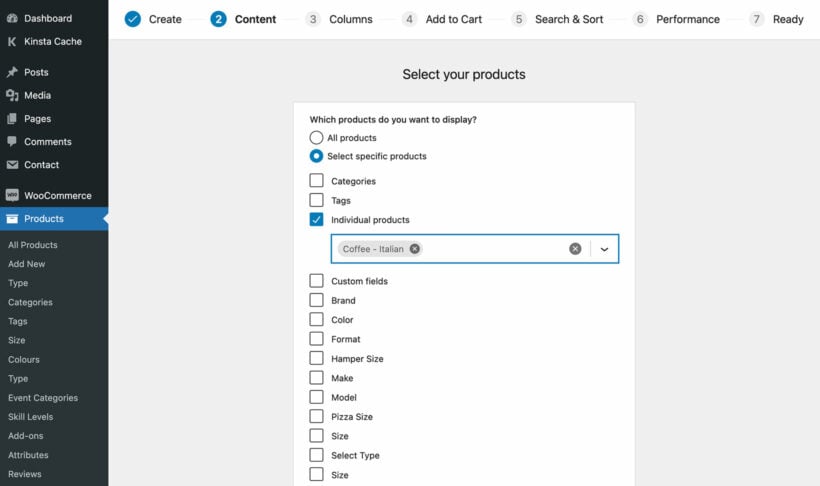
- Add all the columns of product data that you want to include in the mix and match order form.

- On page 1 of the table builder, choose the option to
- Change the 'Add to cart method' to 'Checkbox' and change the variations option to 'Dropdown'.

Repeat the above steps to create a separate table for each group of mix and match products that you want to list separately. To save time, duplicate an existing table at Products → Tables and edit which products are included.
4b. Create the mix and match products page
- Next, go to Pages → Add New to create a new page where we’ll list the WooCommerce mix and match products. Add any text that will appear above the order form, such as instructions or information about the ordering process.
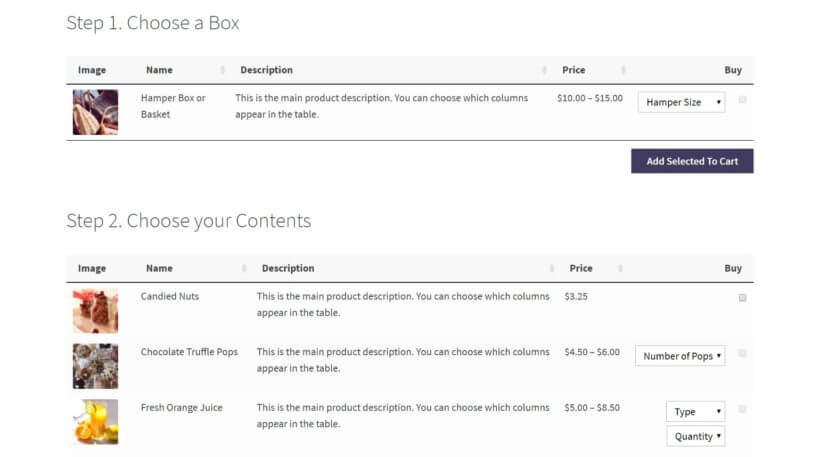
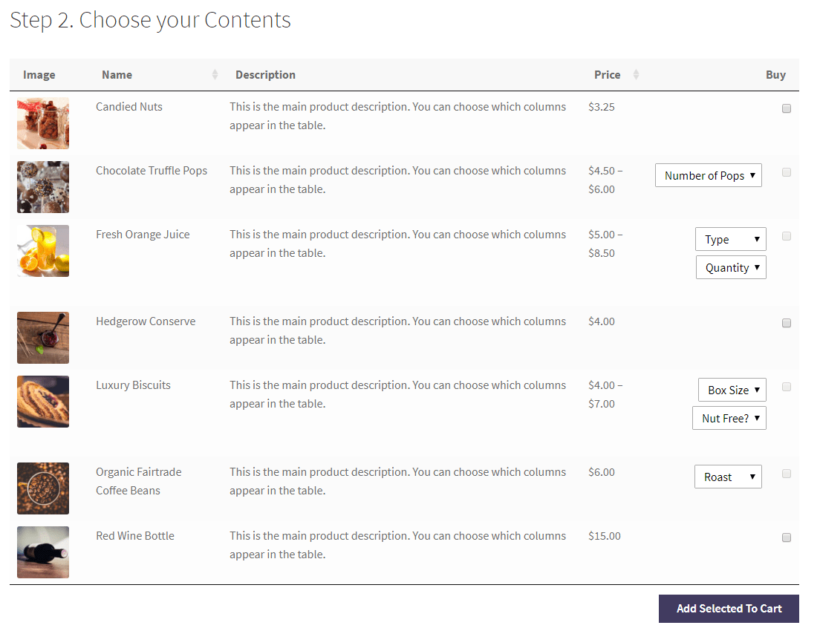
- Divide the page into sub-headings. Each sub-heading will be based on the categories you created in Step 1. Following our example, the sub-headings might be Step 1 - Choose a Container, Step 2 - Choose your Contents, and Step 3 - Choose the Finishing Touches.
- Finally, insert a 'Product Table' block under each heading and select the relevant product table which you created earlier. If you don't use the WordPress block editor then instead, you can get a shortcode for each table from Products → Product Tables.
That’s it! Now hit the Publish button and preview your page on the storefront. It should look something like this:
Bonus tip #1 - Add extra mix and match product options
Fortunately, you can easily do this with the WooCommerce Product Options plugin. This fantastic WooCommerce extension makes it easy to add extra options to your mix and match products. For example, you can add multi-select checkboxes to each product. You can even add text fields where the customer can enter a personalized message.
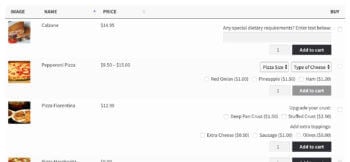
Bonus tip #2 - Too many options? Add quick view lightboxes
Some WooCommerce mix and match products websites end up with a large number of variations or options for each product. For example, look at the Pizza Fiorentina product in the screenshot above. This product has 2 rows of product add-ons, which isn't a huge number of options - and it's already taking up a fair amount of vertical space. As a result, you can easily imagine what would happen if you tried to list several dozen options per product!
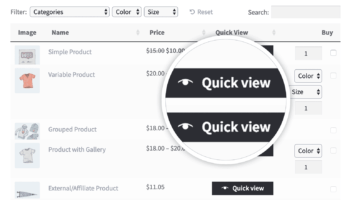
Customers click on the quick view buttons to view more product information and purchase options in a lightbox window.
There are lots of benefits from using quick view to sell WooCommerce mix and match products:
- You can choose what information to include in the lightbox. For example, you may wish to show the full gallery of product images. Or you may wish to hide the images and just show extra product data or add to cart options. Alternatively, you can have both! Either way, there's no limit to the number of variations and options that you can offer in the lightbox.
- Customers remain on the product table at all times and don't have to visit a separate page to purchase each better. That's why quick view is better than using the single product page to sell mix and match products.
- WooCommerce Quick View Pro also supports other methods of selling mix and match products such as grouped products, Composite products, and Product Bundles. List the products in a table, and customers can create custom product marketing bundles from within the quick view lightbox.
Bonus tip #3 - Sell mix and match product subscriptions
Most mix and match WooCommerce products configurators sell products on a one-off basis, with a single payment.
If you prefer, you can create mix and match product subscriptions. The instructions are the same as above, but you need to add the YITH WooCommerce Subscriptions plugin to take repeat payments.
WooCommerce Subscriptions make it easy to accept free trials and regular payments for each product. You can choose whether to offer a free trial and whether customers will be billed weekly, monthly, or whatever frequency you like.
Bonus tip #4 - Restrict how many mix and match items the customer will order
So far, you've learned how to sell mix and match products by setting a fixed regular price for each product or variation. The total order cost is the sum of all the products that the customer selects and adds to their cart.
Some WooCommerce mix and match websites prefer to set a fixed cost for the entire product box. If you do this, then you'll need to add a product price for the container itself and set the price of the contents products as $0.00. (You can easily hide the item pricing column of the tables listing the mixed and matched contents.)
If you do this, then you'll want to restrict the number of products that the customer can order. You can easily do this with the WooCommerce Quantity Manager plugin. Its plugin lets you create a minimum and maximum quantity rules. The rules prevent customers from ordering the wrong amount - essential for selling fixed price mix and match products in WooCommerce.
For example, you might set a minimum and maximum quantity of 1 for the container itself. You would then add a maximum quantity or value for the 'contents' category. This controls how many items can be added to the container.
Bonus tip #5 - Sell mix and match packages with quantity-based discounts
Perhaps you want to sell WooCommerce mix and match products with a choice of packages, with discounts based on the number of products ordered. This is a good way to give discounts based on the number of photos purchased, without having to restrict the number of products that each person can buy.
To do this, use the WooCommerce Discount Manager plugin to dynamically change the price based on the number of products in the cart.
Next, you need to display the information in the frontend in a format that will encourage people to buy more:
- At the top of the page, add information about the different packages and prices.
- Underneath, use WooCommerce Product Table to list your mix and match products.
Customers can choose as many photos as they like and they will automatically be charged the correct price for their package.
Where to get the plugins
Letting customers mix and match products to create personalized orders and gift hampers is a great way to deliver an exceptional customer experience. And the best part is that it’s incredibly easy to do with the WooCommerce, WooCommerce Product Table, and Quick View WordPress plugins.
Now you know how to create your own WooCommerce mix and match product order form. Hopefully, you’re in a good position to take things further.
Also, be sure to check out our step by step tutorial on how to use WooCommerce to sell ‘build your own’ products for inspiration and detailed instructions!
How do you use mix and match products in your WooCommerce store? We’d love to hear from you so let us know by commenting below!
6 Comments
Is there any way to limit the number of products added in each step? Thanks! :)
Hi Daniel, thank you for your comment. To limit the number of products added, you can look into YITH WooCommerce Minimum Maximum Quantity. You can also check this for more info on the matter - Can I restrict how many products people can order as part of the meal deal?
You can also reach us via our Support Center for additional help. Thank you.
Really a good and detailed article. This is exactly what I tave been looking for.
Do you know if these plugins integrate with woocommerce subscriptions and woocommerce delivery options?
Thanks for saying so, Andreas.
You can integrate with WooCommerce Subscriptions and we have a detailed tutorial that shows you how, as well as a front-end demo that you can try out.
I'm afraid I'm not familiar with a plugin named WooCommerce Delivery Options, but you can test it with our on your site risk-free, as we offer a full 30-day money back guarantee, which lets you buy the plugin and try it for up to a month, and get a full refund if you're unhappy with it or if it doesn't suit your needs. Should you have any questions or difficulty, just get in touch via our dedicated Support Center and we'll either help you out until you get the results you need or give you a swift refund.
I just had a question. Let's say I have a meal prepping business. Clients pay me weekly for either 5 meals a week or 10 meals a week. However, eating the same meals every week would get boring. Would this allow them to go in and change the meals they want each week in their account management if it were done by a certain date and time? I know I'd have to use Subscriptions Plugin too.
Hi, Steven. Thanks for enquiring and sorry for the late reply! You can get in touch with us much quicker at our dedicated Support Center.
Yes, I agree - that could quickly get boring. To achieve what you describe would entail allowing users to edit their WooCommerce orders that have already been processed and paid for. By default, WooCommerce doesn't have this option, but you can add it by either (finding and) using a plugin that will allow your users to do so, or via a custom code snippet. Either case, especially the latter, would entail advanced usage of all the plugins involved and I hope you'll understand that it is a developer-level task.
If you don't have a developer who can do this for you, then I recommend that you post a job on Codeable where their pre-approved WordPress experts will send you a quote. We have partnered with them to provide plugin customizations for our customers. Codeable have several developers who are experienced in customizing our plugins.