How to list WooCommerce brands in a filterable product table layout
Customers love their favorite brands. That's why you need the best WooCommerce brand plugins to display product by brand, allow them to filter by brand, and more.
In the world of e-commerce, product branding is a critical element in building a strong online presence. For businesses using WooCommerce, showcasing your product brands effectively can make a significant difference in attracting and retaining customers.
WooCommerce comes with a built-in 'Brands' taxonomy which lets you display the brand of each product in your store. In this article, I'll tell you about 2 awesome plugins which will help your customers to find and view customers by brand more easily:
- WooCommerce Product Table - Display products in a quick order form complete with information about their brand. Customers can view products by brand, sort by brand, and more.
- Product Filters - Allow customers to filter products by their favorite brand.
By the end, you will have a solid understanding of how to use these tools to showcase your product brands effectively and improve your online store's performance.
What are WooCommerce brands?
WooCommerce brands are a built-in taxonomy that lets you assign a brand name, description, and logo to each product in your store. You manage brands under Products > Brands, in the same way as categories and tags. The native feature covers tagging products and basic brand archives.
To list products by brand in a sortable table, store owners add a table plugin such as WooCommerce Product Table. To let shoppers filter by brand, they add WooCommerce Product Filters.
How to use the built-in WooCommerce Brands taxonomy
This is how to add brands to your WooCommerce products:
- Go to Products → Brands.
- Set up your brands.
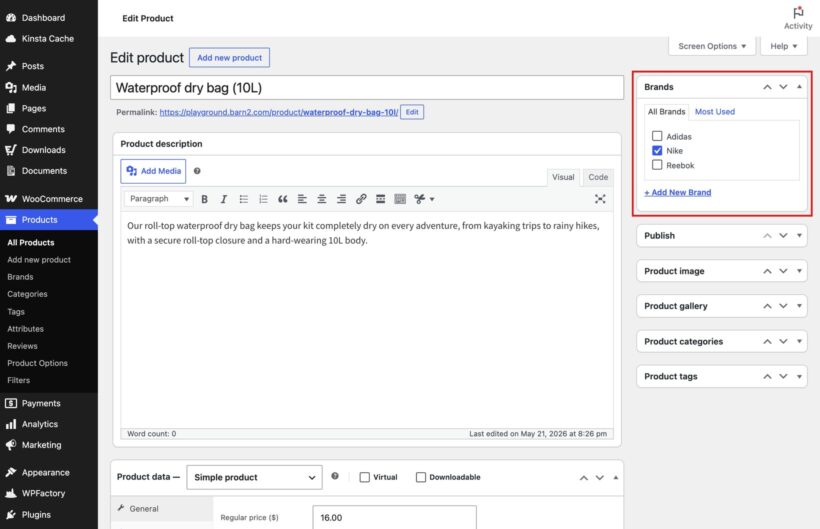
- Find the 'Brands' section on the right hand side of the Add/Edit Product screen. Select a brand for each product as needed.
As you can see, working with WooCommerce brands is really easy.
Limitation of WooCommerce Brands
While the built-in WooCommerce brands are everything you need to tag each product with brand information, it's not ideal for displaying products by brand. For example, it can't:
- List products by brand.
- Let customers sort your product list by brand.
- Let customers filter and find product by brand.
Keep reading to discover two plugins that work alongside WooCommerce brands to fill these gaps.
Native WooCommerce brands vs display plugins
The built-in brands taxonomy handles tagging and basic archives. It cannot list products by brand in a table, sort a product list by brand, or offer visual brand filters. The table below shows which tool covers each job, using features already described on this page.
| Capability | Native WooCommerce brands | WooCommerce Product Table | WooCommerce Product Filters |
|---|---|---|---|
| Assign brands to products | Yes | Uses the native data | Uses the native data |
| Sortable brand column in a product list | No | Yes | No |
| List only products from one brand | No | Yes | No |
| Brand filter dropdown above a table | No | Yes | No |
| Image, checkbox and word-cloud brand filters | No | No | Yes |
List and sort products by brand
WooCommerce Product Table is our flagship plugin here at Barn2. It works by listing your WooCommerce products in an interactive table or one-page order form. It comes with extra features such as customizable columns, search box, product variations support and more. The table plugin also provides more sophisticated ways to allow WooCommerce users to filter by brand.
Product table views are a popular way to increase conversion rates. They can boost your sales because it makes the buying process quicker and easier. Customer can quickly view all your products on a single page. They can see all the information they need (including brand, if you're using the WooCommerce Brands plugin). This lets them add to the cart without having to click elsewhere.
One of WooCommerce Product Table's biggest selling points is its ability to show extra data directly on the product listing page. It supports all the standard WooCommerce product data such as name, price, add to cart, description, short description, attributes, variations - the list goes on. However, the WooCommerce core doesn't come with a brands field. That's why you need to use it with the WooCommerce Brands plugin to display product brands in a table.
Once you have created a product table with a brand column, customers can click on the column header to instantly sort products by brand.
How to Use WooCommerce Brands with WooCommerce Product Table
- Tag your products with their brand, as described earlier in this WooCommerce brands tutorial.
- Next, use the plugin documentation to create brands and assign them to your products. This is really easy - just look for the 'Brands' section on the right of the Add/Edit Product screen.
- Next, install WooCommerce Product Table.
- The table builder will open when you activate the plugin, or you can create a table later via Products → Product Tables.
- Use the table builder to choose set up your product table. Specifically:
- On the first page, choose whether you want to list products on a page manually or use the table layout on your main shop page templates.
- On the 'Columns page', select the 'Brand' column. If you have already installed a brand plugin then this will appear automatically in the list of columns.
- On the search page, click to add filters and add a 'Brand' filter. This will allow customers to filter by brand.
- If you selected to add the table manually then the final page of the table builder will give you a shortcode which you can use to do this. Either use this or the 'Product Table' Gutenberg block to insert the table onto any page.
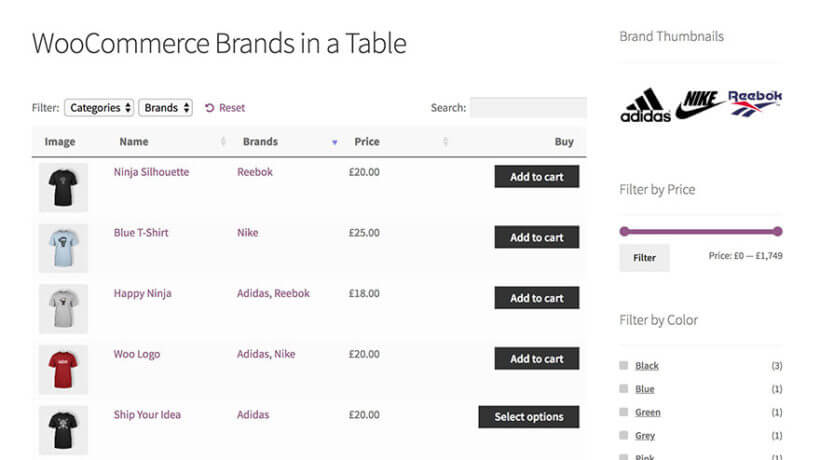
When you view your product table with WooCommerce brands, you will see a list of products with your chosen settings. You'll also see a 'Brands' column in the table. Clicking on a brand in the WooCommerce table will filter the list of products by that brand. A 'Brand' filter dropdown will also appear above the table. However, I'll show you how to add more user-friendly brand filters in a minute.
How to list products with a specific brand
You can also use WooCommerce Product Table to list products by brand. To do this:
- Go to edit your table at Products → Product Tables.
- In the 'Select products' section, select 'Brand' and then enter the slug of the brand you wish to display. You can get this from the page where you added all the brands.
- Insert the table onto a page, and it will only list products with the selected brand.
Let customers filter by brand
While the WooCommerce Product Table plugin includes simple filter dropdowns, you probably want more visual ways to let customers filter by brand. After all, customers love buying products by their favorite brand and want a quick way to find and view them.
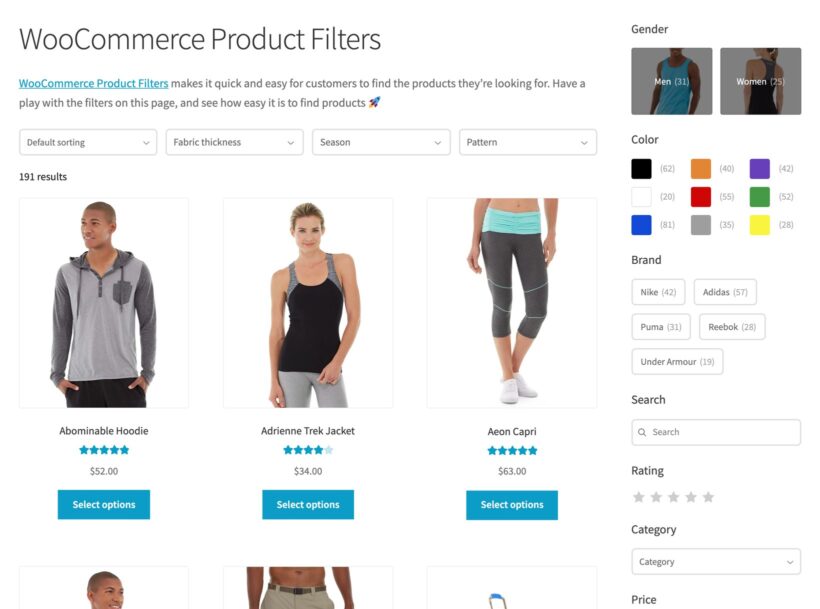
The best way to do add sophisticated and eye-catching brand filters to WooCommerce is to install the Product Filters plugin. This comes with a wide range of styles which you can use to filter by brand, including:
- Checkboxes and radio buttons listing all the brands.
- A clickable image of each brand (**recommended**).
- A word cloud displaying the name of each brand as labels.
How to add a brand filter to WooCommerce
It's easy to add filter by brand to your WooCommerce store:
- Install the WooCommerce Product Filters plugin.
- There are several ways to choose where the filters will appear on the page. You can use either of these options separately, or combine them to add filters to multiple locations:
- To display filters above the list of products on all your shop pages, select the name of the relevant filter group in the plugin setup wizard. You can also do this on the plugin settings page at Products → Filters → Settings.
- Go to Appearance → Widgets and add a 'Product Filters' widget. This will display it in the sidebar area on the pages where you list products.
- You can also display filters in other locations such as via shortcodes and Gutenberg blocks, or in your page builder plugin such as Elementor. Learn how in the plugin documentation.
- Go to Products → Filters and add or edit a filter group.
- Add a filter in your chosen style (e.g. image buttons).
- Select 'Custom Taxonomy' as the source of the data to be used in the filter. Select 'Brand' as the taxonomy name.
Frequently asked questions
How do I add brands to WooCommerce products?
Go to Products, then Brands, to create each brand. Then open the product editor and select the brand in the Brands panel on the right hand side of the screen.
How do customers filter WooCommerce products by brand?
The simplest option is the brand filter dropdown in a WooCommerce Product Table layout. For image, checkbox, or word-cloud brand filters on your shop pages, use WooCommerce Product Filters and select Brand as the taxonomy.
Can you list WooCommerce products by brand?
Not with the native feature alone. A table plugin such as WooCommerce Product Table can display a sortable brand column, or list only the products from one brand.
Take your WooCommerce brands to the next level
Enhancing the display of product brands on your WooCommerce store can improve the best branding plugins for WooCommerce, you can effectively showcase your product brands and make it easy for customers to find and filter products based on their preferences.
- With the WooCommerce Product Table plugin, you can display your products in a streamlined order form that includes brand information, and enable customers to view products by brand, sort by brand, and more.
- The WooCommerce Product Filters plugin empowers customers to filter products by their favorite brands, making it easier for them to find and purchase the products they desire.
With the tips and strategies outlined in this article, you can take your product branding to the next level and create a strong online presence for your business. So, don't hesitate to start implementing these plugins on your WooCommerce store and see the positive impact it has on your sales and customer engagement.
2 Comments
Can this be filtered in the sidebar?
Hi, Tom. If your shop page layout displays/has a sidebar, then yes you can add/display/use this filter widget on it.