Complete guide to selling your crafts online

Whether you’re just starting out selling handmade crafts or have already been doing so through online marketplaces (like Etsy, Artfire, Zibbet, Amazon Marketplace, or eBay) or social media platforms (like Instagram), you can always take the next step by setting up your own online crafts shop.
This practical guide contains an overview of the main things to think about if you want to sell arts and crafts online. You’ll also find clear, step-by-step instructions on how you can make your dreams a reality by creating your own website to sell crafts online – no technical knowledge needed!
Our easy-to-follow non-technical tutorial will teach you how to build a website for selling handmade goods. But first, let’s take a minute to discuss why you need to create your own crafts website instead of listing your products on an online marketplace. Let's consider how it can help you boost sales and increase your income from selling crafts.
Should I create my own crafts website?
Selling handicrafts on your own website enables you to maintain control of your business and avoid the restrictions and fees that come with selling on a marketplace. This way, you can decide what you want to sell, and keep 100% of the profits. Many marketplaces don’t accept certain types of products, even if they meet their handcrafted requirement.
In addition, selling crafts on your own website means you can fully customize your online store and choose its design and features. Most marketplaces don't allow any customization over the look and feel of your product pages. As a result, you can differentiate your products from the competition and grow your brand.
Websites like Etsy, Artfire, Zibbet, Amazon Marketplace, and eBay charge fees (listing fees) for showcasing your products. If you publish a listing on Etsy, it’ll cost you $0.20 in listing fees to keep your listing on the marketplace until the item is sold. After an item sells, Etsy sellers are charged 5% of the transaction fee on the sale price plus they have to pay for postage. You’ll also have to pay the payment processing fees if you accept payments with PayPal.
With your own website to sell crafts online, there are no listing fees or commission to pay - which means more profit for you!
Selling on your own online store
When you don’t pay fees to marketplaces like Etsy or Amazon Marketplace i.e. by selling on your own website, you’ll be able to retain 100% of your profits.
Keep in mind that you can still choose to sell your crafts on both types of platforms at the same time. If you’re already selling on a marketplace such as Etsy, you can keep selling there while you create your e-commerce site. However, you’ll have to ensure consistent inventory across these multiple channels and navigate through the limitations and fees inherent to a marketplace.
Setting up and running your own e-commerce site has its benefits and challenges. Knowing how to set it up will help you avoid any pitfalls. This article will serve as a helpful guide and give you clear step-by-step instructions about how to build your online store for selling handmade products. Anyone can do it and you don’t need to hire a web developer.
Further reading: The Best Print-on-Demand Plugins for WooCommerce.
Why use WordPress and WooCommerce to sell crafts online?
To create your own online crafts store, you’ll need two things: a WordPress website and the free WooCommerce plugin. Both are completely free.
WordPress gives you access to paid and free themes for your site’s design. You can easily find free WordPress themes for your crafts shop in the WordPress Theme Directory or opt for a premium theme instead.
Similarly, WooCommerce has a library of tens of thousands of free and premium extensions that add extra features to your online store. This allows you to sell crafts more efficiently.
Displaying products on your store
The default WooCommerce store layout offers limited features for craft shops. It displays products in a grid view – 2 to 3 products per row – with large photos.
On the other hand, the WooCommerce Product Table plugin offers crafters a better way to display craft products online. Its table layout gives you much more space to list multiple products than the default WooCommerce store layout, allowing you to show more products per page.
With the WooCommerce Product Table plugin, you get complete control over the information you want to include in the product table (such as product description and pricing) and how it appears to customers. You’ll be able to create searchable, sortable product tables with filter options that customers can use to see products from specific categories (e.g. handmade purses and handmade jewelry) and easily find the products they want to buy using search boxes.
In addition, you can place buy buttons for all your craft products in a single one-page order form, enabling customers to quickly add products to their shopping cart.
How to set up an online store to sell crafts online
Below we’ll show you step-by-step how to set up an online store to sell crafts:
Step #1: Create your website
To get started, you’ll need to choose a hosting provider that fits your website’s requirements.
Choosing a hosting provider
Look for a web host that offers a reasonable amount of storage and bandwidth. Make sure that it gives you basic security features to keep your site and server safe, and has tools such as easy backups and restores in case anything ever goes wrong. Additionally, your hosting provider should also let you install WordPress with one-click installation.
Kinsta is a managed WordPress hosting company that caters to both small and large-scale online businesses. It offers fast load times, scalability, and 24/7 customer support. Its Starter plan costs $30 per month for 10GB storage space for one WordPress website.
SiteGround is a popular hosting service that focuses primarily on solopreneurs and small online businesses. It has an excellent reputation for its site performance and customer services. Its StartUp plan costs $14.99 per month for 10GB of storage for one website.
Between SiteGround and Kinsta, you can choose the hosting option that fits your requirements and budget best. Kinsta has the best performance and ease of use, and SiteGround is better for low budgets.
Installing WordPress
Next, you’ll need to install WordPress and set up your website. Most hosting providers let you install WordPress using an “auto-installer” in your cPanel dashboard (a user-friendly control panel) which takes just a few clicks. If you're using Kinsta then you can tick a box to install WordPress when you set up your webspace in their Dashboard. If you’re using SiteGround, you can complete this install by following this step-by-step guide.
WordPress themes for arts and crafts stores
Once you’ve successfully installed WordPress, the next step is to choose and install a theme that has the look and feel you want to portray for your online crafts business. Here are our hand-picked WooCommerce-ready themes for selling crafts:
- Storefront for anyone looking for a flexible WordPress theme offering clean and simple site design. We used Storefront for all the screenshots in this tutorial. For something less generic, you can use any of the Storefront child themes.
- Crafts and Arts for anyone who’s looking to create an arts and crafts portfolio for displaying beautiful handmade items.
Step #2: Set up WooCommerce
Now that you’ve created your WordPress website, you’ll need to install WooCommerce and run the setup wizard. Simply log into your WordPress dashboard and navigate to Plugins → Add New.
Here, search for WooCommerce and install the plugin by clicking the Install Now button. Once that’s done, click the Activate button to activate it.
The plugin will automatically start the WooCommerce setup wizard. Here you’ll be asked questions about the location and currency of your online store. We recommend selecting PayPal and Stripe if you'll be accepting credit and debit card payments. You’ll also be asked about the different kinds of products you’re planning to sell – physical, digital, or both.
You can always come back to this wizard to change the settings later. WooCommerce is a flexible online shopping platform that lets you easily customize your online store configurations, making it incredibly easy to get started.
Step #3: Create categories for your craft products
Next, you’ll have to create product categories to structure your craft business. For example, if you sell handmade goods like jewelry, your product categories could be necklaces, rings, earrings, and bracelets.
Let’s look at how to add craft products to WooCommerce:
- From the WordPress admin panel, go to Products → Add New.
- Enter the product title, description, and product image.
- Complete the Product data section by filling in details about each craft product like the price and stock information.
- Simple product means products without variants. So, when adding craft products with only one version, keep this option selected.
- For craft products with multiple options (e.g. sizes, color, or material), select Variable product. This will enable customers to select these attributes before placing their order.
- Finally, click the Publish button to add the craft product to your store.
Step #4: Display products in a table layout
The default WordPress store page layout isn’t ideal for selling handmade crafts online. When displaying products where you want the customer to focus is on what the product looks like as well as the product information to emphasize the qualities and uniqueness of a product, you’ll need to display them in a grid-style, structured layout.
Here’s how you can create product tables on your WooCommerce store to list products on the front-end:
- Get the WooCommerce Product Table plugin and install and activate it on your WordPress site.
- Head over to Products → Product tables and create a product table based on your preferences.
- The WooCommerce Product Table plugin enables you to automatically replace the default WooCommerce templates with a product table. This way, you’ll be able to automatically add craft products order forms to your main shop page and product category pages.
- Add columns for image, name, description, price, and buy. You can also add any others you require.
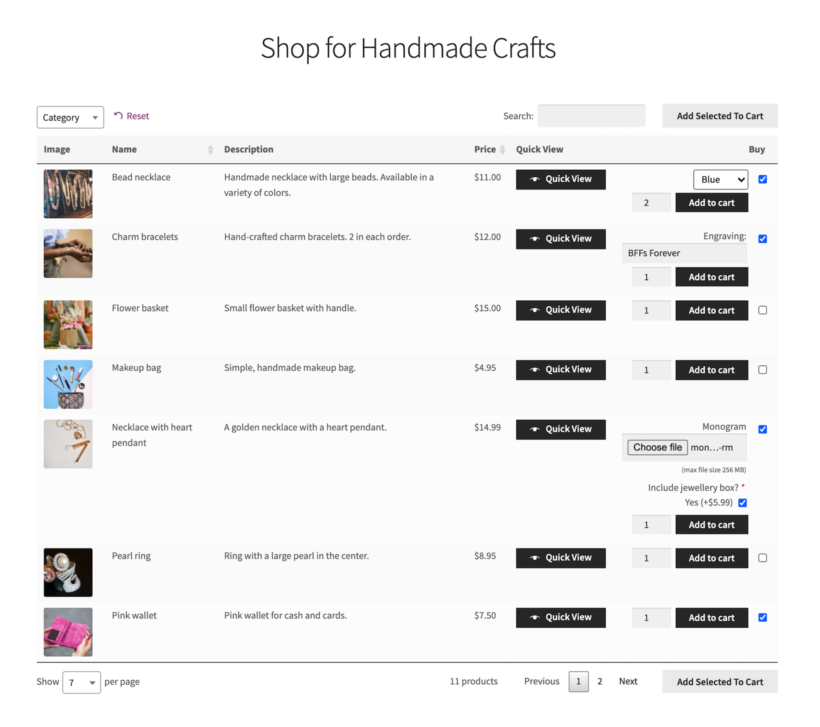
Your shop page will look something like this on the front-end:
Bonus: display products in a lightbox
A great way to optimize your customer’s shopping experience and boost online sales is by allowing them to view extra images, choose options, and add products to their cart without going to individual product pages. The WooCommerce Quick View Pro plugin helps you do just that.
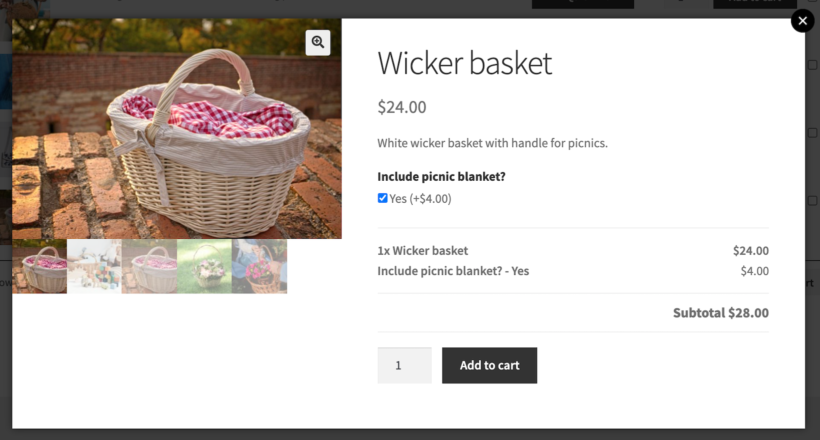
Using this plugin, you can add a product quick view to your table layout. This way, customers can view more product details and larger photos without having to visit the single product page.
The WooCommerce Quick View Pro plugin seamlessly integrates with WooCommerce Product Table to help you set up a user-friendly quick view functionality complete with product information, gallery photos, variations, and purchasing options.
Bonus: let customers personalize their products
In addition, if you plan on selling customizable craft products in your shop, then you can allow customers to place personalized orders or customize their products. You can achieve this by using the WooCommerce Product Options extension that lets you take personal messages and engravings using text boxes.
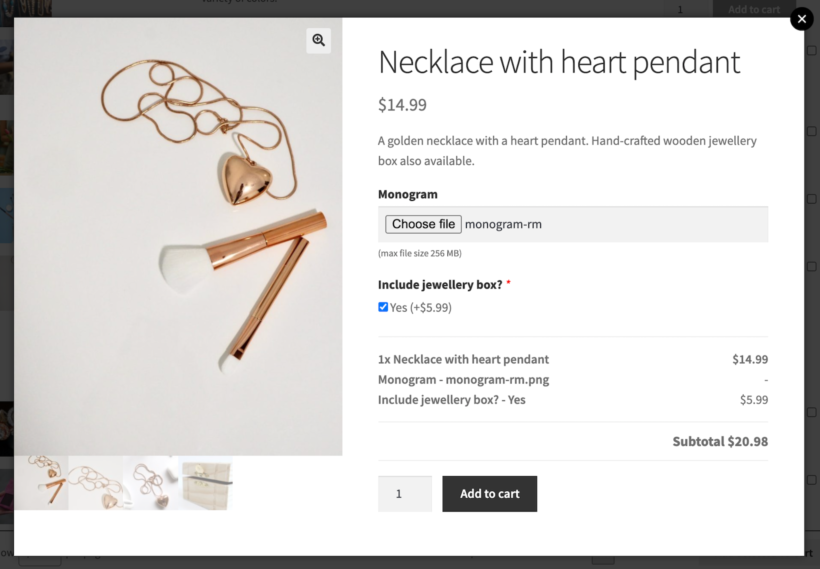
You can also use this tool to add paid or free options to your products using various field types like checkboxes, radio buttons, custom text inputs, drop-down fields, and more.
Step #5: Add pages to your navigation menu
You’ll also need to create your website navigation menu where you can add links to your main shop page, product categories, along with the About page. Here’s a step-by-step tutorial showing how you can add navigation to your WordPress craft products store.
Step #6: Start receiving orders
You might be wondering: what happens when someone places an order?
Order management in WooCommerce involves receiving, tracking, and completing customer orders. This process starts when an order is placed and ends when the customer receives their ordered package.
Once your crafts website is up and running, here’s how the order management process would work for your business:
- When a customer places an order on your website, you’ll receive an email notification. You can view the customer’s order details on the back-end.
- You’ll have to send the order details to the inventory where the order will be picked, packed, and shipped to the customers’ address.
- To see if the customer is satisfied with their order, request a review.
Sell handmade crafts online
Creating your own e-commerce website means you don’t have to pay third-party listing fees to sites like Etsy or be restricted by social media platform rules and you are in control of choosing the design and features of your website.
Setting up an online presence for your arts and crafts business is simple and easy. Plugins like WooCommerce Product Table and WooCommerce Quick View Pro allow you to create an online crafts shop that offers an exceptional user experience to your customers.
The WooCommerce Product Table plugin offers several useful features including filters, search and sorting, and product categories that help customers find the products they want, faster.
We showed how you can create a WooCommerce crafts store and, hopefully, you’re in a better position now to turn your crafts passion into profit.
Ready to start selling crafts and handmade products online? Get WooCommerce Product Table today!