Complete guide: How to create a restaurant delivery website

The management of restaurants are now being significantly impacted by the world of technological improvements. Given that the majority of people spend a significant portion of their days online, restaurants have enormous market potential. In fact, customers who frequent restaurants are more interested in buying food online. Restaurant managers and owners are constantly looking for ways to make it easier for consumers to order meals online and have it delivered quickly.
Most restaurant owners are setting up a restaurant delivery website to stay in business and give a neck to neck competition to others owners. The good news is that you can create a food delivery website in WordPress in a few simple steps.
One of the key benefits of setting up your own restaurant delivery website is that you don’t have to rely on third-party food delivery service providers and food delivery apps like Grubhub, Uber Eats, Postmates, or Doordash. Instead, you can start taking online orders for your own local restaurant and keep 100% of your profits.
In this tutorial, we’ll explain how you can create a restaurant delivery website using the WooCommerce Restaurant Ordering plugin. You can also watch this video to see how it's done.
How to create a restaurant delivery website in WooCommerce
To create a food delivery website, you’ll need a WordPress website with the WooCommerce plugin installed. You’ll also need the WooCommerce Restaurant Ordering plugin to set up your online menu and take orders online.
If you don’t already have a WordPress website set up, check out our in-depth tutorial on how to create a WooCommerce restaurant online ordering system for step-by-step instructions.
It's much more cost-effective than signing up with a third-party food delivery service provider like Grubhub, Uber Eats, Doordash, or Postmates.
Step #1: Add food items as WooCommerce products
The first thing you need to do is to add menu items to your restaurant delivery website as WooCommerce products.
We recommend organizing food items into different categories the way you would if you were creating a menu for your physical restaurant.

For example, your categories might be:
- Starters
- Main Courses
- Desserts
- Drinks
Once you’ve created the categories, simply add each food item as an individual WooCommerce product. Enter its title, description, category, and image, and then fill out the Product data section to set the price and (optionally) variations and other options.
Step #2: Install WooCommerce Restaurant Ordering on your WordPress website
The WooCommerce plugin automatically creates shop pages with its own layout for displaying products or, in this case, food items. However, this isn’t ideal for a restaurant delivery website. Instead, you can use the WooCommerce Restaurant Ordering plugin to list your online menu in a one-page order form.
Get the WooCommerce Restaurant Ordering plugin and install it on your WordPress website. You’ll get the plugin’s files and license key in the confirmation email.
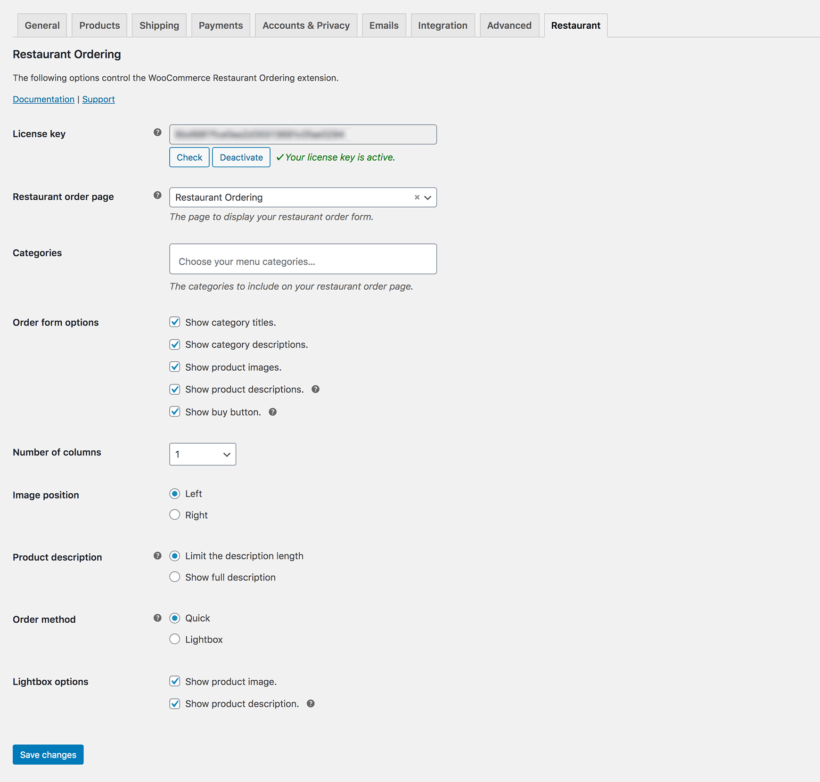
Head over to WooCommerce → Settings → Restaurant from the WordPress admin panel and enter your license key. You can choose the default settings for your restaurant food ordering forms from the same screen. Also add opening dates and times if you want to prevent people from placing orders while you're closed.
Here's how it works:
The WooCommerce Restaurant Ordering plugin automatically creates a food order form for you. If you preview your food delivery website on the front-end, it should look something like this (depending on your settings):
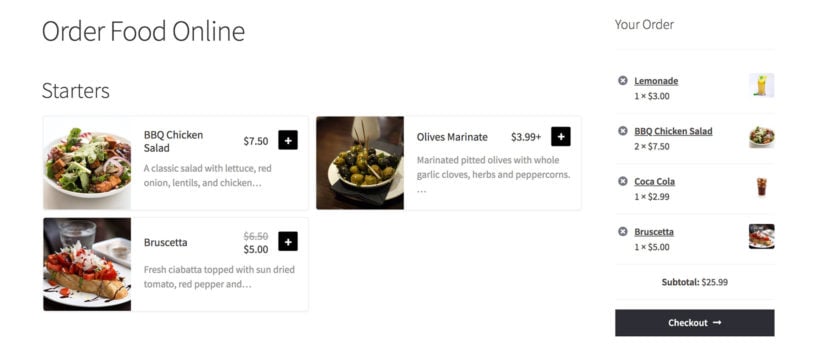
The food items are listed in a menu-style format with images, descriptions, and pricing information.
Optionally, you can create separate food order forms for different categories instead of listing all of them on one page. You can also create a section for Special Offers.
The easiest way to do this is by adding the [restaurant_ordering] shortcode to a page and using the shortcode options to choose which categories to include on that page.
Customers can simply place their order online and then proceed to the checkout page.
Step #3: Set up delivery and collection
One of the biggest advantages to using WooCommerce to power your restaurant delivery website is that it has options built-in for delivery and collection. To configure these settings, simply head over to the WooCommerce → Settings → Shipping section of the WordPress admin.
For example, you can create shipping zones for the areas you offer deliveries to. Let’s say you want to offer free shipping to areas close to your restaurant and charge for areas further away. You can set up two shipping zones in WooCommerce. And, if you want to offer collection or takeout option, all you have to do is set up a third shipping zone that gives customers the option to collect their orders from the restaurant.
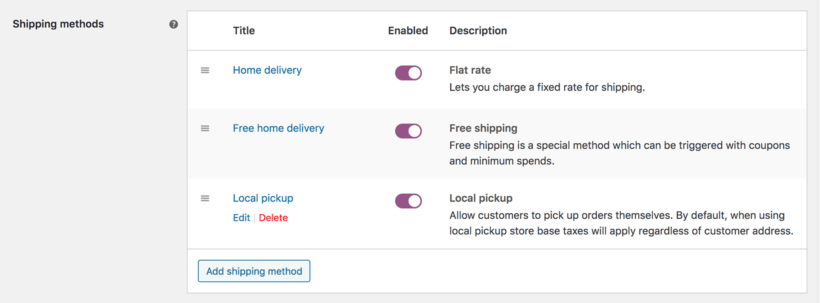
The WooCommerce plugin also lets you offer delivery options for each shipping zone you create. You can use these options to set up free home deliveries if the order value is above the minimum spend, charge for deliveries on orders less than the minimum spend, and offer local pickup.
If you like, then you can also add a plugin to allow customers to choose an exact delivery or collection time slot.
Step #4: Printing orders in the kitchen
To keep things simple, you can integrate a GPRS printer with your restaurant delivery website to automatically print orders in the kitchen in real-time. For this, we recommend using the WooCommerce Automatic Order Printing plugin. It offers seamless integration with WooCommerce Restaurant Ordering.
Alternatively, you can receive an SMS notification of new orders instead of printing orders to the kitchen. Our best advice is to use the SMS Alert Order Notifications plugin. You can also use the Twilio SMS Notifications plugin to send customers an SMS when their order is ready. This is especially useful if you want to offer local pickup options. Keep in mind that you’ll need to ask for the customer’s phone number at checkout if you want to offer this service.
Step #5: Offer online or offline payments
The WooCommerce plugin lets you set up various payment options. If you’re just getting started and want to offer online payment options, choose PayPal Payments Standard and enter your PayPal email address. In addition to this, you can also accept credit or debit card payments without using PayPal. For this, you would simply select Stripe and follow the setup instructions.
You can also offer offline payments (such as Cash on delivery) which are particularly useful for restaurant delivery websites. This way, your delivery drivers can collect payments from customers. This way, you can rival online food delivery service providers like Grubhub, Uber Eats, Doordash, and Postmates.
Start accepting online orders today
By setting up your own restaurant delivery website in WordPress you can start accepting online orders and keep 100% of the profits. This is much better than going with an online food delivery service provider like Grubhub, Uber Eats, or Postmates. The WooCommerce Restaurant Ordering plugin makes it easy to get started with a step in the right direction.
Once you’ve set up your restaurant delivery website, there are plenty of ways to enhance the customer’s shopping experience, for example, by setting up delivery and collection and offering online payment options in your online ordering system.
Ready to set up your restaurant delivery website and make it easier for customers to order food? Get the WooCommerce Restaurant Ordering plugin today.