Setting up custom WordPress user roles (+ access restrictions)
Want to know how to add and edit WordPress user roles? Keep reading to discover how to use a WordPress user role editor and restrict access to different parts of your website based on user role.
Your WordPress site's security isn't just about firewalls and strong passwords - it also depends on how you manage user access. By default, WordPress provides several user roles, each with its own set of permissions. However, these roles might not fit your specific needs, leaving gaps in security and access control.
Without the right user role setup, you risk unauthorized changes, accidental content deletions, or even security breaches. Whether you're running a membership site, an online store, or a private blog, editing WordPress user roles ensures that the right people have the right level of access - no more, no less.
In this guide, you'll learn:
- How to choose the right WordPress user roles.
- The security implications of each role and how to protect your site.
- How to safely add new users and update existing ones.
- The best methods for creating custom user roles with plugins or code.
- How to control content access and restrict sections of your site.
By the end, you'll have a secure, well-structured user role system that keeps your site running smoothly while protecting sensitive areas from unauthorized access. Let's get started!
Set up WordPress user roles
WordPress user roles are permissions that control what users can and cannot do within a website. WordPress comes with five default user roles: Subscriber, Contributor, Author, Editor, and Administrator.
- Subscriber - Can only log in and update profile
- Contributor - Can write and edit own drafts
- Author - Can publish and manage own posts
- Editor - Can publish and manage all posts
- Administrator - Has full site access
WordPress user roles let site owners manage access to different tasks. These tasks include writing posts, creating pages, moderating comments, managing plugins, and managing themes. Each role has specific capabilities that determine what actions users can perform.
By allocating specific user roles, you control which site areas each person can access. For instance, if you need someone to help publish posts, they only need the Author role. If you want someone to draft content without publishing, the Contributor role works best.
By assigning roles in WordPress you can have multiple people working on the same site handling different tasks and responsibilities. Let's quickly take a look at each user role available in WordPress itself. After that, I'll tell you how to edit WordPress user roles, create additional user roles, and use them to control who can access the front end of your website.
Super Admin
- Best for: Network owners, IT administrators managing multiple sites.
Super Admin is the highest authority role in WordPress multisite networks. Super Admins have unrestricted access to create, modify, and delete sites within the network. They can manage users, plugins, and themes across all network sites.
- Use case: Organizations running multiple WordPress sites require centralized control over network-wide settings.
- Security implications: Super Admin accounts hold ultimate authority over all network sites. Limit Super Admin access to trusted individuals only. Compromised Super Admin accounts can result in total loss of control.
Administrator
Administrator is the highest ranking user role on single WordPress sites.
- Best for: Business owners, lead developers, or trusted managers of a single-site WordPress installation.
Administrator role capabilities include adding, editing, and deleting plugins, pages, posts, themes, categories, and taxonomies. Administrators can moderate comments, export and import files, create private posts, and customize page layouts. They have full access to the WordPress admin menu and can edit other user roles.
- Use case: Site maintenance responsibilities include configuring plugins, updating content, and troubleshooting issues.
- Security implications: Administrator accounts require strict access control. Grant Admin access only to individuals who need full site control. Minimize the number of Admin accounts to prevent unauthorized changes.
People often refer to the Administrator role as 'Admin'. For example, you might say "A WordPress site should have as few admins as possible for security reasons".
Editor
- Best for: Content managers, marketing teams, or editorial staff.
Editor is a WordPress user role with access to posts, pages, and categories only. Editors cannot control plugins, themes, site settings, or users. They can publish, edit, and delete any posts or pages on the website.
- Use case: Teams managing blog posts, news updates, or content-heavy websites benefit from Editor roles.
- Security implications: Editors can delete or modify any published content. Assign this role cautiously to prevent unauthorized changes to key pages.
Author
- Best for: Freelance writers, guest bloggers, or contributors who publish content independently.
Author is a WordPress user role with permission to publish new posts. Authors can edit and delete their own posts. They cannot edit other users' content or access site settings.
- Use Case: Regular blog contributors who need to publish content without accessing other site areas.
- Security Implications: Authors can publish content without approval. Assign this role only to trusted users to avoid publishing errors or inappropriate content.
Contributor
- Best for: Guest writers, junior content creators, or interns.
Contributor is a WordPress user role that can add and edit their own posts. Contributors cannot publish posts directly. A user with a higher role must approve and publish their content.

- Use case: Teams requiring content review before publication use Contributor roles for quality control.
- Security implications: Contributors cannot publish content directly. This minimizes unauthorized or low-quality posts going live. They can still access and modify draft content.
Subscriber
- Best for: Registered users on membership sites, forums, or e-commerce stores.
Subscriber is the WordPress user role with the lowest level of control. Subscribers can only log in, update their user profiles, and change their passwords. They have no content editing capabilities.

- Use case: Websites requiring user registration benefit from Subscriber roles. This includes e-commerce platforms, discussion forums, or private content access sites.
- Security implications: Subscribers have no access to website settings or content management. They pose minimal security risks. Control spam registrations using CAPTCHA or verification methods.
Choose the right role
When you need to let people edit a WordPress website, don't just give them the Administrator role. That's a bad idea because:
- Administrators can make absolutely any change to your website, so there's a higher chance of user error. This could have serious consequences if you give an inexperienced team member full Administrator access.
- Due to their higher privileges, it's far more serious if an Administrator's account gets hacked. If an Admin-level account gets full access to the WordPress Dashboard then very bad things can happen. In contrast, if a lower level user account is hacked then there's a lower potential for damage.
Because of this, you should always give people the lowest role that would enable them to do the work they need to do. If they need full access to edit the content on your site, then give them an Editor account rather than Administrator. If you'll be checking their work prior to publication then they only need Contributor.
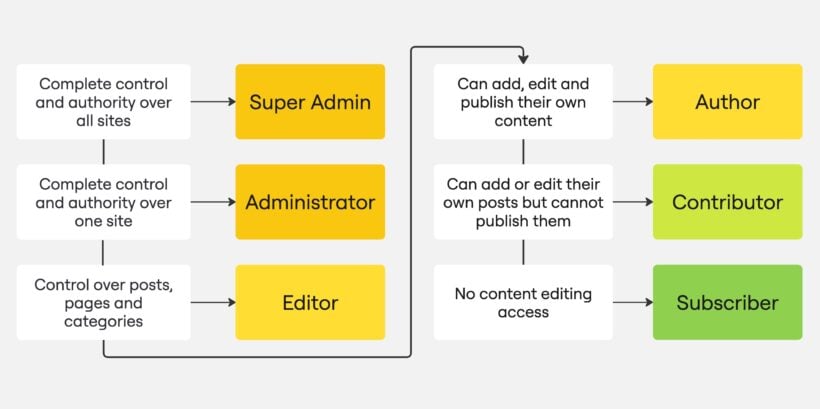
For quick reference, here's a useful decision flowchart for role selection:
Add new users safely
Managing user roles correctly is crucial for maintaining control over your WordPress site. Assigning the right roles prevents unauthorized access and reduces security risks. Here's how to edit WordPress user roles and update user data safely.
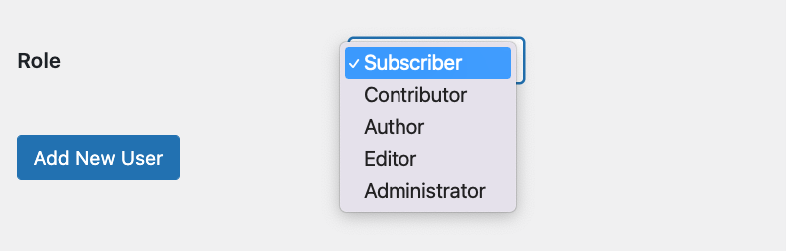
How to change a user's role in WordPress
Changing a user's role in WordPress is a simple process. This allows you to adjust access permissions as needed.
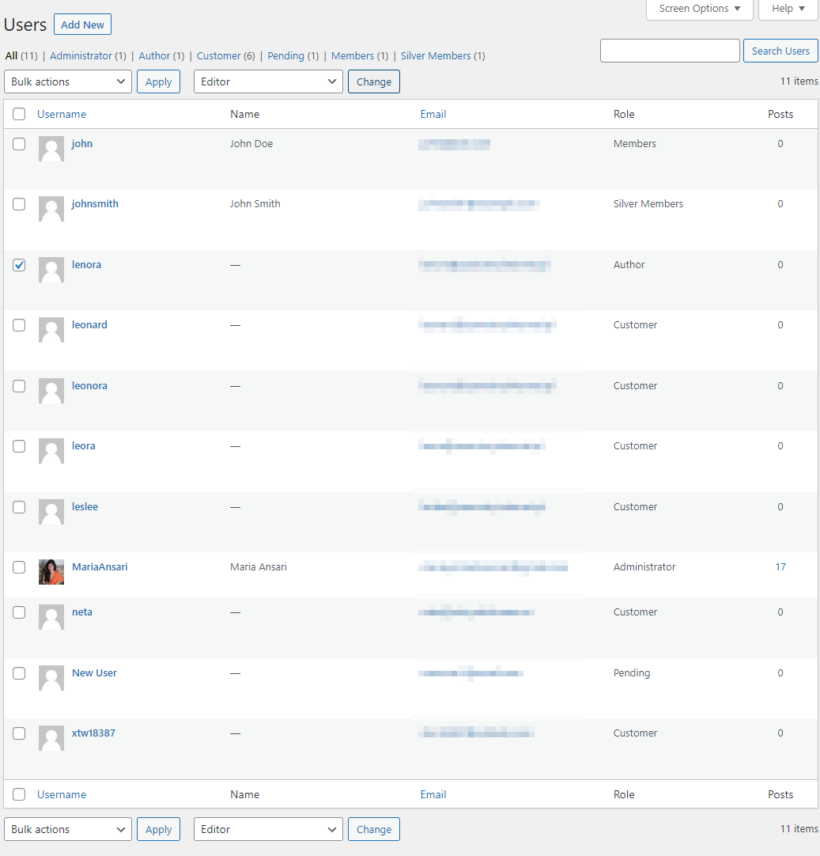
- Go to the Users tab in the WordPress admin panel.
- Select the user(s) whose role you want to change.
- Use the Change role to… dropdown menu to select a new user role.
- Click Change to apply the update.
Best Practice: Review and audit user roles regularly. Ensure only necessary permissions are granted. Remove outdated accounts when access is no longer needed.
Warning! Administrator access should be limited to users who absolutely need it. This reduces the risk of accidental changes or security breaches.
You can also change a user's role from their profile page:
- Navigate to Users → All Users and click on a user's name.
- Scroll down to the Role section, select a new role, and click Update User to save changes.
How to edit user data in WordPress
WordPress user data editing includes profile information, passwords, and customer details. The platform allows you to modify these details through the admin interface.
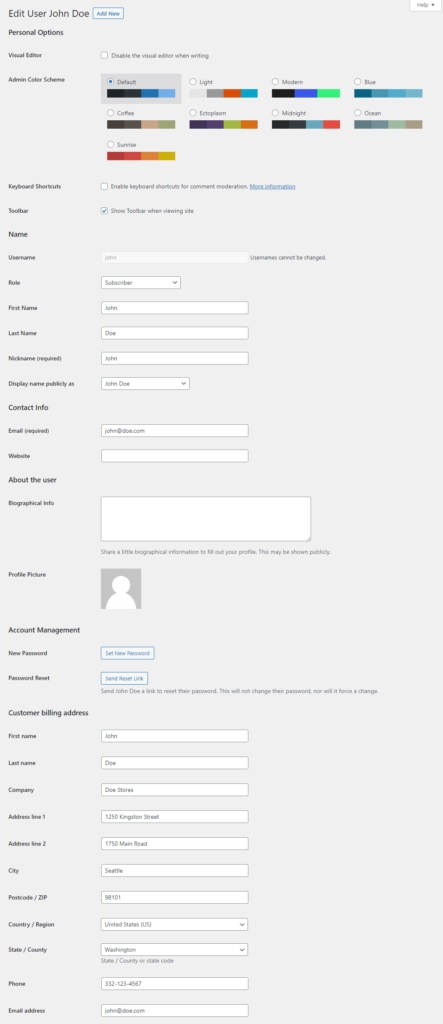
- Navigate to Users → All Users in WordPress.
- Click on the Edit button to navigate to the Edit User page.
- You can modify and edit the fields here. You can set general information about the user, their contact information, set a new password, or send a reset link, and also edit customer billing address and information.
- Once you are done making changes, click on the Update User button at the bottom.
Best Practice: Enforce strong passwords for all users. Enable two-factor authentication (2FA) for high-level roles. Never use generic usernames like "admin" for high-privilege accounts.
By following these steps and best practices, you can manage user access efficiently while keeping your WordPress site secure.
Secure your user roles
User role security is essential for protecting WordPress sites from unauthorized access. Administrator accounts require the strongest security measures since they have full site control.
You can secure user roles by implementing strong authentication measures and controlling site access. Both approaches work together to create comprehensive security.
Best practices:
- Keep the number of Administrator accounts to a minimum.
- Avoid using common usernames like "admin" that are easy targets for hackers.
- Restrict access to the WordPress admin panel by limiting login attempts or using IP-based access controls.
A well-managed admin role structure reduces the chances of unauthorized changes or malicious attacks.
Enable multi-factor authentication (MFA)
Multi-factor authentication (MFA) is a security method requiring two verification steps for login. MFA prevents unauthorized access even when passwords are compromised. The second verification typically uses a mobile app or email code.
How to implement MFA:
- Use security plugins like Wordfence, Solid Security, or WP 2FA to enable MFA.
- Require MFA for all Administrators and Editors.
- Encourage other users to enable MFA for added protection.
Weak passwords remain a major vulnerability. Combining MFA with strong password policies ensures that even if one layer of security fails, there is another in place to protect the account.
Monitor admin access and user activity
User activity monitoring is the practice of tracking logins and role changes in WordPress. Regular monitoring identifies unauthorized access before problems occur. It helps detect unexpected role escalations or suspicious logins.
How to monitor access:
- Install security plugins like WP Activity Log or Sucuri Security to track logins and role changes.
- Set up alerts for failed login attempts or unexpected administrator account creation.
- Periodically review user roles to ensure no one has unnecessary privileges.
By actively monitoring user activity and securing administrator access, you can prevent unauthorized changes and keep your WordPress site protected.
Control content access
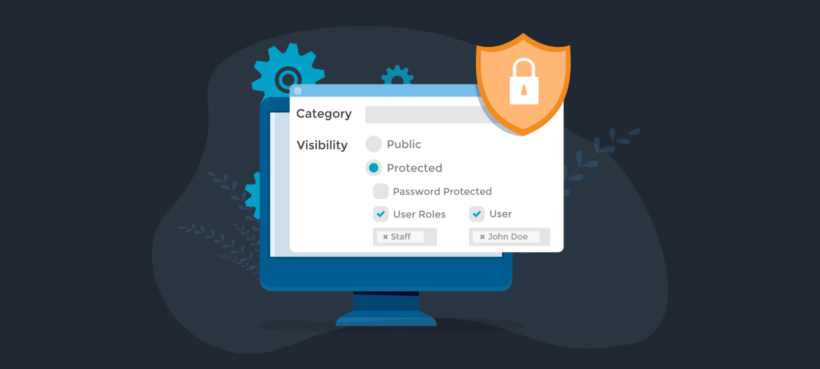
Content access control is the ability to restrict which parts of your website each user role can view. The free User Role Editor plugin manages backend permissions but doesn't control frontend content access.
For example, while User Role Editor lets you create a "VIP Members" role, you can't use it to restrict which parts of your membership site they can access. That's because the permissions that you can edit with User Role Editor only control access to the WordPress back end.
To get this extra functionality, I recommend using User Role Editor with the Password Protected Categories plugin. This lets you choose which parts of the front end of your WordPress site each user role can access. It lets you create hidden areas within a WordPress site or blog which only specific user roles can access. This is the easiest way to create custom user roles in WordPress and control access to your website front end.
How it works
Password Protected Categories works by controlling user role access to categories and taxonomies. This includes categories for pages, posts, and custom post types. For instance:
- You can hide access to blog categories that contain premium content meant exclusively for Subscribers. This way, only people with the Subscribers user role will be able to access the exclusive blog posts on your website.
- It's possible to create a hidden members-only area that only user with the VIP Member role can access.
- If you're using a WordPress events plugin to let employees book training courses, you can restrict your event categories to your custom 'Employee' role.
Any type of content in WordPress can be structured into categories. This makes Password Protected Categories the perfect solution to edit user role access to each part of your site.
For even more fine-grained control, Password Protected Categories also offers a 'User' feature. This lets you select individual user accounts to give access to, in addition to whole user roles.
Setup instructions
- Start off by installing and activating the Password Protected Categories plugin on your WordPress website.
- Next, go to the section of the WordPress admin where you add and edit categories for the type of content you want to restrict. For example, if you're giving user role access to a blog category then you'd go to Posts → Categories. (Tip: If you need to restrict access to pages by user role, then you need to set up the ability to create page categories using the free Add Category to Pages or Category Tag Pages plugin.)
- When editing or creating the category, find the 'Visibility' section on the left. This is where you control access based on user role.
- Next, select each user role you want to grant access to:
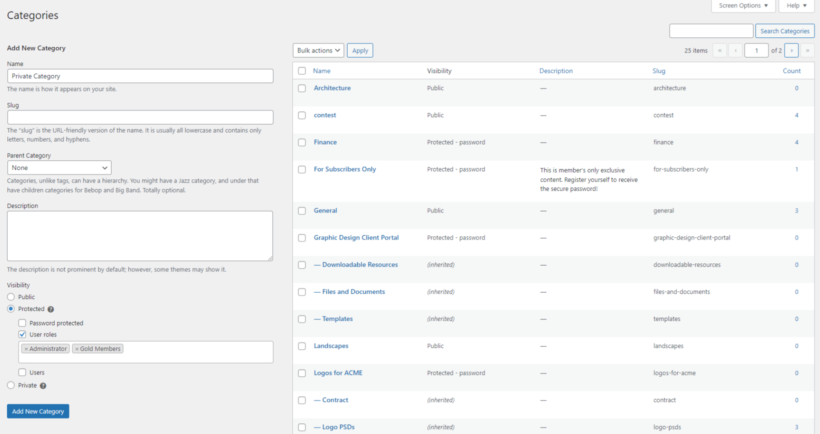
- When you're done, click on the Add New Category button.
- Next, it's time to add all your exclusive content to the private category.
Now when people log into an account which has one of the user roles you selected in step 4, they will be able to see the hidden content. Make sure it's easy for them to access by adding a link to the category to your navigation menu. Only logged in users with the correct roles will see these menu links.
If you don't already have a front end login form then I recommend adding one with the free Theme My Login plugin. This makes it easier for your custom or edited roles to log into their account without having to visit the WordPress dashboard. You can also use Theme My Login to redirect each user role to a different page when they login:
Set up custom WordPress user roles
Above, I explained what are the default user roles in WordPress and when to use each one. But what happens if none of the default roles meet your needs?
Custom WordPress user roles are user-created roles with specific permissions tailored to your needs. You can create new roles or edit existing ones to match your requirements exactly.
First, we'll look at how to use the free User Role Editor plugin to create and edit WordPress user roles. You can use this user role plugin to edit roles and choose what level of access they have to edit the WordPress back end. However, this won't let you control which parts of the website each role can access on the WordPress front end - we'll do that with the Password Protected Categories plugin later in this tutorial.
How to edit the privileges for a WordPress user role
- Install the User Role Editor plugin on your WordPress site.
- Navigate to Settings → User Role Editor.
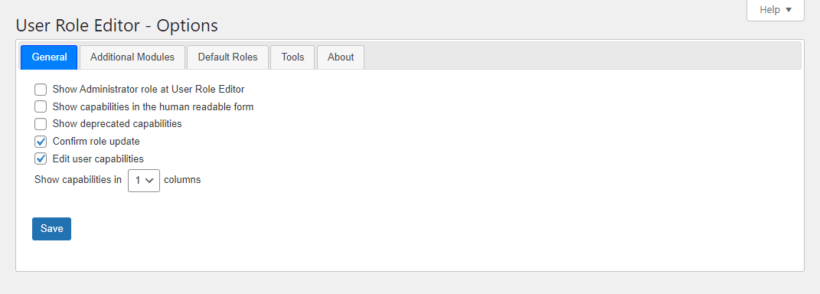
- Make sure the Edit user capabilities checkbox is selected and click on the Save button.
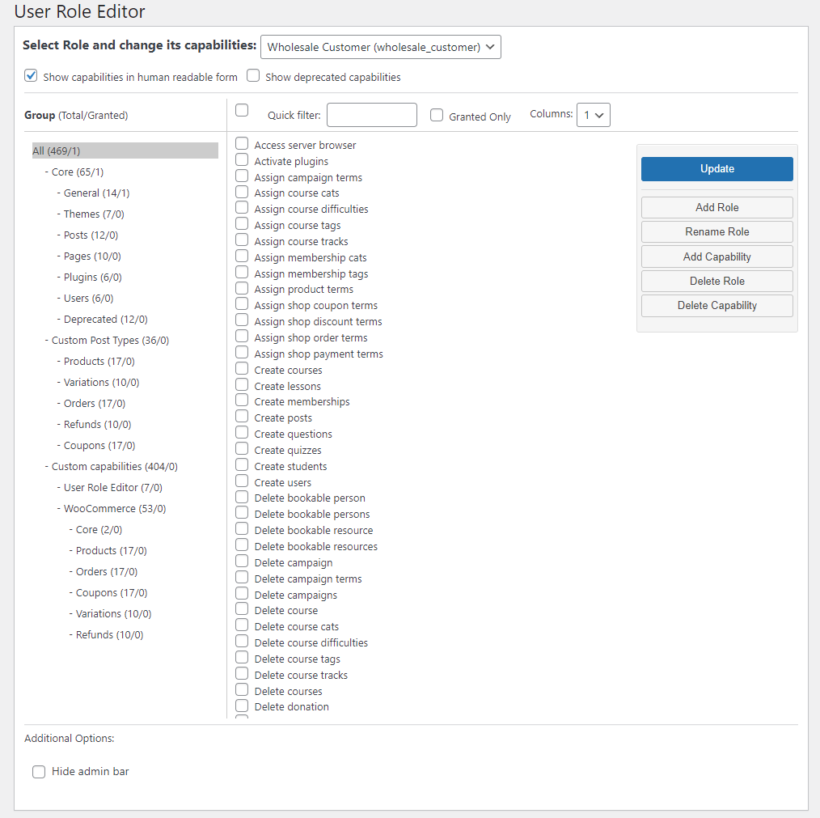
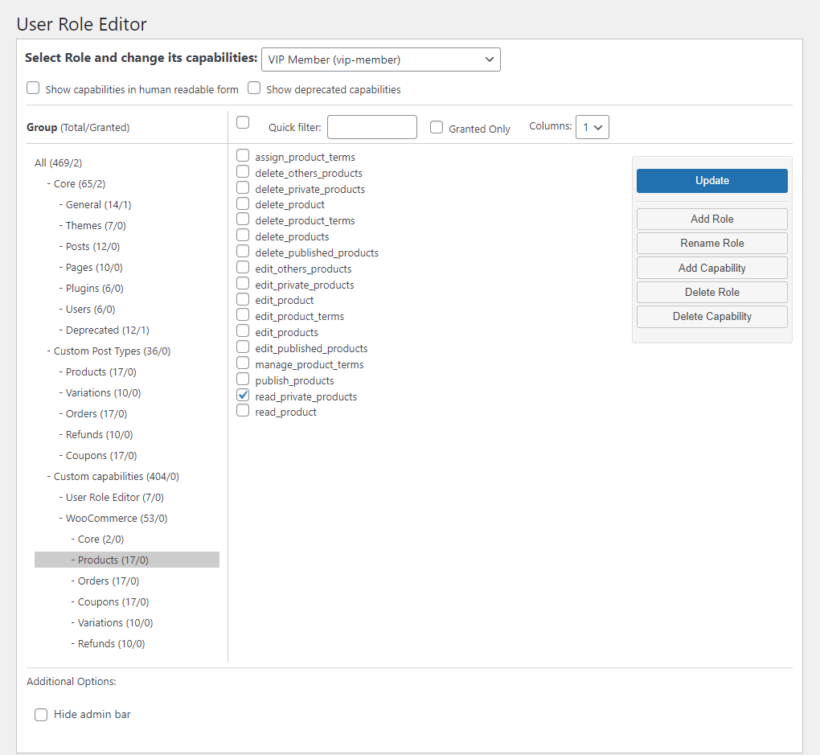
- Now navigate to Users → User Role Editor and select the user role you want to change the privileges for.
- Select the privileges you want to enable or disable for the selected role. Click the "Show capabilities in human readable form" to make the meaning of each permission easier to understand.
- Click on the Update button to save changes.
You can also delete user roles if you'd like.
How to create new user roles in WordPress
Creating a new WordPress user role is necessary when default roles don't match your requirements. For example, a 'VIP Member' role provides special access to specific site areas. Creating dedicated roles is better than modifying default WordPress roles.
- Install the User Role Editor plugin on your WordPress site.
- Start by navigating to Users → User Role Editor and click on the Add Role button.
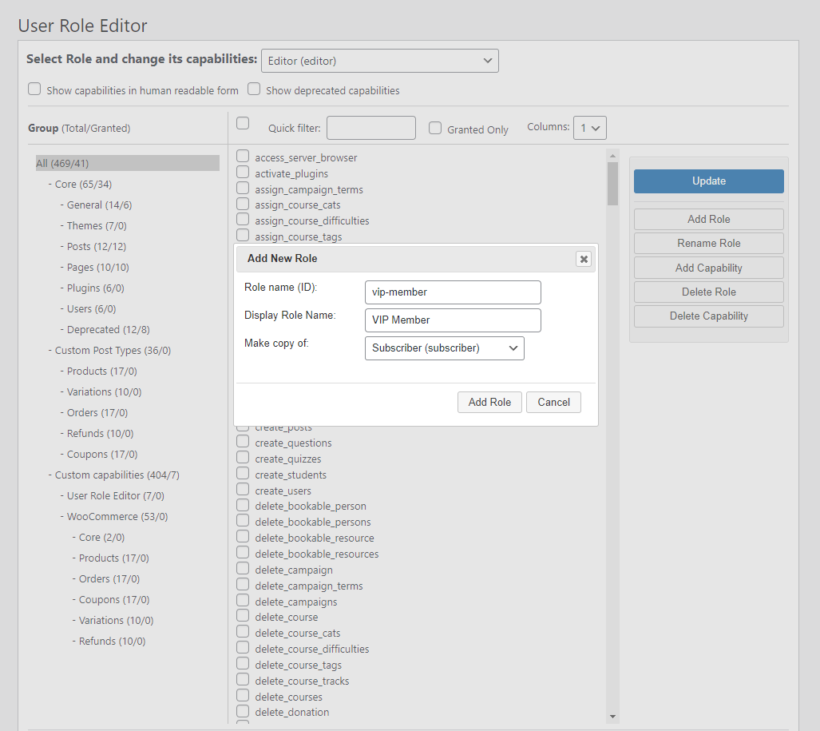
- Give your new user role a unique name and select an existing user role to duplicate. It's easiest to clone an existing user role that has similar privileges to those you want to grant to the new role. You can later make changes to the new role's permissions as needed.
- Once you've finished editing the privileges of your new user role, click on the Update button to save changes.
- Now you can select the new role when adding new users. Alternatively, you can use the instructions above to move existing users to this role.
Creating custom user roles with code
Creating custom user roles with code is a plugin-free method for adding WordPress roles. This approach provides direct control over permissions while reducing plugin dependencies. Code-based role creation keeps sites lightweight and efficient.
To add a custom user role, insert the following code into your theme's functions.php file or a custom plugin:
function add_vip_member_role() {
    add_role(
        'vip_member',
        'VIP Member',
        [
            'read' => true,
            'edit_posts' => false,
            'delete_posts' => false,
            'upload_files' => true, // Adjust capabilities as needed
        ]
    );
}
add_action('init', 'add_vip_member_role');
This code creates a new role called "VIP Member" with limited capabilities, allowing users to log in and upload files but not edit or delete posts.
Best practices for custom roles in code
- Define precise capabilities: Grant only the permissions necessary for the role's intended function. Avoid giving broad privileges unless required.
- Use a custom plugin: Create a simple custom plugin to manage roles instead of adding to
functions.php. This prevents losing roles when changing themes. - Remove unused roles: Remove unnecessary custom roles with
remove_role('vip_member');to maintain site security and cleanliness. - Test thoroughly: Create test users after adding new roles. Verify they have expected access and restrictions.
By using this approach, you can create and manage custom user roles programmatically while maintaining security and efficiency.
Get started with Password Protected Categories
In this tutorial, you've learned how to:
- Work with the built-in WordPress user roles.
- Use the User Role Editor plugin to add and edit user roles.
- Control which user roles can access different parts of your website using the Password Protected Categories plugin.
Using a WordPress role editor plugin like this is a great way to make your website more private. It also lets you create exclusive content and grant access to specific user roles only. This is great for running and managing a membership site.
Password Protected Categories offers a robust solution for restricting access to parts of a WordPress site based on user role. It makes it incredibly easy to edit WordPress user role access to each part of your site 💪
2 Comments
Would like to be able to use this same sort of technique to secure individual files in the 'uploads' folder. Things like PDF document and images that are not tied to one specific page.
Hi, Dwight. You can use the Prevent Direct Access (PDA) Gold plugin to protect the downloadable files themselves. We have provided a tutorial about how to use it with Protected Categories.