How to boost your WooCommerce revenue with sales pages

Creating a WooCommerce sales page can increase conversion rates and boost your store's revenue by drawing attention to your best deals. In this detailed guide, I'll show you how to create an on-sale page in WooCommerce in ten minutes or less.
If you're looking for a way to get customers to buy more products in each order, adding a WooCommerce sales page can be super effective.
Dedicated sales pages can increase your site's traffic, encourage impulse purchases, and increase your store's overall revenue. So in this tutorial, I'll show you step-by-step how to create an on-sale page in WooCommerce. You'll need the following plugins:
- WooCommerce Discount Manager - To set products on sale, tailor how the discounts are applied to products, and manage the sale.
- WooCommerce Product Table - To present the on-sale products in a beautiful, functional product table on the dedicated WooCommerce sales page.
The final result will look something like this:
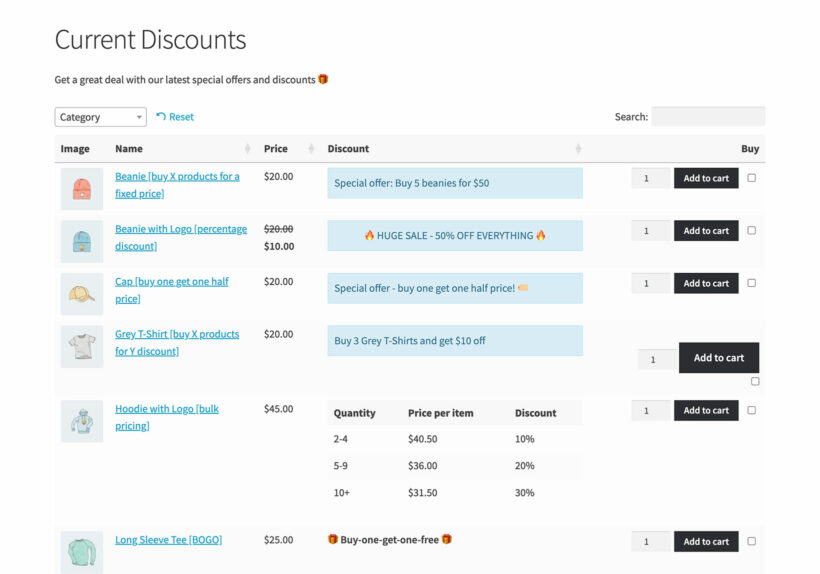
First things first, let’s make sure that we are on the same page 😉 about what WooCommerce sales pages are.
What is a WooCommerce sales page?
In WooCommerce, a sales page is a web page that presents all the products that are on sale in an online store. Think of it like a dedicated hub on your website that shoppers can browse through to discover deals on discounted products from any category or department within your store.
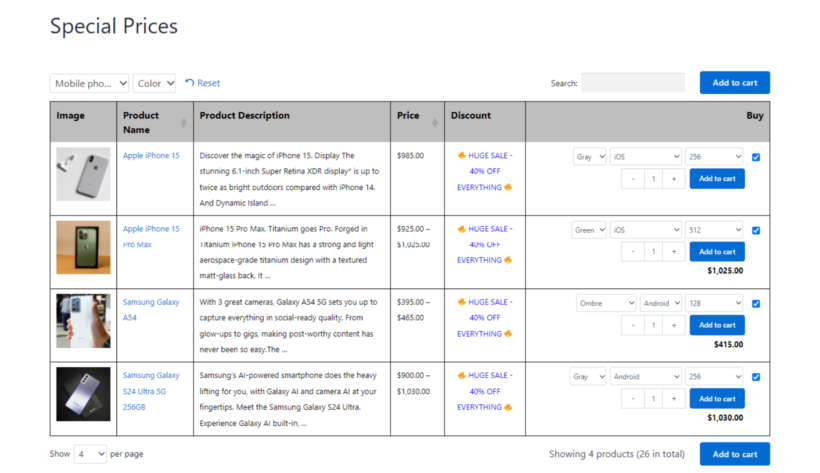
Take a look at the example above. This is the sales page of a WooCommerce store that sells electronic items. Customers can easily view the various categories of discounted items, add them to their carts, and proceed to the checkout page to complete their purchases.
Benefits of WooCommerce sales pages
Using dedicated sales pages for promotions gives you more scope to experiment with things like format, tone, and length without affecting your main website. We send a lot of direct traffic (from email or affiliates) to the sales page and find it helpful to be able to provide an overview of both the product and the deal itself.
Laura ElizabethClient Portal
Creating an exclusive sales page makes it easier for customers to find attractive deals. This boosts purchases of these specific items and increases overall traffic to your store as potential customers share the deals with friends and family.
Here are the top benefits of creating on-sale pages in WooCommerce.
- It improves product discovery: Collating all the items on sale on one page makes it easier for shoppers to discover products they may have otherwise missed. This increases the likelihood of them making additional purchases they hadn't initially planned.
- It boosts sales revenue: Studies have repeatedly proven that customers love deals. Showing several items with their prices marked down can spur customers to buy multiple products at once to avoid missing out on bargain prices.
- It enhances customer satisfaction: Customers appreciate the ease of browsing through a curated selection of deals without having to sift through your store's entire product catalog. This tailors their shopping experience, saves time, and leaves shoppers feeling satisfied with their purchase decisions.
How do I create a sales page in WooCommerce?
In the sections below, I'll walk you through the steps to add an on-sale page to your WooCommerce site.
First, we'll use WooCommerce Discount Manager to create a discount type, apply it to relevant products, add the sale badge and sale banners with custom promotional notices, and more.
Then, we'll add on WooCommerce Product Table to display the on-sale products in a sleek and functional product table template and showcase them on the dedicated WooCommerce sales page.
Let's dive right in.
1: Set eye-catching sales with WooCommerce Discount Manager
WooCommerce Discount Manager is a simple-to-use plugin that lets you flexibly set products on sale.
Woo store admins love using it to create various kinds of sale offers, including buy one get one free (BOGO), percent discounts, fixed discounts, volume or bulk discounts, site-wide or storewide sales, and virtually any other sale type you can think of.
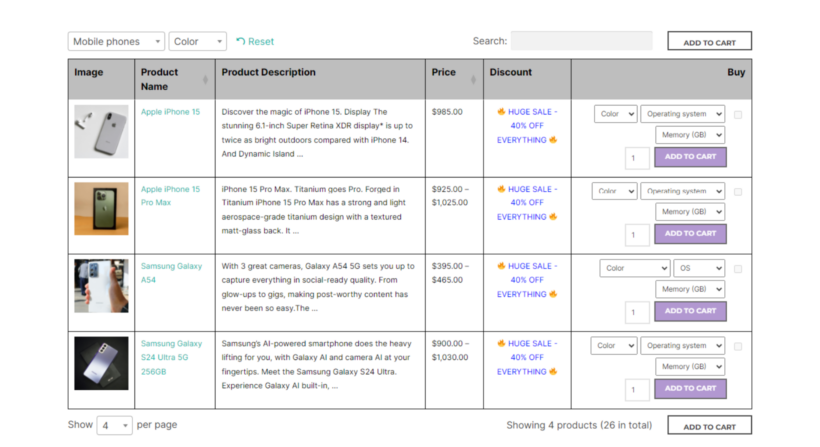
An added bonus is that it automatically applies the discounts to customers' orders — no coupon code needed. This means there's one less step for customers to take while placing their orders, and it reduces the friction in the ordering process.
WooCommerce Discount Manager's top features
- It lets you set up any type of discount offer: simple fixed percentage off, simple fixed amount off, buy x get y free (like BOGO or B2G2), cart total, dynamic price discounts, bulk price discounts, user-role-based, etc.
- There's no need to manually update the sale price for each item, it automates the process of setting products on sale. So you can apply discount rules to specific product categories and product sub-categories, specific products, and storewide.
- It lets you add start and end dates for each discount type. So you can schedule when specific products are available for sale. Again, this cuts down on the amount of manual work required to manage sales.
- You can add rules and conditions for how shoppers use the discounts in your online store — add sale start dates and end dates, minimum cart spends, minimum order requirement, discount priority level, etc.
- It lets you show sale badges and banners with custom messages to promote the offer on individual product and cart pages. This can help improve conversions and reduce cart abandonment rates
How to set products on sale with WooCommerce Discount Manager
Creating a sale with the WooCommerce Discount Manager plugin is pretty straightforward. Follow these steps.
Step 1. Create a discount type
- Get WooCommerce Discount Manager (pro version only) and add it to your site.
- From your WordPress website's admin menu, head to Marketing → Discounts.
- Press the "Add New" button to add a new discount rule.
- Enter a name for the rule.
- Choose the type of discount you wish to offer customers for this promotional campaign. You can offer a:
- Simple discount: To provide shoppers with a simple fixed percentage or amount off.
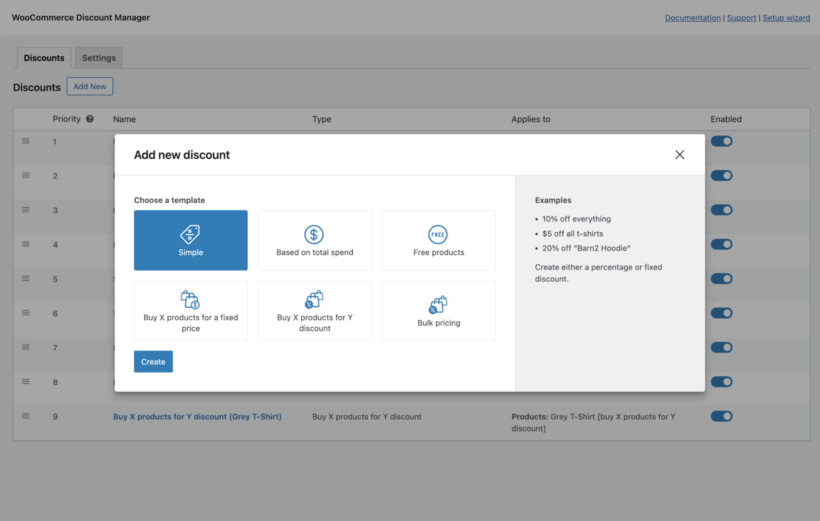
- Based on total spend: To add a minimum spend threshold for shoppers' carts for them to be eligible for the sale price.
- Free products: This adds a base number of products customers must buy to qualify for a specific number of free products. (Note that the free products given to each customer will either be the lowest price or the same price as other items in each customer's cart).
- Buy X products for a fixed price: This gives customers multiple products for a fixed price. For instance, a clothing store can run a "buy 3 hoodies for $75" promo.
- Buy X products for Y discount: This provides shoppers with a set percentage or amount of the cart subtotal.
- Bulk pricing: This provides shoppers with a fixed price or percentage off of specific products in their shopping cart or the entire cart value.
- Simple discount: To provide shoppers with a simple fixed percentage or amount off.
Step 2. Customize the discount type
- Mention the items to be offered for sale in the "Which products?" field. You can offer specific products or entire product categories for sale. Don't worry, you'll be able to specify products to be excluded from this discount later on (if required).

- Define the logic for this discount to operate with. For example, if you previously selected "Simple discount", this is where you'll get to add the fixed discount percentage or amount.
- Tick the checkbox for "Sale badge" if you wish to add the default WooCommerce "Sale" label to products that are part of this discount.
- Define which customers qualify for this sale in the "Applies to" field — either all customers who shop at your store, people with select user roles, or even select users.
- Select the appropriate option for when the sale goes live in the "Availability" field. Pick "Always available" to offer the sale indefinitely and "Specific dates" to add start and end dates to schedule the sale (recommended).
Step 3. Add compelling sales notices to promote the sale
- Scroll down to the "Product page content" area and add custom text to promote the sale offer. This sale banner will be shown on the single product page of all products available on sale. You can even use emojis and images to make it more prominent. For example, a clothing store might display something like "🤑Buy 3 Grey T-Shirts and get $10 off 🤑".
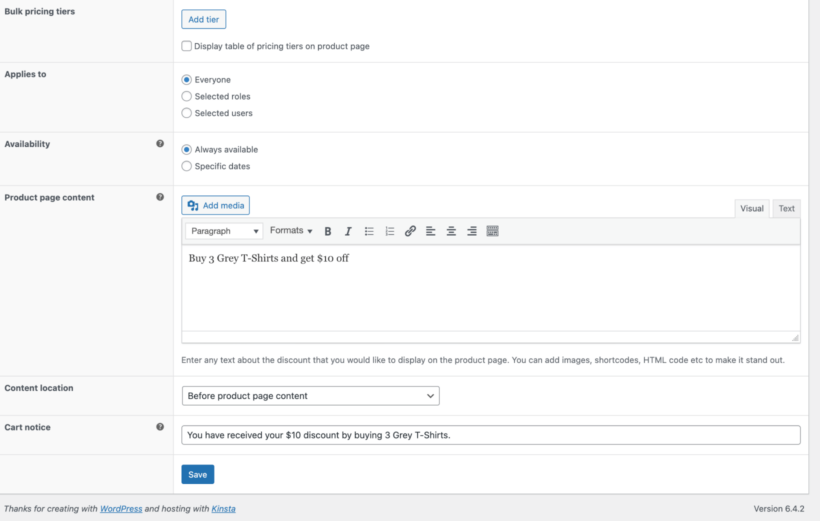
- Pick the location for the sale banner to appear on the single product page: before the product page content, before the add-to-cart button, before the product title, before the product meta information, before the short description, and before dedicated tabs.
- Now, add the sale-related notification to be shown on the cart page — above the cart when the discount offer is applied — in the "Cart notice" field. In line with the above example, it can be something like, 'You have received your $10 discount by buying 3 Grey T-Shirts' or 'Woop woop 🎉! We've added your free product(s) to your shopping cart 🛒!'.
- Finally, save the settings.
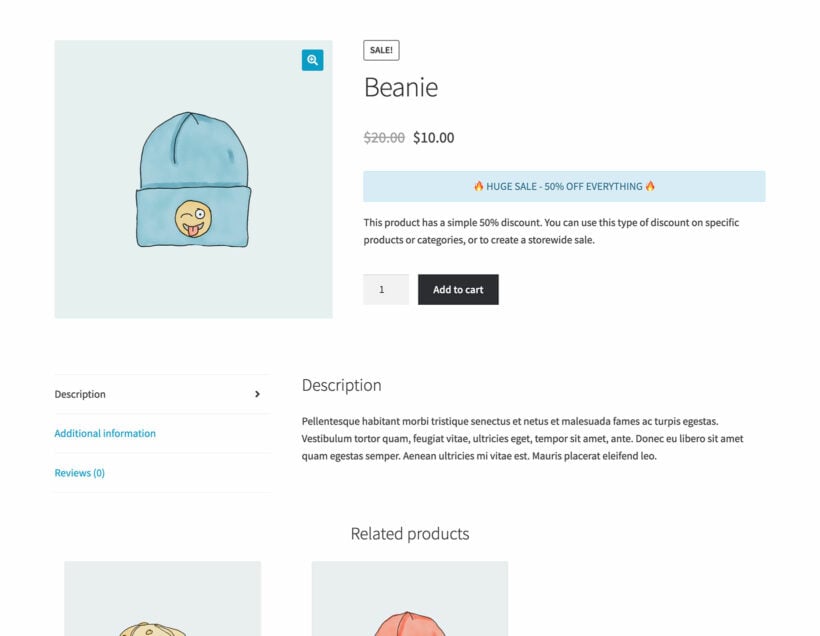
That's about it! Now head to the front-end view of your ecommerce site and test drive to check out the discount offer. For context, here's how the discount we just created looks on the product detail page of a demo site:
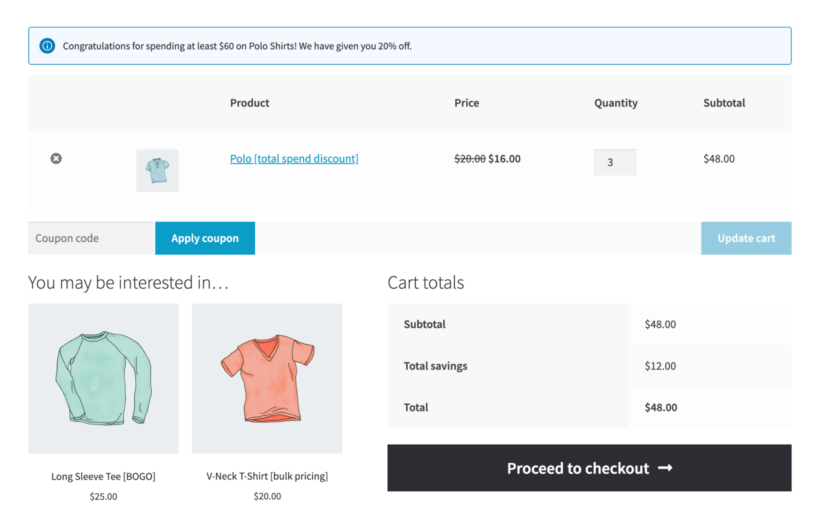
And on the cart page:
2: Create your on-sale product table
Once you've added products on sale, it's time to collate them in a dedicated place on your website.
To do so, you can pair the WooCommerce Product Table and WooCommerce Discount Manager plugins to build a great shop page that can easily function as an on-sale page.
WooCommerce Product Table will create a beautiful, highly functional table that will fully replace your shop page. It will also add tons of additional features, such as search, sort, and filter options, quick 'Add to Cart' selectors and buttons, quantity pickers, and others, that allow shoppers to easily see everything on sale. This can greatly improve the ordering experience and product discoverability, which increases your store's revenue.
The whole process is extremely customizable, so you can tailor your custom product tables to suit your shop and your customers’ needs.
1. Configure the product table
- Install and activate WooCommerce Product Table on your website.
- The table builder will open when you first activate the plugin. You can also access it later by going to Products → Product Tables → Add New.
- Use the table builder to set up the product table which will appear on your WooCommerce sales page.
- Choose which products to include on the sales page.
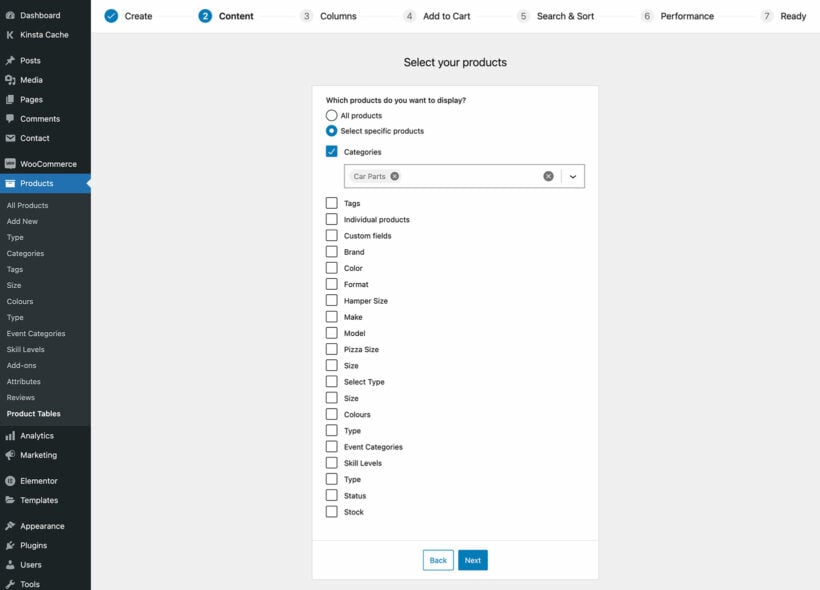
- When you choose the table columns, as a minimum you should add the product name, product image, summary, product price, and purchase button. You can also add a 'Discount content' column which will present the product page content you added for each discount when you set up WooCommerce Discount Manager.
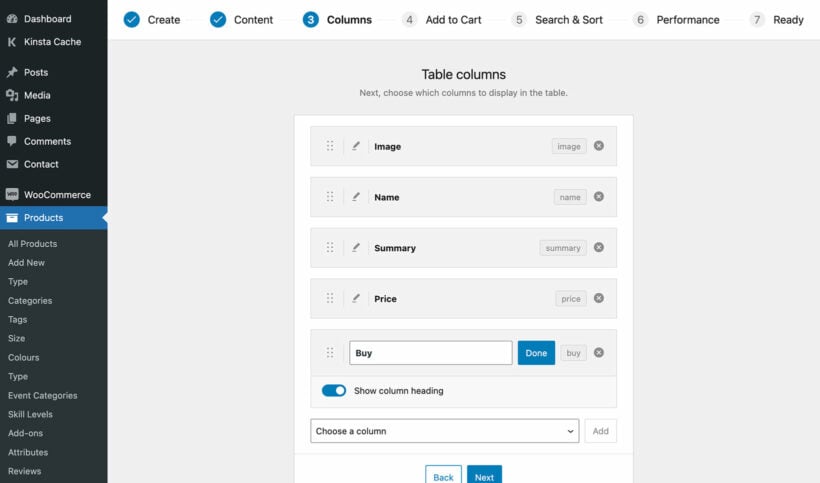
- Pick the preferred method for customers to add products to their cart. I recommend "Cart boxes and checkboxes".
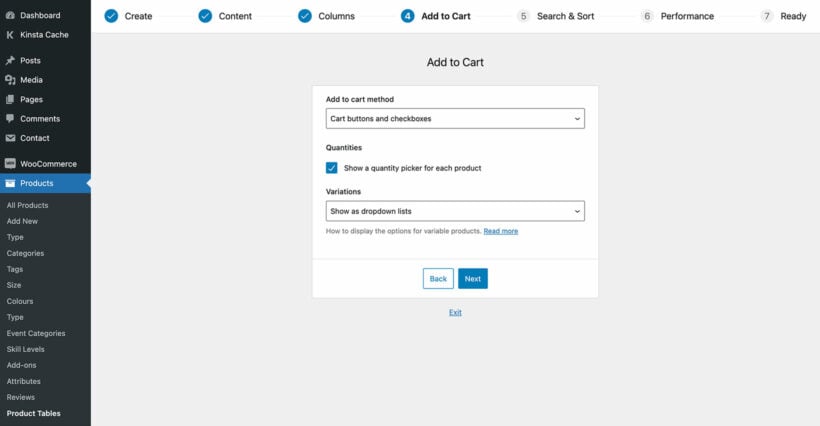
- Enable quantity pickers to allow customers to adjust the product quantity while selecting products.
- Choose how you want variable products to be shown in the product table: as dropdown lists, one variation per row, or with the 'Read More' button linking to the product page.
- Set up filtering to enable customers to find on-sale products even quicker. You can add custom filters or base them on the table's contents.
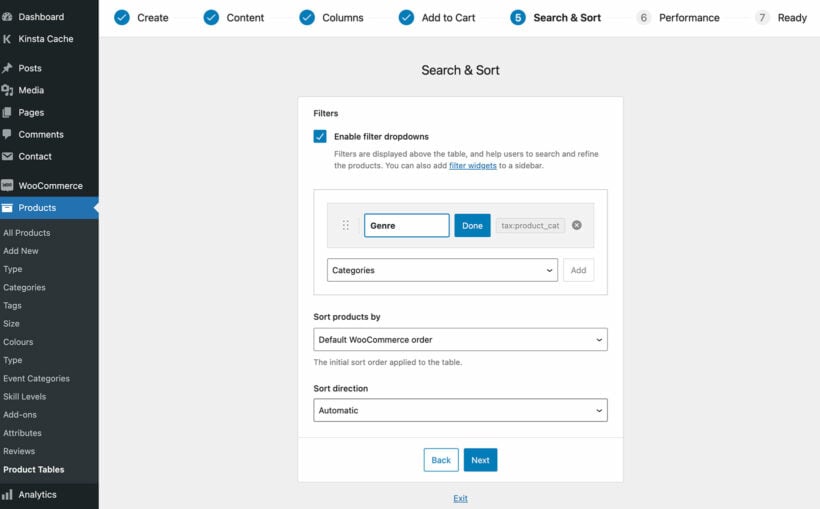
- The last page of the table builder will give you a shortcode for inserting the table onto the WooCommerce sales page. Copy this to your clipboard.
2. Create a dedicated WooCommerce sales page
Once you've configured WooCommerce Product Table, the next step is to use a shortcode to list the on-sale products on your site's front end. Follow these steps:
- Navigate to Pages → Add New in your WordPress site's admin, and create a WooCommerce sales page.
- Give it a relevant name, something like "Current Discounts" or "Special prices".
- Either paste the shortcode from your clipboard, or insert a 'Product Table' Gutenberg block and select your table.
- Hit publish.
- Go to Appearance → Menus, and select the header menu.
- Then drag and drop the newly created page to the menu and hit save.
That's it. Now go to the front end to check out your WooCommerce sales page.

Maximize profits with optimized WooCommerce sales pages
Many first-time and returning shoppers specifically look for discounts when they land on your online store. Creating an on-sale page is a great way to help customers quickly identify which items on your website are available at a discount.
In this guide, I've shown you the two top-notch plugins to help you create a high-converting on-sale page in WooCommerce:
- WooCommerce Discount Manager - To set products on sale, customize how the discount offers are applied to products, and manage the sale overall.
- WooCommerce Product Table - To showcase the on-sale items in a sleek yet super-functional product table layout on the dedicated WooCommerce sales page.
Get started with WooCommerce Discount Manager and WooCommerce Product Table and boost your stores' revenue today!