Importing and managing product attributes in WooCommerce
Importing products with attributes into WooCommerce shouldn't leave you with broken filters and missing variations. I'll show you the critical setup step most guides skip - creating global attributes first - which determines whether your filters actually work.
I've watched too many store owners celebrate successful imports, only to discover their size filters remain empty while products display perfectly. The import looks flawless, products show their attributes, yet customers can't filter by color or sort by material. This happens because WooCommerce hides a fundamental distinction between global attributes (which power filters) and local attributes (which merely display text).
Most guides jump straight into CSV formatting, but I'll reveal the essential pre-import step that prevents hours of rework. You'll learn different methods for managing attributes correctly, from traditional imports to modern tools that bypass CSV headaches entirely.
Short of time? Install Setary, the easy way to add and edit all product data including attributes.
How to import products with attributes into WooCommerce
WooCommerce import attributes means bringing product variations and characteristics into your store. Most people do this with CSV files, which is valid by fiddly and error-prone. I'll show you how to do that first, and then we'll look at some alternative tools that avoid messing around with CSV's altogether.
Step 1: Create global attributes in WooCommerce first
Before touching any CSV files, you need to establish your store's attribute vocabulary. This involves creating global attributes so that you can create products which reference these attributes correctly. It's important to this instead of creating the attributes separately for each product because this ties them all together. For example, if you create a 'Size' attribute for each product without first creating a global 'Size' attribute then WooCommerce won't know that all the 'Small' t-shirts are the same size. Create a 'Small' global size attribute first, and WooCommerce will seamlessly link the relevant options.
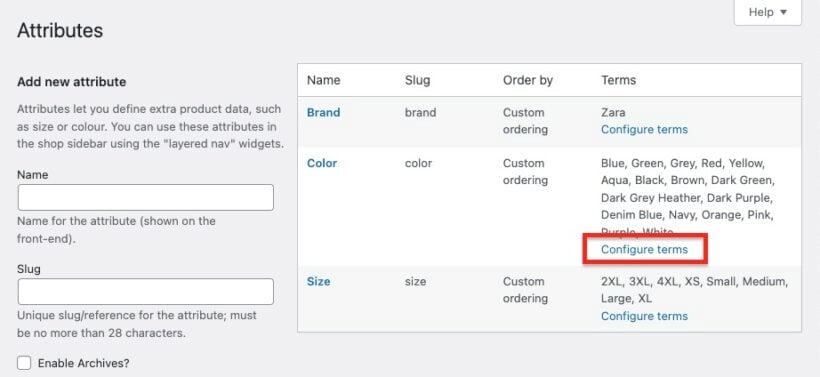
- Navigate to Products → Attributes in your WordPress dashboard.
- Here you'll create each attribute your products will use - Size, Color, Material, or whatever characteristics your products need.
- For each attribute, add the specific terms customers will select from. If you're creating a Size attribute, add terms like Small, Medium, and Large. Configure whether customers can browse by this attribute (Enable Archives) and whether it creates product variations (Used for variations).
I learned this lesson the hard way when importing 500 products with color attributes. Everything imported perfectly, but the color filter stayed empty. After three hours of troubleshooting, I discovered my attributes were local, not global. Creating global attributes first would have saved that entire afternoon.
Step 2: Prepare your CSV file
Follow the WooCommerce documentation to prepare a CSV in the correct format.
Use Google Sheets or LibreOffice Calc to prepare your CSV - never Excel, which corrupts special characters and SKUs starting with zeros. Save with UTF-8 encoding to preserve any special characters in product names or descriptions.
Your CSV needs these critical columns for attributes to work properly:
- Type - Set to "variable" for parent products with options, "variation" for child products.
- SKU - Unique identifier for every row, no duplicates allowed.
- Attribute 1 name - Must match your global attribute exactly (case-sensitive).
- Attribute 1 value(s) - Multiple values separated by commas (Blue, Green, Red).
- Attribute 1 visible - Use 1 to display on product page, 0 to hide.
- Attribute 1 global - Use 1 for filters to work, 0 creates local attributes.
- Attribute 1 used for variations - Use 1 if this creates product options.
That "Attribute 1 global" column determines whether your filters work. Set it to 0 and your attributes become decoration - visible but useless for filtering. I've seen countless imports fail because this single column was wrong.
Step 3: Run the import
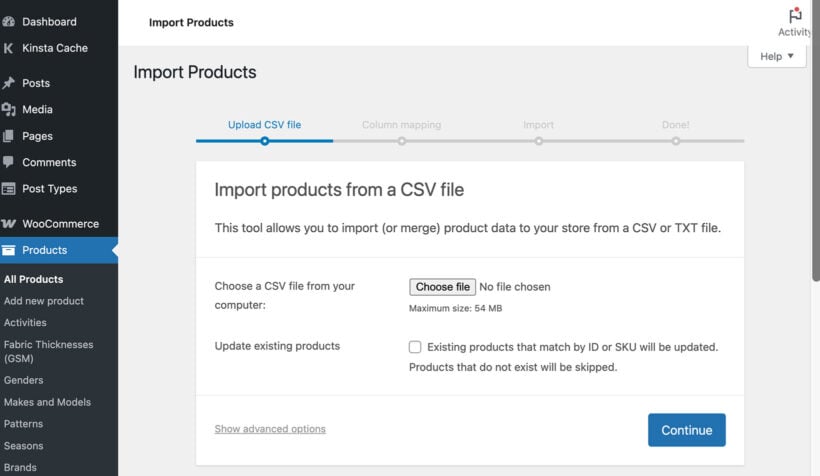
- Navigate to Tools → Import and upload your prepared CSV file.
- The column mapping screen appears next - match your CSV columns to WooCommerce fields carefully. Pay special attention to the attribute columns, ensuring they map correctly.
- Check "Update existing products" if you're modifying current inventory rather than adding new items.
- Click "Run the importer" and monitor the progress bar.
Small imports under 500 products usually complete within minutes. Larger imports might timeout on shared hosting. If you're having problems importing CSV's with attributes into WooCommerce, then check out the alternatives discussed below such as Setary.
Step 4: Verify your import
Check individual product pages first - attributes should display correctly under Additional Information. Visit Products → Attributes to confirm your global terms were created or updated properly.
Test your shop page filters immediately. If they're empty despite products having attributes, you imported local attributes instead of global. Open a variable product and check that variations generated correctly with proper pricing and stock levels.
Why this method works: Understanding global vs. local attributes
Global attributes are taxonomy data stored in WordPress's term tables. They power store-wide features like filters, layered navigation, and product comparisons. When you create a "Color" global attribute with "Red" as a term, WordPress treats it like a category that products can belong to.
Local attributes are custom post meta attached to individual products. They display on product pages but remain invisible to filters, search, and other store-wide features. Creating a local "Color" attribute stores it as text on that single product - useful for display but worthless for organization.
When customers can't filter by size despite every product showing sizes, it's because those sizes are local attributes. The product page reads both types, displaying everything correctly. But filter widgets only access global attributes, leaving them empty despite products having the data.
Read our Guide to Managing WooCommerce Product Attributes if you want a comprehensive understanding of attribute management.
As you can see, you can successfully import attributes to WooCommerce from CSV if you prepare the file carefully and use global attributes. However, it's still a lot of work and CSV formatting can easily go wrong! Keep reading for some better WooCommerce import tools - and even some alternate ways to add attributes in bulk without using CSV 👀
Alternative methods for different scenarios
Method 1: Using dedicated plugins for complex imports
For complex migrations or initial store setup, WP All Import provides drag-and-drop field mapping that simplifies attribute imports. The visual interface shows exactly where your data goes, reducing mapping errors that plague manual imports.
The plugin handles complex product structures better than native tools, correctly linking variations to parents and managing image galleries efficiently. While excellent for one-time migrations, the process still revolves around preparing and running import jobs rather than ongoing management.
While WP All Import is more flexible than the native CSV importer and supports attributes, you still have to prepare the import file. This leaves room for error just like any other import tool.
Method 2: Managing bulk attribute updates without re-importing everything
Once your store runs with thousands of products, the traditional export-edit-import cycle becomes risky. One misplaced comma can corrupt product relationships. A single wrong setting might delete all your variations.
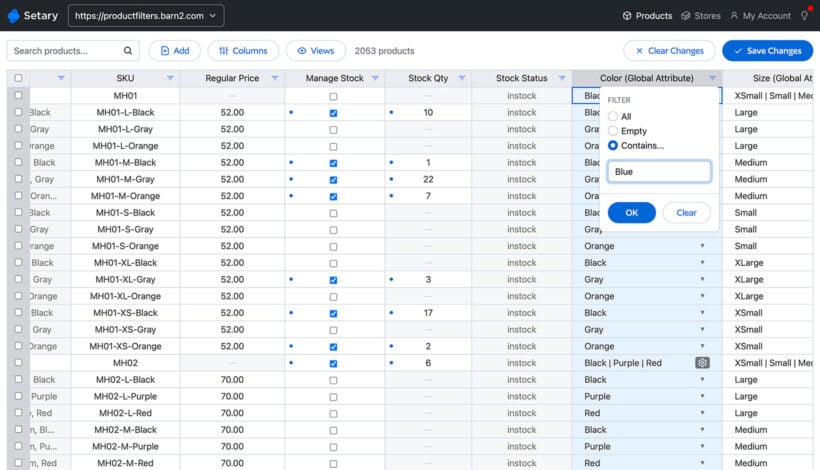
For established stores - especially those with variable products - Setary eliminates the attribute import process entirely. Your catalog appears in an editable grid that works like Google Sheets - no CSV files to manage or format.
Edit attributes, prices, and stock levels directly in the spreadsheet interface. Changes save straight to your database without any import process. Copy, paste, and fill-down operations work exactly as expected, making bulk updates feel natural.
In addition to the quick spreadsheet editor, Setary provides bulk actions for even faster editing:

Either way, using Setary to add attributes bypasses the usual import processes externally. In turn, this bypasses the PHP memory limits that crash other bulk editors and relieves pressure from your store. When you bulk change attributes used for variations, Setary regenerates them automatically. Your product structures stay intact without manual recreation.
Troubleshooting common attribute import failures
Why are my filters empty after importing?
Your products display perfectly with all attributes visible, yet shop filters stay empty. The import created local attributes stored as post meta instead of global attributes stored as taxonomies. Product pages read both types, but filter widgets only access global attributes. Re-import with "Attribute 1 global" set to 1, or convert existing attributes using the method described above.
Why do I have duplicate attribute terms?
Inconsistent capitalization creates separate taxonomy terms - "Blue" and "blue" become different attributes. WooCommerce treats them as distinct, causing filter confusion and inventory splits. Standardize capitalization before importing.
Why did my import time out or crash?
Your server couldn't process the entire CSV within its execution time limit. Shared hosting often restricts PHP to 30 seconds and 128MB memory. Split large files into 500-product chunks or use tools like Setary that process externally.
Why did attribute values disappear after an update?
Mixing global and local attributes during re-import confuses WooCommerce's data relationships. Always maintain consistency - if you started with global attributes, keep them global through all updates.
Read our tips for efficient WooCommerce product exports and exporting attributes to learn how to avoid these issues when preparing import files.
Master the architecture, not just the import process
Successful attribute management isn't about mastering CSVs - it's about understanding WooCommerce's architecture. Stop treating imports as data dumps. Instead, think strategically: first establish your store's shared vocabulary by creating global attributes, then import products that reference this vocabulary.
This architectural understanding solves the filter bug, prevents variation failures, and eliminates mapping confusion. You're not just importing data; you're building relationships between products and their characteristics.
The safest import is the one you never make. Instead of wrestling with CSV formatting and risking broken variations with every update, manage attributes directly in Setary's live, spreadsheet-style editor. Your filters keep working, variations stay intact, and updates happen instantly.
Get started with Setary today and manage product attributes with confidence. Transform hours of import preparation into minutes of direct editing.