How to import and update WooCommerce product data
It's surprisingly difficult to import products into WooCommerce - particularly at scale. I'll show you several foolproof methods.
Your 2,000-product import has been spinning for an hour, or worse, it froze at row 800. You followed the WooCommerce instructions perfectly, but the process still failed. Sound familiar?
This isn't a software bug - it's a physics problem. Your server has hard limits on processing time and memory, and when your import workload exceeds those limits, it fails predictably. I've watched countless store owners waste days trying to import large catalogs, not realizing they're fighting against mathematical impossibilities.
Whether you're importing products for the first time or troubleshooting a failed import, this guide covers the complete process:
- Learn the standard CSV import method that works for small catalogs.
- Understand exactly why imports fail at specific row counts.
- Discover advanced strategies for importing any size catalog reliably.
Most importantly, I'll show you the math behind import failures and how to match your import strategy to your server's actual capabilities. By the end of this guide, you'll know whether to split your files, upgrade your hosting, use specialized import tools, or bypass the import process entirely with modern bulk product management solutions like Setary.
Let's start with the basics before diving into why product imports go wrong and how to fix them.
The standard process: How to import products in WooCommerce
First, let's cover the foundational steps for importing products into WooCommerce. These steps work well for smaller catalogs and give you the basics you need to understand before tackling larger imports.
Preparing your product CSV
Before you begin any import, you need a properly formatted CSV file. Either create one from scratch or download sample-products.csv from the WooCommerce plugin folder at wp-content/plugins/woocommerce/sample-data/sample_products.csv to use as a template. I find that starting with the sample file saves hours of troubleshooting later, especially if you're new to CSV imports.
CSV stands for comma-separated values. Each row represents a product and each column contains specific product data. The key columns to include are SKU, Type (simple, variable, grouped), Name, Regular Price, and Categories. Use Google Sheets or LibreOffice Calc to edit your CSV files - avoid Excel as it often corrupts special characters and formatting.
If you already have products in WooCommerce, you can export them first to get a perfect template tailored to your store. This is better than using the sample CSV file because it already contains your global attributes etc. Navigate to Products → All Products and click Export to download your existing catalog.
For more details on preparing exports for reimport, check our guide on efficient WooCommerce product exports.
Step-by-step import process
WooCommerce has a built-in CSV import tool that handles basic product imports. Here's how to use it:
- In your WordPress dashboard, navigate to WooCommerce → Products and click the Import button at the top of the page.
- Upload your prepared CSV file. WooCommerce accepts files up to 8MB by default.
- Map your CSV columns to WooCommerce product fields. The importer tries to match columns automatically, but always double-check these mappings.
- Review the field mappings carefully. If a column doesn't match, use the dropdown to select the correct WooCommerce field.
- Click 'Run the Importer' to begin the process. Important: do not leave the page until it completes.
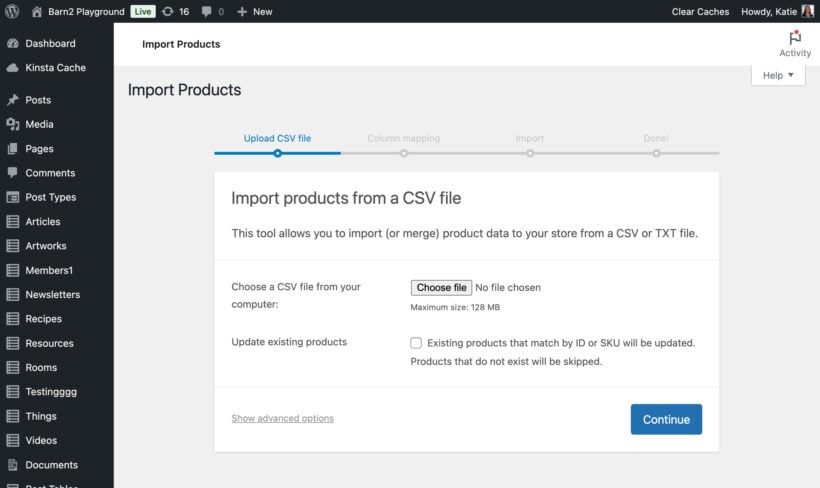
Updating existing products
You can also use this tool to bulk-update product prices for sales or stock changes. Include a SKU or ID column in your CSV that matches your existing products. During import, select the 'Update Existing Products' checkbox. This tells WooCommerce to update products rather than create duplicates.
I recently used this method to update prices across 200 products for a seasonal sale. The import worked perfectly because I kept it under 500 products - a safe limit for most shared hosting environments.
Why does my WooCommerce import fail at 800 products?
If your import consistently fails around the same row number, you're experiencing a server timeout. This happens when the import workload exceeds your server's processing capacity within its time limits.
The workload calculation
An import isn't a single action - it's thousands of server operations. The formula is simple: Products × Images × Database Operations = Total Server Workload.
Consider what happens during import. For each product, WooCommerce validates the data, creates database entries, processes images, generates thumbnails, updates product counts, indexes for search, and creates relationships between categories and tags. A 2,000-product import with three images each might require over 240,000 separate server actions.
Your server's hard limits
Every WordPress server has strict limits that kill long-running processes. The most common culprit is PHP's max_execution_time, typically set to 30-60 seconds on shared hosting. Your server also has memory limits that restrict how much data it can process at once.
Think of it like trying to pour a gallon of water through a straw in 30 seconds. The process gets overwhelmed and automatically stops. These limits exist to prevent one site from consuming all server resources and affecting other sites on the same server.
Quick diagnosis: Find your failure point
Understanding where your import fails tells you exactly what's wrong:
- Failure at rows 1-100: You have a CSV formatting issue. Check for special characters, incorrect UTF-8 encoding, or missing required columns. Read our guide on CSV formatting best practices to fix these issues.
- Failure around rows 500-1,000: Classic server timeout. Your import exceeds the max_execution_time limit. You need to either split your file or increase server limits.
- Failure after 2,000+ rows: Memory limit exceeded. Your server runs out of RAM while processing the import. This requires chunking your import into smaller pieces.
- Variable products import but variations don't link: Parent-child relationships are broken in your CSV structure. Check that your Post_parent column correctly references parent SKUs or IDs. Our variable products import guide explains the exact structure needed.
How to read real import error messages
These technical errors tell you exactly why your import failed. For example:
- 'Maximum execution time exceeded' means your workload took longer than your server allows. Your file is too big for a single import run, and you need to split it into smaller chunks.
- 'Allowed memory size exhausted' indicates your CSV file requires more RAM than your server provides. Either reduce the file size or increase your PHP memory limit.
- 'MySQL server has gone away' happens when the database connection drops during a very long import. This also indicates the import job was too large for your server configuration.
Understanding these errors transforms import failures from mysteries into solvable problems. Once you know the cause, you can apply the right solution.
Your import strategy based on catalog size
Success requires matching your import strategy to your catalog size and server capabilities. Here's what works for different scenarios:
| Method | Max Products | Use Case | Server Load | Best For |
| Native Importer | ~500 | Initial setup | High | Small, budget-conscious stores |
| WP All Import | ~5,000 | Regular imports | Medium | Growing stores with medium catalogs |
| Setary | Unlimited | Ongoing management | Low | High-volume stores needing frequent updates |
Importing small catalogs (under 1,000 products)
Split your CSV into 500-row chunks that your server can process before timeout. Use a free CSV splitter tool or do it manually in your spreadsheet application. Name each file sequentially (products-1.csv, products-2.csv) to keep track of your progress.
Import each chunk separately, waiting for one to complete before starting the next. This method is free and effective if you have time. I've successfully imported 3,000 products this way, though it took about an hour of hands-on work.
Importing medium catalogs (1,000-10,000 products)
The WP All Import plugin optimizes the import process better than native tools while still running on your server. Unlike the default WooCommerce import products tool, it chunks imports automatically, handles errors gracefully. It can also resume failed imports where they left off. The investment pays for itself if you import products regularly.
WP All Import also handles complex data relationships better than the native importer. It correctly links variations to parents, manages product galleries efficiently, and can import custom fields from other plugins.
Large catalogs / updating any number of existing products
For stores with large catalogs or those needing frequent updates, Setary eliminates the import/export cycle entirely. Instead of wrestling with CSV files, you add and edit products directly in a spreadsheet interface that connects to your store.
Setary processes 1,000 products per minute through cloud servers, bypassing your WordPress server completely. This means no timeouts, no memory issues, and no impact on your site's performance. It's particularly effective for stores in the 1,000-50,000 SKU range where native tools fail but enterprise systems are overkill.
Keep reading to learn more about how Setary is the perfect alternative to learning how to import products to WooCommerce.
Bypass imports: Add and update products in bulk with Setary
While the native WooCommerce importer can update products by matching SKU or ID from a CSV file, this process is slow and risky. It's overkill for routine tasks like updating prices or stock levels. Every import risks data corruption, and you need to export, edit, and reimport for every change 🙀
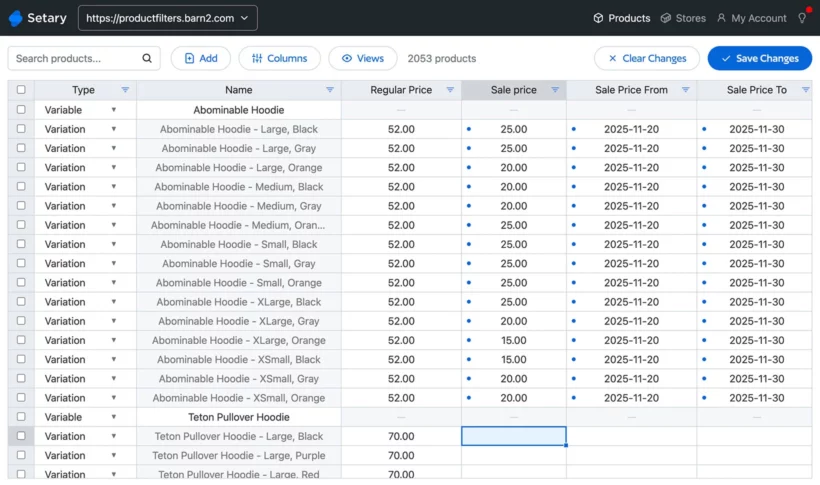
Setary takes a different approach by eliminating the file import/export process entirely. It does this by displaying your store's inventory in a live spreadsheet grid that works like Google Sheets. No downloads or uploads needed - changes sync directly with your store.
Instead of importing products to WooCommerce, you add and edit products either by:
- Direct editing: Filter products by category, type, or stock status, then edit cells directly in your browser. Change hundreds of prices or stock quantities by simply typing new values. You can even mass update product descriptions and metadata using the same interface.
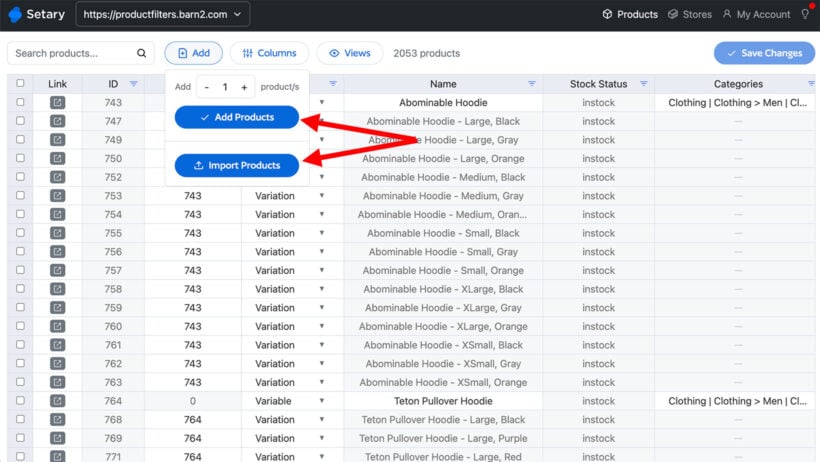
- Adding new products inline: Instead of importing from a spreadsheet, just add a row to the spreadsheet and add a product or variation that way. Or even easier, duplicate an existing row and edit the data as needed 🚀
- Setary also supports CSV imports for the rare occasion when you have a large number of products to import.
For stores managing frequent updates, this approach transforms hours of CSV preparation into minutes of direct editing.
Advanced strategies for complex imports
Some import scenarios require special handling. Here are solutions for common complex situations:
Importing variable products correctly
Variable products require specific CSV structure. You need separate rows for the parent product and each variation. The parent row must have Type set to 'variable', while variation rows need Type set to 'variation'.
Each variation needs a Post_parent value linking it to the parent product's SKU or ID. Attributes must be created in WooCommerce before import, and exported attributes or imported attribute values must match exactly, including capitalization. For detailed instructions, see our variable products import guide.
Handling product images efficiently
Images are often the bottleneck in large imports. Each image requires downloading, processing, and thumbnail generation. For best results, host images on a CDN or external server rather than including them in the import. Use direct URLs to images in your CSV, and ensure images are optimized before import.
Consider importing products first without images, then adding images in a separate pass. This lets you verify product data is correct before committing server resources to image processing.
Managing custom fields and metadata
If your products use custom fields from plugins like Advanced Custom Fields, you need to include these in your import. The native importer supports meta fields, but the column names must exactly match the field keys. WP All Import handles custom fields more elegantly with its visual mapping interface.
For complex metadata structures, consider using Setary's bulk attribute editor after the initial import. This lets you add custom data without risking your core product information.
Your import is a math problem, not a mystery
Frustrating import failures aren't random bugs - they're predictable outcomes of a simple equation. Once you understand the math, you can choose the right strategy every time.
Stop treating imports as a gamble and start treating them as a calculated process. Before you click 'Run', follow this framework:
- Estimate your workload: Count your products and multiply by complexity (images, variations, custom fields).
- Know your server's limits: Check your PHP time and memory limits in your hosting control panel.
- Choose the right strategy: Chunk for small imports, optimize with WP All Import for medium catalogs, or offload to Setary for large or frequent updates.
Your next import will complete successfully because you now understand the math behind it. By choosing an approach that respects your server's capabilities, you'll trade hours of frustrating guesswork for the confidence of a predictable, successful import every time.
Ready to move beyond troubleshooting failed imports? See how Setary's direct-editing approach can simplify your next catalog update. With cloud-based processing and a familiar spreadsheet interface, you'll wonder why you ever struggled with CSV imports in the first place.