How to export WooCommerce product attributes without breaking variations

Exporting WooCommerce product attributes sounds simple until you try to re-import your CSV and watch your entire catalog break. The real challenge isn't getting data out - it's getting it back in without destroying variation relationships.
You need to get WooCommerce product attributes into a spreadsheet for bulk price updates, inventory management, or migration. WooCommerce makes this easy with built-in export options.
But here's what nobody tells you: a successful export is only measured by a successful re-import. That CSV means nothing if it can't make the return journey intact.
I've seen this pattern dozens of times. Store owners export hundreds of products, edit in Excel, re-import, then find all variations broken. Disconnected products. Text instead of dropdowns. Days spent fixing manually.
Luckily, there's an easy solution - use Setary's bulk spredsheet editor to export WooCommerce attributes, edit them, re-import and even copy them between stores 🚀
Why re-importing destroys your catalog
Getting data such as product attributes out of WooCommerce is simple dumping. However, getting it back in requires exact formatting and preserved parent-child relationships. One wrong column header destroys your catalog.
Variable products link parents to variation children through specific naming conventions. WooCommerce expects the exact format "attribute_pa_color", not "Color" or "pa_color". This "Blue|1|1" format means value, visible status, and whether it's used for variations. Change these numbers incorrectly and products won't display properly. You might even create duplicate attributes instead of matching existing ones.
This guide covers three safe export methods, the exact pitfalls that cause imports to fail, and how to skip the risky export-import cycle when you just need to edit products.
Method 1: Export WooCommerce products with attributes using the built-in tool
Summary: No plugins required, but fiddly and error-prone
WooCommerce export attributes is the process of extracting product attribute data from your store into a CSV file. This includes both global attributes (shared across products) and local attributes (specific to individual products).
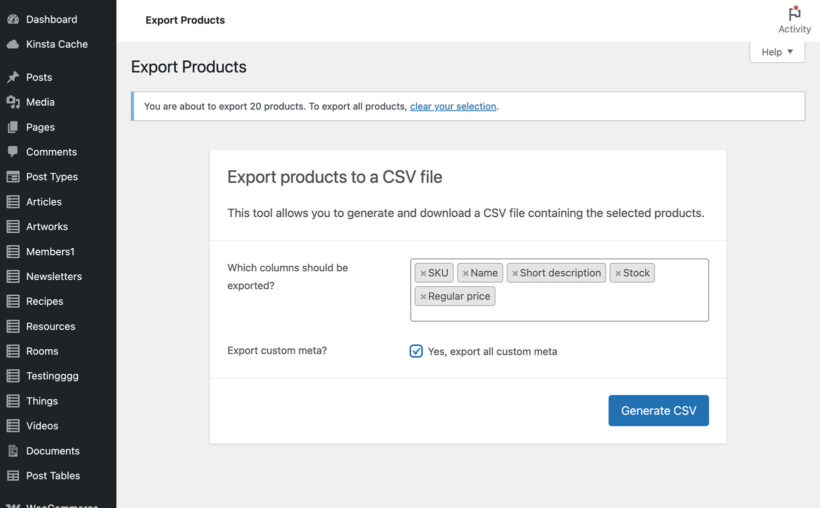
In your WordPress dashboard, navigate to Products → All Products → Export. Select the columns you need, then click Generate CSV.
Here's the step-by-step process:
- Navigate to Products → All Products in your WordPress admin.
- Click the Export button at the top of the page.
- Choose which product types to export (simple, variable, grouped, external).
- Select specific columns or keep all columns checked.
- Make sure 'Export custom meta?' is checked to include attributes.
- Click Generate CSV and download your file.
What you'll actually see in the CSV export
Product attributes appear in columns labeled like "Attribute 1 name" and "Attribute 1 value(s)". Global attributes show as "Attribute 1 value(s) global". Each variation gets its own row with parent SKU referenced.
This structure separates parent products from their variations. One t-shirt with three colors creates four rows: one parent plus three variations.
The critical limitation
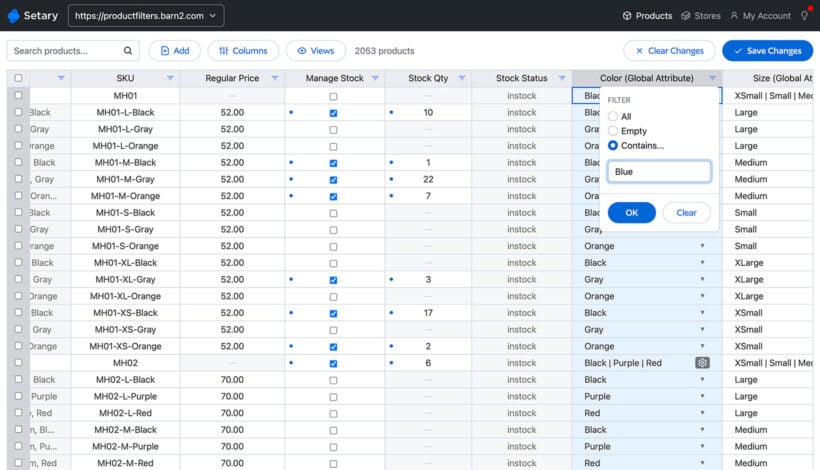
This built-in tool cannot filter by specific attributes. You can't export only "Blue" t-shirts or products with "Material: Leather". Instead, you either get everything or nothing.
This becomes a problem with large catalogs where you only need to work with specific product subsets and attributes.
When this method works best
- Quick backup before major changes.
- Stores with under 500 products.
- One-time data dumps for analysis.
- When you need all products anyway.
Read our step-by-step guide to learn how to successfully import WooCommerce variable products.
Method 2: Reliably export WooCommerce attributes with a dedicated plugin
Summary: More flexible, but still requires complex re-importing the exported attributes
Plugins handle several things better than the built-in WooCommerce attribute export. Firstly, they filter by any attribute value before exporting. They rename columns to match external system requirements. They also export only what changed since last export. Finally, they're better equipped to handle large catalogs without timeout errors.
For scheduled feeds and automation
WebToffee's plugin Product Import Export for WooCommerce excels at automated workflows.
Strengths: Set up automatic exports via WP-Cron, send files to FTP or email, choose specific attribute columns.
Process: Navigate to WooCommerce → Product Im-Ex → Export → Select attributes → Schedule if needed → Export.
Best for: Nightly inventory feeds, regular backups, supplier data sharing.
Limitation: Still requires re-importing attributes for edits, adding risk to the workflow.
For complex migrations and custom layouts
WP All Export gives you total control over CSV structure.
Install WP All Export Pro to drag-and-drop interface to build any column layout. It handles 10,000+ products efficiently without server timeouts.
Process: Navigate to All Export → New Export → WooCommerce Products → Drag attribute fields → Configure → Run Export.
Best for: Moving to another platform, creating custom supplier feeds, one-time migrations.
Limitation: Powerful but complex. Requires careful field mapping on re-import. Small mistakes create big problems.
Both plugins improve on WooCommerce's native export. However, they still follow the export-edit-import pattern that introduces risk at every step.
Method 3: Skip the export-import cycle with Setary
Summary: Recommended solution - seamlessly exports and re-imports attributes
The problem with the export-edit-import loop
The thing to consider is that every export is a snapshot that goes stale immediately. And even worse, every import is a chance to break variation relationships. The time between export and import is when other changes might happen (orders, stock updates). Even with perfect technique and no one else editing products, you're risking data integrity twice per editing session.
Direct editing with Setary eliminates the risk
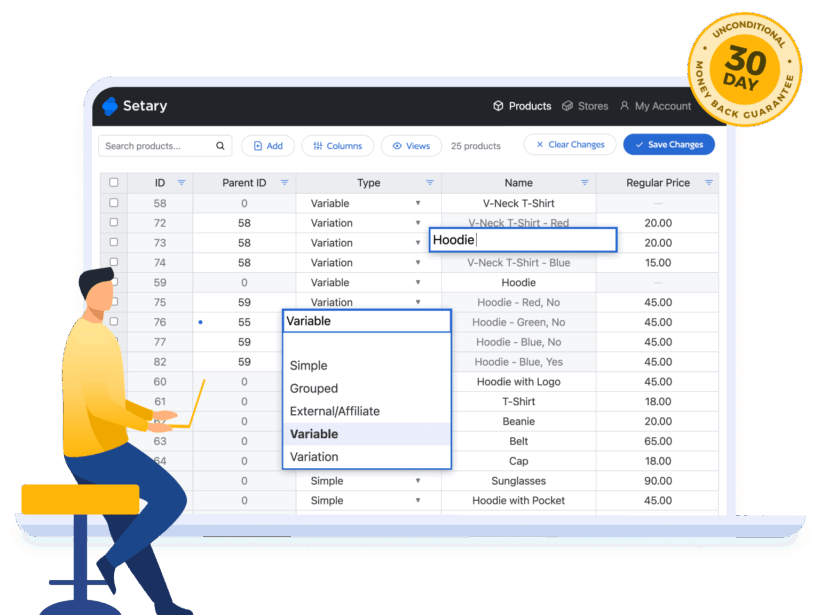
Setary provides a cloud-based spreadsheet that connects directly to your WooCommerce store. Your products appear in a familiar grid interface like Google Sheets or Excel. As a result, you don't have to export your attributes to edit them in bulk. Instead, they automatically appear in the Setary editor where you can make changes, which then re-sync with your store ✨
Changes save directly to your store through the WooCommerce REST API without you needing to manage files. No CSV downloads, no re-imports, no broken relationships.
Once your products are in Setary, you can filter by any attribute (e.g. to show only "Material: Leather" products), edit prices, and save instantly. The changes write back through secure API calls in real-time.
How it works in practice
- Install the lightweight Setary connector plugin.
- Open Setary's web interface and see your entire catalog as a spreadsheet.
- Use familiar spreadsheet operations: copy, paste, find, replace, fill down.
- Click 'Save to Store' and changes write back through secure API calls.
- Export to CSV anytime if you need a file for other purposes.
The interface works exactly like Excel or Google Sheets. You can sort columns, filter rows, and edit cells inline. The difference is changes save to your live database instead of a static file, cutting out the export/import steps.
You can connect multiple WooCommerce stores to Setary and switch between them. That way, you can migrate product attributes between sites - still without needing to export or import from CSV.
When Setary makes sense
- Weekly or daily bulk editing variations tasks.
- Teams who need to collaborate on product updates.
- Stores where mistakes are costly (high-value products, active ad campaigns).
- Anyone who's lost hours to failed imports.
- Advanced product variation management.
Method comparison: Choosing the right tool for your needs
| Method | Best for | Strengths | Limitations |
|---|---|---|---|
| Built-in WooCommerce export | Quick backups under 500 products | Free, no plugins needed, simple one-click process | No attribute filtering, high re-import risk, limited to basic exports |
| WebToffee Product Import Export | Automated recurring exports, supplier feeds | Scheduled exports, attribute filtering, FTP delivery | Still requires re-import for edits, adds complexity |
| WP All Export Pro | Complex migrations, custom feed formats | Total control over CSV structure, handles 10,000+ products | Steep learning curve, mapping errors common on re-import |
| Setary | Regular bulk editing without export-import risks | Direct spreadsheet editing, no re-import needed, real-time saves | Requires plugin installation, subscription-based |
Use built-in tools for backups, WebToffee for automation, WP All Export for migrations, or Setary to skip the risky round-trip entirely.
Your 5-step integrity check before re-importing any CSV
If you use Setary to bulk edit your attributes, then you can skip this section. However, if you're still using the CSV method then you should test the process before running imports on your live store. Use a staging site, local environment, or at minimum run during off-hours with a fresh backup.
Step 1: Export a small test batch
Select 5-10 products including simple and variable types with different attributes. This gives you a manageable file to verify your process.
Choose products that represent your catalog's complexity. Include items with multiple variations, global attributes, and local attributes.
Step 2: Perform the "null test"
Export test products, make zero changes, immediately re-import. If this fails, the problem is file structure, not your edits.
This reveals formatting issues, encoding problems, or server limitations before you invest time in actual edits.
Step 3: Make minimal test changes
Update just two or three cells in your test file. Change a price, modify stock status, update a description. Re-import and verify those exact changes appear correctly.
Gradual testing catches problems early when they're easy to fix.
Step 4: Verify variation counts
Count variations before and after using Products → All Products → filter by Variable. Numbers must match exactly or you've lost data.
If your test started with 47 variations and ended with 43, don't proceed to the full import. Find out what happened to those four variations.
Step 5: Check the frontend customer view
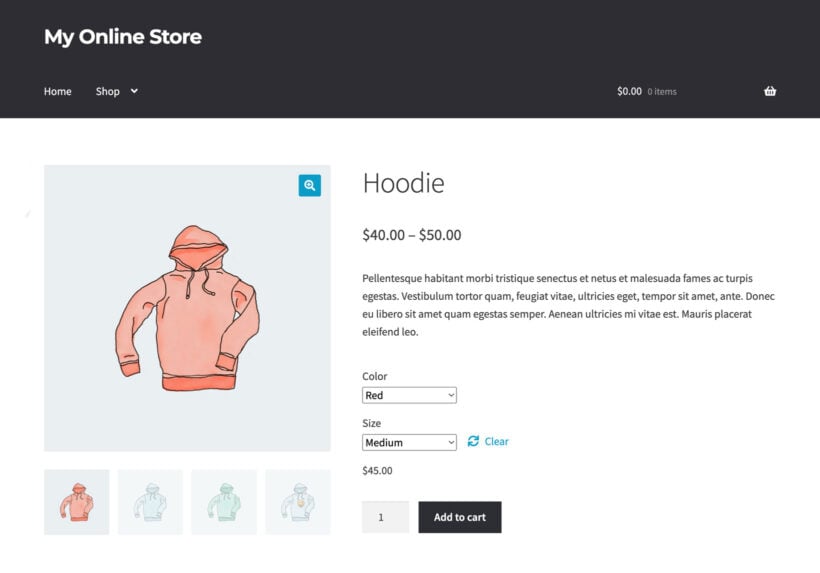
Visit product pages in your test environment. Verify that variation attributes appear as dropdowns, not text. Confirm prices, images, and stock work correctly. Test adding variations to the WooCommerce cart.
Backend data can look perfect while the frontend is broken. That's why you should always check what customers actually see.
Common export-import failures and how to avoid them
Global vs. local attributes cause the hidden catalog killer
Be aware of the 2 types of WooCommerce product attribute:
- Global attributes are product characteristics that appear across multiple products in your store. They're created at Products → Attributes and use the "pa_" prefix automatically. Color, Size, and Material are common global attributes.
- Local attributes are product-specific characteristics created directly on individual product pages. They don't use the "pa_" prefix and can't be reused across products.
WooCommerce stores these differently in the database. Global attributes appear with "pa_" prefix and work with product filters. Local attributes export as plain text.
Mix these up during import and WooCommerce creates duplicate attributes instead of matching existing ones. You end up with "Color" and "pa_color" as separate attributes in your database.
Parent-child relationships that must survive
Variable products link parents to variation children through IDs and attributes. Breaking these links creates orphaned variations that won't display correctly.
Each variation row needs a Post_parent column that references the parent product's SKU or ID. Miss this and variations import as standalone products.
One misnamed column ("Color" vs "pa_color" vs "attribute_pa_color") destroys these relationships. WooCommerce is extremely particular about exact column names.
The mysterious pipe notation decoded
The pipe character separates attribute settings in WooCommerce exports. This notation confuses many store owners who encounter it for the first time.
When you export products, attribute columns show values like "Blue|1|1" or "Large|1|0". Each section controls different aspects of how the attribute behaves.
The first value is the actual attribute term. This is what customers see (Blue, Large, Cotton). The second number controls visibility on the product page. "1" means visible, "0" means hidden. Visible attributes appear in the "Additional information" tab. The third number determines if the attribute is used for variations. "1" means yes, "0" means no. Only attributes set to "1" create dropdown selectors for customers.
For global attributes, the format includes "1" for both visibility and variation usage by default. Local attributes might use "0" for the variation flag since they can't create variations.
Never guess with pipe notation. Export a few products, note the exact formatting, and replicate it precisely when editing.
Excel silently corrupting your data
Excel auto-converts SKUs "00123" to "123". It reformats dates and destroys product codes, and strips leading zeros from variant IDs.
The solution is to use Google Sheets or import as text in Excel. In Excel, use Data → From Text/CSV and explicitly set columns to text format.
UTF-8 encoding scrambling special characters
Product names with é, ñ, or © get destroyed during export-edit-import cycles. WooCommerce exports files in UTF-8 encoding, but Excel often guesses the encoding incorrectly.
Always save as UTF-8, check every time. In Excel, use the import wizard instead of double-clicking the CSV file.
The variation explosion overwhelming your browser
One t-shirt with 5 colors times 8 sizes equals 40 spreadsheet rows. Each variation requires its own row in the CSV.
100 variable products easily create 1,000+ rows that crash browsers during editing. This means that files can easily become massive and unwieldy. leading to browser or server crashes.
The solution is to export by category to work with a more manageable number of items at once. Alternatively, use direct editing tools like Setary.
Stop WooCommerce attribute export errors before they start
Every store owner who's lost a weekend to broken variations learns the same lesson. Exporting the attributes was never the hard part. The challenge is getting data back in without destroying the relationships that make your store work.
Stop measuring export success by whether you got a file. Measure it by whether that file can return intact. Or better yet, question whether you need an export file at all.
Get started with Setary for WooCommerce today to manage product attributes effectively without export or import chaos.