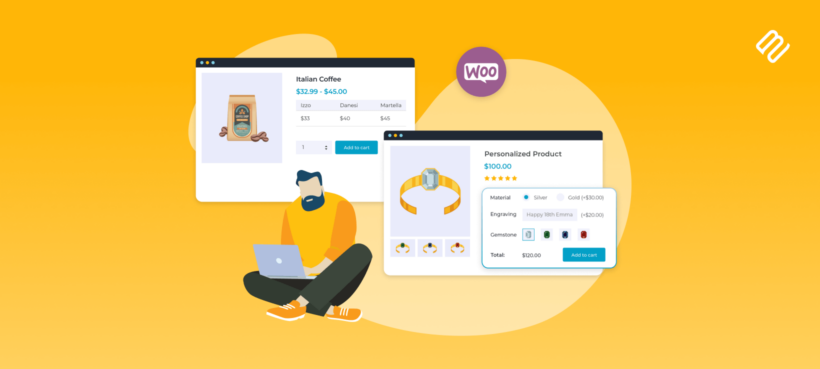
This is the complete guide on how to create and display WooCommerce custom fields. You'll learn how to show extra product data and sell extra product options on your website.
59% of shoppers are more likely to buy from a store that allows for product customization. WooCommerce comes with various types of data which you can add and display about your products. It also comes with a variable product type, with dropdown list fields to allow customers to select different options. But what if you want to create your own custom fields and display them in your ecommerce store?
Read on, or watch this video to find out!
In this tutorial, I'm going to reveal two easy ways to create WooCommerce custom fields and display them on the shop or product page:
Extra product option fields which allow customers to customize the product.
Custom fields for displaying extra data about the product.
Keep reading to learn more about each type of custom field in WooCommerce and how to set them up, step-by-step.
What are WooCommerce custom product fields?
When people talk about WooCommerce custom fields, they typically mean one of two things:
Selling extra product options, as an alternative (or enhancement) to variationsThis involves installing a WooCommerce custom product fields plugin which displays dropdown lists, checkboxes, radio buttons, text fields, etc. for the customer to complete before adding the product to their cart. You can either do this by displaying existing variations in more interesting ways, or by creating custom options using a plugin. Technically, extra product options aren't custom fields at all - they're better known as product add-ons! However, a lot of people refer to them as custom fields. They're perfect for adding a WooCommerce text field to the product page, and collecting other data and options from customers.
Adding extra information about the productThis is the classic use of custom fields. In WordPress, custom fields are used to add additional data to posts, pages, or products. You use these to store and display extra information on your website. For example, if you're already using all the built-in types of product data for other purposes then a WooCommerce custom field plugin can display additional text for you.
Continuing on, we will explore the steps involved in adding both types of custom fields to your WooCommerce products. You will also learn how to make the custom fields visible on the shop and product page.
By following the steps outlined in this guide, you will be able to effectively use custom fields in WooCommerce. This will enhance your store and improve the shopping experience for customers. Whether you're looking to add extra information about your products or offer additional options, WooCommerce custom fields are a powerful tool to help achieve your goals.
Using custom fields to provide options and collect information from customers
A product with various extra fields added, as an alternative to variations
First, we'll look at how to use custom fields in WooCommerce to show extra information about your products. This involves offering additional options to customers.
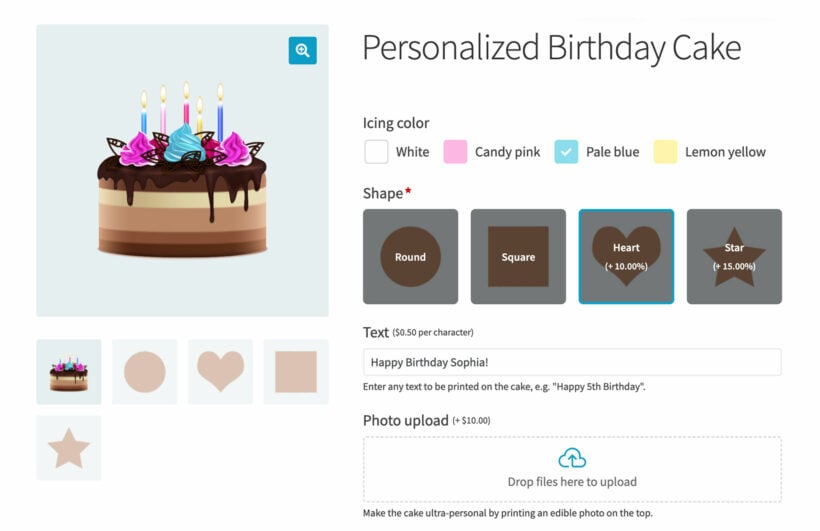
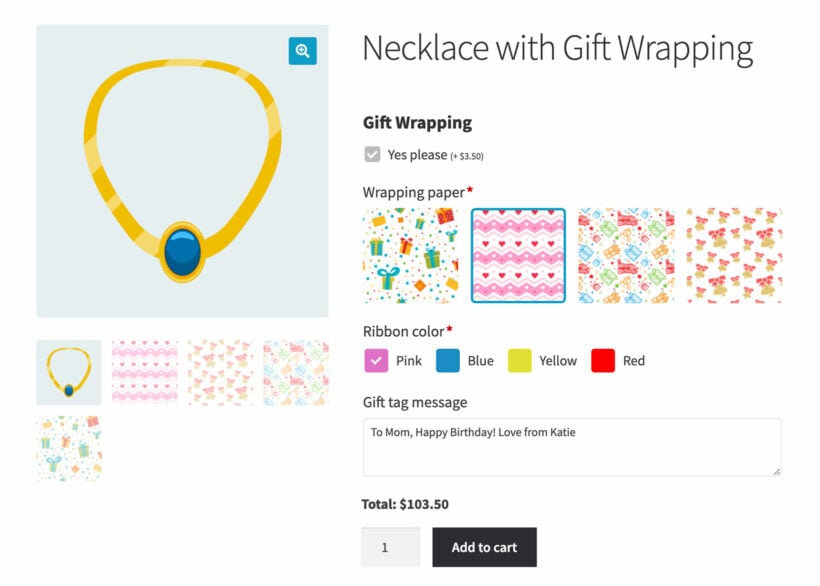
This type of custom field goes beyond merely displaying extra information about a product. It offers customers the option to select additional features before adding the product to their cart.
This method is a remarkable alternative or improvement to product variations. That's because it allows you to add a wide range of field types, including radio buttons, checkboxes, and text inputs - either as custom options, or by taking existing variations and displaying them in more interactive ways. By adding extra fields on the product short description page, customers can provide more choices and data that they can receive along with their orders. For example, adding a WooCommerce custom text field on the product page lets customers enter their own text to be submitted with their order.
Once the customer selects the custom fields from the product page, this is displayed as a custom order field in order notification emails etc. That way, the store owner knows which options the customer has chosen.
Radio button: A custom field which forces customers to select one option from a list.
Text: Let customers enter custom text, such as a personalized message or allergy information.
Text area: Collect entire paragraphs of information from the customer, suitable for longer messages.
File upload: Let customers upload files while placing the order. You can control details like the file types and maximum file size.
Number: Add a custom field to collect numeric information. This is useful for things like phone numbers, measurements or dimensions (especially when used with the price formula custom field type).
Color swatches: A more visual type of WooCommerce custom field, which lets customers choose from a choice of colors.
Dropdown: Let customers to choose an option from a dropdown list.
Customer-defined pricing: This custom field type provides a "Name your price" box where customers can enter an amount to be added to the product price.
Price formula: This is a more advanced WooCommerce custom field type. Use it to create a WooCommerce price calculator with a custom formula to calculate the price based on the information that the customer submits. This type of custom field is popular for creating a measurement price calculator for products priced by size, weight or area.
Date: Add a date custom field to the WooCommerce product page.
Products: This is less of a custom field than the other types. It displays selected products above the add to cart product and is a good tool for upselling additional products.
Visual editor: This is more like the classic definition of a custom field, which lets you display read-only data on the WooCommerce product page. Use this to enter static information such as headings or introductory sentences, instead of fields for the customer to fill in.
HTML: This custom field is like the visual editor field but more technical. You can use it to enter HTML that will appear as static information on the WooCommerce product page.
Introducing the Product Options plugin
There are several WooCommerce custom fields plugins available for adding extra product information to your store. However, when it comes to finding the best solution for letting customers select extra product options during checkout, we highly recommend WooCommerce Product Options. This plugin stands out as the best option for adding custom fields to your products and displaying them during the checkout process.
You can add a wide range of options that appear as custom fields for the customer to select. In fact, it supports all the custom field types listed above. Shoppers can complete these extra custom fields and add them to their cart from the following locations:
From a quick view lightbox, if you're using WooCommerce Quick View Pro. (Customers can access the lightbox from the main shop page or product category pages, so it's a quick way to select add-on custom fields without having to visit a separate page for each product.)
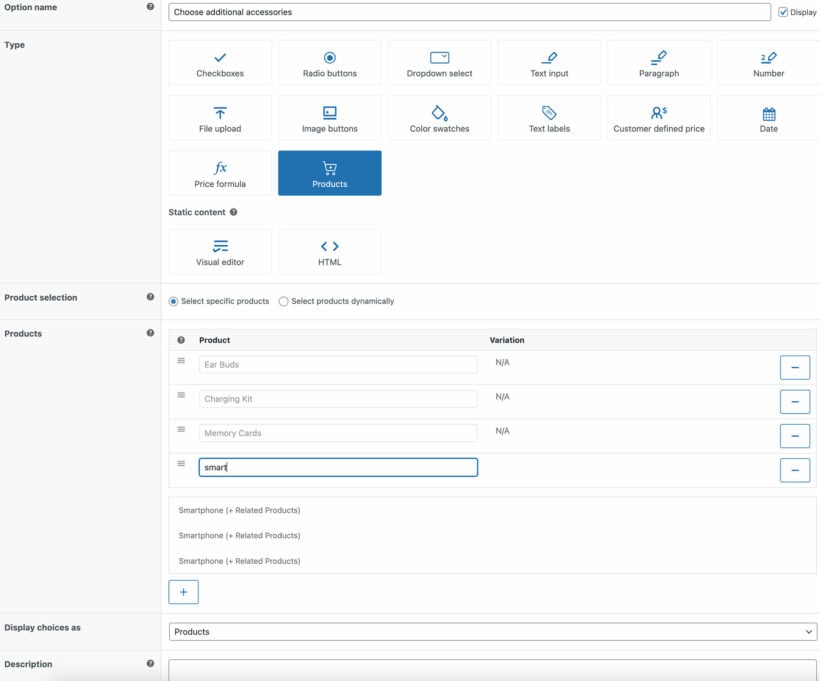
1a. How to create custom fields on product pages
Now we get to the tutorial part of this article. First, I'll tell you how to add custom fields to your WooCommerce products. Afterwards, I'll discuss the options for displaying custom fields on product pages and other shop pages.
The plugin setup wizard will open when you activate the plugin. Use this to activate your license key.
Next, go to Products → Product Options.
Click 'Add New' to create a new group of product options. This will be your group of WooCommerce custom fields. Name it whatever you like.
Use the onscreen instructions to add as many custom fields as you like. For each one, scroll down to configure additional options for each custom field. For example, you can use the price options to increase or decrease the product page based on the custom fields selected. Some field types can only be created directly in the plugin, and others also let you select existing variations to display.
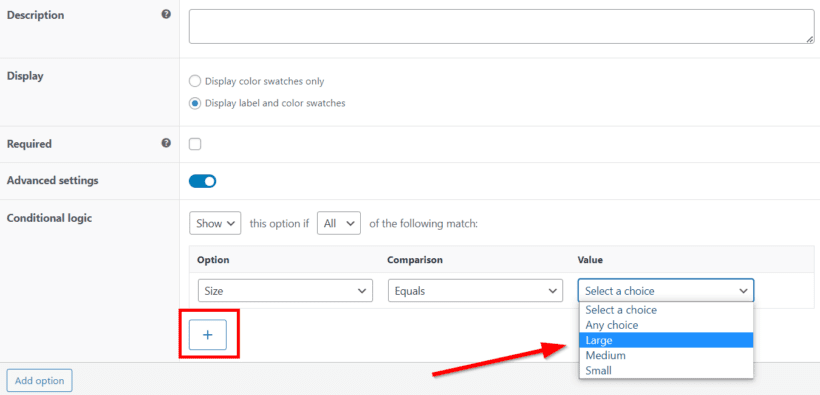
Use the 'Advanced' section to configure additional options. For example, you can add minimum and maximum quantities for some of the custom field types. You can also add conditional logic to your WooCommerce custom fields so that the fields appear conditionally based on the user's selections. This is good if - for example - you want customers to be able to tick a 'Customize this product' to reveal the hidden custom fields.
1b. How to set up custom fields on shop and category pages
As a front end plugin, WooCommerce Product Options seamlessly displays custom field data on the WooCommerce product page. Once you've added your custom product option fields and selected which products they will appear of, they will start appearing straight away.
However, this requires the customer to visit a separate page for each product they want to fill in custom fields for. That might work for your use case, or you might also like customers to be able to select custom fields on the shop page, category pages, and so on. There are 2 easy ways to do this. I'll tell you about these next.
Method 1 - Display WooCommerce custom fields on a shop page order form
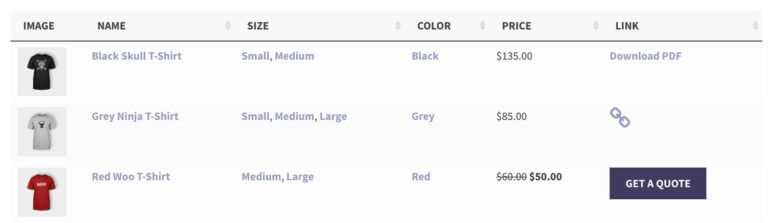
You can use the WooCommerce Product Table plugin with WooCommerce Product Options to display the extra options on your main shop pages. This will replace your usual store layout with a structured product table view, complete with a 'Buy' column. The buy column contains all the purchase options for adding the product to the cart. This includes product variation dropdowns, product add-on custom fields, and a quantity picker.
Example of WooCommerce Product Table used with Product Options
Customers can quickly find the products they want, fill in all the custom fields, and add them to the cart - all from the shop and category pages. This is a good option if you want to add a custom field to a product category, which you can do by enabling the table view on category pages.
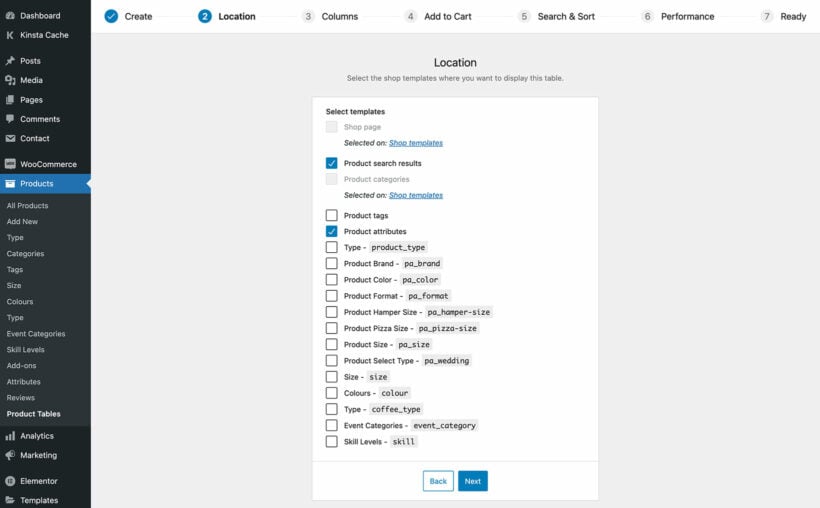
Use the plugin setup wizard to choose the main options for your product tables.
Select the option to display the product table layout on a shop page.
On the next screen, select which WooCommerce shop pages you want to display the order form with custom fields on.
When you choose your table columns, make sure you include a 'Buy' column. The custom fields that you added using WooCommerce Product Options will appear here.
And that's it! Your shop pages will now show product tables complete with WooCommerce custom fields.
Display product option custom fields in a quick view lightbox
Maybe you want customers to be able to fill in the custom fields without visiting individual product pages, but you don't want to change or clutter up the shop page. That's fine.
The solution is to use the WooCommerce Quick View Pro plugin to add 'Quick View' buttons to your shop and category pages. Customers will use these to launch a product lightbox containing the WooCommerce custom field options for that product. That way, they can easily fill in the custom fields and add to the cart, without having to visit the product page.
Example of Product Options used to display the custom fields in a WooCommerce Quick View Pro lightbox
Use the setup wizard to choose what you want to include in the quick view lightbox. Make sure you include the add to cart button, as the WooCommerce custom field options are attached to this.
And that's it! This will add quick view buttons to your shop pages, linked to lightboxes containing your WooCommerce custom fields.
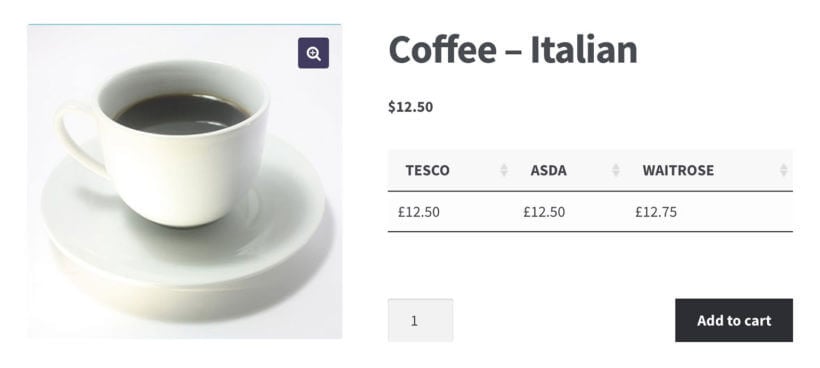
Using custom fields to store extra product data
So far, we've learned how to add custom fields to the WooCommerce product page which the customer interacts with. This involves things like adding some text, selecting options, and so on.
But that's not really the technical meaning of the term 'custom field' in WordPress! A WooCommerce custom field actually refers to something different: a custom meta field which is attached to the 'products' post type.
In part 2 of this tutorial, we're going to focus on custom fields in the technical sense of the word. This is all about displaying extra data on your WooCommerce products, rather than providing editable fields for customers to interact with.
WooCommerce comes with a range of standard fields for storing and displaying information about your products. This includes data such as the product title, price, categories, tags, attributes, tags, dimensions, stock information, and so on. Here, we're talking about how to add a static WooCommerce text field on the product page. That's why it's different from adding custom fields for your customers to fill in.
However, sometimes the built-in WooCommerce product data isn't enough. When that happens, you need to install a WooCommerce custom fields plugin and add some additional fields.
In this section, I'll show you how to use the best plugin to add custom fields to WooCommerce. I'll also show you how to display them on the front end of your shop and product pages like this:
WooCommerce Product Table plugin displaying custom fields in the front end
But before we start, I'll explain the difference between custom fields and taxonomies to make sure that custom fields are actually what you need.
Custom fields or taxonomies?
Lots of people wonder "What is the difference between a custom field and a custom taxonomy"? It's a valid question because they're both ways of adding and displaying custom data about WooCommerce products. Understanding the differences between the two options is crucial in knowing which one best fits your specific requirements.
What are custom fields?
Custom fields, also known as post meta, are individual pieces of information that can be added to your products. They are flexible and be used to store a wide range of data, including text, images, and other media.
In short, custom fields add extra fields to the Add/Edit Product screen in WooCommerce. They're ideal for storing standalone data about products. Here are some examples of when you should use WooCommerce custom fields:
To store a unique product barcode, inventory, or reference number.
For adding extra ways for people to interact with your products. This might be by adding extra buttons (e.g. 'Enquire about this product), icons, or social sharing links.
To display multimedia content about the product, such as embedded video or audio tracks.
To store additional notes about the prices or alternate price options. For example, if you're using a bulk discount WooCommerce plugin and want to list the quantity-based discounts, then you can add this information to a custom field.
The idea of a custom field is that it stores unique information. Since the data stored in the field is unique, you can display it in the WooCommerce front end - e.g. on the product detail page, shop, or category pages. However, you wouldn't expect to use this data to group or filter products. If you want to filter by that type of data, then you need a custom taxonomy instead.
You can create WooCommerce custom fields using any custom fields plugin for WordPress. Once you've created the custom fields, it's easy to show them on your website using the WooCommerce Product Table plugin. Keep reading for full step-by-step instructions on how to do all this. First, I'll quickly tell you about WooCommerce custom taxonomies so that you can be sure you're choosing the most appropriate field type for your data.
What are custom taxonomies?
Like WooCommerce custom fields, taxonomies are a way to store and show extra product data. They are a way of grouping and organizing products into categories or tags. However, the difference is that they are designed to store reusable information which can be used to group and filter products. For example, you can create a dedicated archive page listing all products that share a specific custom taxonomy term. You can also use taxonomies to filter products using the WooCommerce Product Table plugin.
Custom taxonomies are very similar to WooCommerce product categories. In fact, WooCommerce categories are actually set up as a taxonomy under the hood. When you create a custom taxonomy in WooCommerce, it adds tick boxes/checkboxes to the right-hand side of the Add/Edit Product screen - just like categories.
Here are some examples of when you might use WooCommerce custom taxonomies:
A WooCommerce bookstore needs to store extra product data such as year of publication, author, and publisher. Since more than one book has the same year, author, or publisher, customers need to be able to sort and filter by this data. You can do this using WooCommerce custom taxonomies.
If your products relate to a specific geographical area, then you can use custom taxonomies to group products by area. For example, you could create a custom taxonomy called 'Area' and add a separate taxonomy term for each state or county. Customers can then filter by area, or view lists of products from a specific area only.
A WooCommerce clothes store can use custom taxonomies to store extra data such as brand names. Customers can then search and filter to find products with their favourite brands, as this field isn't built into WooCommerce as standard.
In summary
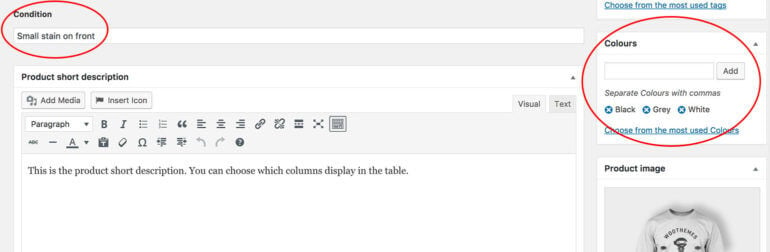
Custom field for 'Condition', custom taxonomy for 'Colours'.
When deciding between custom fields and taxonomies, it's important to consider the type of information you want to store and the way in which you want to organize your products. If you need to add unique or specific information to a product, custom fields may be the better choice. However, if you're looking to categorize and organize your products, taxonomies may be suitable.
Ok, now you know when to use custom fields. Next, I'll show you how to create advanced product fields for WooCommerce. It's surprisingly easy!
While many individuals opt to add custom fields programmatically, this tutorial is designed for non-developers. By reading on, you will learn how to add custom fields to your WooCommerce products without writing a single line of code. This makes it possible for you to display extra product fields wherever you desire, including on the product page, the shop page, and category pages.
Which custom field plugin?
In order to add custom fields to your WooCommerce products, you'll need to have a WooCommerce custom fields plugin installed. There are numerous high-quality and free plugins available for creating custom fields in WooCommerce, including Easy Post Types and Fields and Advanced Custom Fields (ACF). Each custom field plugin offers unique features and benefits, so you can choose the one that best fits your needs and preferences.
If you prefer, you can also opt for a dedicated WooCommerce custom fields plugin. These are specifically designed for adding custom fields to products in the WooCommerce platform. However, custom fields are essentially the same whatever WordPress post type you're adding them to. For that reason, there's no need to use a WooCommerce-specific plugin.
I'm going to show you how to create WooCommerce custom fields using Easy Post Types and Fields, and also Advanced Custom Fields. These are my two favorites.
However, the instructions are the same for most other custom field plugins for WordPress. If the custom fields don't show up on your site when you follow the later sections of this tutorial, make sure the plugin isn't adding extra characters to the start of the custom field name. (You might need to contact their plugin support to ask about this.) For example, Toolset automatically adds wpcf- to the start of the custom field name, so you need to know this.
Creating custom fields with Easy Custom Post Types & Fields
Easy Post Types and Fields is a free WooCommerce custom fields plugin. It makes it easy to add custom data fields to your WooCommerce products.
This plugin was designed to make it as quick and easy as possible to add custom fields. It comes with a choice of plain text and visual editor custom field types. Use it if you want a quick and straightforward way to add WooCommerce custom text fields to the product page.
How to add custom fields to WooCommerce products
Log into the WordPress dashboard and go to Plugins → AddNew.
Search for ‘Easy Post Types and Fields’, then install and activate the free plugin.
The setup wizard will open. Skip this and go to Post Types → Manage, then click on the 'Other Post Types' tab.
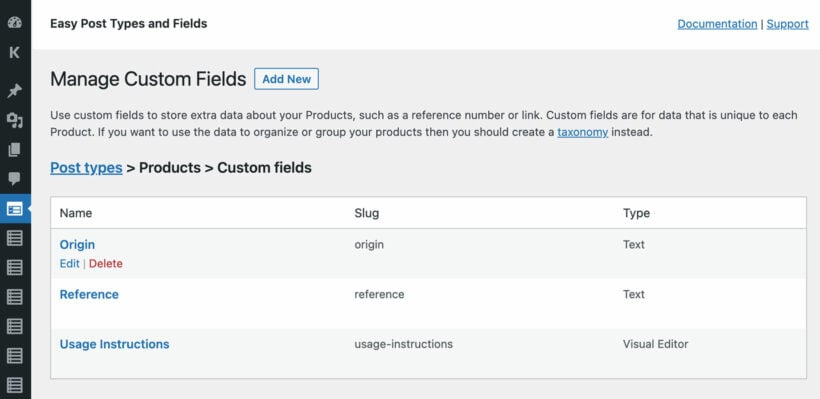
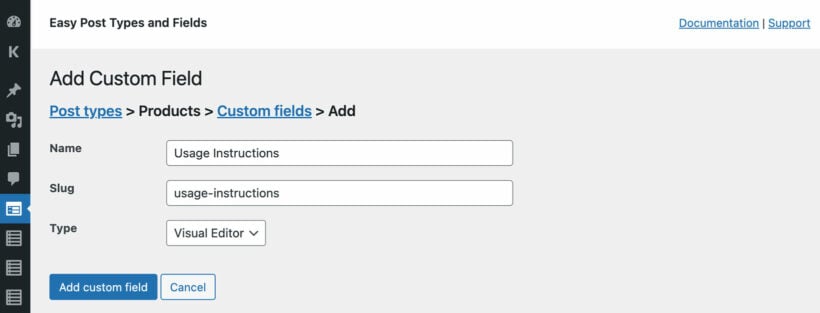
Find the 'Products' post type (this is added by WooCommerce) and click 'Custom Fields'.
Click the button to add as many fields as you like to your WooCommerce products. Make a note of the name of each custom field - you'll need this to display it later in this tutorial.
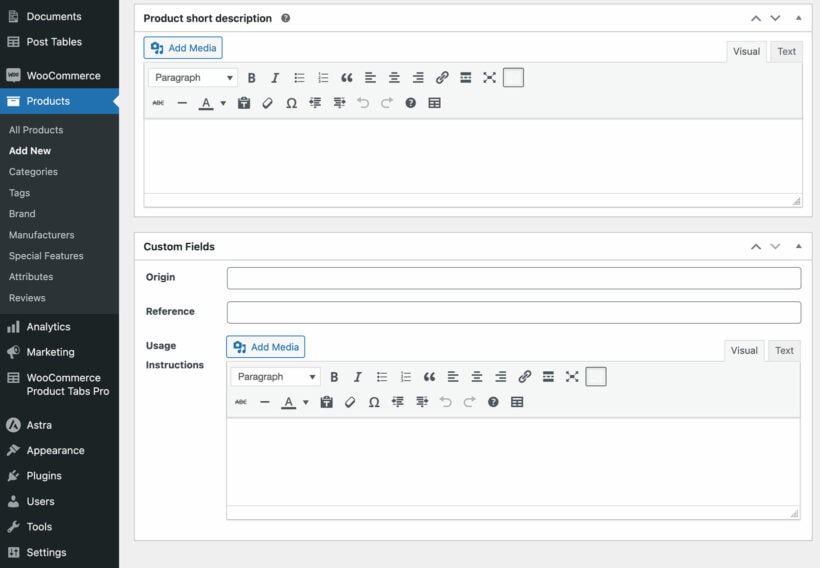
Finally, edit your products. On the 'Edit Product' screen, you'll find the custom fields that you added in step 4. Fill in the data as needed.
How to create custom fields with the Advanced Custom Fields plugin
Advanced Custom Fields (ACF) is a popular WordPress custom fields plugin. Use it if you're willing to spend a bit more time on setup and want extra features such as additional field types:
Log into WordPress and find Plugins → Add New. Search for ‘Advanced Custom Fields’, then install and activate this free plugin.
Click ‘Custom Fields’ on the left-hand side of the WordPress dashboard.
Click the ‘Add New’ link by the ‘Field Group’ at the top of the page.
Next, you'll see the ‘Add New Field Group’ page:
First, add a name for the group of custom fields you're creating. (No one else will see this.)
Location – Choose Show this field group if Post Type is equal to Product. This tells Advanced Custom Fields to show the custom field on the Add/Edit WooCommerce product screen.
Press the blue ‘Add Field’ button. Now it's time to create the individual custom fields where you'll store the extra product data.
Add a Label for the custom field. This is how the custom field will be labeled on the Add/Edit Product screen.
Choose a Name for the custom field (this should be 1 word in lowercase). You'll need this to display the WooCommerce custom field on the front end of your website, later.
Choose a Field Type from the available types of a custom field. You can choose text, text area, numbers, checkbox, radio button, etc.
Complete any extra fields for the custom field such as adding a default placeholder value. Finally, click the blue ‘Publish’ button.
That's how to create WooCommerce fields. The next step is to add data to the custom field value for some or all of your products. To do this, go to the 'Edit' page for each product and you'll see the extra WooCommerce custom field(s) lower down the page. They'll be shown somewhere below the Product Data section. Edit the placeholder, enter values into the custom fields, and then save the product.
2b. How to display custom fields on shop pages
How to show custom fields on the shop page
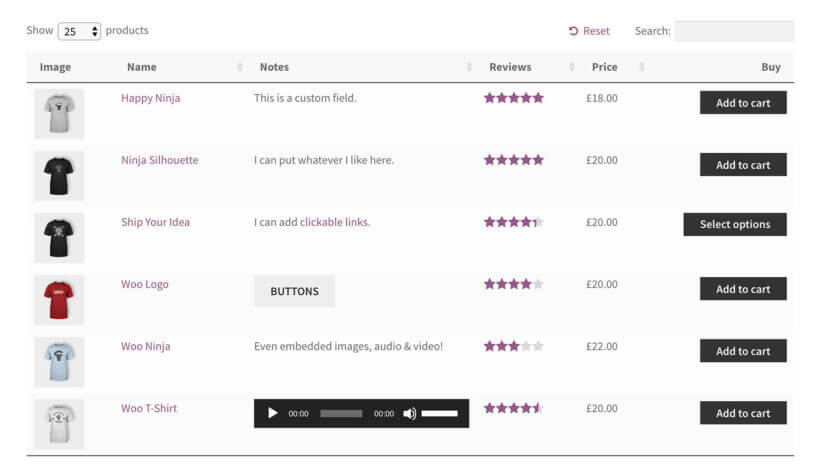
A shop page product table with a custom field column
In the previous section, I showed you how to store new custom fields for your WooCommerce products in the back end. The next step is to display these fields on the front end of your WordPress website for customers to see. Of course if you're using custom fields simply as a way to store internal notes, then there's no need to display them. However, if you want to show your WooCommerce custom fields on your website, it's a simple process.
There are several ways to make custom fields visible on the front end of your website. This includes displaying custom fields on product pages, the shop page, and category pages.
The easiest way to show your extra product data is to install the WooCommerce Product Table plugin. This takes your products and lists them in a quick order form layout anywhere on your site. You can add product tables to any page you like. This might be normal pages, or your WooCommerce shop and category pages.
You can choose which columns to include in the product table. The great thing is that you can include WooCommerce custom fields in the table. This is more flexible than the default store layout, which just lists basic information such as the product name and price. It's a really easy way to display the extra product data that is stored in custom fields.
The product table builder will open. Activate your license key and choose the other settings for your first product table. For example, you can choose which products to include in the table. Alternatively, you can select which default shop pages you want to display the table with custom fields on.
In the Columns section, make sure you add your custom field columns. If you're using the Easy Post Types and Fields or Advanced Custom Fields plugins to create custom fields, then these fields will appear in the list of columns. For other custom field plugins, select 'Custom field' and enter the custom field name.
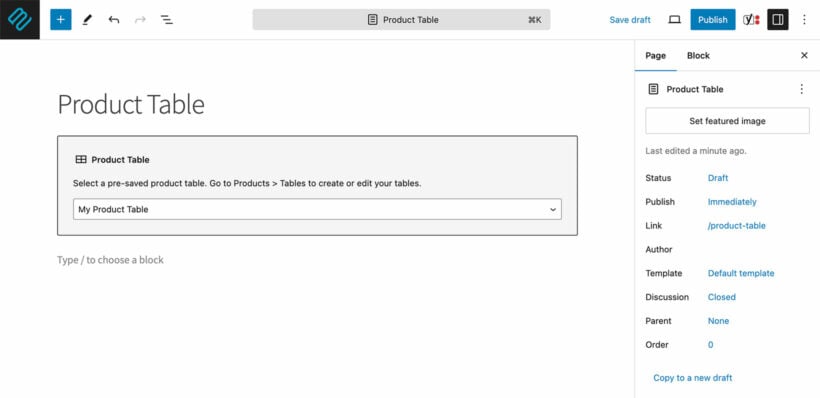
Now it's time to add product tables to a page. (You can skip this step if you selected the option to show product tables on your main shop pages.) To list products with custom fields anywhere, either use the shortcode from the final page of the table builder or insert a 'Product Table' Gutenberg block.
Next, view the page and see what it looks like! You will see a product table, complete with custom fields.
Make changes to how your custom fields are displayed
WooCommerce Product Table is a very flexible plugin. Choosing your columns is just one of over 50 options! Look at them all and configure your table to show whatever product data you need.
Have a play, and get your product tables and WooCommerce custom fields showing exactly as you need them.
How to display custom fields on the WooCommerce product page
So far, I've shown you several ways of displaying custom fields on WordPress pages, shop, or product category pages. It's also possible to show a WooCommerce text field on the product page (also known as the product detail page).
The WooCommerce product page is great, as it displays lots of product data such as product title, image gallery, short and long description, product category, product price, attributes and variations. However, there's no built-in way to add custom fields to custom product pages.
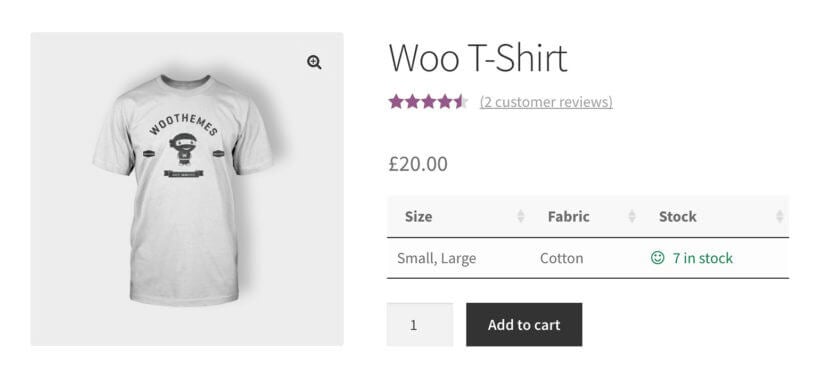
You can do this using the WooCommerce Product Table plugin that we looked at in the previous section. It can show custom field values anywhere on your site - including the WooCommerce product page. When used on the single product page, it looks like this:
A product table displaying custom field data on the WooCommerce product page
Setup tutorial
1. First, create the table of custom fields
Edit each product and add data to the custom fields as required.
When you activate it, a table builder will open guiding you through the main settings for your custom tables. You can also launch this later at Products → Product Tables.
On the 'Create a table' page, select the 'Add to a page using a block or shortcode' option.
On the 'Select your products' page, select the 'Individual products' checkbox and search for the product whose custom fields you want to display. (Don't worry if you want to show different custom fields on different products, as I'll show you how to do this in a minute.)
Select other options for the table, such as columns. If you're using the Easy Post Types and Fields or Advanced Custom Fields plugins for your custom fields, then these will appear in the list of columns. For other custom field plugins, choose 'Custom field' and add the custom field name.
Copy the shortcode from the final page of the table builder.
Now repeat Steps 3-8 for the other products that you want to display product custom fields on. You can quickly do this by duplicating an existing table and changing which product is selected.
Now go to Products → Product Tables → Settings. I recommend disabling elements such as the search box, product totals and reset button. That's because these are designed for listing large numbers of products in a table, and they're not relevant to displaying custom fields on the WooCommerce product page.
2. Next, add the table to the product page
Open the 'Edit Product' screen for the product where you want to add a table of custom fields.
Add a product table shortcode that you copied earlier to the Short Description field.
This is how it will look on the front end WooCommerce product page:
What if I don't want to show the custom fields for each product manually?
The instructions above tell you how to manually add a product table with custom fields for specific products. You can do this for as many products as you want to display custom fields.
If you want to show custom fields on all your WooCommerce product pages then you will need to do this globally by adding product tables to the single-product.php template. This is a bit technical and you can ask your developer to do this for you. If you don't have one then I recommend that you post a job on Codeable where one of their WordPress experts will send you a quote.
To get you started, we've provided an article with code snippets on how to automatically add product tables after the short description field on the single product page. The code snippet adds a table of the current product's variations, and you can change the [product_table] shortcode to add custom field columns, disable the variations option, and make any other changes you require.
Can I add custom fields to other sections of the WooCommerce product page?
Above, I showed you how to add custom fields to a table in the short description on the WooCommerce product page. This is a good option because most themes show the short description near the top of the page, under the product name and price.
If you'd rather show custom fields elsewhere on the single product page, that's absolutely fine. Simply add the product table shortcode to wherever you'd like to display the custom field values. For example, you could add it to the long product description instead.
What other extra data can I show on the WooCommerce product page?
Custom fields and taxonomies are just the tip of the iceberg. You can use WooCommerce Product Tables to show any type of product data in a table. This can include:
Product image, name, price
Short or long description
Categories and tags
Attributes and variations
Star rating from reviews
Embedded audio and video
This is a much more flexible way to show WooCommerce extra product data in the short description field. Customers can see all the relevant data from the neat table layout, instead of having to scroll down to the long description tabs.
Have a play with showing custom fields and other data on the WooCommerce product page. Think about what will best sell your products and maximize conversions. This is a great way to increase sales and make your e-commerce store an even bigger success.
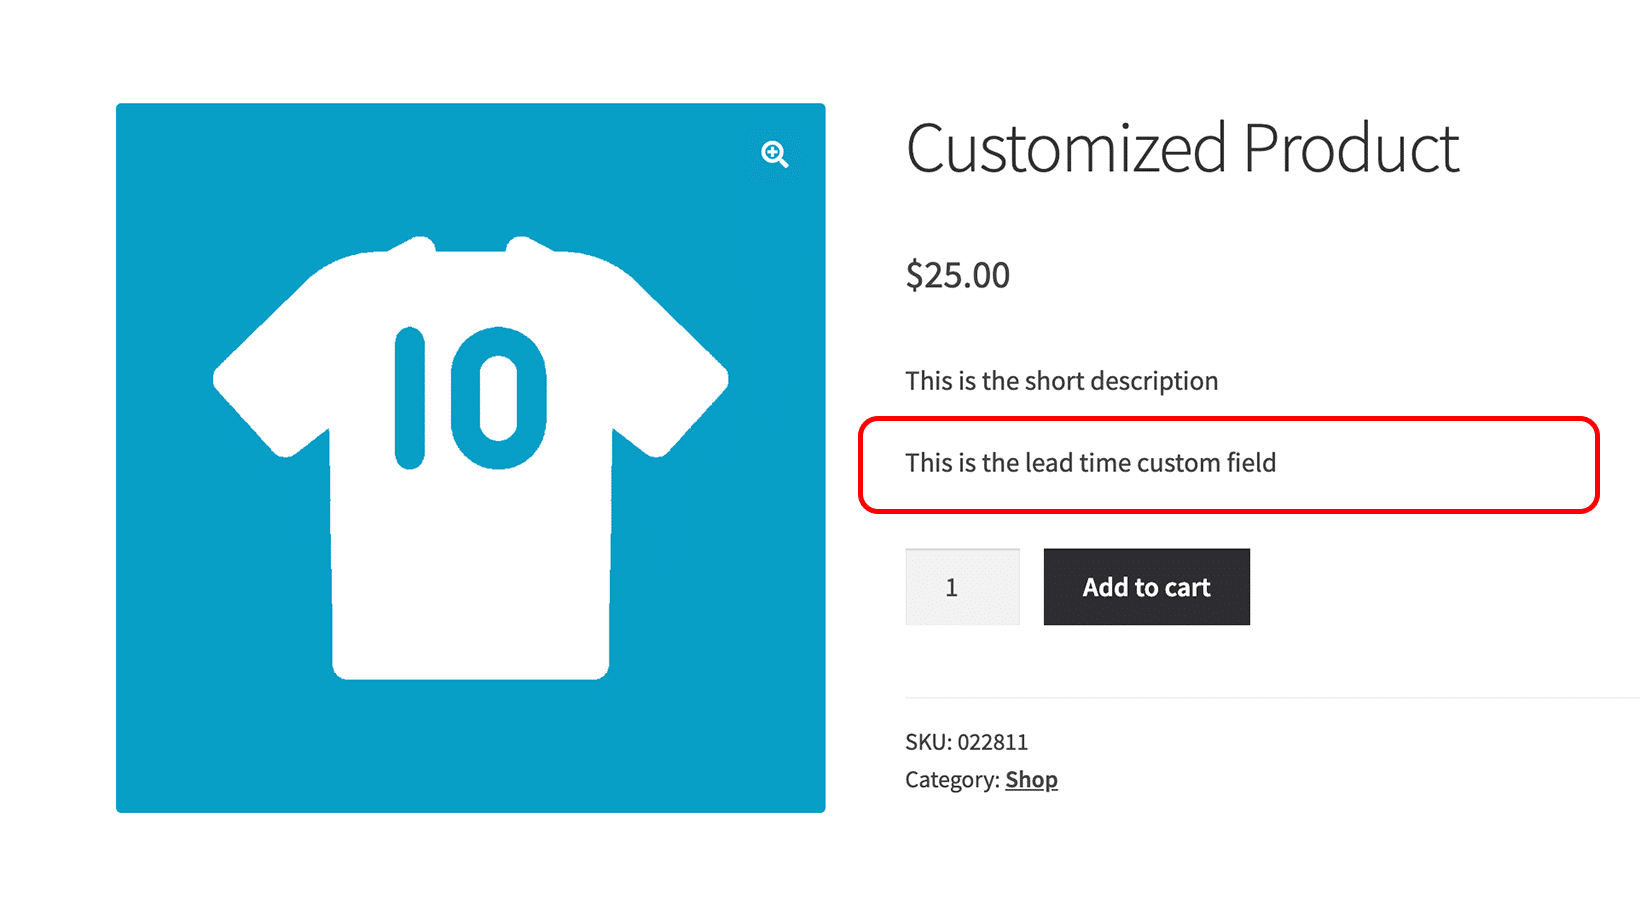
Alternate method: Show a text custom field above the add to cart column
So far, you've learned how to add a table to the single product page, with each custom fields displayed in a column of the table. If that's not the layout you want, then I have an alternative suggestion for you.
We're going to use a plugin called WooCommerce Lead Time. While the plugin is designed to display waiting times, it works by creating a WooCommerce custom field and showing it on the single product page, immediately above the add to cart button. As a result, you can use it to show any type of text-based information and not just lead times.
To set it up, simply install the plugin and add the information that you want to display to the 'lead time' field. The text you have added to the 'lead time' custom field will appear above the add to cart button, under the short description.
The other benefit of using WooCommerce Lead Time for your custom field is that you can choose whether to add the information individually for specific products only; or globally so that it appears on all product pages.
How to list WooCommerce products with a specific custom field value
Finally, I'll show you one more option for showing WooCommerce custom fields in the Product Table plugin.
As well as displaying custom field labels in the table layout, you can create tables containing products with a specific custom field value.
For example, imagine that you wanted to display products with a custom field value of 'June' (saved in a custom field called 'Month'). To do this, you could select 'Custom field' on the 'Select your products' page of the table builder and enter 'month' as the custom field name, and 'June' as the value.
How to add custom fields to product programmatically
If you're a developer, then you might be wondering how to add custom fields to a WooCommerce product programmatically. Can you even add custom fields to a WooCommerce product without plugins?
The answer is yes! WooCommerce allows you to programmatically add custom fields to products without installing any additional plugins. However, as you can imagine, the programmatic approach to creating custom fields for WooCommerce products involves programming!
With a programmatic approach, you can add custom information directly to your product metadata. You can also include your custom field(s) as part of the existing WooCommerce product data meta box.
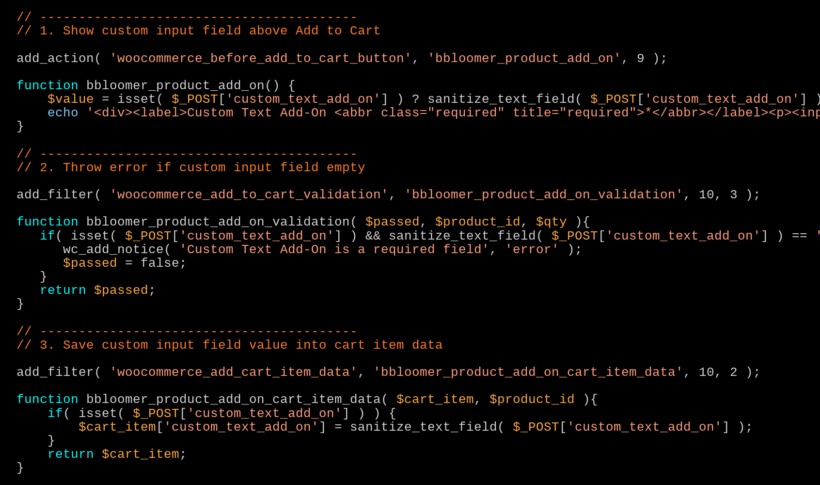
Code sample 1
Your code will depend on the kind of custom fields you're looking to add to your products. Many product types only need a simple custom text field to let users enter some value. For such use cases, this custom text input field snippet by WooCommerce developer Rodolfo Melogli suffices:
As you can see, you’ll be using a bunch of core WooCommerce functions and hooks in the code. For example, you're using the WooCommerce hook "woocommerce_before_add_to_cart_button" to show your custom field on your product page. You're also using the woocommerce_add_order_item_meta hook to save your product input fields for Woocommerce into the order meta information. These can vary greatly depending on the custom fields you're trying to add.
When you take such input from your users, you should include it in your cart page summary (with your cart item details), your checkout, and also in your order's email. The snippet we just saw doesn't just let you allow your users to enter a text-based value inside your product page but also takes it over to your cart and checkout. Not just that, it adds the custom input to your order confirmation email too.
Code sample 2
Next, we'll share some example codes kindly published by Plugin Republic. You'll be adding these snippets to your WordPress child theme's functions.php file. You could use the code snippet below to register a custom field, display the input field in the General tab of the WooCommerce product data box, and save it as product metadata:
/**
* Displays the custom text field input field in the WooCommerce product data meta box
*/
function cfwc_create_custom_field() {
$args = array(
'id' => 'custom_text_field_title',
'label' => __( 'Custom Text Field Title', 'cfwc' ),
'class' => 'cfwc-custom-field',
'desc_tip' => true,
'description' => __( 'Enter the title of your custom text field.', 'ctwc' ),
);
woocommerce_wp_text_input( $args );
}
add_action( 'woocommerce_product_options_general_product_data', 'cfwc_create_custom_field' );
/**
* Saves the custom field data to product meta data
*/
function cfwc_save_custom_field( $post_id ) {
$product = wc_get_product( $post_id );
$title = isset( $_POST['custom_text_field_title'] ) ? $_POST['custom_text_field_title'] : '';
$product->update_meta_data( 'custom_text_field_title', sanitize_text_field( $title ) );
$product->save();
}
add_action( 'woocommerce_process_product_meta', 'cfwc_save_custom_field' );
Then, you could use WooCommerce's many hooks to display that field data on the front end of your e-commerce store at the spot where you want it to appear.
For example, this snippet displays the custom field data after the add to cart button on your single product page:
/**
* Displays custom field data after the add to cart button
*/
function cfwc_display_custom_field() {
global $post;
// Check for the custom field value
$product = wc_get_product( $post->ID );
$title = $product->get_meta( 'custom_text_field_title' );
if( $title ) {
echo get_post_meta($post->ID, 'custom_text_field_title', true);
}
}
add_action( 'woocommerce_after_add_to_cart_button', 'cfwc_display_custom_field' );
There are also other hooks that let you display information on the WooCommerce checkout page or the cart page.
Is It worth adding WooCommerce custom text fields programmatically?
While you don't need any plugins to programmatically add custom fields to WooCommerce using this method, you can end up with errors. Your custom code could have compatibility issues with the other WooCommerce extensions or WordPress site plugins that you might be running. You can also experience code validation errors.
As you can tell, using plugins is a much simpler way to add custom fields to product pages. While it is possible to display custom fields without the use of a plugin, it's really only accessible to developers. That's why the methods described above are a better option for most store owners.
2 easy ways to create and display custom fields
And that's it! I've shown you two easy ways to show custom fields on your website:
We've learned how to add custom product input fields for WooCommerce to collect extra information from customers. This uses the WooCommerce Product Options plugin.
Neither method for adding custom fields to WooCommerce products requires any special technical knowledge.
Follow whichever method in this tutorial interests you the most, and put it into practice on your own website. It's a fantastic non-technical way to store and display extra product data in WooCommerce.
hi, i m facing problem when i m changing currency from PKR(default currency) to USD, only currency symbols are changing not value in custom fields. Like my add on product is for PKR2000 , when i convert the currency into USD , PKR2000 change into USD2000. Please help me fix this issue. thank you
Hi, Shahid. Thanks for including a link to an example on your site - I see what you mean. I believe you're using the "pricing hints" feature in the product add-ons created by the Advanced Product Fields for WooCommerce plugin by Studio Wombat on your site. For the best advice regarding your concern, I suggest that you contact Studio Wombat support, or you can use the WooCommerce Product Options plugin featured in this article. I hope this helps point you in the right direction. Please let me know if you have any more questions. Thanks!


35 Comments
hi, i m facing problem when i m changing currency from PKR(default currency) to USD, only currency symbols are changing not value in custom fields. Like my add on product is for PKR2000 , when i convert the currency into USD , PKR2000 change into USD2000. Please help me fix this issue. thank you
Hi, Shahid. Thanks for including a link to an example on your site - I see what you mean. I believe you're using the "pricing hints" feature in the product add-ons created by the Advanced Product Fields for WooCommerce plugin by Studio Wombat on your site. For the best advice regarding your concern, I suggest that you contact Studio Wombat support, or you can use the WooCommerce Product Options plugin featured in this article. I hope this helps point you in the right direction. Please let me know if you have any more questions. Thanks!