Earn affiliate commission with a WooCommerce product reviews website

Passive income is the holy grail for modern online entrepreneurs. The Internet - and WordPress in particular - has created unique opportunities to earn money online without having to work for each sale. A little known way of earning passive income is to create a WooCommerce affiliate website which compares and reviews products from other companies.
Most WooCommerce affiliate review websites are started on a shoestring budget. With that in mind, I will teach how you to build a website to earn commission through publishing product reviews and comparisons, for minimum cost. We'll focus on free tools and plugins where possible, and I will only recommend paid options if there's no free alternative.
The website will be built using the free WordPress content management system, which gives you full control over your website content. The products and reviews will be listed using the free WooCommerce plugin, which powers over 41% of all online shops worldwide.
To improve on the rest of the 41%, I'll show you how to use the WooCommerce Product Table plugin to list products and reviews in a user-friendly product comparison table, with extra features such as search, sort and filter. This will make it easier for customers to compare the products reviewed at a glance, make quick buying decisions and click on your affiliate links.
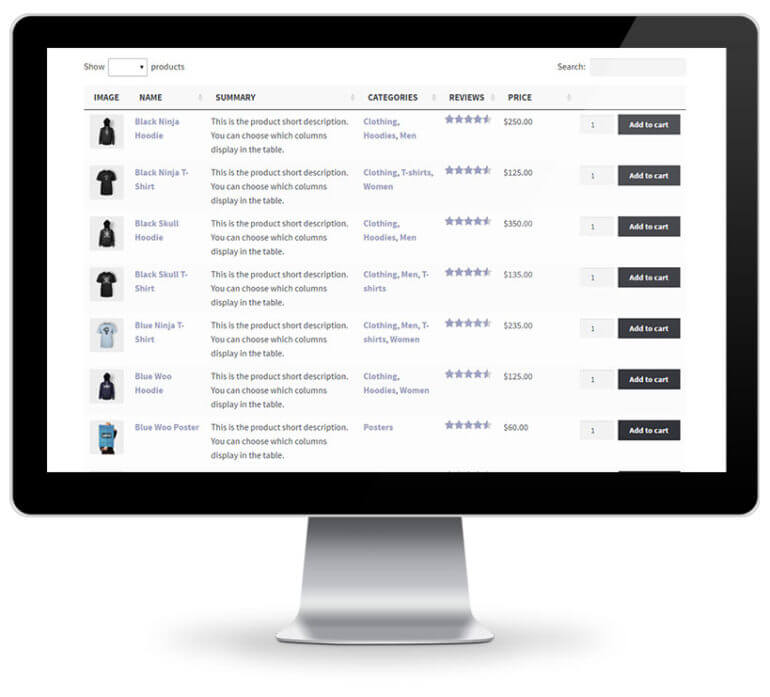
How can I earn affiliate income by publishing product reviews?
It works like this:
- You develop a genuinely useful website with comparisons and reviews of companies other companies' products. These might be reviews you have added yourself, and/or reviews that other visitors to your website have written.
- Each product is added to your website using the WooCommerce plugin. However, instead of selling the products directly on your website, the 'Buy' buttons are affiliate links to the website that sells them (e.g. Amazon).
- When a customer reads a review and clicks on the Buy button, they are taken to the other companies' website. A cookie is stored in their browser to record that they clicked on your affiliate link. If they buy the product, you will earn a percentage commission of the total sale price.
It's that easy! With this method, you can list products and product reviews and ratings on your website. This provides useful information to your visitors, giving them an incentive to use your site. Once they find a product they like, they can click on your affiliate link and buy from the other website.
Most major e-commerce stores have affiliate schemes. The easiest option is to sign up with Amazon Associates, since Amazon sells a huge range of products and offers generous commission. However, you can implement this tutorial using any store that provides referral links that will pay you affiliate commission.
Can I really earn affiliate commission that easily?
 Ok, no. Did you notice the phrase 'genuinely useful' in the previous suggestion? That's the key.
Your WooCommerce affiliate reviews website will only be truly successful if you offer something useful that people will benefit from.
If you're lazy and publish content that is already available elsewhere, then your site won't get a good search engine ranking and no one will visit it. That means that you won't earn any affiliate commission.
However, if you work hard at finding a niche, and spend time adding and promoting unique content, then this is a good business model that could work well for you.
Case study - Best Toys for 2 Year Olds Amazon affiliate site

For example, my reviews website Best Toys for 2 Year Olds is a WooCommerce Amazon affiliate website. It's a very simple blog-style website that provides parent-friendly advice and reviews on the best toys for 2 year old children. It's intentionally non-corporate and speaks from one parent to another. Parents read the advice and click through to buy the products on Amazon, which generates affiliate commission in the process.
To do this, I publish a blog post reviewing a range of products. Next, I add each product to WooCommerce with my Amazon affiliate link. Finally, I use the WooCommerce Product Table plugin to list the products directly in my blog post. This makes it really easy for customers to compare products and click through to buy - using my affiliate links, of course!
In this tutorial, I'll show you how to use WooCommerce to create an affiliate reviews website just like this.
What types of products can I include in my WooCommerce reviews website?
You can use WooCommerce to review almost any type of product. In terms of earning affiliate commission, it's best to focus on products that can easily be compared with similar products.
Here are some examples, but do your research and find an area that interests you personally! For instance, I founded Best Toys for 2 Year Old because I had a daughter this age and had been struggling to find developmentally age-appropriate toys. Think about what interests you, start Googling, and look for gaps in the market.
Generic affiliate websites reviewing a wide range of products
If you're an affiliate for a diverse website like Amazon, or for a range of different companies, then it's tempting to review many different types of product. While this is a chance to get a nice variety of traffic to your website, it's hard to find success by trying to be all things to all people.
Instead, I'd recommend finding a niche industry or even focus on a specific type of product.
Affiliate websites focusing on a specific industry
Another option is to choose a specific industry and feature a range of products for that market sector. This could be anything from lightbulbs, spare parts or tools, to electronics, appliances or WordPress plugins.
By reviewing lots of products from a specific industry, you can create a website with plenty of high quality, keyword-rich content. This is a good opportunity to establish your affiliate reviews website as an authority in your industry, which will reward you with a good search engine ranking. This will drive more traffic to your website and more people are likely to use your affiliate links.
Niche websites reviewing one type of product
As anyone in the SEO (search engine optimisation) industry will tell you, it's better to be no. 1 in Google for a less competitive keyword than to be no. 30 for a popular one. With that in mind, look for a specific type of product where you have a reasonable chance of success.
For example, I was recently researching hot tubs and discovered an affiliate reviews website which reviewed all the main hot tubs on the market. It provided unique and genuine comparisons of the options, with plenty of advice. By adding extra value and information that wasn't available elsewhere, their website was ranking nicely in Google and was probably attracting enough traffic to earn affiliate commission.
What will it cost?
There are very few upfront costs. These are the main financial costs:
- Domain name All websites need a domain name, e.g. barn2.com. These aren't expensive and cost a few pounds per year, depending on the type of domain name you choose. A local domain (e.g. .co.uk) is cheaper than a generic domain such as .com.
- WordPress web hosting All websites need a good host. I recommend an optimised WordPress host such as Kinsta. Don't use cheap web hosting because your website will be slower and less reliable. This will harm your search engine ranking, reduce visitor numbers and increase bounce rates - all of which will reduce your affiliate commission. Investing in good hosting is money well spent.
- WooCommerce Product Table plugin This is the only paid plugin needed for this tutorial. You need it to display your products, ratings and affiliate buttons in a user-friendly comparison table or grid which will maximise your affiliate income.
This tutorial will show you how to save money by using free options where possible. For example, we'll be using the free WordPress content management system (CMS) and the free WooCommerce plugin. The screenshots in this tutorial use a free WordPress theme, so there are no design costs. I'll even tell you how to add affiliate links in WooCommerce without needing any dedicated WordPress affiliate plugins. (Special affiliate plugins are available and they all work with the methods in this tutorial, but they're not essential.)
As you can see, you can launch a WooCommerce affiliate reviews website with very little upfront cost. The main investment is your time. While the overall website setup won't take much time, you need to invest more time in your website content. If you're prepared to do this, let's get started!
#1 - Sign up to 1 or more affiliate programs
Before you start setting up your WooCommerce product reviews website, you should register for one or more affiliate schemes.
If you're just getting started, then I recommend signing up to Amazon Associates as a minimum. This is a good starting point because Amazon sells nearly every type of product. They probably have the biggest affiliate scheme in the world and pay fairy generous commission.
You can also sign up to any other websites that offer an affiliate scheme. (If you're reviewing WordPress plugins, sign up for our own affiliate scheme and earn 30% by writing about Barn2 Media's plugins!) The important thing is that the scheme provides referral links or affiliate links that you can use online.
Once you've done that, get the affiliate link for each of the products that you're planning to review or compare on your WooCommerce website.
Read our complete guide to creating a WooCommerce Amazon affiliate website.
#2 - Get a WordPress website & install a theme
Next, sign up to a good WordPress hosting package (we use and recommend Kinsta). They should provide a tool to install WordPress and help you get up and running with a domain name.
You need to install a theme for the design of your website. Since you'll be using WooCommerce, I recommend using a theme that is designed to work with WooCommerce. This will avoid a lot of problems later on.
The best free WooCommerce theme is Storefront - you can find it by going to Appearance → Themes in the WordPress admin and searching for it. This is the official WooCommerce theme and is the theme I used for the screenshots in this tutorial. If you don't like the design, you can use one of the Storefront child themes which provide a nice choice of skins. The child theme designs are either free or $39. They all come with full instructions and documentation on how to set them up.
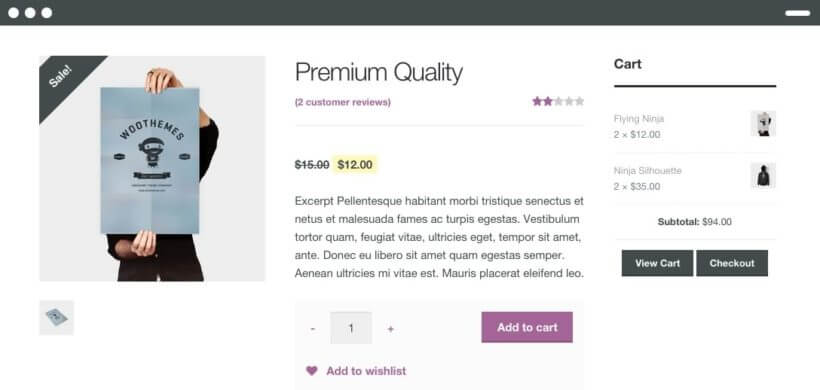
If you want a more versatile theme, there are plenty of WooCommerce-ready themes on ThemeForest. These typically have significantly more features than Storefront and its child themes, and are a lot more work to set up. There's also a greater potential for things to go wrong, due to the extra complexity. You should only choose a more flexible/complex theme if there are definite benefits in doing so.
#4 - Start blogging or writing reviews
This section depends on how you're planning to structure your WooCommerce reviews website.
If you're planning to publish your reviews as comparison-style blog posts, then you can start writing posts. This is easy - just log into the WordPress admin and go to Posts → Add New. Each post should compare multiple products.
Alternatively, perhaps you're adding your reviews in a more permanent format. You can use pages for that (Pages → Add New).
Either way, you can write about the products that you're reviewing and add your reviews in whichever format you're like. Then, use the following steps to add a product comparison table to boost your affiliate commission.
#4 - Install WooCommerce
Now it's time to install WooCommerce. This is the world's leading e-commerce plugin and is 100% free. While your affiliate reviews website won't be selling products directly, you need this to create your affiliate products, add information and reviews about them, and add your referral links.
- Still in the WordPress admin, go to Plugins → Add New and search for 'WooCommerce'. Install and activate the free plugin.
- You'll be taken to the WooCommerce Setup Wizard. This is the quick way to get your affiliate store set up. Follow the steps in the wizard. They won't all be relevant to your affiliate product reviews website, but don't worry about that.
#5 - Add your affiliate products, with descriptions or reviews
Next, go to Products → Add New and add your first product:
- Add the various information for the product, e.g. title. Most fields aren't compulsory (e.g. categories and tags) - just use the relevant ones.
- Upload a product image. I recommend using images for a WooCommerce affiliate review website because images will attract customers and make them more likely to click your affiliate links.
- For the main product description, add one of the following:
- Information about the product, such as the specification. I strongly recommend writing unique content here. Don't copy and paste text from the manufacturer's website because if you do this, your website is very unlikely to get a good ranking for that product in the search engines. While you probably won't be penalised for duplicate content (although this is a danger and there are copyright issues), the search engines will reward you for unique content.
- Your own review of the product.
Add the product data
- Next, find the 'Product Data' section. Select 'External/Affiliate product' from the dropdown list. Add the following:
- Product URL - Add your affiliate link for the product here.
- Button text - Enter the text that will appear on the button with your affiliate link. This might be 'BUY', 'BUY NOW', 'Buy on Amazon' or similar.
- You can also add a product price and sale price below. This will display the price on your website so that people can see what it costs before clicking through. However, if you do this, I recommend that you regularly check the price on the website selling the product. You don't want to advertise the wrong price!
- In the 'Advanced' tab, tick 'Enable reviews'. This will allow visitors to review the product. It's an excellent opportunity to increase your affiliate clicks by providing 'social proof', which makes the products more credible. Customer reviews add keyword-rich content to your website and can boost your search engine ranking. WooCommerce will collate the product ratings and you can display these as a column in your comparison tables (see next section).
- Click the blue 'Publish' button.

Repeat the steps in this section to create each of your affiliate products.
#6 - Create your affiliate products table
The next step is to install the WooCommerce table plugin, which you need to list your products and their ratings in a comparison table layout:
- Get WooCommerce Product Table. Install it using the instructions that you receive when you buy it.
- After activating your plugin license key, the table builder will launch. Use it to set up the affiliate products table, for example by adding columns and filters.
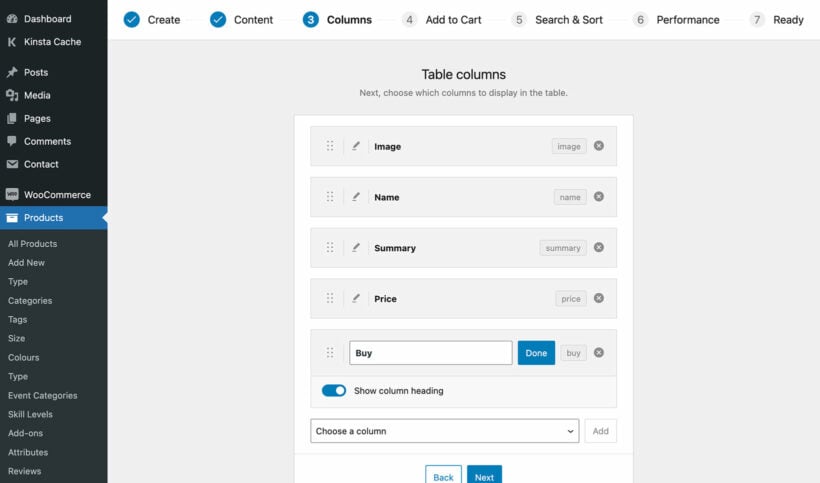
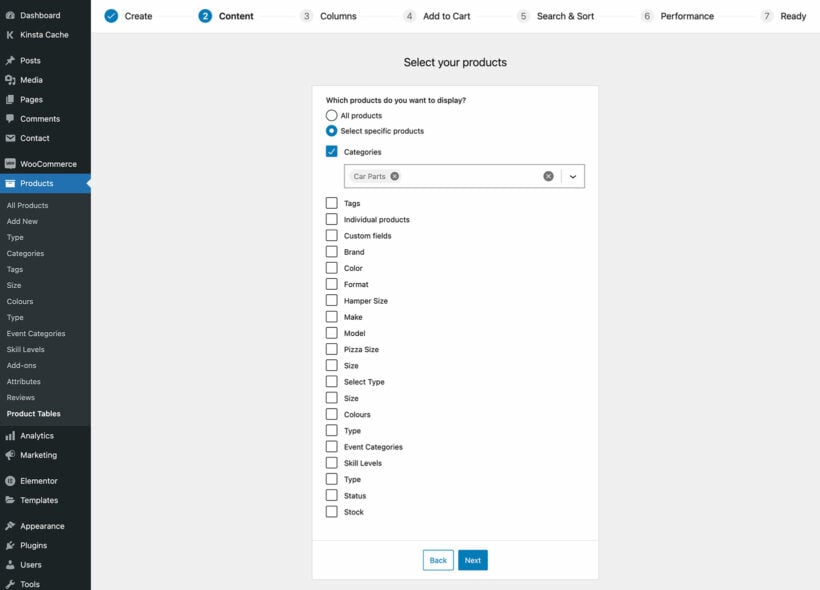
- You can also choose exactly which products to display in the table.
- Copy the shortcode from the final page of the table builder.
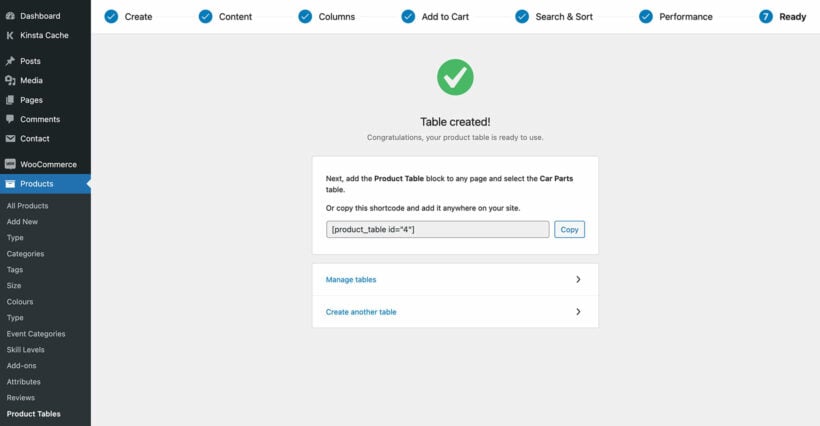
- Next, go to the page or blog post where you want to add a product comparison table with affiliate links. Either insert the 'Product Table' Gutenberg block, or the shortcode that you copied a minute ago.
This will create a default WooCommerce table listing your products. As your WooCommerce reviews website grows over time, you'll probably want to list different products on different pages. You can do this by creating multiple tables, each containing different affiliate products. For example, you might want to create a different product category for each type of product, or use tags too control which products to show in each table. Play around with all the options and create as many WooCommerce comparison tables as you like, each listing different affiliate products.
Add extra product data to the comparison table
When you added your products earlier, you added various types of data such as title, description, price, categories and tags. All of this can be displayed in the WooCommerce product comparison table.
If you need to store and display even more data about the products, then you can do this by creating WooCommerce custom fields and taxonomies. Each of these can also be displayed as columns in the table. For example, you can use these to store technical data that will help customers to check the suitability of each product.
Add product quick view popups
You can choose which columns of product data to include in the list of products reviewed. But what if you want to show more data than will fit in the table, or you've added multiple images of each product? In that case, you'll need to provide extra information outside of the comparison table. There are a couple of ways to do this:
- You can add the extra information to the main product review. For example, if you've published a blog post reviewing the best 5 smartphones then you can add extra information to the main content of the post. You can then keep the product table simple, with more basic information.
- WooCommerce automatically creates a separate page for each product. Visitors can access by clicking on the name of a product in the table. However, this means loading an additional page for every product, which isn't very user-friendly.
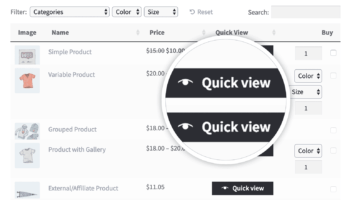 A better option is to use WooCommerce Product Table with its sister plugin - WooCommerce Quick View Pro. This adds user-friendly quick view buttons to the list of products. Visitors can view the full image gallery for each product and extra information in a popup lightbox, without having to visit a separate page. The lightbox also includes a button with your affiliate link, so customers can learn more about the product and immediately click through to buy. (Tip: If you add quick view to your WooCommerce reviews website, then you should enable the option to replace all links to the single product page with quick view links.)
Add filters to the product table
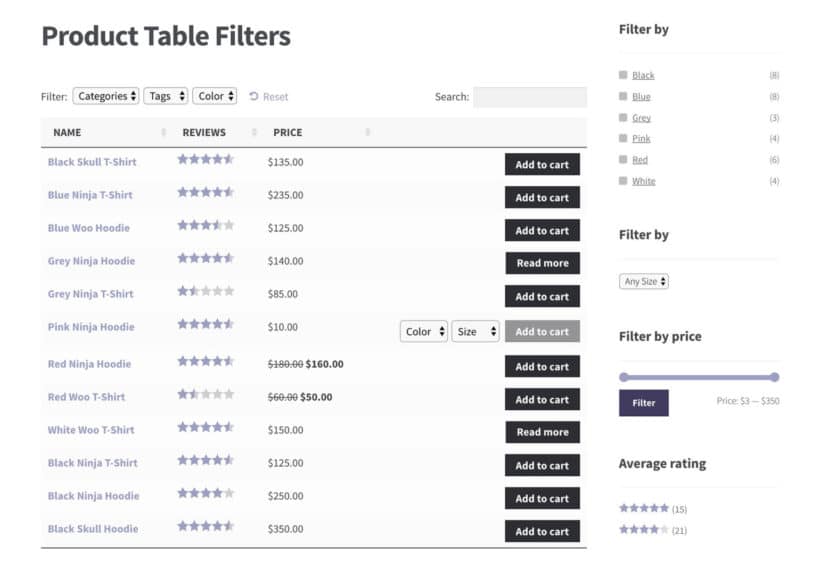
If your tables are just comparing a few products, then you don't need to worry about filters. After all, visitors will be able to see everything on one page!
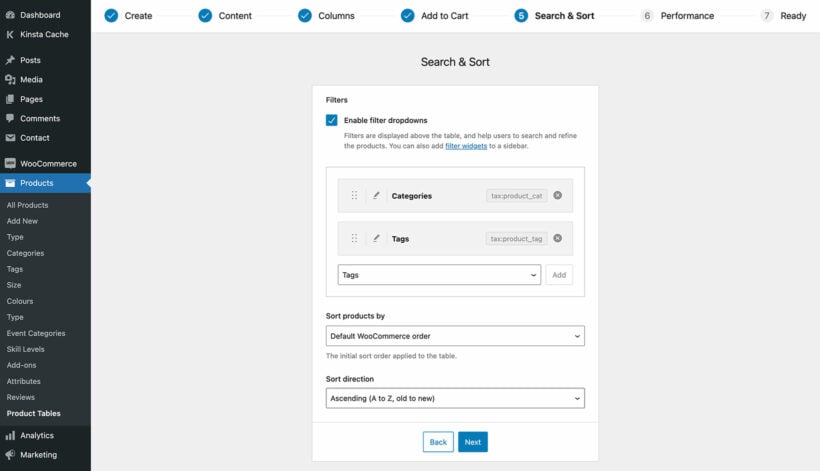
If you're comparing lots of products, then filters can make it easier for visitors to find the products they're looking for. WooCommerce Product Table has 2 types of filters: dropdown lists above the comparison table, plus sidebar widgets. These can be used to filter by various types of product data, price, or average rating.
Creating a successful WooCommerce affiliate reviews website
If you follow the steps in this tutorial, you'll be well on your way to creating a successful product reviews website that will generate affiliate commission.
Once your website goes live, it's important to continue adding search-engine-friendly content to it. This will build your search engine position over time. To give you website the best possible chances, check out our WordPress SEO packages and discover how we can promote your website.
Do you already earn affiliate income by publishing product reviews and comparisons in WordPress and WooCommerce? Please share your tips and advice with our other readers by adding your comments below.
One Comment
That was helpful and really nicely laid out, thank you!