Export Shopify products, orders and customers to Excel
Shopify lets you export products, orders, and customer data as CSV files - which you can open in Excel. But there's a faster way: Setary lets you bulk edit products in a live spreadsheet that syncs directly with your store, no import or export required.
Most people searching "Shopify to Excel" fall into two camps. Some need a data extract for reporting or analysis. Others want to bulk edit products across a large catalog. The right approach depends entirely on which one you are.
One thing most guides skip: Shopify exports CSV files, not .xlsx files. That distinction matters, because Excel can misread formatting and encoding when you open a CSV by double-clicking it. There's a better way to import the file, which I'll cover below.
This article walks through the native export process for products, orders, and customers. It also covers the real limitations of each export, and explains when a spreadsheet tool like Setary makes more sense than exporting at all.
How to export Shopify products to CSV/Excel
Shopify's product export creates a CSV file containing all product data, including titles, descriptions, prices, variants, and inventory. You can then open this in Microsoft Excel to edit it before re-importing.
Here's the step-by-step process:
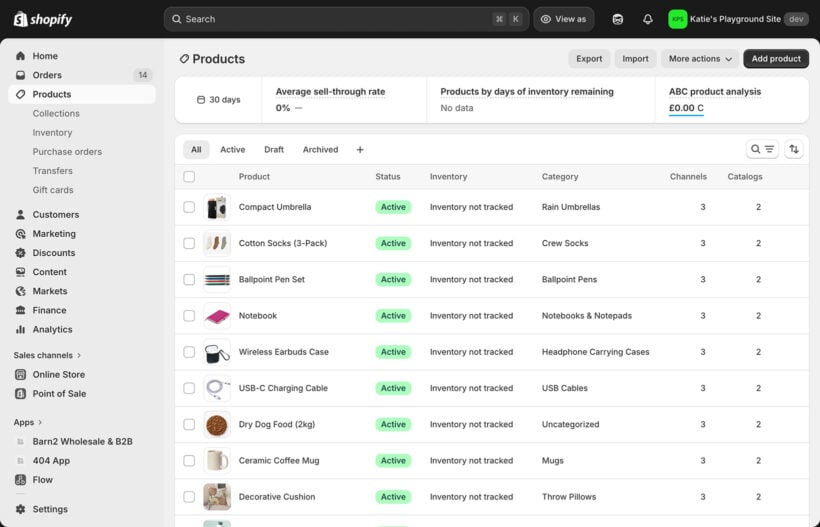
- In the Shopify admin, go to Products → All products.
- Click the 'Export' button in the top right corner.
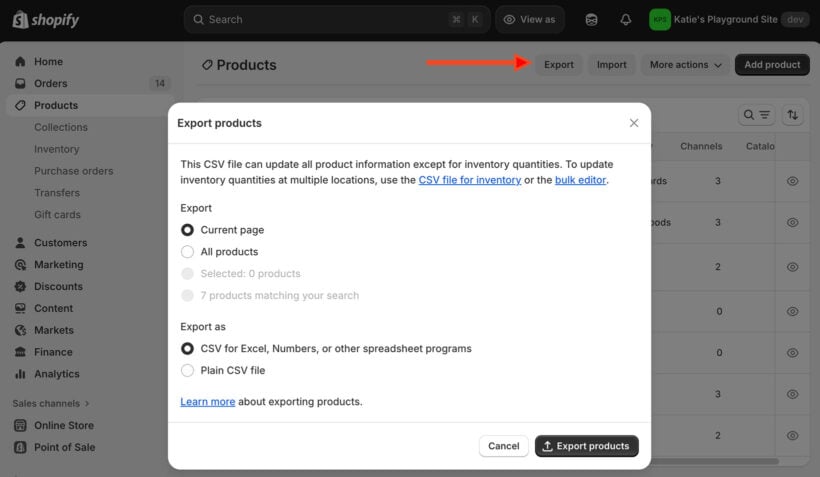
- Choose which products to export: all products, selected products, the current page, or products matching a filter.
- Choose the export format. The 'CSV for Excel, Numbers, or other spreadsheet programs' option uses UTF-8 encoding with a BOM. This helps Excel read special characters correctly, so it's the better choice for most merchants.
- For exports over 50 products, Shopify emails the file to the store owner's address. Smaller exports download immediately.
- To open the file in Excel, use Data → From Text/CSV rather than double-clicking the file. This avoids the common issue where Excel garbles accented characters or drops leading zeros from SKUs.
What the export includes and excludes
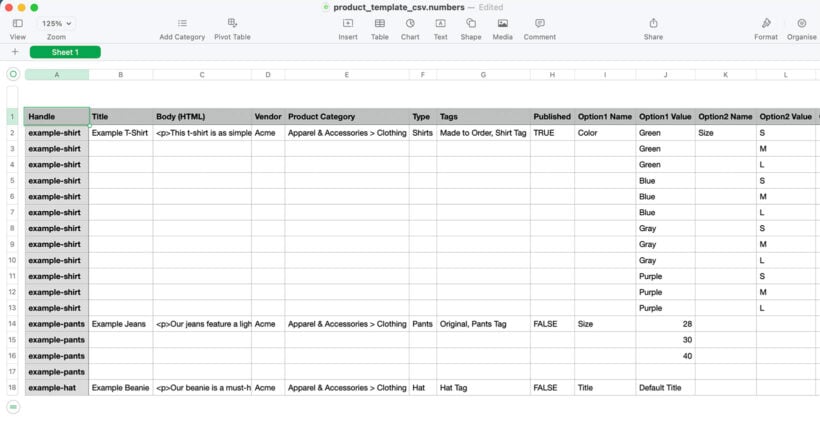
Each product variant to import appears as a separate row. A product with three size options creates three rows, all sharing the same title and description. It's worth flagging this before you send the file to a colleague who isn't expecting it.
Shopify metafields are not included in the standard product CSV. For those, you'll need a third-party app.
How to export Shopify orders to Excel
The native export process
Exporting orders from Shopify follows a similar pattern to products. Here are the steps:
- In the Shopify admin, go to Orders.
- Use the filter and date range controls to narrow down which orders you want. You can filter by status, date, channel, and more before exporting.
- Click 'Export', choose your date range or selection, and confirm.
- For large date ranges, the file is emailed to the store owner. For smaller selections, it downloads immediately.
- Open the file in Excel using Data → From Text/CSV for clean formatting.
The export includes order number, date, billing and shipping addresses, line items, quantities, prices, discount codes, payment method, and fulfillment status.
The multi-row problem
Here's something most guides don't explain clearly: orders with multiple line items export as multiple rows. One row per product, not one row per order.
If you need one row per order (for example, to sum order values in a pivot table), you have two options. You can consolidate rows manually in Excel using a pivot table or a CONCATENATE formula. Or you can use a third-party app like Matrixify, which gives you far more control over column structure and supports filtering orders by almost any criteria before export.
Matrixify is worth looking at specifically if you handle complex order data exports regularly. It's the dedicated solution for that use case.
How to export customer data from Shopify
Shopify allows you to export customer data as a CSV file from the Customers section of your admin.
The export includes names, email addresses, phone numbers, billing and shipping addresses, total order count, total spend, and marketing opt-in status.
To do it:
- Go to Customers in your Shopify admin.
- Use the filter or search controls to select a segment if needed.
- Click 'Export', choose all customers or the current selection, and confirm.
The customer export does not include order history details. For that, you need the orders export instead.
One practical use is exporting your customer list to Excel for segmentation analysis, identifying your top spenders, or importing into an email marketing platform that doesn't have a direct Shopify integration.
Customer data exports are subject to GDPR and other data protection regulations. Only export what you need and store it securely.
The real problem with the export-edit-reimport workflow
Many Shopify merchants export products to Excel specifically to bulk edit them. Updating prices, descriptions, stock levels, or SEO fields across many products at once is a common need. The workflow does work, but it has a predictable structure: export, edit, save, re-import, wait for Shopify to process the file, fix any import errors, and repeat.
For stores with hundreds or thousands of products, this cycle takes time. Every re-import carries some risk too. Mismatched column headers, accidentally overwriting data, or Shopify rejecting rows with validation errors are all real possibilities.
The bigger issue is that Excel is not connected to your store. The moment you export, your spreadsheet is already out of date. If a colleague updates a product price in Shopify while you're editing the CSV, one of you will overwrite the other's changes on import.
This isn't a criticism of Excel. It's a tool designed for offline data manipulation, not live store management. The workflow works. It's just slower and more error-prone than it needs to be for the specific task of bulk editing product data.
For reporting and analysis (where you genuinely need a static snapshot to work with) exporting to Excel makes complete sense. The problem only arises when people use it as a workaround for bulk editing.
A better way to bulk edit: Setary for Shopify
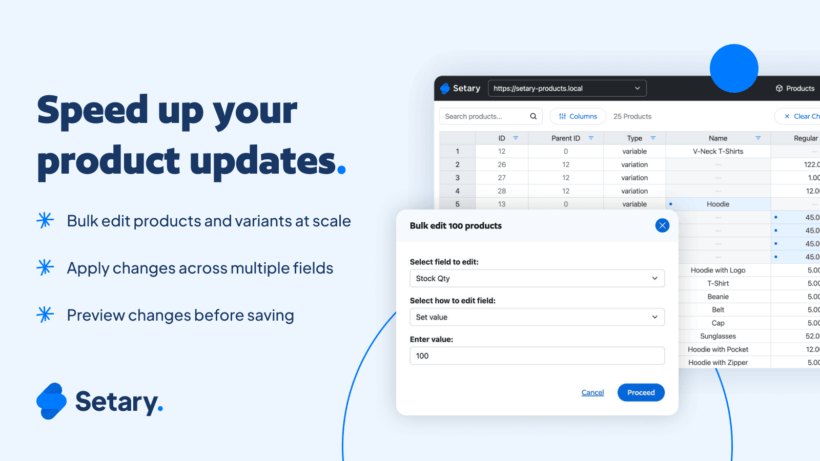
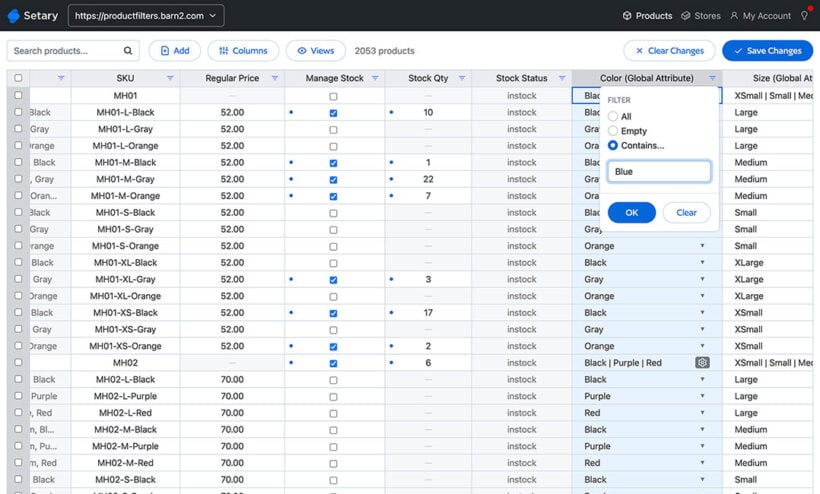
Setary is a spreadsheet editor for Shopify that displays your product data in a live, Excel-style grid. You edit products directly in the spreadsheet, and changes sync to your store automatically, with no export or import step.
The interface will feel familiar if you use Excel or Google Sheets. You scroll through all your products, click a cell to edit it, and the change saves to Shopify in real time.
Here's what you can edit in Setary:
- Product titles, descriptions, and tagsEdit core product content directly in the grid.
- Prices and compare-at pricesUpdate pricing across variants without opening each product individually.
- SKUs, barcodes, and stock quantitiesManage inventory data from one view.
- Product statusSwitch products between active and draft in bulk.
- Metafields and SEO fieldsWrite and update SEO titles and meta descriptions across your catalog.

Because Setary is always connected to your live store, you're always working with current data. There's no risk of re-importing a stale spreadsheet and overwriting recent changes.
Setary is particularly useful for tasks like seasonal price updates across a large catalog, writing SEO titles and meta descriptions in bulk, or fixing product data inconsistencies. These are exactly the jobs that would otherwise require multiple export-edit-import cycles.
One honest limitation: Setary is focused on product data. If you need to analyze order history or build custom reports, exporting orders and customers as CSV files remains the right approach.
When exporting to Excel is still the right choice
Exporting to Excel makes sense for several specific tasks where a live editor doesn't help:
- Building sales reports and revenue summaries from order data.
- Analyzing customer purchase patterns or segmenting by lifetime value.
- Creating a backup snapshot of your product catalog at a specific date.
- Sharing data with a third party (accountant, agency, or supplier) who needs a file.
- Migrating products to a different platform.
For these use cases, Shopify's native CSV export (or Matrixify for more complex order data) is the right tool.
The short version: if you need to analyze or share data, export to Excel. If you need to edit and push changes back to your store, Setary is faster.
FAQ
How do I export orders from Shopify to Excel?
Go to Orders in your Shopify admin, use filters to select the orders you want, then click 'Export'. Shopify generates a CSV file you can open in Excel. For large exports, the file is emailed to the store owner's address.
Can you export customer data from Shopify?
Yes. Go to Customers in your Shopify admin and click 'Export'. The CSV includes names, email addresses, billing and shipping details, order count, and total spend.
How do I open a Shopify CSV in Excel without formatting problems?
Open Excel and use Data → From Text/CSV to import the file, rather than double-clicking the CSV directly. This gives you control over encoding and prevents issues with special characters or leading zeros.
Does Shopify export to .xlsx format?
No. Shopify exports CSV files only. You can save the file as .xlsx once it's open in Excel if needed.
Is there a way to bulk edit Shopify products without exporting to Excel?
Yes. Setary is a spreadsheet editor that connects directly to your Shopify store, letting you edit product data in an Excel-style grid with changes syncing automatically. No CSV downloads or re-imports needed.
Export Shopify products: The right way
If you need a data extract for reporting, analysis, or sharing with a third party, Shopify's native CSV export does the job. Use Data → From Text/CSV when opening in Excel to avoid formatting issues.
If you're exporting just to bulk edit and then re-import, that's a workflow problem Setary solves directly. It's worth trying before the next time you're about to download a 3,000-row product CSV. You'll be amazed at how much time you save 🚀