How to share school board documents in WordPress - public and private
Schools and educational institutions often face a unique challenge: they need to share certain school board documents publicly while keeping others accessible only to board members or specific committees. If you’re running a WordPress website for a school, charter school, or similar organization, the right plugins can make this task simple and efficient.
Legal requirements in many countries and US states make it mandatory for schools to publish specific documents - including agendas, meeting minutes, and financial reports - to remain compliant. With monthly meetings and years of records, the volume of documents can quickly add up, making it a real headache to organize for administrators. In this guide, we’ll show you how to set up a WordPress document sharing system that supports both public and private content - all without complicating your workflow.
Why WordPress is perfect for school board document sharing
WordPress is an excellent platform for sharing school board documents because it’s flexible, easy to use, and packed with plugins that can customize the experience. However, the challenge comes when you need to provide open access to some documents, like meeting minutes and financial statements, while restricting sensitive content to specific people.
That’s where Barn2’s plugins come in. Many schools, including those working with design agency Rodriguez Valle Creative, share board documents in WordPress using the following solutions.
Read more in our case study about how Rodriguez Valle Creative works with New York charter schools to keep their document sharing in compliance with state law.
Which plugins should you use?
While Rodriguez Valle Creative originally used Posts Table Pro to create a searchable table of public documents, a better option for this type of setup is Document Library Pro. It’s designed specifically for document-heavy sites and includes more advanced features like automatic file indexing, better search functionality, and flexible category control - perfect for organizing school board documents in WordPress.
For private content, it uses Document Library Pro's access control features. These let you lock down entire sections of your library, so only authorized users with a password (or specific user accounts) can access certain documents. When combining both plugins you can create a user friendly public facing document library, and a private area that only board and faculty members can access when logged in. The plugin allows for 3 types of protection:
- Password protection, where anyone who has the password can access the private area.
- Role based protection, where website users with an account can access items based on their user role (the website administrator can set up which parts of the site can be accessed by specific roles).
- User based protection, similar to role protection, this option allows the selection of specific users who should have access granted to them.
How to set up secure school board document sharing in WordPress
Follow the steps in this tutorial to first create a school board document library in WordPress, then learn how to secure your private categories of files.
Installing the Document Library Pro plugin
The installation steps are similar to any other premium WordPress plugin:
- Get the Document Library Pro plugin.
- Download the plugin's zip files from the order confirmation page or email.
- Navigate to "Plugins" → "Add New" within your WordPress admin dashboard.
- Upload the plugin's zip file you just downloaded. Select "Install" → "Activate".
Adjusting the plugin's general settings
Document Library Pro is designed to be highly flexible, so you can tailor it to suit a wide variety of document management needs. Since every site is different, the exact settings you choose will depend on your specific goals. For a full breakdown of what each setting does, you can refer to the plugin's configuration guide in the knowledge base.
First, get the plugin. You'll need the Advanced plan in order to get features such as bulk import and access control restrictions.
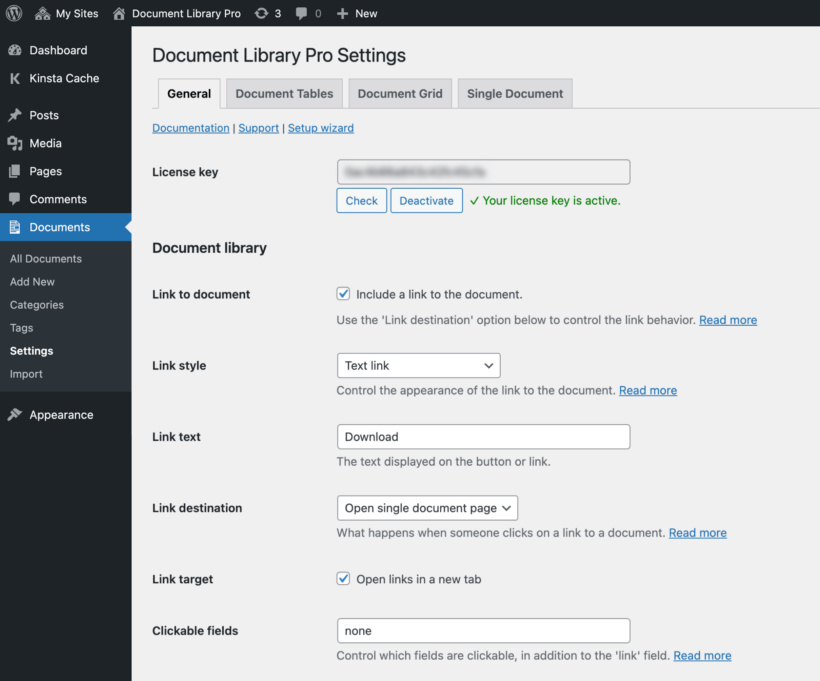
Once you've installed and activated Document Library Pro, your first step is to configure the general settings. There are two ways you can do this:
Option 1: Use the setup wizard
Right after activation, the plugin will automatically launch a setup wizard. This step-by-step tool walks you through the most important configuration options so you can get up and running quickly. If you need to access it again later, just go to “Documents” → “Settings” → “General” and click on “Setup Wizard”.

Option 2: Adjust settings manually
If you prefer to configure things manually, head to “Documents” → “Settings” → “Document Library Pro” → “General”. From there, you can explore each option and adjust them based on your site’s needs. For help with any of the settings, check out the plugin's documentation.
Organizing your document library structure
Before you start uploading documents, it’s important to plan out how you’ll organize them. A clear structure makes it much easier to manage and retrieve documents later—especially when you're dealing with both public and restricted content.
Document Library Pro gives you two primary ways to categorize your files: document categories and tags. Let’s take a closer look at each method.
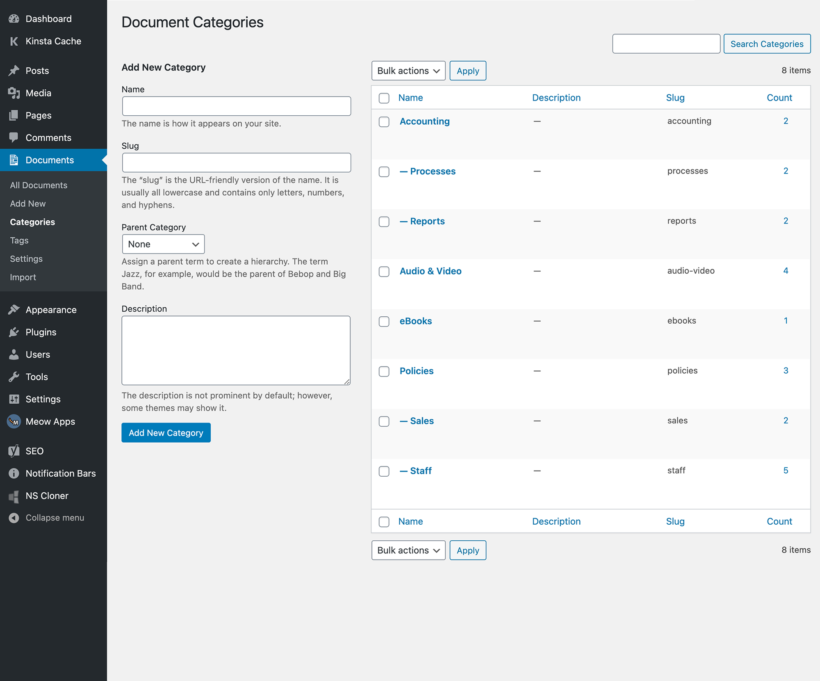
Using document categories
Document categories function a lot like the standard WordPress post categories. They support a hierarchical structure, which means you can create parent categories and nest child categories beneath them. This is especially useful for keeping your documents neatly grouped.
For school board document sharing, it’s a good idea to keep public and private documents in separate categories. This will make it easier to control access when applying security settings later.
To add a new document category:
- Go to "Documents" → "Categories" in the WordPress admin.
- Fill in the name, slug, and a brief description.
- Click "Add New Category".
- Repeat this process for any other categories you need.
To add a subcategory:
- Navigate again to "Documents" → "Categories".
- Enter the name and slug for your subcategory.
- Use the "Parent Category" dropdown to assign it under a main category.
- Add a short description, then click "Add New Category".
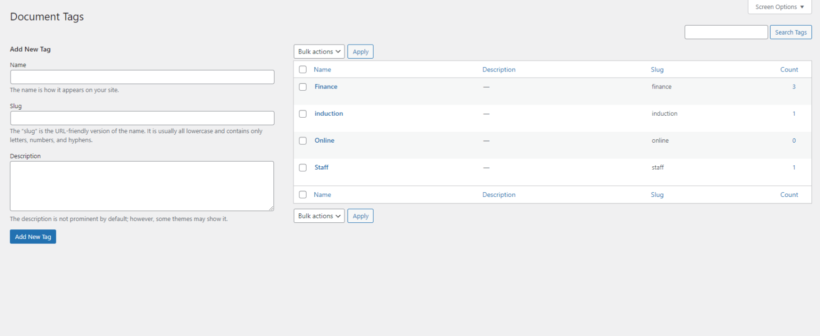
Adding document tags
Alongside categories, you can also use tags to further label and organize your files. Tags work similarly to blog post tags in WordPress — they’re a flexible way to assign keywords that describe different attributes of each document.
Tags might include things like the year, author, subject, document type, or any other criteria that can help users locate content more easily.
To create a new document tag:
- In your WordPress admin area, go to "Documents" → "Tags".
- Fill in the tag name, slug, and a short description.
- Click the "Add New Tag" button.
- Repeat the steps to create as many tags as you need.
Using tags in combination with categories gives you a powerful structure for organizing your school board documents in WordPress — especially when balancing public and private access.
Adding documents to your library
Once you’ve adjusted the general settings in Document Library Pro, the next step is to begin uploading and organizing your files. You can display the documents directly or include downloadable links, depending on your needs.
There are several convenient methods available for adding content to your library. You can:
- Upload documents manually
- Use drag-and-drop uploading
- Select files from the Media Library
- Add external file URLs
- Import documents in bulk using a CSV file
Each of these options is explained in detail in the plugin’s documentation. Refer to the knowledge base guide if you'd like additional help or examples.
Method 1: Upload documents manually
If you want to upload files one at a time, this method is for you.
- Head to "Documents" → "Add New" in your WordPress admin dashboard.
- Add the file name, media, description, slug, and other required details.
- Select the appropriate categories and tags from the bottom right corner.
- Select "File Upload" from the "Document Link" tab in the top right-hand corner.
- Select "Add File".
- From the page pop-up, click "Upload Files" → "Select Files".
- Choose the document you want to upload and select "Add File".
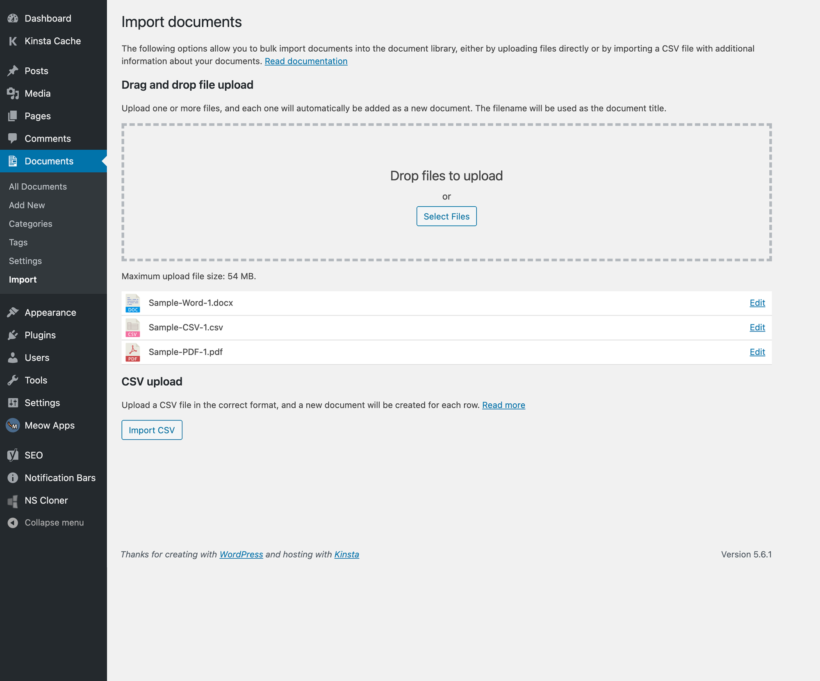
Method 2: Drag and drop documents
Here's how you can upload multiple files at a time to your WordPress site:
- Navigate to "Documents → Import" within your admin dashboard.
- Drag and drop files within the "Drag and drop file upload" section.
- Go to the "All Documents" section to individually update file name and other details for the uploaded documents.
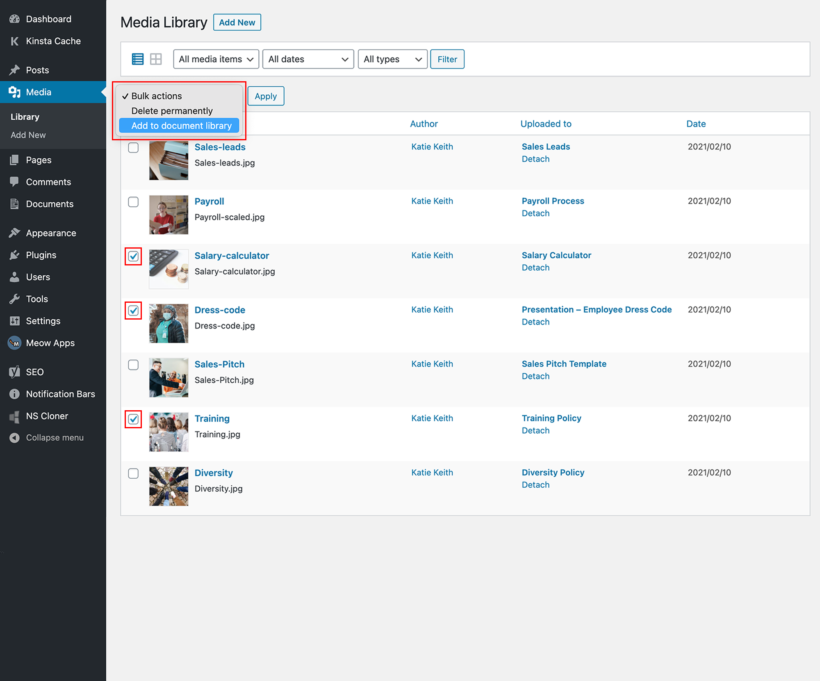
Method 3: Add documents from your WordPress Media Library
To convert files that are already in your Media Library, you can use this method.
- Navigate to your WordPress Media Library within your WordPress admin dashboard.
- Change the view from "grid" to "list" in the top left corner.
- Select the media files you want to add to your document gallery.
- Open the "Bulk actions" dropdown, select "Add to document library", and click "Apply".
- Click on the link within the Success message popup to add details such as categories, tags, and so on.
Method 4: Link to files hosted externally
We also have a way to embed and display files hosted on external platforms like Google and Dropbox on a web page on your website:
- Go to "Documents" → "Add New" within your WordPress admin dashboard.
- Add the document name, media, description, slug, categories, tags, and other required details.
- From the "Document Link" tab in the top right corner of the page, click on "a custom URL".
- Enter the link and click on the "Add File" button.
Note: Your website visitors won't be able to preview files hosted externally before downloading them.
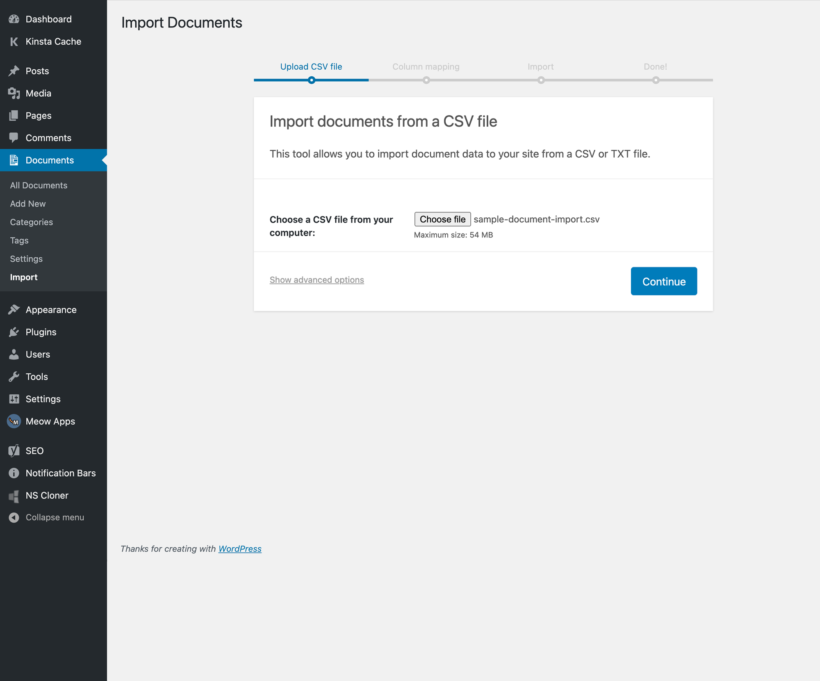
Method 5: Bulk CSV import
This method is a bit complicated, so I've added a link to the knowledgebase article with more details if needed. Here's the step-by-step guide to bulk-import CSV files:
- Add all the document details, such as URL, category, tags, document authors, etc., to a new CSV file.
- Go to "Documents" → "Import" → "Import CSV" within your WordPress dashboard.
- Click on "Choose file" → "Continue".
- Match the columns from the CSV file to the custom post-type fields on the "Map CSV fields to documents" page.
- Click on the "Run the importer" button.
- After the documents are imported, you'll see a success message popup with a link to edit the documents if needed.
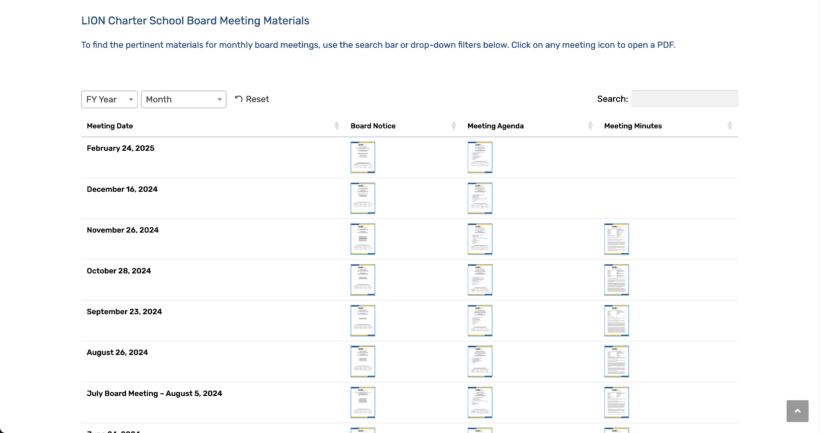
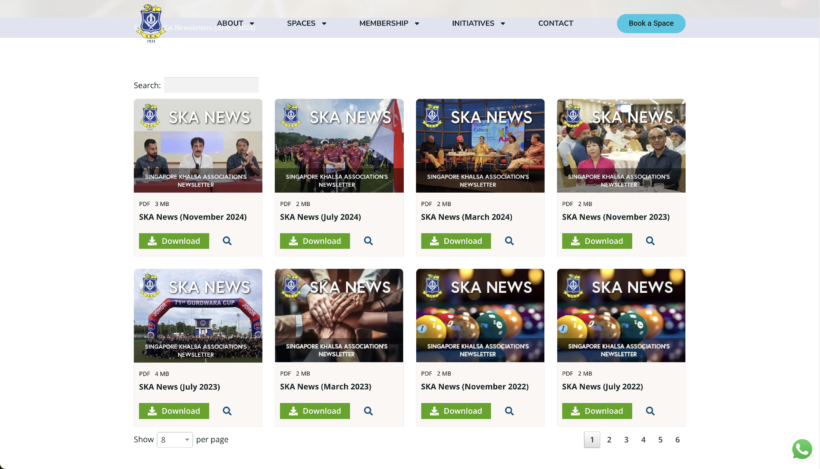
How to display school board documents on your website
By default, the plugin adds a "Document Library" page to your website, which will simply display the documents in your library based on the settings you have chosen. You may choose to either edit that page, or hide it and add a new page of your own. To show a document library anywhere on your website you can simply use the [doc_library] shortcode. Read more about the various shortcode options and display options in our knowledge base.
How to secure private board documents with password or role protection
Now because we took the extra step to categorize and tag our school board documents, the task of protecting the private categories is incredibly easy! There are just 2 steps that you need to take:
Step 1: Restrict access
In Document Library Pro, you can restrict access on 3 levels. For the purposes of this tutorial, I'll be doing it at a category level. However, you can equally do it globally in Documents → Access Control, or on the 'Add/Edit' screen for each document:
- Go to Documents → Categories. Whether you choose an existing category or create a new category, simply open the category page and scroll down. You should be able to see a Visibility section with the following options:
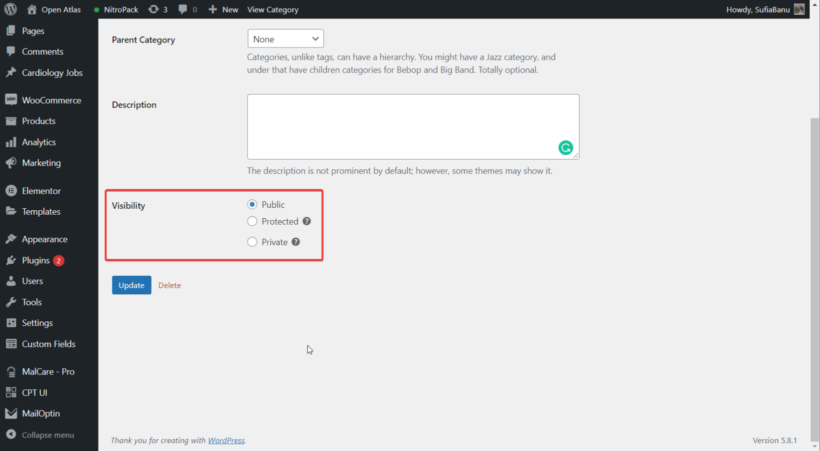
Choose between Public, Protected, and Private - Public: This is self-explanatory.
- Protected: Under this, you will find the Password Protection, User Roles, and Users options.
Implementing these options is far from complicated. Just select the option you need and then add a password or user roles or select which users should have access.
Step 2: Create a document library login form
Document Library Pro comes with a built-in login page. Just search for 'Document Login' in your list of WordPress pages, then rename it to anything you like and link to it from your navigation menu.
A better way to share school board documents
Whether you’re managing a school board site or any other organization that needs a mix of public and private content, Document Library Pro gives you the flexibility to securely organize and display your documents - without confusing your users or wasting time.
Ready to create a streamlined, professional document sharing system for your school? Get started with Document Library Pro today!