How to sell clothes online with WooCommerce
Ecommerce is big business. It's also incredibly competitive, which means you need to take advantage of proven techniques to give yourself the best chance for success and make money by selling online. Rarely is this more true than when you’re trying to sell clothes online, given the saturation of the online fashion market.
To encourage customers to choose you over the competition, you’ll want to make buying clothes on your website a convenient and streamlined experience. This means finding a way to display your clothing products and options effectively, such as by using a customized product table.
Or perhaps you need a quick and easy way for customers to choose clothes sizes, colors and other options?
Best plugins for selling clothes online
In this guide, we’ll introduce you to the best plugins for selling clothes online with WooCommerce. This includes:
- WooCommerce Product Table - List clothing products in a quick order form layout which is perfect for one-page shopping. (Learn more.)
- WooCommerce Product Filters - Add advanced filters so that customers can quickly find closed based on size, color, price, and more. (Learn more.)
- Bulk Variations - Display all of the options for an item of clothing in a quick buying grid, so that customers can purchase multiple sizes and colors with ease. (Learn more.)
- Quick View Pro - Let customers preview products and add to the cart without leaving the shop page. (Learn more.)
- WooCommerce Fast Cart - And finally, provide the fastest possible way for customers to review and complete their order. (Learn more.)
- Product Options - Add extra options in order to sell customizable products. For example, add file upload fields for a logo, or text message fields for a custom message. (Learn more.)
All of these amazing plugins make it easier for customers to browse and buy clothing such as t-shirts, shoes or accessories. They are all either developed by the same company or guaranteed to be compatible. As a result, you can mix and match them to create a robust clothing store that meets your exact business needs. You can either buy them individually or save money with an All Access Pass.
Let’s get started!
Plugin 1: Why your clothing store can benefit from a customized product table
Some online consignment shops (like Etsy, thredUP or Poshmark) sell products that require a lot of detailed information. For instance, an online electronics shop will usually merit dedicated pages to explain the ins and outs of each item.
However, a clothing store is a little different as is the case with thredUP, Tradesy, and Poshmark. If you're running this kind of ecommerce site, chances are your products are pretty simple to grasp. Most customers won’t need a lot of information in order to know whether they want to buy a particular shirt, for example. They’ll just want to know what it looks like, and see the options when it comes to colors and sizes.
Therefore, making visitors navigate to a bunch of individual product pages – as in a traditional ecommerce store layout – can be counterproductive when you’re trying to sell clothes online. Some customers might like this extra information, but most want a quick buying process. Instead, you can show off everything you have to offer in a concise product table.
Keep in mind that you don't need to compete with high-end brands that sell luxury items like Louis Vuitton, Chanel, Gucci, or Prada right off the bat.
This lets customers view all the clothing options in one place. They can compare products easily, and add everything they want to their carts from a single page. Once they're done, they can proceed to checkout and make the payment through the payment options you offer (such as PayPal). It's just like buying in a physical clothing store! What’s more, it's simple to set up if you have the right plugin.
Introducing WooCommerce Product Table
While WordPress and WooCommerce are the perfect foundation to sell clothing online, they're missing some essential features. For example, they don't provide a way to show off all your items on a single organized page, similar to eBay. Luckily, you can easily listing clothing products with the WooCommerce Product Table plugin:
This plugin helps you create a customized product table to display any or all of your clothing products. Among its many features, this plugin:
- Lets you organize all your clothing, accessories, and more into one table similar to eBay.
- Makes it easy for customers to compare items.
- Customers can click on a clothing image to view a zoomed in version in a lightbox.
- Includes sorting and filtering capabilities, making your product table dynamic.
- Enables you to display product variations (such as colors and sizes) alongside each item.
Best of all, WooCommerce Product Table is simple to use and only takes a few minutes to set up.
Try out the WooCommerce Product Table clothing store demo for yourself!
How to sell clothes online with WooCommerce Product Table
In the following tutorial, we’re going to assume that you already have a WooCommerce store set up to sell clothes online. If you’re creating a brand-new ecommerce site, therefore, you'll want to do three things before proceeding:
- Set up a basic WordPress website.
- Install WooCommerce, and go through its setup wizard to configure your store.
- Add all your clothing and other items as individual WooCommerce products.
Once those tasks are out of the way, you’re ready to get started.
Install and activate WooCommerce Product Table
First up, you’ll want to get the WooCommerce Product Table plugin running on your clothing website. To do that, you’ll need to purchase the plugin.
After the plugin is installed, activate it. Next, the table wizard will open. It also walks you through the main settings for creating your table listing some or all of clothes products. This will get WooCommerce Product Table fully up and running, ready to start selling clothes online.
Popular settings for selling clothes online
Here are some tips on which settings to choose in the setup wizard:
Display - Where to display product tables
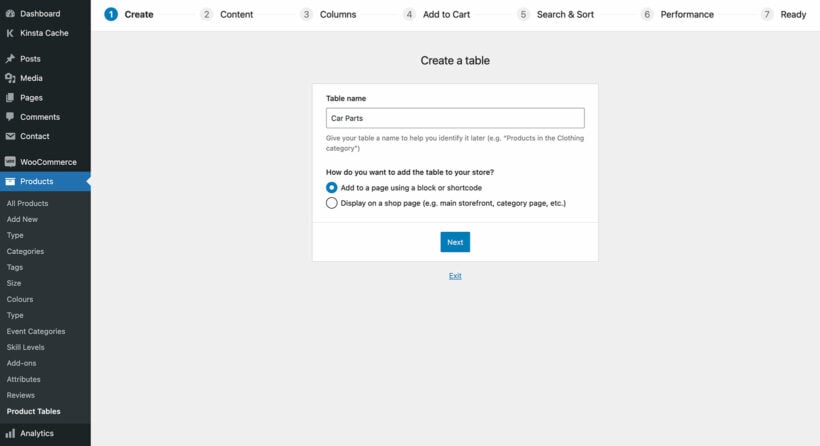
Enable the table on your shop page templates if you want your whole clothing store to use the table layout. Alternatively, you can add the table listing clothes products to specific pages only. If you do this, then you can then choose exactly which products/categories/etc. to display.
Table content
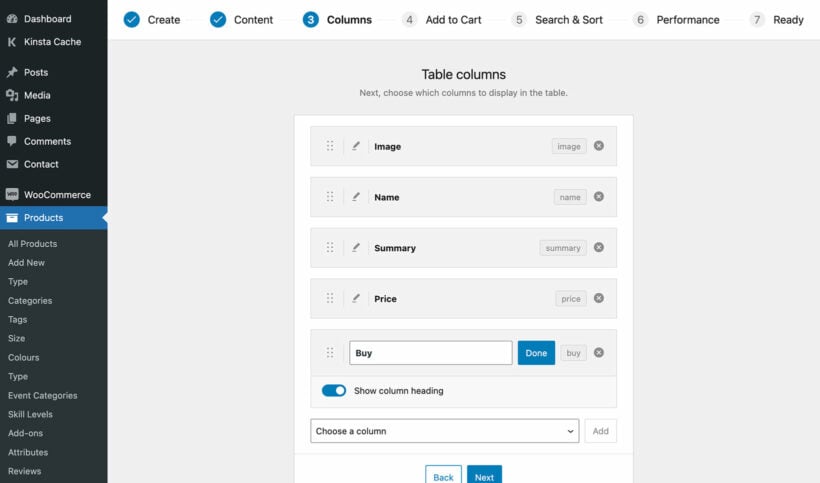
Next, use the Columns page of the table builder to specify what information will appear in the product tables.
You’ll probably want to include images, as well as a few details about each item such as its category, description, and sale price. And don't forget to include the product name and a 'Buy' column!
Adding to the cart
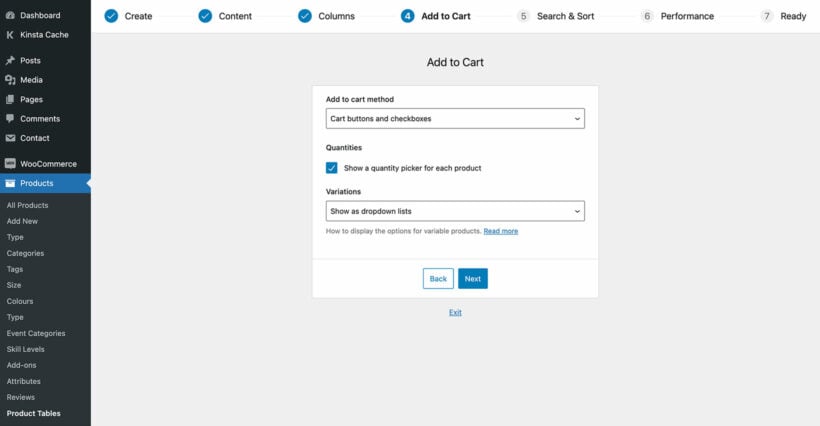
The add to cart method controls what appears in the 'Buy' column of the table. If your customers are likely to choose one clothing item at a time then use the 'Button' method. Alternatively, select 'Checkbox' (or 'Both') to allow customers to use multi-select to add multiple clothing products at once.
Right below that, you probably want to check the 'Quantities' box. This will enable customers to purchase more than one of each item directly from the product table page. That's a useful feature for a clothing store to have, as it's quicker than visiting a separate page for each product.
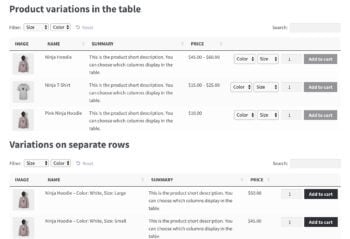
Most importantly, you’ll want to choose how to display product variations. This setting displays your items’ variations right within the table. In other words, customers will be able to see and select all clothing options, such as colors and sizes. You can either display these variations as dropdown menus, or on their own rows.
Product filters
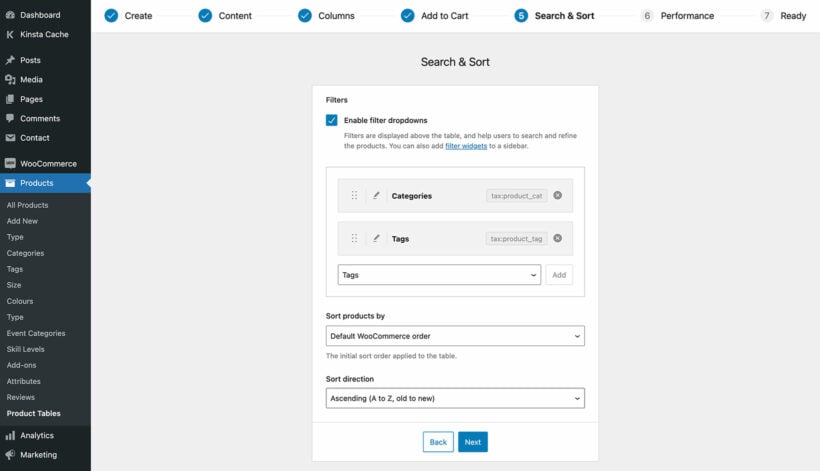
Nearly all stores that use WooCommerce to sell clothes online need some sort of filtering. This allows customers to select details about what they're looking for (e.g. their size or preferred colors) and quickly narrow down their selections.
WooCommerce Product Table comes with some basic filter dropdowns which you can enable above the table. You can enable them on the next page of the setup wizard. Alternatively, leave this option empty if you want to add more advanced features. We'll look at how to do that a bit later.
Preview your WooCommerce clothing store
If you enabled the product table on your shop templates, then you can view these straight away. Alternatively, add a 'Product Table' block to another page, or copy the shortcode from the final page of the table builder and add it that way.
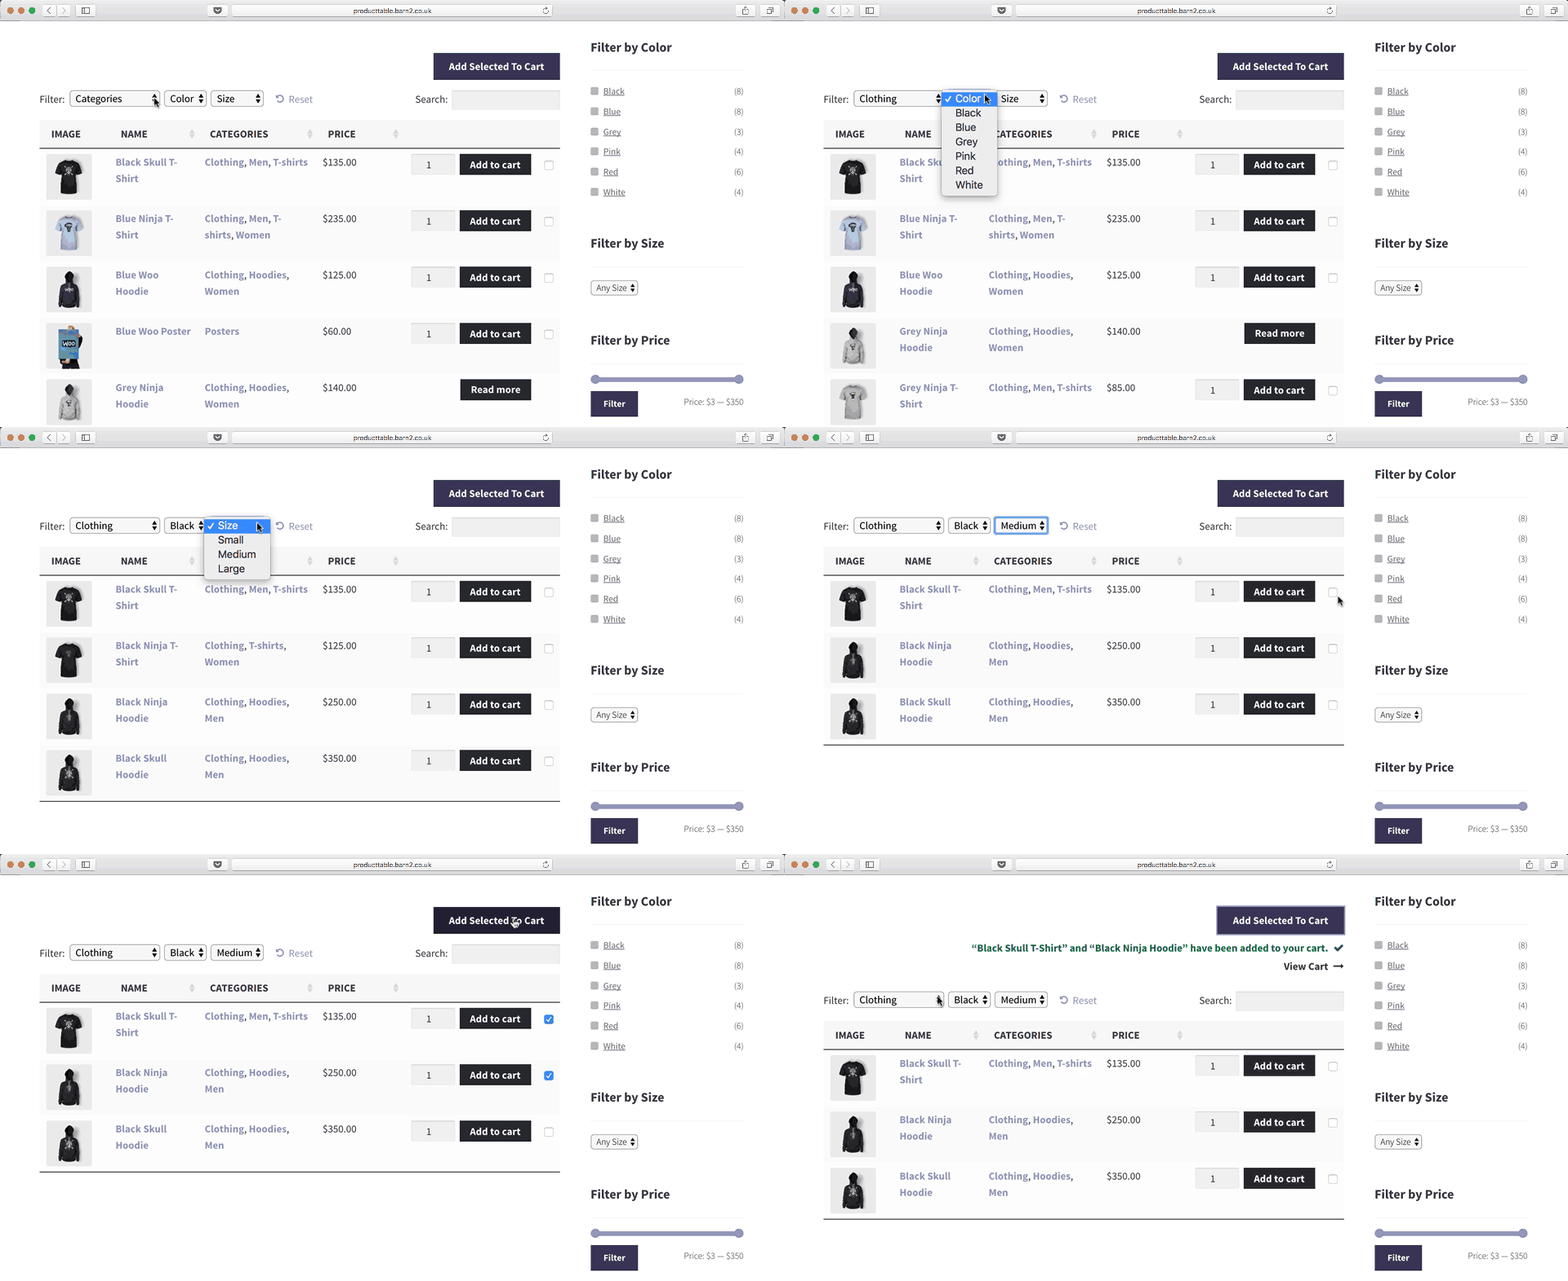
Now, the basics are in place to sell clothes online in WooCommerce. You can see what it looks like so far by viewing the front end. Depending on your settings, it might look something like this:
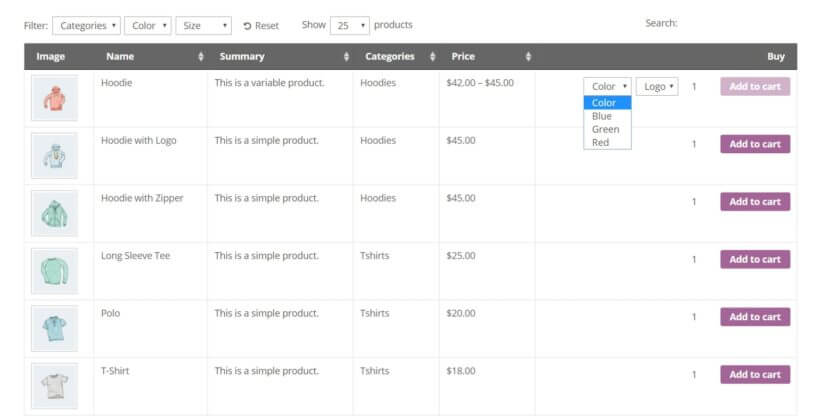
You can continue to make changes – anything you alter in the settings will be instantly applied to your product tables. When you’re happy with the way your table looks and functions, you're done!
Your ecommerce store is now ready to publish. However, you might want to add some extra features to truly supercharge your WooCommerce clothes website. We'll look at these next.
Plugin 2: Use advanced product filters to help customers find specific clothes more easily
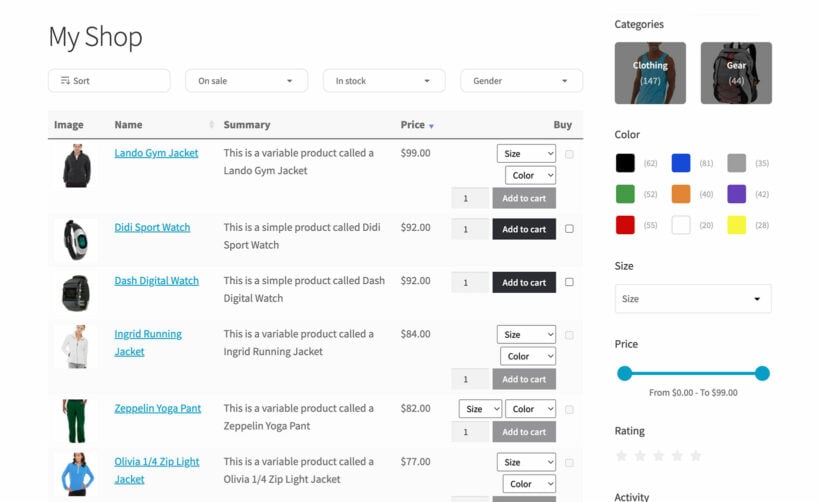
In step 1, we learned how to use the basic filter dropdowns that come with WooCommerce Product Table. For more advanced filtering, you can use the WooCommerce Product Filters plugin instead.
As you can see in the screenshot above, this is perfect for helping customers to find exactly what clothes they like. They can filter by category, color, size, price, rating, and any other data you have added for your clothing products. They look great and you can choose from various filter styles, such as images, color swatches, checkboxes, sliders, and more.
If you have a lot of clothing products then advanced WooCommerce filtering is a must for selling clothes online.
How to add filters to your WooCommerce clothes store
- Install the WooCommerce Product Filters plugin.
- Activate your license key in the setup wizard, and choose how you want your filters to behave. One of the options in the wizard allows you to display the default filter group at the top of all your shop pages. Select this if you want to show filters above the list of clothes in your store. Or if you want the filters to appear in the sidebar on the left or right of the list of clothes, then ignore this.
- Next, go to Products → Filters and add all the ways that you want your customers to be able to filter products.
- If you selected to display the default filter group at the top of your clothes shop in Step 2, then ignore this step. Alternatively, go to Appearance → Widgets and use the Product Filters widget to display the filters in your store sidebar.
Plugin 3: Create a grid of color and size options
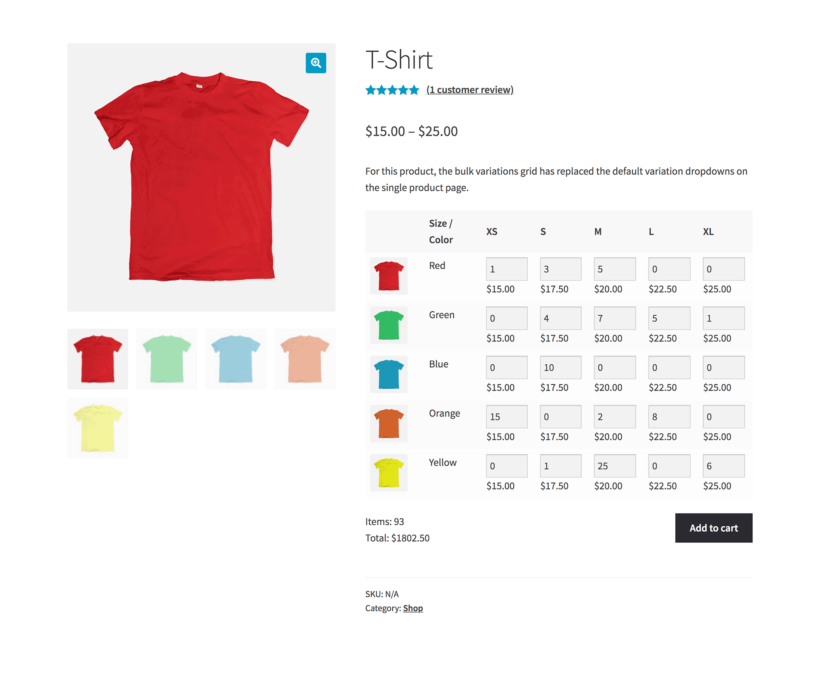
Have you used product variations to sell different size and color options of the clothes in your store (or any other type of option)? If so, then WooCommerce will normally display each option as a dropdown for customers to choose from. Once they select a size and color (for example), the price appears and they can add it to the cart. They then repeat the process for each combination of options they want to order.
That's not ideal for selling clothes in WooCommerce because customers tend to order multiple sizes and colors to try. It's much better if customers can see all the options and prices at once.
You can do this by installing the WooCommerce Bulk Variations plugin. To help you decide if you need it, then see whether you answer 'Yes' to any of these questions:
- Would you like a faster way to add and edit variations in bulk. For example, do you want to be able to instantly add an image of a blue t-shirt to all the blue variations on your t-shirt product? Or do you want to be able to quickly set the price of all the 'Large' size t-shirts at once?
- Do you want people to be able to select clothing sizes and other options in bulk on the single product page?
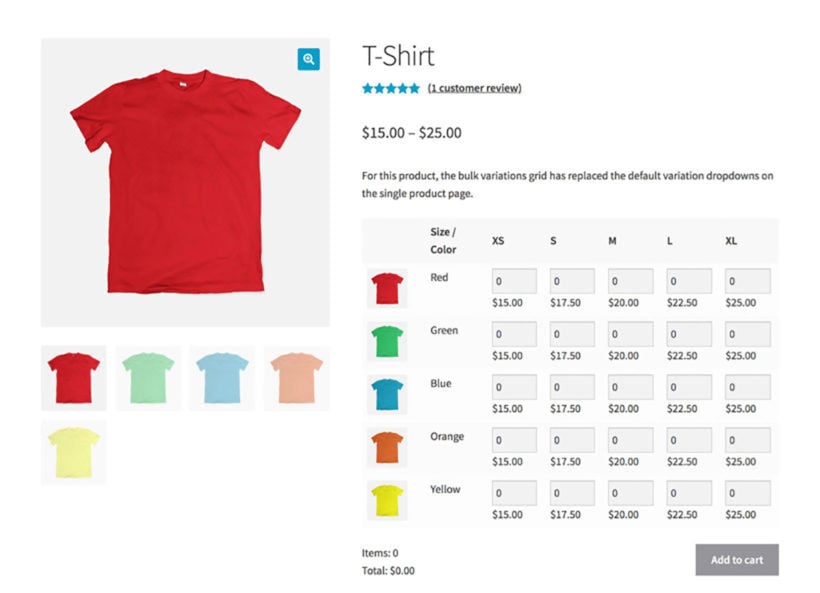
Instead of having to select their clothes size from a dropdown, WooCommerce Bulk Variations displays all the options in an eye-catching grid or matrix.
A WooCommerce bulk variations form is ideal for selling clothes in larger quantities. For example, you'll need this if you're selling clothes for parties or corporate events, branded workwear, or wholesale.
The variations are displayed in two dimensions within the matrix-style order form. The customer can enter the quantity that they require for each option, and quickly add them all to the cart.
Case study: Elite Teamsport
Elite Teamsport uses WooCommerce Bulk Variations to sell teamwear kits and training wear on their online store.
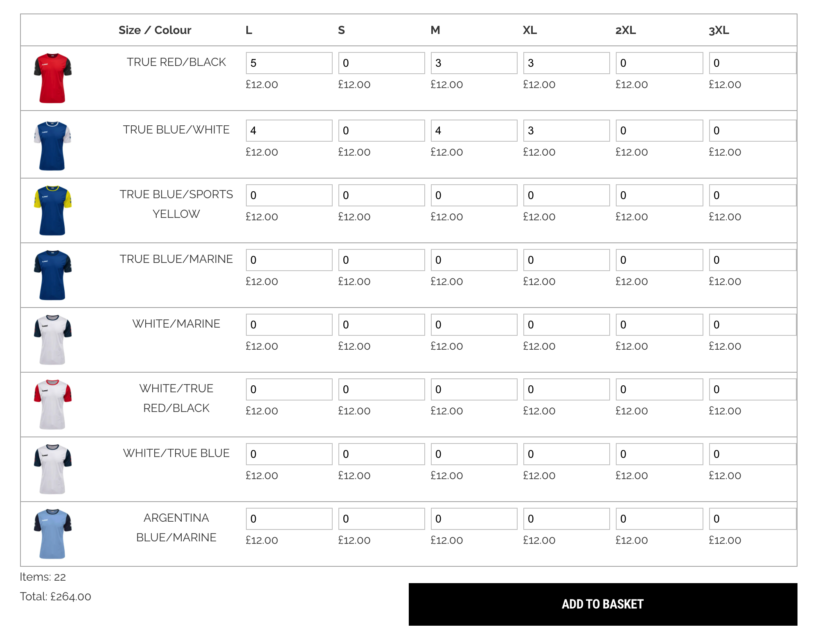
From the single product page, customers can choose to either buy one variation at a time or select multiple options and add them all to their cart at once. The WooCommerce Bulk Variations plugin displays all of the available variations in a grid layout with size and color attributes. This makes it easy to buy multiple variations of a product and reduces friction in the buying process.
Customers can use the quantity selectors to specify how many units of each product. They can then click the Add to Basket button to add them to their shopping cart in one go.
How to set up WooCommerce Bulk Variations
- Install WooCommerce Bulk Variations on your site.
- The setup wizard will open. Use this to set up the plugin, including enabling it on your variable products.
- To edit variations in bulk, go to the 'Variations' tab on the 'Edit Product' screen. Use the 'Filters' bar to select which variations you want to edit. Next, use the bulk actions dropdown above to apply changes in bulk.
Tip - WooCommerce Bulk Variations lets you edit and display variations. If you want one of these features but not both, that's fine - just activate the ones you need.
Plugin 4: Add quick view to your clothes store
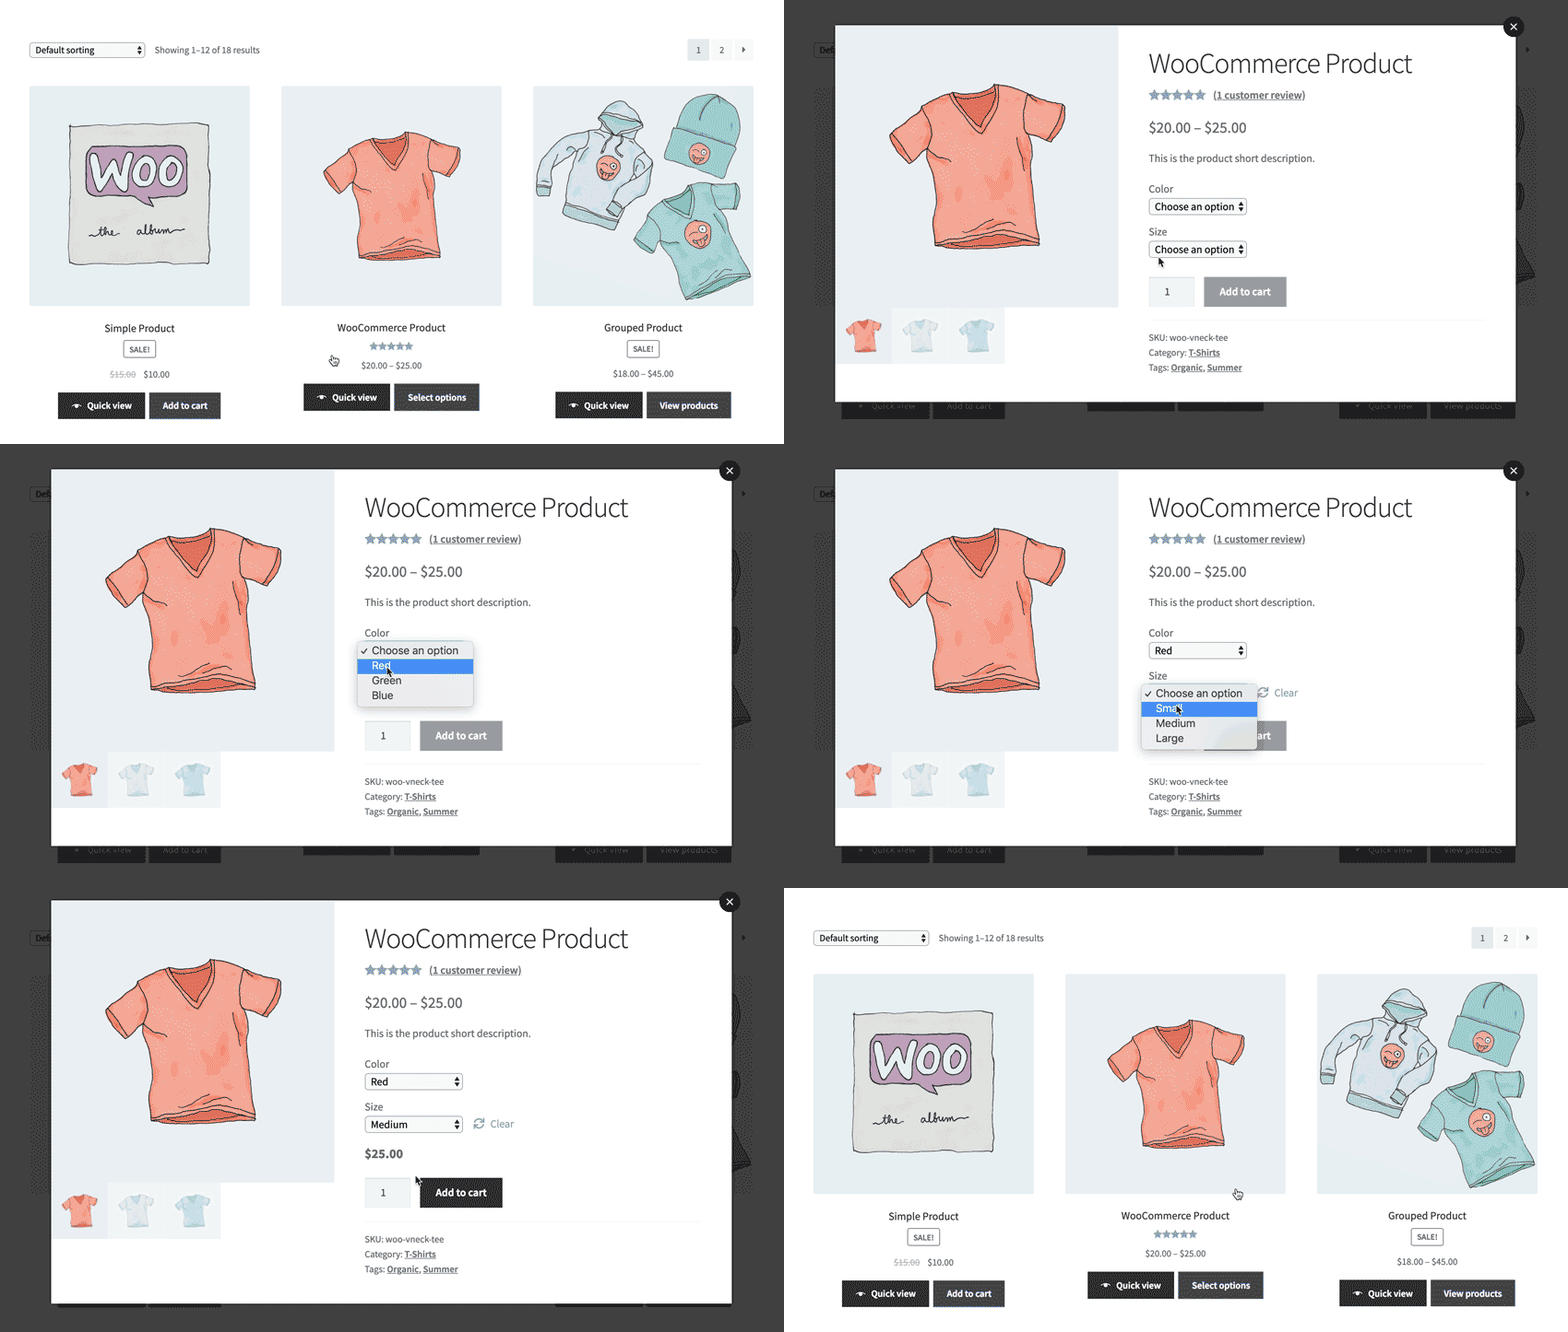
You can take your store to the next level by combining the table layout with product quick view.
Think about when you've bought high-quality clothing or handbags online from leading fashion websites like Etsy, thredUP, Tradesy, and Poshmark. You've probably noticed that nearly all of them offer some sort of quick view function. This is where you can see extra pictures and buy without having to visit a separate page for each garment. There's a reason for this - it's because quick view is a much more user-friendly way to sell clothes online.
That's why you need the WooCommerce Quick View Plugin. This handy tool adds - you guessed it - quick view links or buttons to your WooCommerce clothing store. Customers can use these to view more photos of each clothing item, zoom in on images, view the selling price, and buy directly from a quick view popup. You can also show the short description in the quick view, which is a useful place to add size charts, washing instructions and other useful information.
If you're selling customized clothing, then quick view is ideal for this too. Use it with the Product Options plugin to add text input boxes. This is where customers can upload a logo or enter a personalised message to be added to their custom clothing product.
You can use quick view with product tables. Alternatively, it also works as a standalone product that adds quick view buttons to the default WooCommerce store layouts.
If you're using the WooCommerce Bulk Variations plugin, then the variations matrix can appear in the quick view lightbox. That way, people can select variations and buy in bulk without having to access a separate page for each garment.
How to add quick view to your WooCommerce clothes store
As we saw earlier, the WooCommerce Quick View Pro plugin is a must if you're selling clothes with WooCommerce and WordPress. This how to set it up:
- Install and activate WooCommerce Quick View Pro.
- Go to the plugin settings page at WooCommerce → Settings → Products → Quick view.
- Enter your license key and choose what you want to appear in the quick view lightbox. For selling clothes, you'll probably want the full product image gallery, image zoom, and possibly the short description and add to cart options.
- If you're using WooCommerce quick view with product tables, then you should also go back to WooCommerce → Settings → Products → Product tables. Add
quick_viewto the list of product table columns, or tick the option further down the page to replace links to the single product page with quick view.
Plugin 5: Speed up ordering with an on-page cart and checkout
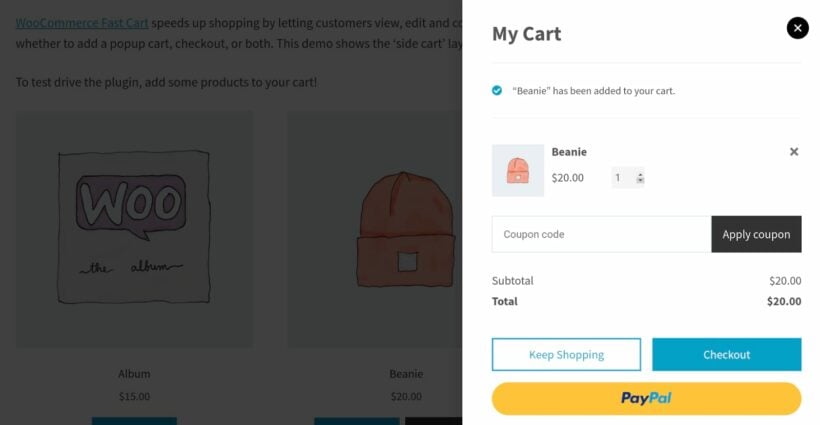
Plugins like Product Table, Product Filters and Quick View Pro make it quicker and easier for customers to find and add products. In contrast, the WooCommerce Fast Cart plugin speeds up the final stages of the ordering process.
Normally, WooCommerce makes customers visit separate cart and checkout pages to complete their order. That's quite time-consuming, and your WooCommerce clothes store will convert better if they can complete their order on the same page.
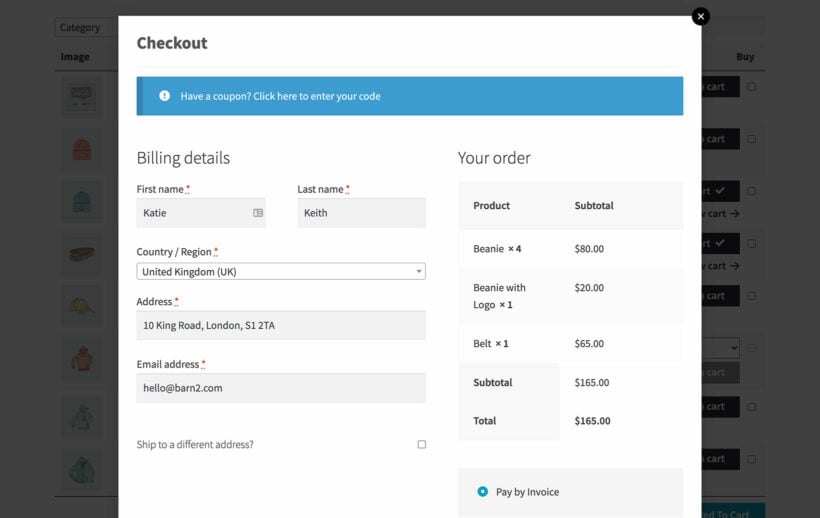
WooCommerce Fast Cart adds a popup cart and/or checkout to your store. As soon as customers add clothes to their cart, the popup cart either launches automatically or a floating cart icon appears. They can use this to review their selections, make changes, add related products, and even pay and check out - without ever leaving the page.
Plugin 6: Sell customizable clothes with product add-on options
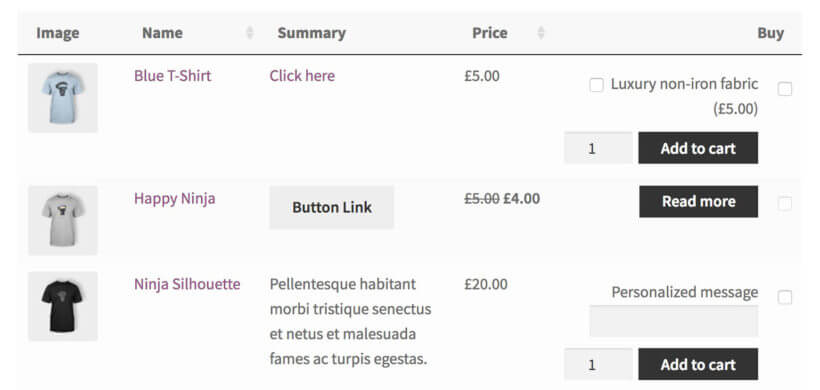
The above three steps are sufficient for creating a fully-featured and compelling product table. However, there’s one more tool you may want to consider adding to your site: Product Options.
This add-on lets customers further personalize their purchases. You can enable them to add on items to their orders, via input boxes, drop-down menus, and checkboxes. If you offer personalized clothing and accessories, this extension will also make it easy for customers to request custom messaging.
For example, if you want to sell personalized custom t-shirts online then Product Add-Ons is a must. You can use it to add check boxes for optional extras, and a text entry box to add a personalized message. It's even possible to include a File Upload field (e.g. to upload a custom logo or design), although customers will need to click through to the single product page to use this.
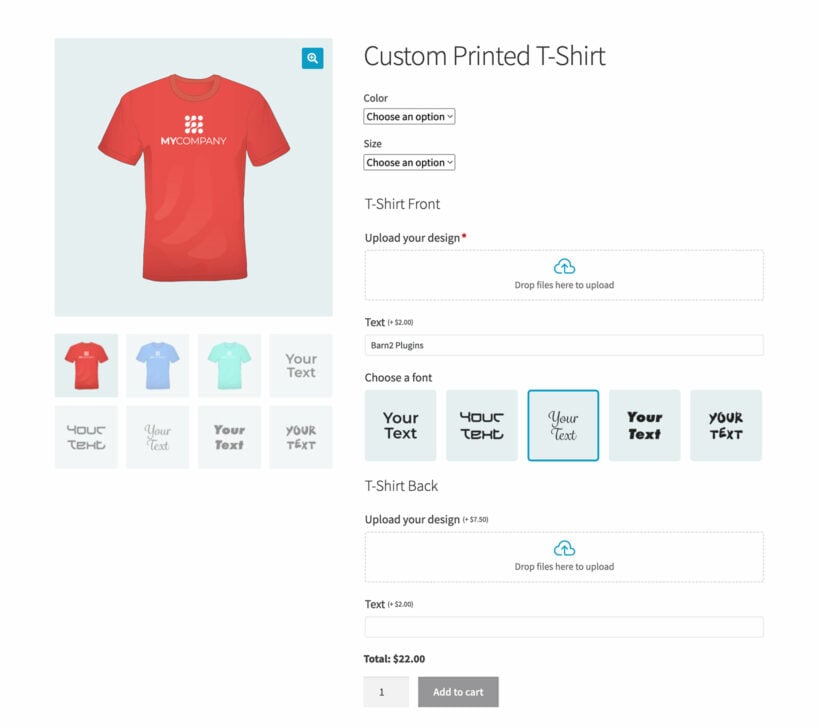
As you can see, Product Add-Ons is a valuable addition that helps you sell clothes online more effectively. The extra product options appear on the single product page and also in the 'Buy' column of the product table.
Where to get the plugins
If you’re looking to sell clothes online, you’ll need to use the most effective strategies in order to stand out. This includes finding a way to show customers everything you have to offer – and all the relevant variations – in one convenient place.
Fortunately, this is a simple matter with the plugins featured in this article:
- Product Table - perfect for listing clothes in a flexible order form layout.
- Product Filters - ideal for helping customers to find products more quickly.
- Bulk Variations - perfect for letting customers choose sizes and other options in bulk on the product page, and for bulk editing variations.
- Quick View Pro - perfect for speeding up shopping.
- Fast Cart - ideal for speeding up the final stages of the customer journey.
- Product Options - essential for selling customizable clothing products.
Use the plugins alone or together to create a professional clothing store that will be a pleasure to use. You can save money with an All Access Pass. They all come with full support, documentation and a full 30-day money back guarantee.
Do you have any questions about how to sell clothes online with WooCommerce? Let us know in the comments section below!
2 Comments
I a wholesale re-seller for a large company. I had freelogoservices make a product web page. I am not happy with it since it's built using Weebly. The had trouble linking to my Payment Tech for CC authorization [ via Authorize.net] but after months they figured it out. My manufacturer has great web page and they will allow us to replicate it using our name as a DBA. They just offered to allow us to link to their site so that an order placed on my site would go to their site for the order fulfillment part. We can change Payment tech to split the charges to us and the payments to the MFG. My question is 1. do we need to rebuild the site using Shopify, and 2. is there a way to make the link to the MFG site so that is seamless to the customer? I do not know on what platform the Mfg operates, but I can find out.
Hi Alisha, we only work with WordPress and WooCommerce so I can't advise you on Shopify. I can tell you how to do what you need in WooCommerce if that helps!
If you want a WordPress website with WooCommerce for the shop pages, then you can do this. There are 2 main options for you:
1. When you add each product in WooCommerce, choose the External/Affiliate product type from the dropdown at the top of the 'Product Data' section on the Add Product screen. This lets you add the URL of the product on the third party site, so that customers can click through and purchase there.
2. If you want the payment to be taken directly on your site then you can set up WooCommerce with normal products and PayPal payments, and use PayPal Adaptive Payments to automatically split the payments. You can use the Advanced Notifications add-on to automatically send the order confirmation emails to the fulfilment centre.
Option 2 will be more seamless to the customer because everything will take place on your own website.