How to enhance your WordPress site with gallery shortcodes

In this tutorial, I'll cover all the ways to add image galleries to your WordPress website: with the Gutenberg Block editor, the default gallery WordPress shortcode, and the powerful Document Library Pro plugin.
Image galleries are incredibly versatile. They make posts and pages appear more visually appealing, increase web visitors' engagement by providing an interactive browsing experience, showcase products or services, and much more.
Thankfully, adding an image gallery to your WordPress site is easier than ever. I'll show you the two methods to do this:
- Using WordPress's native options - This method is for you if you want to add a basic image gallery using the default Block editor, Classic Visual editor, or gallery WordPress shortcode.
- Using a plugin like Document Library Pro - This method is for you if you want to create beautiful, functional image galleries with image descriptions, lightbox previews, download buttons, categories, tags, sort, search, and filters for improved navigation, and other advanced options.
The best part? Each method is 100% beginner-friendly and can be set up in ten minutes or less — no HTML, PHP, or CSS knowledge required.
Let's begin with a quick overview of what we mean by a WordPress image gallery.
What is the gallery function in WordPress?
In WordPress, the gallery function enables you to showcase multiple images or videos neatly on your website. Think of it like adding photos to an album or arranging them neatly on a wall.
A gallery is handy in situations where you wish to display a collection of images, such as product photos on an e-commerce site, a portfolio of your work, or snapshots from an event. Instead of cluttering your webpage with individual images, you can use the gallery function to present them in a structured and beautiful layout.
Use cases for WordPress image galleries
The idea of an image gallery is pretty flexible. Various kinds of WordPress sites use it to organize content effectively, share detailed information, and ultimately enhance users' browsing experience.
Here are some common use cases for WordPress image galleries:
Creative portfolios
Many creatives — such as photographers, artists, designers, illustrators, etc — use image galleries to showcase their work in a visually appealing manner. Galleries make it easier for creatives to categorize their work based on themes, projects, genres, categories, etc. This allows potential clients or employers to easily browse through their digital portfolios, get a sense of their style and expertise, and evaluate their quality of work before deciding to hire them.
E-commerce product images and videos
Product images are proven to significantly impact the purchasing decisions and conversion rates in an e-commerce store. Whether it's clothing, accessories, gadgets, or any other merchandise, displaying product images, videos, and even audio in a gallery allows customers to experience them from different angles and perspectives. In addition, features like lightbox previews and descriptions can help provide further product details and enhance the overall shopping experience on a WooCommerce site.
Event highlights
Websites for weddings, concerts, conferences, or festivals often include photo galleries to document the event highlights. Organizers can create galleries featuring photos of speakers, performers, attendees, memorable moments, or the venue itself. Sharing event highlights engages attendees and provides a glimpse of the event experience to attract future participants. Moreover, visitors who couldn't attend the event can still experience it vicariously through the photo slideshows.
Travel and tourism-focused blogs
Blogs dedicated to travel and tourism-related content are usually heavy on visuals. They usually share travel experiences, destination guides, and other captivating images of scenic locations, landmarks, and activities to inspire and inform their audience. Adding images to galleries enriches the content and allows web visitors to immerse themselves in the experience.
Real estate listings
Real estate agents and agencies typically use photo galleries to showcase properties available for sale or rent. This helps them effectively market properties online and attract new clients. Each property listing may include a gallery showing the interior and exterior photos, floor plans, and virtual tours to give prospective buyers or tenants a comprehensive view of the properties.
Testimonials and case studies
Many online businesses use galleries to showcase testimonials from satisfied customers or case studies highlighting successful projects. Including images alongside testimonials adds authenticity and credibility to the content. Testimonials and case studies provide social proof that builds trust with potential customers and increases businesses' conversion rates.
Community building and audience engagement
Websites that feature member contributions, community events, or types of user-generated content typically showcase multiple images and accompanying details in a gallery layout. For instance, let's say you post makeup tutorials on your YouTube channel. You can ask your subscribers to post photos of themselves, recreating your looks and share them on a section of your site. This encourages participation and fosters a sense of connection among community members.
Training and educational content
Visual aids can help explain complex concepts more effectively than text alone. Learning-focused websites — for instance, those for schools, universities who use WordPress, e-learning departments within companies, etc. — can incorporate image galleries to complement text content and make the study materials more engaging and accessible to students and trainees.
How to use WordPress's default options to add an image gallery
Follow these steps to add a basic gallery that showcases images using the gallery WordPress shortcode, the Gutenberg (or Block) editor and WordPress's classic editor.
Adding an image gallery using WordPress's Gutenberg editor
Follow these steps to create an image gallery in WordPress using the default Gutenberg Block editor:
- Head into your WordPress admin area.
- Navigate to the post or page where you want to add the image gallery. If you want to add a gallery to a new post or page, click on "Add New." Click on "Edit" to add a gallery to an existing post or page.

- Click the "+" icon located or hit the slash ("/") key on your keyboard to add a new block.
- Type "gallery" into the search bar or scroll down the block inserter until you locate the "Gallery" block. Then click on it to add it to your post or page.

- With the Gallery block selected, select the "Upload" button to upload new images from your computer, or choose images from your media library if they're already uploaded.

- After uploading or selecting your images, you'll see them displayed within the Edit gallery block. You can drag and drop each image to reorder it. You can also add captions or descriptions to individual images.

- Click the "Insert gallery" button to add the gallery to the post or page.
- Finally, scroll back up and click the "Publish" or "Update" button to save the gallery.
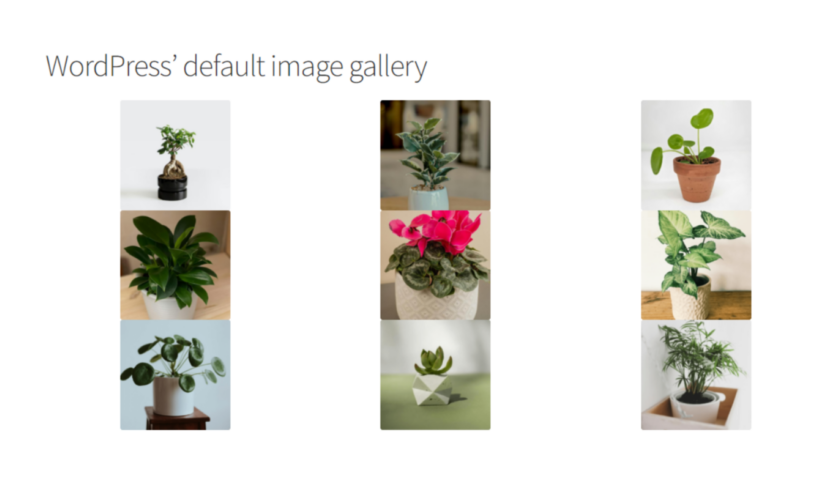
That's it! You've successfully created an image gallery using WordPress's default Gutenberg editor. Here's how it'll look on the front end:
Adding an image gallery using WordPress's classic visual editor
These are the steps to create an image gallery in WordPress using the default classic visual editor. While most WordPress sites now use the block editor or a page builder like like Elementor, you might still find Classic Editor used in plugins that create their own custom post types. That's why you might still need to know how to add image galleries in Classic Editor:
- Open up your WordPress admin dashboard.
- Navigate to the post or page where you want to add the image gallery. If you want to add a gallery to a new post or page, click on "Add New." Click on "Edit" to add a gallery to an existing post or page. (Note: Ensure you're using the Classic Editor, not the Block Editor).

- You'll find the "Add Media" button above the Classic Editor. Click on it to open the media uploader modal.
- Select "Create gallery" from the "Actions" menu on the left side of the media uploader.
- To upload new files: Navigate to the "Upload Files" tab. Then, drag and drop files into the media uploader or click on "Select Files" and add new images from your computer.
- To add files already in your media library: Navigate to the "Media Library" tab and select the images you want in the gallery.
- After adding or selecting the images, click the "Create a new Gallery" link on the bottom right corner of the modal window.
- Now, it's time to configure the gallery settings. Here, you can add individual captions to each image, rearrange the order in which images are presented, choose how many columns you want in your gallery, and more.
- Click the "Insert gallery" button to add the gallery to the post or page.
- Finally, scroll back up and click the "Publish" or "Update" button to save the gallery.
That's it! You've successfully created an image gallery using the default WordPress classic editor.
Adding an image gallery using the default gallery WordPress shortcode
WordPress's classic visual editor shows you a live preview of the image gallery. However, if you switch to the "Text" tab in the WordPress editor, you'll see that it's actually powered by shortcodes.
You can use the WordPress image gallery shortcode absolutely anywhere. For example, if you're using a page builder plugin like Elementor or Divi Builder then you can insert the shortcode into their 'Shortcode' modules. You can also add shortcodes to widgets and other text or code areas.
Follow these steps to create an image gallery using the native gallery WordPress shortcode:
- Open up your WordPress admin dashboard.
- Navigate to the post or page where you want to add the image gallery. If you want to add the gallery WordPress shortcode to a new post or page, click on "Add New".
- Add the shortcode wherever you want the image gallery to appear.

Note: Replace the gallery ids "362,361,360,359,358,307" in the picture with the IDs of the images you want to include in your gallery. You'll find each image's ID by going to Media → Library and hovering over each image. The ID will be shown in the permalink.
That's it! Here's how the image gallery created with the default gallery WordPress shortcode looks on the front end:
Optional: Customize the gallery WordPress shortcode
The shortcode I shared above will help you create a barebones image gallery. Here are some attributes that you can add to it to further customize the appearance and behavior of the gallery. Add these attributes to the gallery WordPress shortcode as needed, separating them with spaces. For instance:
- Columns: This specifies the number of columns in the gallery grid. For example, the below shortcode attributes will display the gallery items in two columns.

- Size: This defines the size of the images shown in the gallery. You can use predefined image sizes like "thumbnail", "medium", or "large", or specify custom image sizes. For example,

- Link: This attribute determines how the images in the gallery link to. Options include "file" (links to the full-size image file), "none" (no link), or "attachment" (links to the attachment page). For example,

Bringing it all together, the updated gallery WordPress shortcode is:

That's it! You've successfully created an image gallery with the default gallery WordPress shortcode.
How to add a gallery in WordPress with the Document Library Pro plugin
The default WordPress gallery works well to create a barebones image gallery. However, if you're looking to add advanced features, you'll notice that it can be pretty restrictive. For instance:
- It has limited layout options: It only presents images in a basic grid layout, which may not be ideal for some use cases.
- It lacks the preview feature: Your web visitors must open up individual images to get a closer look at them — not the best user experience.
- You can't assign tags and categories to images: Tags and categories organize images and make it easier for web visitors to navigate galleries and for search engines to understand and index your site's content.
- There's no built-in download functionality: Without a built-in download option, people can't save images from the gallery easily. The native feature isn't suitable for this use case.
- It lacks search, sort, and filter options: Search, sort, and filter features make it easier for visitors to find specific images. This is most useful for sites that want to showcase a large collection of images. In these situations, people may struggle to find specific images and get frustrated.
Thankfully, you can fix these issues using the Document Library Pro plugin.
Benefits of creating image galleries with Document Library Pro
Document Library Pro is the best image and image and video WordPress plugin. Thousands of people love using it to create, showcase, and manage various types of content — including images — on their WordPress websites.
(Excuse the name. WordPress regards various types of content — PDFs, Vimeo videos, YouTube playlists, audio files, and, yes, even images as documents. And that's why Document Library Pro is so named).
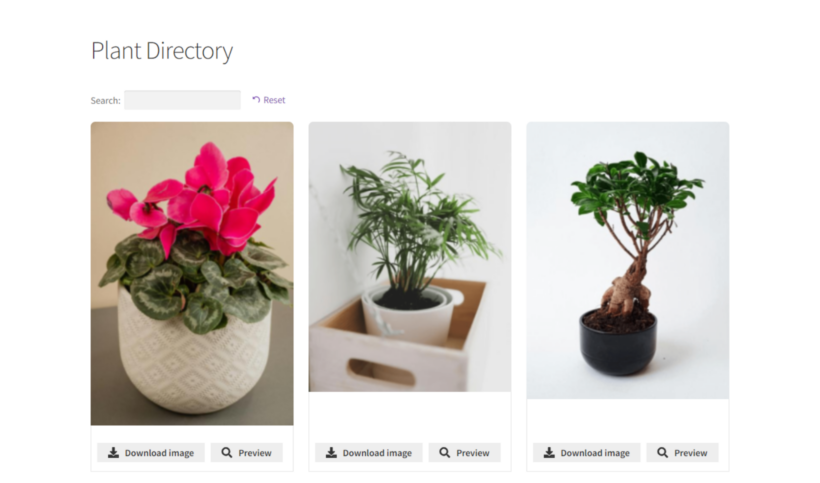
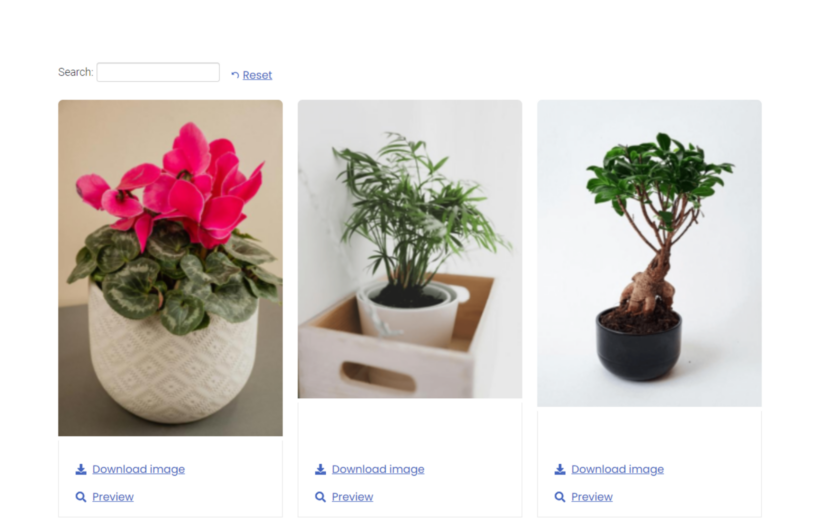
Document Library Pro looks fantastic on all themes and presents your images in a sleek grid gallery layout like this:
Or in a structured, organized table layout like this (Note that you can increase or decrease the size of the images and other columns as you prefer):
Document Library Pro's features
- There are two sleek, user-friendly layout options to present images on your site's front end of your site: grid and table.
- It lets you add search, sort, and filter options to enable people to find images quickly and provide a better viewing experience.

- You can add custom columns with additional information, such as text, image descriptions, dates, tags, categories, download buttons, and more. This provides a better user experience and adds metadata to improve search engine rankings.
- It has cache and lazy load options built in to ensure your fast page load speeds. This is invaluable if you want to present a huge number of images (even hundreds or thousands) in each gallery.
- You can add image galleries to any location on your WordPress site.
Best of all, galleries created with this WordPress gallery plugin are highly responsive. Considering that over 50% of online browsing happens via mobile devices and 75% of web users prefer mobile-friendly websites, Document Library Pro easily adapts the image gallery to various screen sizes. So whether it's mobiles, tablets, or desktops, it automatically adjusts the number of columns and image sizes to fit the size of the screen to ensure your image gallery looks and functions correctly no matter what.
How to create WordPress image galleries with Document Library Pro
Setting up image galleries using Document Library Pro is pretty simple. You can customize the standalone default template page that's added to your site when you install the plugin or use shortcodes to add image galleries anywhere else — on sidebar widgets, in the footer section, in the middle of a page or post, etc.
Follow these steps to add an image gallery to a standalone page on your site.
1: Install the Document Library Pro plugin and activate it
The setup steps are similar to any other premium WordPress plugin:
- Buy Document Library Pro.
- Save the plugin to your computer.
- Open up your WordPress admin dashboard and navigate to Plugins → Add New Plugin.
- Choose "Upload Plugin" and select the file you previously saved to your computer to upload it.
- Select Install Now → Activate.
2: Configure Document Library Pro's core settings
Here, we'll customize the primary settings in the setup wizard. You can amend them later if required:
- First, enter the product license key and click on "Check" to activate it.
- Go to the next page to update your preferred image gallery layout settings. Pick your preferred default layout: table or grid. If you want to use the table-folder layout, select the table option, then tick the "Folders" checkbox below.

- Enable the "Document preview" option.
- If you picked the table layout above:
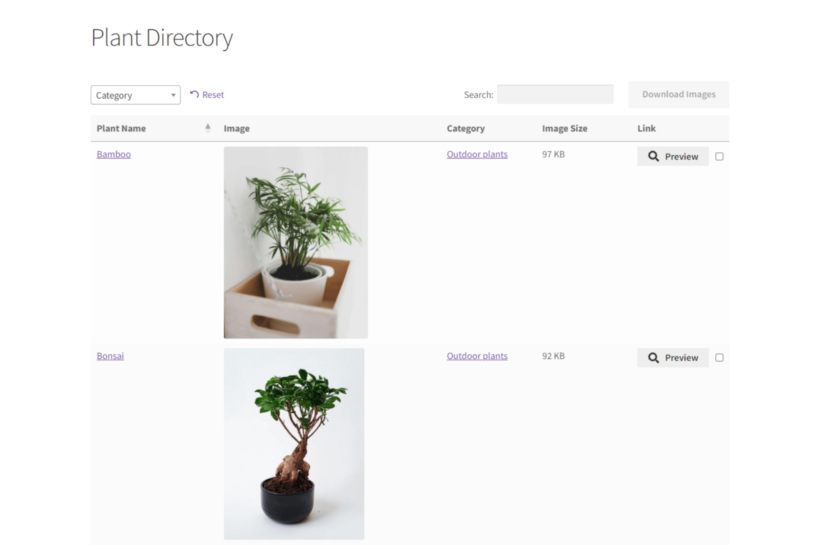
- Specify the columns you want in your image gallery, with a "comma" after each one. Don't add spaces. For this tutorial, I'm creating an image gallery of various plants for a website that shares nature-related content. I want to include the plant names, an image of each plant, plant type, whether indoor or outdoor, image sizes, and preview links. So I used the following columns
"title:Plant Name,image,doc_categories:Category,file_size:Image Size,link". Note: Refer to this guide for the exact fields you can add and what each field means.
- Specify how you want people to access images in your gallery in the "Accessing documents" menu, i.e, with a link to the single image page, a multi-select checkbox (for multi-downloads), or both.
- Enable lazy load if you want to showcase a huge number of images in the gallery. This prevents the page from slow load times.

- You can add filters to enable people to find images on the "Document Filters" page quickly. Choose "Show based on columns in table" from the menu. Otherwise, choose the "Disabled" option.
- Specify the columns you want in your image gallery, with a "comma" after each one. Don't add spaces. For this tutorial, I'm creating an image gallery of various plants for a website that shares nature-related content. I want to include the plant names, an image of each plant, plant type, whether indoor or outdoor, image sizes, and preview links. So I used the following columns
- If you picked the grid layout above, specify the details you wish to showcase in your image gallery.

- Click "Finish setup" and then "Go to settings page".
3: Tailor how the image gallery appears on the front end
Document Library Pro automatically inherits your WordPress theme's styling to match your website's look and feel. Additionally, you can finetune how the image gallery appears and behaves on your site's front end:
- Go to Documents → Settings → General within your admin dashboard.
- Locate the "Document links" section and ensure that the "Link to document" checkbox is enabled.

- Specify your preferred "Link style". This describes how the standalone link to access each image appears on the image gallery. I selected "Button with icon and text".
- Update the text on the "Download" button to something more apt such as 'Download Image".
- Select "Direct access" from the "Link destination" dropdown.
- Enable the "Open links in a new tab" option next to "Link target".

- Scroll down and locate the "Number of documents" section. Specify the number of images you want showcased at once in the gallery. If you wish to showcase all images at once, enter "-1" here.
- Finally, click on "Save changes" at the bottom of the page.
4: Add images to the gallery
There are 5 different methods to add images to be showcased in the gallery:
- Add individual images manually.
- Add images from your site's Media Library.
- Drag and drop images.
- Upload bulk images in a CSV file.
- Accept image submissions from the front end.
Here's a quick guide on how to use each method.
1: Add individual images manually
Follow these steps to upload a single image to the gallery at a time:
- Navigate to Documents → Add New within your dashboard.
- Update details in the relevant fields: document name, description, excerpt, slug, and featured image, and select from the list of categories and tags.

- To upload the image to your site's Media Library, select "File Upload" from the Document Link dropdown in the top right corner.
- Then select File Upload → Add File. Choose the image you wish to add and click the "Add File" button.

- Alternatively, if the file is hosted on an external platform, such as Google Images or Dropbox, etc., click the File URL in the Document Link menu and add the URL for the image. Note that if the image file is hosted externally, the preview option won't work.
2: Add images from your site's Media Library
Follow these steps to add images from your Media Library to
the gallery:
- Navigate to Media → Library within your admin.
- Change to the "List" mode and tick the checkboxes next to each image you want to add to your gallery.
- Select "Add to document library" from the Bulk Actions menu and hit "Apply".
- Click on the link near the top of the page to update categories, tags, and other details for each image.
3: Drag and drop images
Follow these steps to upload multiple images at once using the drag-and-drop method.
- Navigate to Documents → Import within the admin area.
- Select the images you want to add from wherever they are on your computer.

- Drag the images and drop them in the Import page → Drop files to upload section.
- Then, go to the "All Documents" area to update details for each image.
4: Upload bulk images in a CSV file
Follow these steps to add images and their details to a CSV file and upload them in bulk.
- Save this sample CSV file to your desktop to ensure that the format is accurate. Note: The format used is critical. This method won't work if it is incorrect.
- Open up the sample CSV file in Excel, Google Sheets, Numbers, or any other spreadsheet editor.
- Update the details in the spreadsheet editor as appropriate:
- "Title": The name of the image.
- "Content": The image to be added or embedded.
- "Categories", "Tags", and all other fields: For additional metadata.
- Save the spreadsheet editor file as a CSV document.
- Log in to your WordPress admin and go to Documents → Import → Import CSV.
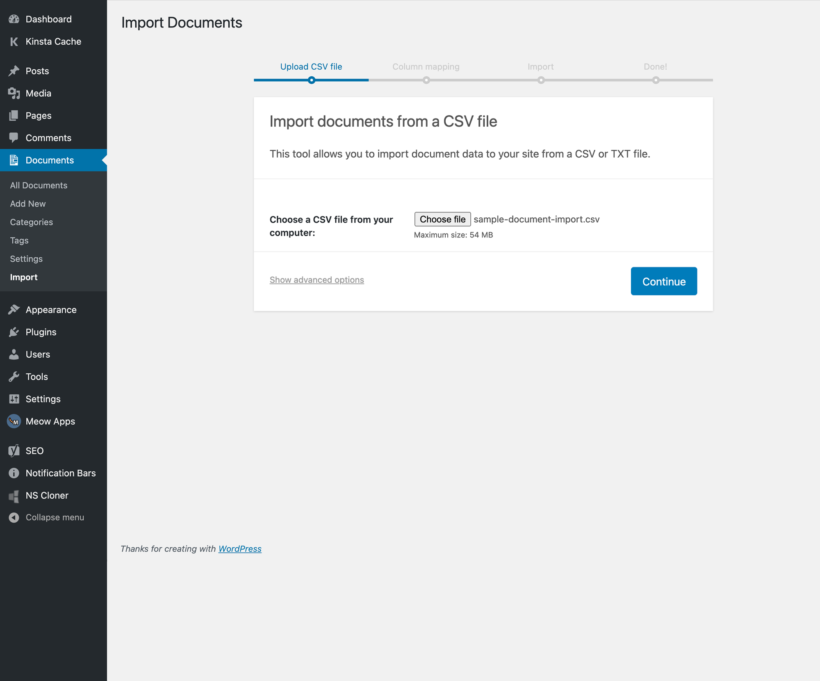
[/image_border] Bulk upload documents to the library from a CSV file - Select Choose file → Continue.
- Pair each column in the CSV file to the custom post-type options on the "Map CSV fields to documents" screen, then click "Run the importer".
- When the CSV file is successfully imported, you'll see a popup with a link to update the details if required.
5: Accept image submissions from the front end
Follow these steps to enable people to upload images to your gallery from your site's front end. This is useful to allow anyone to add images without giving them admin access to your site.
- Open your WordPress admin and go to Pages → Add new page.
- Add this shortcode
[dlp_submission_form]to create a form to accept images in your gallery. - Optional: Enable manual approval to prevent spam submissions. Head to Documents → Settings → General and locate the "Front end document submission" section. Tick the "Enable admin email" and "Enable moderation" checkboxes.
- Save the settings at the bottom of the page.
How to display the image gallery on the default standalone gallery page
Once you install the Document Library Pro plugin, it adds a page named "Document Library" to your site's primary menu. This title might not be ideal for an image gallery. Here's how to update it:
- Access your WordPress admin dashboard and go to Pages → All Pages → Document Library. Rename the page to "Image gallery" or any other appropriate name.

How to display the image gallery using the Document Library Pro image gallery shortcode
In addition to the standalone default page that comes with Document Library Pro, you can use shortcodes to add flexible image galleries with dozens of attributes anywhere on your site.
The standard Document Library Pro gallery shortcode is [doc_library]. Below, I'll share additional parameters that you can use to customize your image galleries as desired.
Note: The galleries created with shortcodes will override the settings you chose while configuring the plugin. So feel free to customize it however you prefer.
Advanced shortcode parameters to customize your image gallery
Here are additional shortcode parameters that you can use to expand the standard [doc_library] shortcode to create unique image galleries using the core document library.
Resuming with the plant directory example above, let's say that you want to create separate albums for each type of plant.
To create a gallery that lists all the indoor plants, you'd first need to create a category called "indoor plants", then create a page (or edit an existing one) and add the following shortcode: [doc_library content="image,title,excerpt" doc_category="indoor plants"]
Alternatively, you can choose to combine multiple but not all categories and showcase them on a standalone page, such as:
[doc_library content="image,title,excerpt" doc_category="indoor plants,outdoor plants,hanging plants"]
You can customize the headings of the gallery columns, such as relabeling “Title” to “Name” using [doc_library content="title:Name”]
You can also change the sizes of the images in the gallery, from the default 50x50 pixels to something else, such as:
[doc_library content="image,title,excerpt" image_size="80x80"]
These are just a few examples of how you can create custom, functional image galleries with Document Library Pro. Check out additional shortcode examples, including how to customize the gallery size here.
That's how to create galleries in WordPress!
In this guide, I've shown you all the ways to add image galleries to your WordPress website. Here's a recap of the methods:
- WordPress's default options: This lets you add a basic image gallery to your site with the:
- Gutenberg (or Block) editor - This lets you use the Gallery block within Gutenberg to showcase several images together.
- Classic visual editor - This uses the visual editor within WordPress's media uploader to add a basic image gallery to posts and pages.
- WordPress gallery shortcode - This uses the shortcode and its variations to add a basic image gallery to posts and pages.
- Document Library Pro: This is the best image gallery plugin that lets you create sleek yet functional image galleries. You can display multiple images with descriptions, previews, and download buttons, tags, categories, filters, a search box, sort options, and other advanced settings.
Get started with Document Library Pro today!