Nonprofit ecommerce: how to set up a charity merch store


A nonprofit merch store sits alongside donation forms as one of the few fundraising tools that scales without scaling the team. A small WordPress catalog of branded tote bags, t-shirts and stickers is enough to start, and it doubles as a walking-billboard for the cause.
The same supporter who donates $50 will often add a $20 tote bag or a $5 sticker pack to that order if the option is there. The supporter goes home with something tangible. And every t-shirt or sticker that gets used in public is a free advert for the organization that paid for itself the moment the order was placed.
Setting it up properly doesn't require a Shopify subscription or an Etsy storefront. WordPress and WooCommerce together cover the platform side for free, and a WooCommerce Product Table layout turns a small catalog into a fast, scannable order form that volunteers can manage in five minutes a week.
Can a nonprofit run an online store?
Yes. Most countries treat the sale of merchandise by a registered nonprofit the same way they treat any small commerce activity, so the practical setup is similar to a regular WooCommerce store. There are a few extra things to confirm before the first sale:
- Sales tax or VAT treatment, including whether your nonprofit status grants any exemption.
- Business licenses and permits, which depend on the items sold and the local jurisdiction.
- Consumer protection rules. Return, refund and privacy policies apply the same as any retail site.
- Charitable solicitation laws if marketing copy implies the proceeds fund a specific program.
I'd recommend a short conversation with a local accountant plus a quick review by the board to clear the legal side. Most established nonprofits already comply with the bulk of it through their general operations.
What to sell in a nonprofit ecommerce store
The two product categories I see consistently working for small nonprofits are branded merchandise and digital products. Each fits a different supporter type. Both can run from the same WooCommerce store.
Nonprofit swag (the workhorse)
The classic nonprofit merch items are tote bags, stickers, mugs, t-shirts, baseball caps and water bottles. Stickers and tote bags are the easiest start because there's no sizing to manage, fulfillment is cheap, and the unit cost stays under $5 even at small print runs. T-shirts add complexity (sizing, returns) but earn more per order.
I'd start a small nonprofit catalog, ideally informed by donor surveys, with six to ten items, not fifty. The goal is visibility: every item carries the nonprofit brand identity out into the world where someone might ask about it. Stickers on laptops, tote bags at the supermarket and t-shirts at events all earn their keep this way.
Other product types that work
Beyond physical merch, nonprofits can sell several other product types.
- Digital downloads such as digital products: eBooks, cause-related guides, original photography or annual reports as paid PDFs.
- Event tickets for fundraising galas, conferences or community events.
- Memberships with monthly or annual recurring billing.
- Experiences such as site tours, virtual events or behind-the-scenes Q&As with the executive director.
- Customized products including engraved plaques, commemorative items or personalized cards.
For nonprofits that primarily run donations and only occasionally sell physical items, a small WooCommerce donation plugin setup with a separate merch tab tends to outperform a full multi-category storefront. Don't over-engineer.
Why WordPress, WooCommerce and Product Table beat Shopify and Etsy here
For a nonprofit already on WordPress (about 60% of UK charity websites use it, according to Studio Republic), the cheapest path to a merch store is to add WooCommerce to the existing site. Shopify charges $29/month even before the first sale. Etsy takes a transaction percentage and forces buyers off the nonprofit's own brand. Neither makes sense when an existing WordPress site already has the donation form, the volunteer base and the supporter email list attached.
WordPress + WooCommerce together cost nothing to install and run on existing hosting. The platform supports physical goods, digital products, recurring memberships and event tickets out of the box.
It also integrates with whatever donation plugin the nonprofit already runs. For most charities the harder question is whether to bother adding a store at all, and what layout to use for the products.
The product table layout is the right default for nonprofit merch
The standard WooCommerce shop layout assumes a customer wants to click each product page to read the details before adding to the cart. For nonprofit merch that flow is wrong. A supporter who came to buy a tote bag, a sticker pack and a mug doesn't want to click three product pages, read three descriptions, configure three options and check out three times.
A product table layout solves this. The whole catalog lives on one page as rows, each with an image, a name, a price, a quantity field and an add-to-cart button. Supporters can browse the full range, tick the items they want, set quantities and hit checkout once.
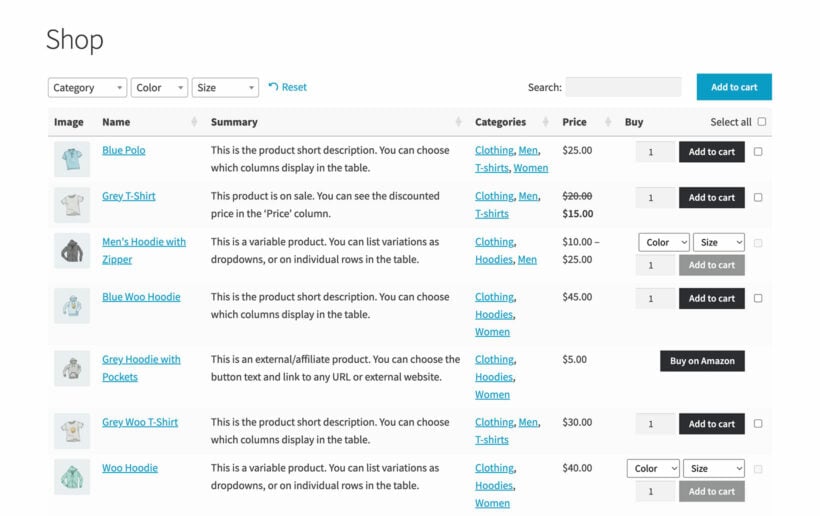
The WooCommerce Product Table plugin handles this. Configuration takes about ten minutes for a small catalog. The same shortcode can be reused across pages to show the full store, a single category (just t-shirts, just stickers), or a curated set tied to a specific campaign.
Setting up a nonprofit merch store with WooCommerce Product Table
Assuming WordPress and WooCommerce are already installed on the nonprofit's site, the merch-store setup runs in three stages.
Stage 1: Add the products
Create each merch item as a standard WooCommerce product:
- Go to Products → Add New.
- Set a title, short description and the regular price.
- Upload a product image. For merch, a photo on a plain background (white or cause-related color) works best.
- If the item has variations (t-shirt sizes, mug colors), set the product type to 'Variable product' and add the variations.
- Publish.
Repeat for the full catalog. Six to ten products is a sensible starting point.
Stage 2: Install WooCommerce Product Table
Get a license from the WooCommerce Product Table page, then install:
- In the WordPress admin, go to Plugins → Add New → Upload Plugin.
- Choose the plugin ZIP file you received by email and install it.
- Activate the plugin and enter your license key when prompted.
Stage 3: Build the table and embed it on the store page
Once the plugin is active, go to Products → Product Tables → Add New and use the table builder to pick which columns appear and which products show up. For a nonprofit merch store, useful columns are:
- Image (thumbnail of the product).
- Name (linked to the product page for supporters who want full detail).
- Price.
- Quantity.
- Add to cart button.

Save the table. How you embed it depends on the editor:
- If you use the WordPress block editor, drop a "Product Table" block onto the page and pick the table you just created.
- If you use a page builder like Elementor, Divi or Beaver Builder, paste the shortcode the plugin generates (it looks like
[product_table id="123"]) into a shortcode/HTML widget on the page.
The Barn2 KB has the full reference on editing product tables and embedding the shortcode.
Where donor-only digital content fits
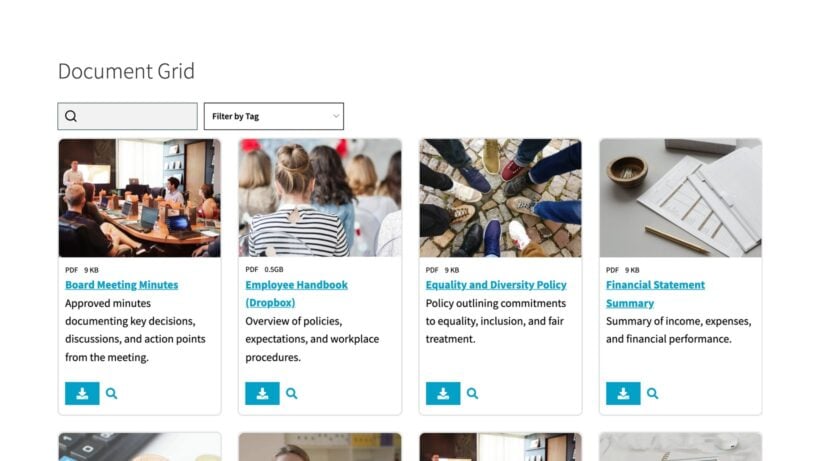
Some nonprofits also want to give supporters access to private digital content, such as annual reports, sponsor packs, monthly briefings from the executive director, or impact-data downloads gated to recurring donors. That sits next to the merch store rather than inside it.
The clean separation is: public merch goes through WooCommerce Product Table, and donor-only digital files go through a Document Library Pro resource portal with access tied to a user role or donation tier. Five organizations show how they built theirs in the Barn2 roundup of nonprofit resource library examples.
Marketing the store
A nonprofit ecommerce store that no one knows about earns nothing. Once the catalog is live, four cheap fundraising ideas consistently bring in early sales:
- Add a one-line mention plus a shop link to the donation thank-you email. Supporters in the donation flow are the warmest audience and the cheapest to convert.
- Send a launch announcement to the full email list with photos of two or three items. Don't try to feature the whole catalog in one email.
- Give every staff member and board member a piece of free merch and ask them to wear or use it at events. The walking-billboard effect compounds across months.
- Add a "Shop" link to the main site navigation so first-time visitors find it without searching.
Resist the urge to run paid ads on a small merch catalog. The math rarely works at the volumes a small nonprofit generates. Email and natural in-person visibility do most of the work for the first year.
For more low-cost marketing ideas, the Barn2 guide to online fundraising ideas covers tactics that complement a merch store.
Why a nonprofit merch store is worth setting up
The economics of a small nonprofit ecommerce store look better than most fundraising channels once it's running. Print-on-demand fulfillment through services like Printful or Sticker Mule removes the need for upfront inventory. There's no warehouse, no postage queue and no volunteer time spent packing boxes.
The store also keeps earning between fundraising campaigns. A donation form is a high-intensity ask twice a year. A merch store is a low-intensity earner all twelve months. The combination flattens the income curve and reduces the team's reliance on a perfect appeal week.
Each item sold also doubles as marketing for the cause. A donor who buys a $25 tote bag gets the bag plus a small token of public commitment. The nonprofit gets the $25 minus print costs, plus every future moment that bag spends in a coffee shop. None of that shows up in the spreadsheet but it lands in the awareness column over time.
Frequently asked questions about nonprofit ecommerce
Do nonprofits have to pay sales tax on merch?
It depends on the jurisdiction. In most US states, even a registered 501(c)(3) charges sales tax on merchandise sales because the items are unrelated to the charitable purpose. UK and EU rules vary. Check with a local accountant before launch.
What's the cheapest way to fulfil orders without a warehouse?
Print-on-demand services like Printful, Sticker Mule or Spring print and ship each item as orders come in. There's no upfront inventory cost, and the nonprofit only pays for what sells. The trade-off is per-unit cost is higher than bulk printing, but the avoided warehouse and labor cost usually outweighs that for sub-1,000-order volumes.
Should I use WooCommerce Product Table or the default WooCommerce shop layout?
For a small merch catalog where supporters often want to buy multiple items in one transaction, a product table layout outperforms the default shop grid. The single-page format lets supporters scan everything at once and add a tote bag plus a sticker pack plus a t-shirt without clicking through three product pages. For larger catalogs with detailed product configuration, the default shop layout can still be the right call.
Can I combine donations and product sales in the same checkout?
Yes. The standard pattern is a small "Add a donation to this order" upsell at the cart or checkout stage, configured through the donation plugin's WooCommerce integration. Most modern WordPress donation plugins support this, including the options covered in the Barn2 roundup of WordPress donation plugins.
How many products should a nonprofit ecommerce store launch with?
Six to ten items is a good starting range. That's enough to give supporters real choice without flooding the catalog or burying the strongest items. Add new products gradually as the existing ones prove themselves.
Is it worth running a merch store if our donations are already strong?
Usually yes, because the store earns at different times than the donation appeals do. It also captures revenue from people who would never give a recurring donation but will buy a $15 t-shirt on impulse. The two channels complement each other rather than competing for the same dollars.
Final thoughts
The decision to set up a nonprofit ecommerce store is rarely about whether merchandise will sell. It's about whether the team has the bandwidth to manage another channel. The product table layout cuts that bandwidth requirement substantially because the catalog lives on one page that volunteers can update in a few minutes a week.
The right setup for a small nonprofit has four pieces. You need WordPress, WooCommerce, a donation plugin already in place, plus WooCommerce Product Table for the merch catalog. If supporters also need access to donor-only digital content, Document Library Pro sits alongside the merch store and handles the gated-library side. Annual costs land in the low hundreds of dollars on existing hosting.
From a standing start, the realistic timeline is one weekend to set up the store and the table, plus another weekend over the following month to nail the first marketing email and the on-site shop link. After that, the store earns or it doesn't, and the answer is visible in the WooCommerce reports within 60 days.
2 Comments
That's a really smart point about offering small add-ons – people definitely feel more connected when they have something physical to take away. It’s great to see how merchandise can be used as a subtle form of promotion too.
Thanks for reading and sharing your thoughts!
You are so right. Physical merchandise serves as a fantastic ongoing promotional tool for non-profits. Whenever someone wears a branded shirt or uses a mug, it creates a personal connection while spreading awareness for the cause wherever they go.
Appreciate you dropping by the blog! -Nikki