Bulk exporting Shopify metafields made simple

Shopify metafields store custom product data that standard fields can't hold. When you have a large catalogue, managing that data product by product is genuinely slow.
Most Shopify stores accumulate metafields across dozens or hundreds of products over time. These fields hold data that the standard Shopify product fields simply can't store: things like materials, care instructions, sizing specs, warranty details, and custom labels. Keeping all of that data accurate and up to date is straightforward when you have a small catalogue. With a larger one, it becomes a real problem.
The usual approach is to export your product data as a CSV, edit the file, and re-import it. Shopify's built-in export does support metafields, but the process has friction points that add up quickly.
There's also a second approach worth knowing about: a spreadsheet-based method that lets you bulk export and edit Shopify metafields without the export and import cycle entirely.
This article covers how the native Shopify CSV export works for metafields, where it falls short, and how Setary solves the problem by displaying products and metafields in an interactive spreadsheet editor.
What are Shopify metafields (and why would you want to export them)?
Shopify metafields are a way to store extra product data beyond the standard fields Shopify provides. A metafield holds information like ingredients, dimensions, warranty details, care instructions, or custom labels. Third-party apps also use metafields to store data such as Google Shopping attributes or imported review scores.
Common use cases include product specifications for technical items, custom descriptions for specific sales channels, and SEO fields added by apps. Each metafield sits within a namespace and key structure, so a single product can carry many separate metafield values.
There are a few reasons you might want to export Shopify metafield data. Auditing data quality across a large catalogue is one. Migrating to a new store is another. Mass updates and feeding data into external systems or ERPs are also common scenarios. Whatever the reason, Shopify doesn't include metafields in its default product export without some extra setup first.

How to export metafields using Shopify's native tools
Using the Shopify admin export
Shopify's built-in product export does include metafields, but only when metafield definitions have been created in the admin first. To set those up, go to Settings → Custom data → Products and add your definitions there.
Once your definitions exist, those metafields appear as columns in the exported CSV. The column headers follow a namespace.key format, so a metafield with namespace "my_fields" and key "material" appears as my_fields.material in the file.
To run the export, go to Products in the Shopify admin and click 'Export'. Select 'All products' or a filtered set, choose CSV format, and download the file. Your defined metafield columns will be included alongside standard product data.
Limitations of the native export method
The native Shopify CSV export works, but it has several friction points worth knowing about before you rely on it:
- Only metafields with formal definitions in the admin appear in the CSV. Legacy metafields or those created by third-party apps may not show up.
- Large catalogues with many metafield columns produce unwieldy files that are slow to work with in Excel or Google Sheets.
- Once you've edited data in the Shopify metafields CSV, you have to re-import it. Shopify's importer has known quirks and failure points.
- A bad import can overwrite existing data unintentionally if columns aren't mapped correctly.
- There's no live preview. You can't see the effect of your changes until after the import completes and you check the results manually.
The full export, edit, and re-import cycle involves downloading the file, opening it in a spreadsheet app, editing carefully, saving as CSV again, re-uploading, and then checking for errors. Each of those steps is a place where something can go wrong.
That said, the native method does have valid uses. If you only need a file for analysis or handoff to a developer, it works fine. The problem comes when you need to edit metafields and push those changes back into Shopify on a regular basis.
There's a different approach that keeps the spreadsheet experience but removes the import and export steps entirely.
A better way: Edit Shopify metafields in a spreadsheet without exporting
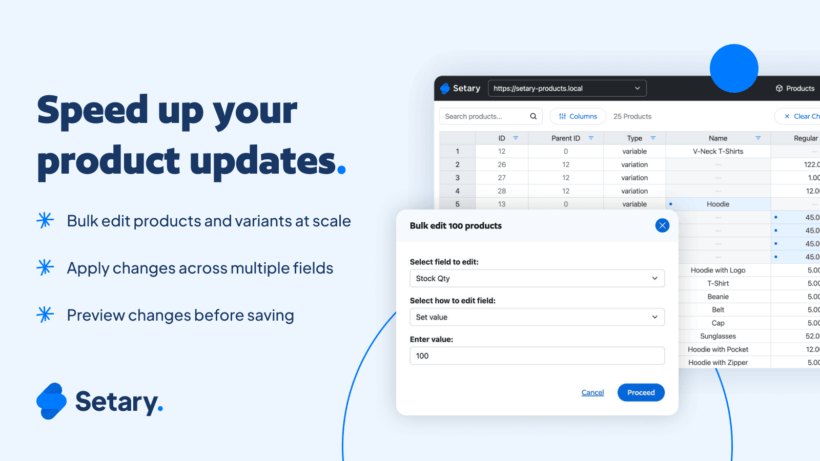
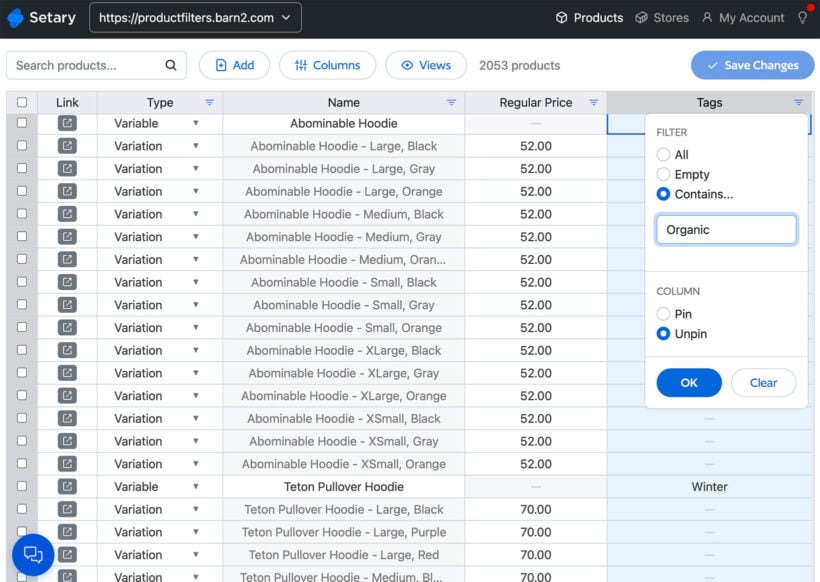
Setary is a Shopify app that gives you a spreadsheet-style editor for your entire product catalogue, including metafields. Your product data loads directly into a spreadsheet interface inside the app. No export is needed.
You edit data in the spreadsheet cells just as you would in a CSV file. Titles, prices, descriptions, and metafields are all editable from the same view. Changes sync back to your Shopify store automatically. There is no import step and no re-uploading of any file.
Metafields appear as their own columns in the spreadsheet. You can see and edit all metafield values across all products at once, which makes bulk editing Shopify metafields much more direct than the CSV method.
Why skipping the export and import cycle matters
The spreadsheet experience in Setary is familiar. Rows and columns, copy-paste, updating data and metafields across multiple products at once. The difference is that the sync removes all the steps that create errors in the traditional CSV workflow.
There's no saving as CSV, no re-uploading, no column mapping, and no checking import logs for failures. The risk of accidentally overwriting data with a bad import is gone. Changes apply directly.
This approach works well for a range of situations:
- Updating metafields across a specific product type or vendor without touching the rest of your catalogue.
- Making changes across hundreds of products at once using copy-paste across rows.
- Migrating data between stores by editing values directly in the spreadsheet rather than managing files.
- Regular ongoing maintenance by SEO teams, catalogue managers, or store owners doing seasonal updates.
The key difference from the native Shopify export is that Setary lets you update Shopify products and sync those changes without the export and re-import cycle. I find that for anyone maintaining custom product data regularly, this is a significant time saving.
How to export metafields in Setary: Step by step
The process of exporting Shopify metafields via Setary is straightforward. Here's how it works:
- Install Setary. Install the Setary app on your Shopify store. You'll find it in the Shopify App Store.
- Connect your store. Setary connects to your Shopify store and pulls in your full product data, including all standard fields.
- Open the product spreadsheet. Your products load into the spreadsheet view. Each product is a row, and each field is a column. This is your Shopify product spreadsheet.
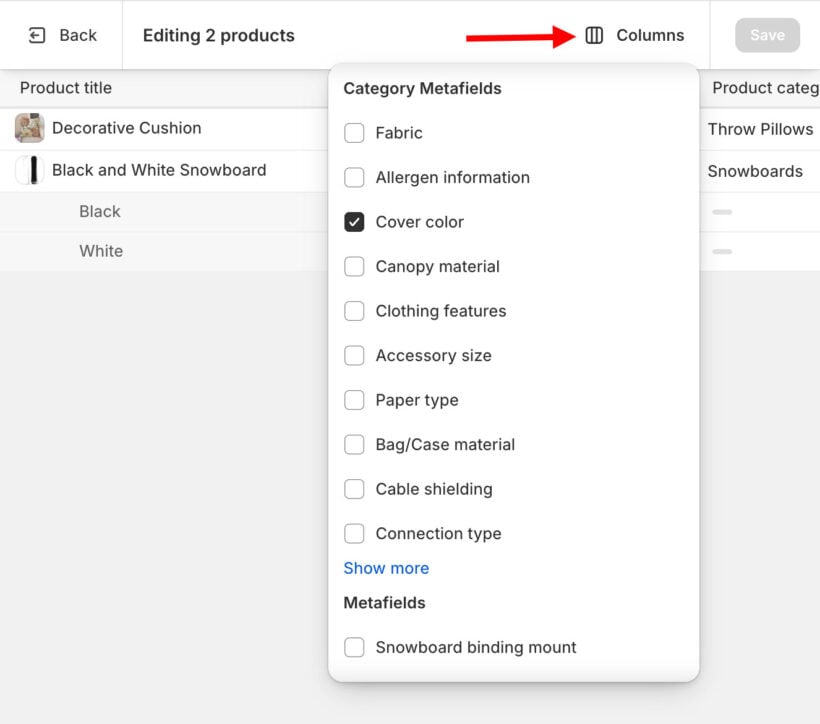
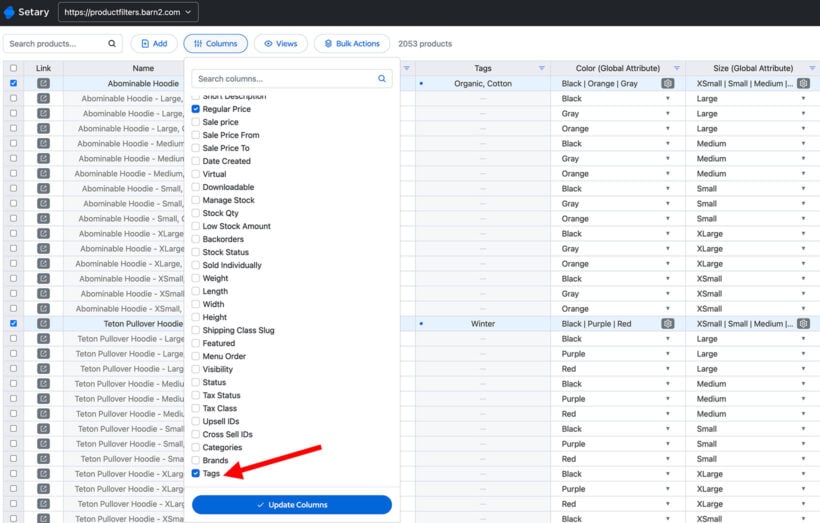
- Add metafield columns. Select which metafields you want to display. Your defined metafields appear as column options. Add as many as you need to the view.
- Edit metafield values. Click into any cell to edit it. Use copy-paste to apply the same value across multiple rows, or edit individual cells. This is where you can edit Shopify metafields in bulk across your full product range. Changes save automatically.
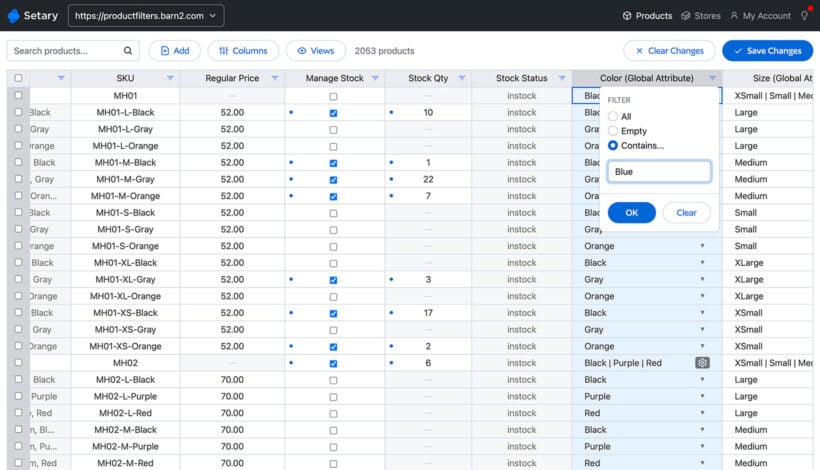
- Filter and sort to focus your edits. Use filters to narrow down to specific product types, vendors, or collections before editing. This is useful when you only want to update metafields for one section of your catalogue.
- Changes sync automatically. There is no import step. Your Shopify store updates as you work. You can check results immediately in the Shopify admin.
This process works for products across your entire catalogue, not just a filtered subset. You can work across all products at once or focus on a specific group using the filter tools.
When to use the native export vs. Setary
Both methods have their place. Here's a practical guide to which one makes sense for your situation.
Use the native Shopify CSV export when:
- You need a one-time data backup of your entire product catalogue, including metafields, stored as a file.
- You're handing data off to a developer or a third-party tool that specifically requires a CSV file format.
- You only need to export metafield data for analysis in Excel or Google Sheets, with no intention of re-importing the file.
Use Setary when:
- You need to export metafield values across many products and want updates to apply immediately without a separate import step.
- You want the familiarity of a spreadsheet without the export and re-import cycle adding risk to your edits.
- You're migrating metafield data to a new store or doing regular ongoing maintenance of custom product data.
- You want to reduce the risk of import errors overwriting existing product data unintentionally.
For anything involving actual editing and re-applying metafield data, Setary is the more practical choice. The native export is useful for one-off file needs. For regular work with Shopify metafield data, the sync-based approach saves a lot of time and removes a real source of errors.
Which method will you use to update metafields in Shopify?
If you need a file for external use or a one-time backup, the native Shopify export does the job. If you're actually editing metafields and want those changes to apply without an import step, Setary is the more practical option. It gives you the spreadsheet experience without the risk of a bad re-import overwriting your data.