Best methods to bulk edit Shopify collections

Discover every method to bulk edit collections in Shopify, from native tools and CSV imports to spreadsheet-style apps that handle thousands of products at once.
When merchants search for "bulk edit collections Shopify," they usually want one of two things. Either they need to edit collection properties like titles and SEO fields, or they want to control which products appear in each collection. Both are covered here.
Most people don't realize that while Shopify does let you bulk-add products to collections, the native tools get painful once you pass a few hundred products. This guide covers faster methods that scale.
We'll start with Shopify's native tools for editing collection properties and adding products to collections. After that, we'll cover Setary for spreadsheet-style bulk management, CSV for large-scale reorganizations, and specialized apps for migrations.
Method 1: How to bulk edit collection properties
Bulk editing Shopify collections through the native admin gives you two options: editing collection settings, and controlling which products belong to each collection. Let's look at both.
Bulk editing collection settings
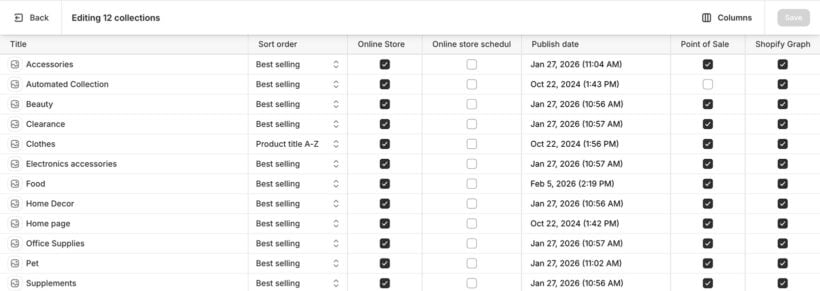
Navigate to Products → Collections, select the collections you want to change, and click 'Bulk edit'. From the spreadsheet view, you can update data such as:
- Title and sort order.
- Template assignments.
- Sales channel visibility (Online Store, Point of Sale).
- SEO fields including page title, meta description, and URL handle.
This is useful for quick presentation tweaks across collections. However, it won't help you move products between collections.
Adding products to collections
- Go to Products → All Products, select the items you want, and choose 'Add to collections' from the actions menu.
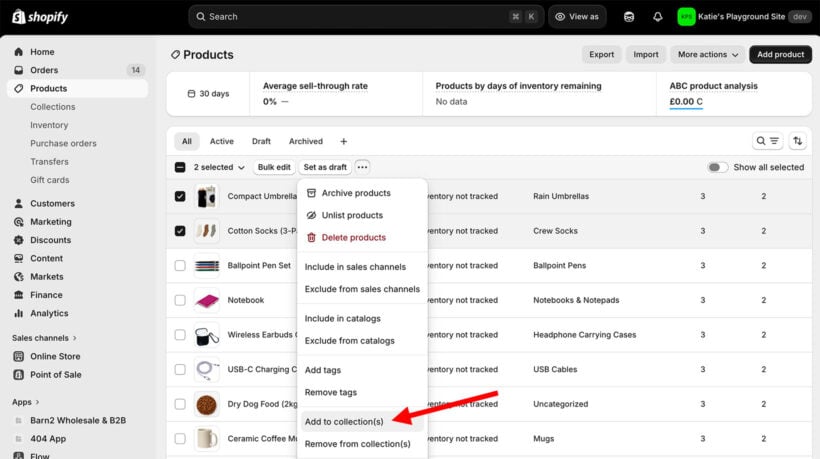
- Select the collection(s) that you wish to add the selected products to.
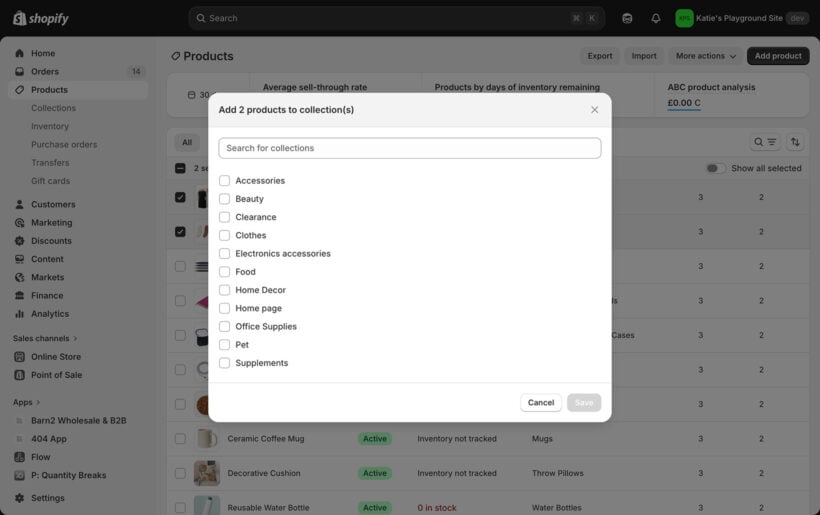
This works fine for small batches but gets tedious once you pass 100 products.
Creating automated collections
A smarter approach is to use automated collections. These automatically add products meeting certain criteria to a collection - for example, if the product has a particular attribute such as a tag, metafield, product type, or vendor.
- In the Shopify admin, go to Collections → Add collection.
- Enter the name and other details for the collection .
- Set the 'Collection type' to 'Smart'.
- In the section below, select the conditions in which a product will be automatically added to the Shopify collection:
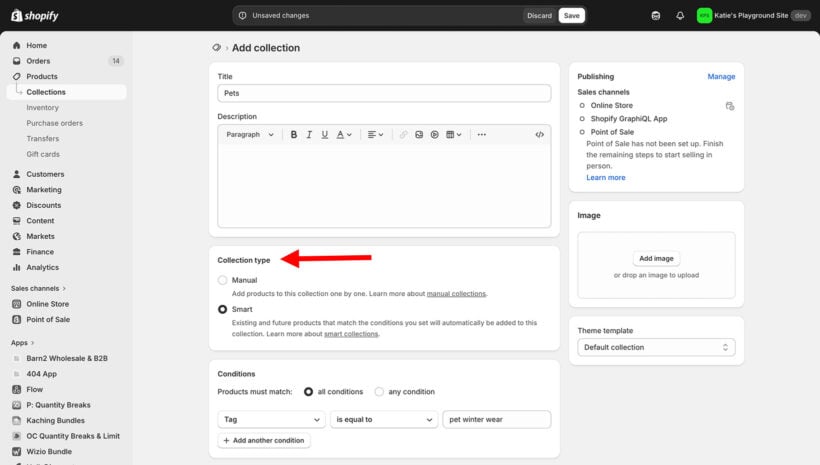
This works well in some circumstances. However, there are limitations. For example, the above screenshot will add all products with the "pet winter wear" tag to the "Pets" collection. However, the logic isn't sophisticated enough to add all products with tags containing the word "pet" to the collection - you'd need to enter every tag individually 🥱. To do that, you'd be better off using a bulk edit collection tool like Setary and filtering for all products containing the word "Pet" in the tags column.
There are also other disadvantages. Using native Shopify to add products to collections hits the same limitations for large catalogs whether you use the bulk editor or smart collections. The pagination limit means you're clicking through pages of 50 products at a time. There's no preview, no undo, and no way to see your changes before they go live. If you need to bulk edit collections across hundreds of products, the native editor becomes painfully slow. For anything beyond occasional updates on a small catalog, you need more control.
Method 2: Bulk edit with Setary for spreadsheet-style control
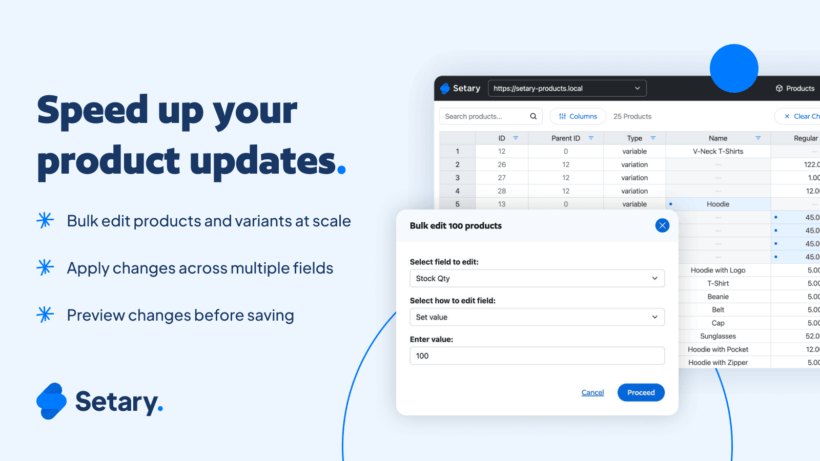
Setary is a spreadsheet editor that connects directly to your Shopify store. It lets you bulk edit collections in Shopify without the disadvantages of the native editor or the export-import cycle of CSV files.
Simply select products using Setary's advanced filtering system, and bulk add them to collections. Finally, you preview your changes and then instantly sync with your Shopify store in real time so that you see results immediately ⚡️
What Setary handles
- Assign products to multiple collections simultaneously.
- Bulk edit product metafields and tags that drive automated collection membership.
- Filter products by collection, then edit their properties in one view.
- Direct collection assignment with immediate sync to your live store.
Why a spreadsheet approach works better
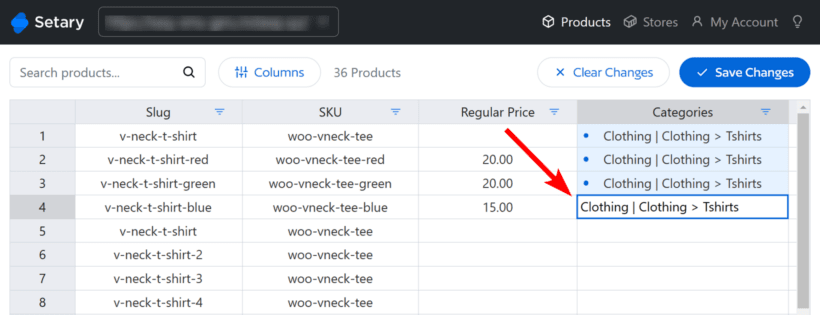
The familiar spreadsheet layout means there's almost no learning curve if you've used Excel or Google Sheets. You can edit hundreds of products in a single session, modifying tags, collection assignments, and product data all at once. There's no 100-item pagination wall to deal with. And unlike Shopify's native bulk editor, Setary lets you preview changes before applying them to your live store.
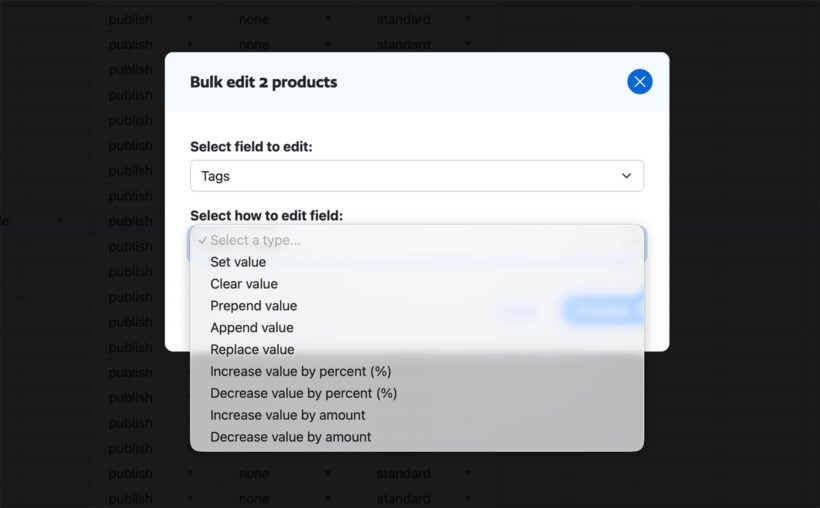
In addition to bulk adding products to collections in the spreadsheet, you can do it using a range of bulk actions. This saves even more time:
Most store owners tell us they switched to Setary because clicking through pages of products was eating up their entire afternoon. The spreadsheet view turns hours of work into minutes.
Katie KeithFounder & CEO
Compared to CSV import/export cycles, Setary is faster for iterative work. CSV mistakes mean starting over from scratch. Setary lets you undo changes and roll back if something goes wrong.
When Setary is the right choice
If you're managing products across multiple collections on a regular basis, Setary saves significant time. Seasonal reorganizations, rotating promotions, and weekly collection updates all become straightforward. Bulk editing product tags for automated collection membership is especially quick in the spreadsheet view.
I'd suggest sticking with native tools for occasional small edits, and switching to Setary when collection management becomes part of your regular workflow.
Method 3: Use CSV for large-scale collection management
CSV import and export works well for specific scenarios where you need to bulk edit collections in Shopify at a massive scale. It's not the most user-friendly method, but it handles situations that the native collection editor can't.
When to use CSV
- One-time store migrations from another platform.
- Major catalog reorganizations where a developer is involved.
- Combining product data from multiple external sources.
The basic CSV workflow
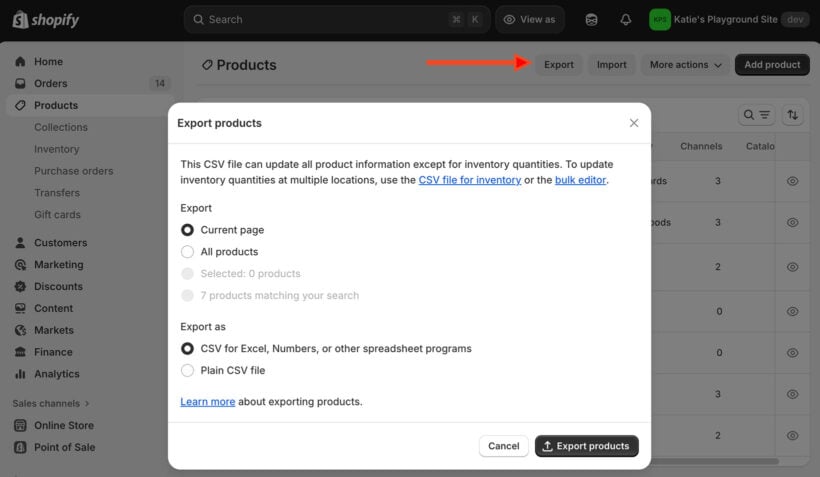
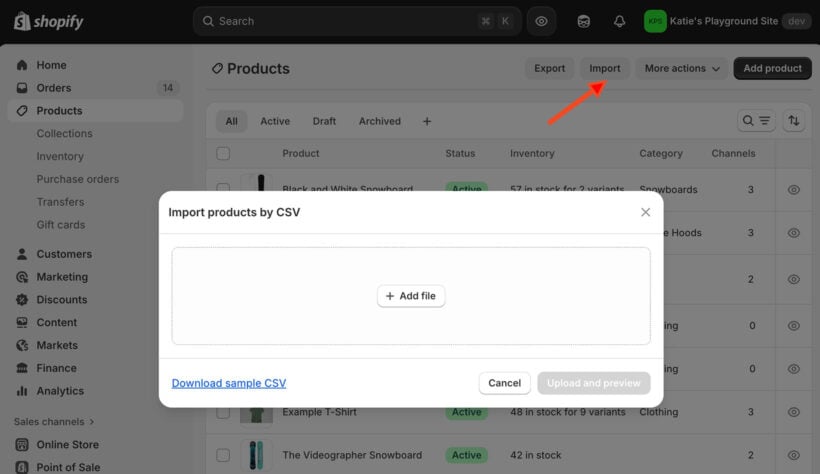
- Export your products to CSV from Products → Import/Export.
- Add a 'Collection' column if it's missing.
- Enter collection names for each product row. Products get added to that collection on import.
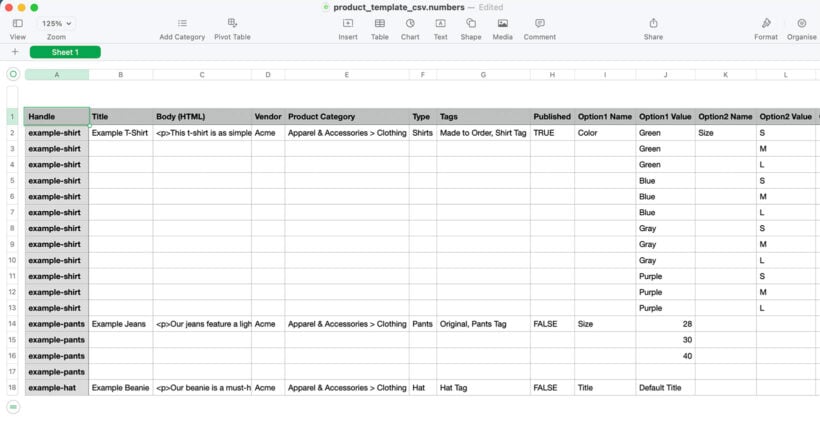
- Import the CSV and select the option to replace existing products with the same handle.
Use find-and-replace in your spreadsheet app for mass updates. Swapping a vendor name across thousands of rows takes seconds in Excel.
As you can see, the CSV workflow goes: edit, save, upload, wait, check for errors, fix them, and repeat. Even small formatting mistakes can cause import failures.
In contrast, Setary lets you edit and see changes instantly. When a CSV mistake happens, you're starting over from the beginning. Setary's preview feature means one wrong move doesn't ruin your afternoon. That's why I would always prefer to bulk edit collections using Setary rather than CSV.
Other Shopify bulk editing apps for specialized needs
For specific use cases beyond regular collection management, these Shopify apps handle niche scenarios well:
| Scenario | App | What it does |
| Moving from another platform? | Matrixify | Handles full store migrations with preview before applying changes. |
| Running flash sales weekly? | Ablestar Bulk Product Editor | Schedules automatic price changes with one-click undo. |
| Need hands-off automation? | Shopify Flow | Auto-tags products and assigns collections based on rules. |
These apps work well for specialized tasks like variant metafield updates, scheduled reversions, or data migrations. But for day-to-day collection management, Setary gives you the spreadsheet control you need without the complexity of migration tools or scheduling systems.
Choose the right method for bulk editing your Shopify collections
Picking the right way to bulk edit Shopify collections depends on how often you do it and how many products you manage. Here's a quick decision framework:
- Occasional small edits?Shopify's native tools work fine for one-time updates under 100 products. Use the bulk editor for collection settings or tag products for automated collections.
- Regular collection management?Use Setary. Weekly updates, seasonal reorganizations, or catalogs over a few hundred products all benefit from its spreadsheet interface, live preview, and undo features.
- One-time migration?CSV or Matrixify make sense when you're importing from another platform and won't repeat the process.
The key insight is that most collection management means editing products, not collections. Whether you're tagging products for automated collections or assigning them directly, get the product data right and the collections follow.
For stores where bulk editing collections is a regular task, Setary transforms the process. Get started with Setary's safe, user-friendly bulk editing today.