Bulk import large product catalogs to Shopify via CSV

Learn how to prepare, format, and troubleshoot a Shopify CSV import for bulk product uploads, plus a faster alternative for ongoing catalog management.
Shopify CSV imports promise a fast way to add products in bulk. The reality is often different. Imports show "successful" while leaving your catalog empty, images missing, or stock counts completely wrong. The frustration is real, especially when you can't figure out what went wrong.
This guide covers how to properly format and import your product catalog via CSV. You'll learn the exact file requirements and how to handle variants and images. You'll also learn how to diagnose import problems when things go sideways.
CSV imports work well for one-time catalog setups, but they have real limitations for ongoing management. We'll also cover Setary - a modern spreadsheet-based syncing tool that eliminates the need for imports entirely.
How to bulk import large product catalogs with CSV
Step 1: Prepare your CSV file with proper formatting
People often ask "What format does Shopify require for CSV import?" Shopify accepts UTF-8 encoded CSV files under 15MB with specific column headers.
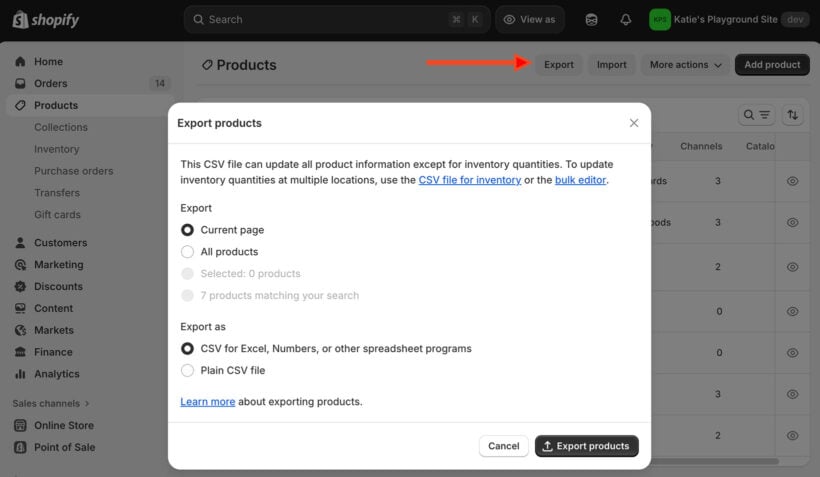
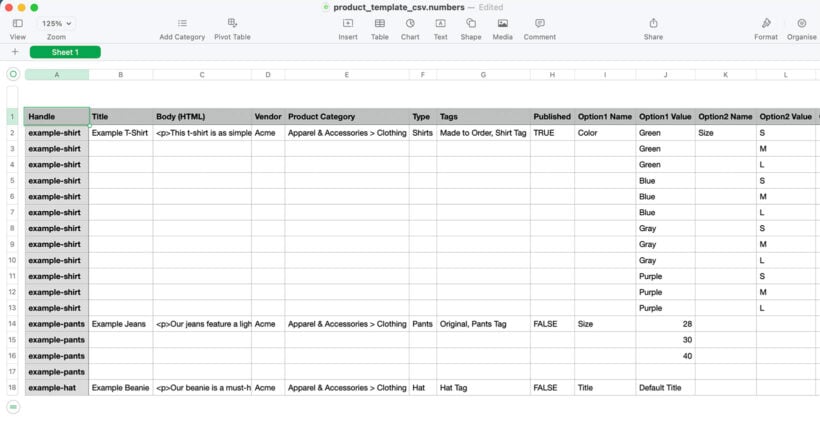
Start by downloading Shopify's sample CSV template. You can also export an existing product from your store by going to Products → Export. I find the most reliable approach is to create one product manually first, then export it as your template.
The only required column for new products is Title. For adding variants or updating existing products, you need both Title and Handle.
Handle is the unique product identifier and URL slug. It determines the product's web address in your store. Use only lowercase letters, numbers, and hyphens. No spaces or special characters. Each Handle must be unique across your catalog, or the import will fail.
Column headers must match Shopify's format exactly, including capitalization. For example, "option1 Name" and "Option1 Name" are different to Shopify. A single typo can block an entire column of data.
One of the trickiest behaviors in Shopify CSV imports is the difference between blank and omitted columns. A blank column actively erases that field during an "Overwrite" import. An omitted column preserves existing data. This catches many merchants off guard and causes accidental data loss for vendor names, descriptions, and other fields.
For large catalogs, split your file into smaller chunks. Keep backup copies of every version, and save your working template for future imports.
Step 2: Structure variants and images correctly
Are you wondering "How do I import products with variants to Shopify?" Variant rows share identical Handle and Title values with unique Option combinations. This creates multiple versions of one product in Shopify's catalog.
Each variant occupies its own row in the CSV. The first row for a product contains all the shared data: description, tags, product type, and vendor. Subsequent rows only need the Handle, Title, Option values, Variant SKU, Price, and Variant Inventory.
Every row needs unique Option1/2/3 Value entries. You can define up to three option types per product.
Including variant-level columns like SKU or price without the Option1 Name/Value columns is risky. Shopify may delete your existing variant structure with no warning.
For images, the Image Src column requires publicly accessible URLs. Local file paths will not work. Host your images on a server, CDN, or Shopify Files.
Add multiple images per product by creating additional rows with the same Handle. Use the Image Position column to control order: 1 is the main image, 2 is the second, and so on.
For example, a t-shirt variant in Small/Red would have the red image URL on its row. The Small/Blue variant would have the blue image URL on the next row. Keep option names and ordering consistent across similar products.
Step 3: Import and test your file
Before importing your full catalog, create a small test file with 5-10 rows of product data. Copy the structure from your exported template exactly.
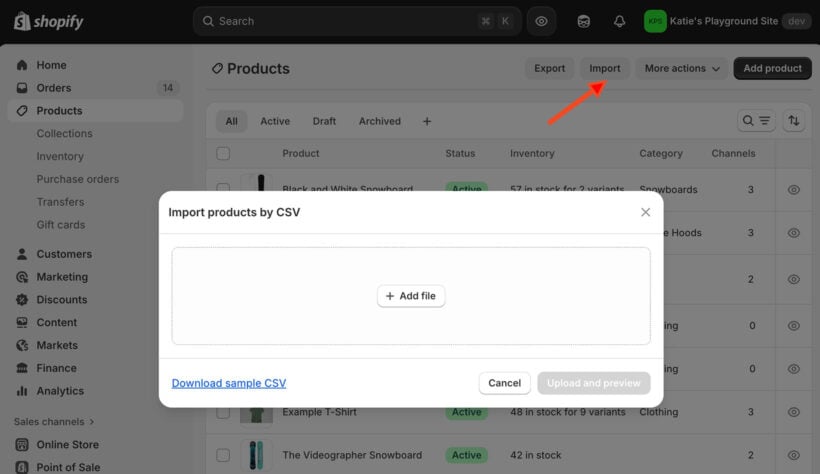
Navigate to Products → Import → Add file and upload your test CSV. Review the preview screen carefully. Verify that each column maps to the correct field before proceeding.
You can choose to publish products immediately or keep them as drafts. This is worth thinking about: publishing immediately makes products visible to customers right away, so drafts are safer for testing. Once an import starts, it cannot be cancelled. Every row will process regardless of errors found partway through.
Check your confirmation email right away. It contains links to specific row errors that the import summary screen may not show. After the import completes, audit your products. Verify that products are visible, images display correctly, stock levels are accurate, and variants are structured properly.
Once your test file imports successfully, scale up to larger batches. Consider doubling the file size with each attempt rather than jumping straight to the full catalog. If you have access to a development store, use it to test full imports before touching your live catalog. Always review both the import summary and the email report before retrying a failed import.
Tip: Shopify does not support native order CSV import. For importing order history, use apps like EZ Importer or Matrixify.
Step 4: Manage inventory during and after import
How do I update Shopify inventory without overwriting stock? Use Shopify's inventory CSV file instead of the product CSV. The inventory CSV updates only stock levels at specific locations without touching product data. This prevents the overwrites that occur when updating inventory through product CSV imports.
Include initial inventory quantities in your product CSV during the first import. After your store is live, switch to the inventory CSV for all stock updates.
The product CSV can reset inventory counts when you edit unrelated fields like titles or descriptions. This happens because Shopify treats every included column as an intentional update. The inventory CSV avoids this by updating only quantities at specific locations, leaving all other product data untouched.
If you sell from multiple locations, each location needs its own row with the location name specified. The Variant Inventory Policy column controls out-of-stock behavior. Set it to "deny" to prevent overselling, or "continue" to allow backorders.
The best practice is simple: use the product CSV for product data and the inventory CSV for stock updates. Mixing the two is where most merchants run into problems.
Safer bulk editing: Skip CSV import entirely with Setary
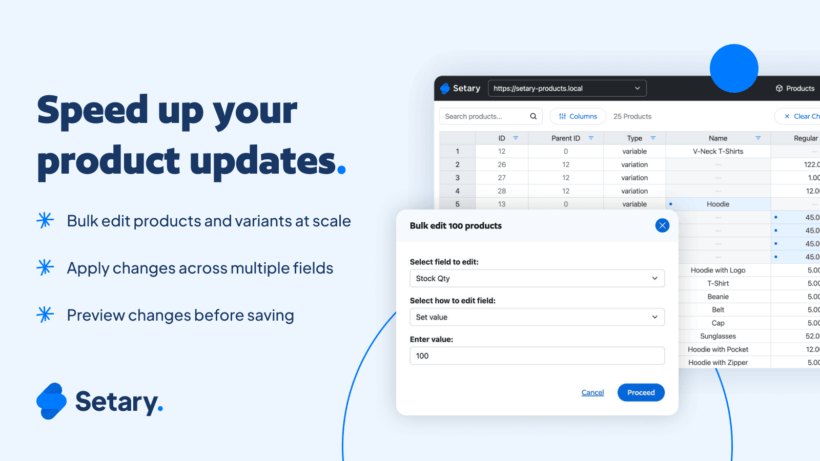
Setary brings spreadsheet-style bulk editing of product data directly into your Shopify store. No more downloading, formatting, and re-importing CSV files. You add, duplicate and edit products in a familiar grid layout that saves changes to Shopify in real time.
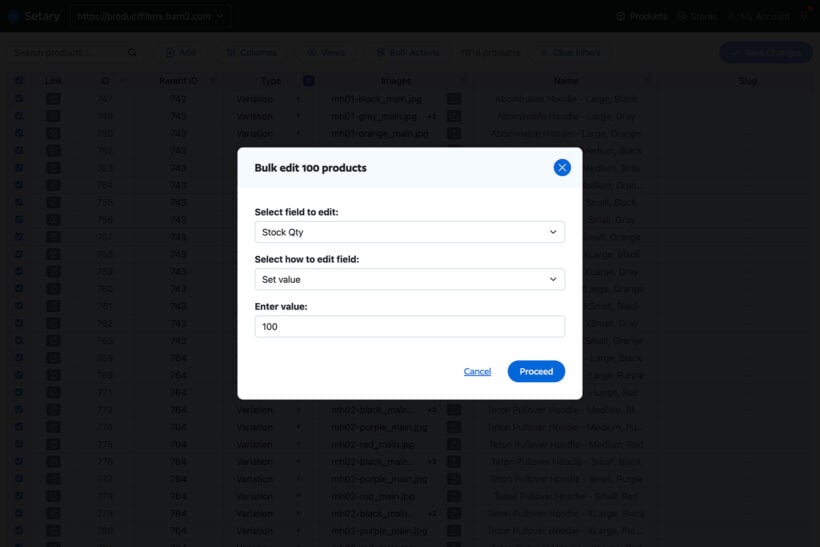
You can clone and then edit hundreds or thousands of products at once. Bulk edit product variants within the same spreadsheet without clicking through individual parent products.
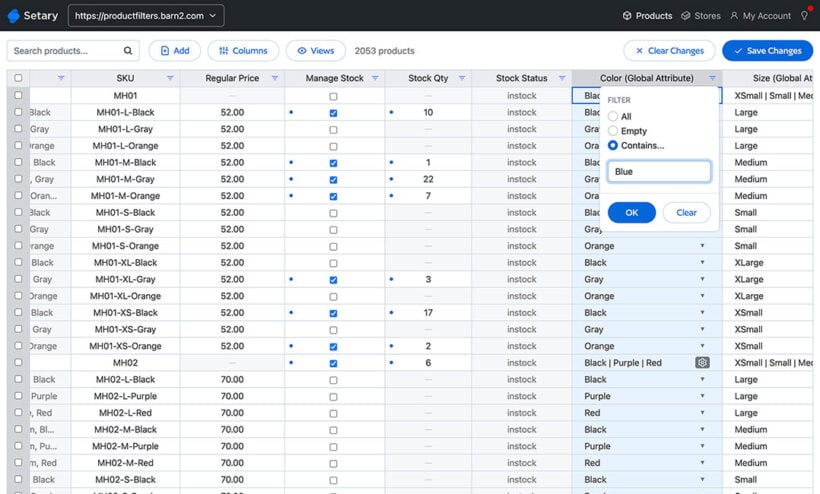
Copy-paste supplier data without worrying about CSV formatting. Drag-fill updates entire columns instantly, just like Excel. You can see existing data before making changes, which eliminates the blank-column overwrite problem that plagues CSV imports.
Filter and search products by any field to target specific segments for updates. Save your favorite filter combinations as "Views" to save time on future sessions.
For merchants managing large catalogs, the time savings add up fast. CSV preparation, testing, and troubleshooting can eat hours. With a live spreadsheet connected directly to your store, the same work takes minutes instead.
Common errors and solutions
People often ask: "Why does my Shopify CSV import show successful but no products?" Of course, this problem won't happen if you're using Setary, However, if you're using the built-in Shopify CSV importer then a successful import with no visible products has several common causes. For example:
- Column headers may not match exactly.
- Handles may contain invalid characters.
- All rows may be variants without a parent row.
- Products may have draft status.
- Required fields may contain blank values.
Shopify displays a "successful" banner even when individual rows fail. This is one of the most confusing parts of CSV imports. The banner means the file was processed, not that every row imported correctly. Check your confirmation email immediately for row-by-row error details.
Here are the most common failure causes:
- Duplicate handlesThese fail unless "Overwrite" is enabled. Each handle must be unique.
- Column header typosHeaders are case-sensitive. A single wrong letter blocks the entire column.
- Invalid handlesHandles with spaces, special characters, or starting with numbers will fail.
- Missing parent rowsAll variant rows without a parent row (the first row with base data) will fail.
- Draft or archived statusProducts set to draft or archived won't appear in your storefront.
- Blank required fieldsMissing Handle or Title values cause Shopify to skip those rows.
- Encoding issuesNon-UTF-8 encoding displays special characters as garbled symbols.
- Unexpected charactersCommas in text fields or unescaped quotes break CSV parsing. Surround text containing commas with quotes.
- Blank columns in overwritesIncluding a blank column during an overwrite import erases that data. Only include columns you intend to change.
Fix sequence: review the error report and fix the specific failing rows. Then re-test with a 5-10 row file before importing the full batch.
The pros and cons of CSV bulk import in Shopify
When CSV imports work well
CSV imports are ideal for one-time catalog setups, such as new store launches or platform migrations. They work best when you have clean, properly formatted data from a supplier or another platform export.
There are no monthly costs involved since CSV import is native Shopify functionality. You get full control over every field before the import runs. You can prepare and review everything offline before making any live changes. For stores with stable catalogs that rarely need updates, CSV may be all you need.
When CSV imports fall short
CSV imports require a deep understanding of Shopify's specific file structure. The multi-row variant format confuses most merchants, even experienced ones.
The "successful" import banner hides row-level failures. You have to dig through logs and emails to find actual errors. Preparation is time-consuming: formatting handles, setting encoding, structuring variants, hosting images externally.
There is no real-time feedback during the import. Errors only appear after everything has processed. The blank-vs-omitted column behavior creates real risk of accidental data loss. For frequent updates like daily inventory changes or seasonal pricing, the export-edit-import cycle becomes unmanageable quickly.
Sorting in Excel or Numbers can corrupt data and break image links. The 15MB file size limit creates problems for large catalogs with rich product data. There is no visual confirmation before the import goes live. You are working blind until the results come in.
When Setary is the better choice

Setary makes sense for merchants who have struggled with CSV imports or experienced repeated failures. It works especially well for catalogs that need frequent updates. Think daily inventory adjustments, weekly pricing changes, or seasonal promotions.
Teams without CSV expertise can start editing products immediately in Setary's familiar spreadsheet interface. Complex variant structures with multiple options and many SKUs are handled automatically.
If you manage inventory across multiple locations, Setary lets you update stock levels without the risks of CSV overwrites. You see live data during every change, which prevents costly mistakes before they happen. Immediate visual feedback means you catch problems in the moment rather than discovering them in an error email hours later.
Merchants migrating from spreadsheet-based platforms will feel at home in the grid interface. Multiple staff members can make updates without needing CSV training or technical knowledge. If you previously hired freelancers or agencies for routine product updates, Setary removes that dependency entirely.
A free trial is available, so you can test it against your actual catalog before committing.
Get your products live with the right approach
You now understand the key requirements for a successful Shopify CSV import. That means UTF-8 encoding, exact column headers, properly formatted handles, and correct variant structure. Import summaries and confirmation emails give you the details you need to troubleshoot failures quickly.
CSV imports work well for one-time catalog setups with clean data. For ongoing management, frequent updates, or complex variants, Setary's spreadsheet interface eliminates the import complexity entirely. See your existing data before making changes, update thousands of products instantly, and skip the download-format-upload cycle.
Choose the approach that matches your technical comfort level and update frequency. Ready to skip CSV headaches? Try Setary and get your catalog live faster.