How to bulk edit inventory on Shopify in minutes

This guide shows you how to bulk edit inventory in Shopify using three proven methods: native tools, CSV imports, and third-party apps like Setary.
You need to update hundreds of product quantities fast. But one wrong number can trigger oversells, angry customers, and a damaged reputation. I've seen this tension play out in three common scenarios that every store owner eventually faces:
- First, there's the flash-fix scramble. Your sale went live with wrong stock counts and support tickets are flooding in. Customers are ordering products you don't have. Every minute costs money and trust.
- Second, there's the planned launch. A new shipment arrived yesterday. You need to update 500+ SKUs before tomorrow's email campaign goes out. The warehouse team sent a spreadsheet, but inputting those numbers into Shopify feels like a full-time job.
- Third, there's automated workflows. Daily inventory syncs between your warehouse and your Shopify store need to run without manual checking. When these break, the consequences cascade through your entire operation.
Luckily, there are three ways to bulk edit inventory in Shopify. Keep reading to discover them all and choose which is best for your store.
TL;DR - What are the three ways to bulk edit inventory in Shopify?
Bulk editing inventory in Shopify can be done through three main methods:
- You can use the native bulk editor for up to 50 products at once.
- You can use CSV import/export for unlimited products. This does the job, but is fiddly and time-consuming.
- Or you can use third-party apps like Setary for spreadsheet-style inventory updates with advanced features.
We'll explore each of these inventory management methods in detail. You'll learn why Setary solves the limitations of native Shopify tools and CSV workflows. We'll also cover best practices that prevent costly inventory editing errors.
Why bulk editing inventory in native Shopify is complex
Here's the root challenge: Shopify manages all inventory at the variant level, never at the parent product level. A "simple" t-shirt becomes 20 separate inventory entries when you have 5 colors and 4 sizes. This creates an exponential increase in the data points you need to bulk edit.
Shopify doesn't have an "update all variants" button. Instead, each variant requires individual attention. This architecture helps with accuracy but makes bulk updates tedious. It explains why that "quick" 30-minute task becomes a 3-hour marathon when you're managing a real product catalog.
I find that many store owners don't realize this until they're knee-deep in product updates and feeling overwhelmed. Understanding this variant-level structure helps you choose the right method for bulk editing inventory in Shopify. The method that works for 20 products fails completely at 200.
There are similar problems if your inventory include large numbers of non-variable products. The sheer amount of data is a huge amount to handle, and Shopify's native bulk edit tools are very limited.
How do I bulk edit inventory in Shopify?
Bulk editing inventory in Shopify is a method of updating multiple product quantities at once through the admin's spreadsheet-style interface. Instead of editing products one by one, you select multiple items, open the bulk editor, and modify inventory values in a grid format. This approach saves significant time for stores with more than a handful of products.
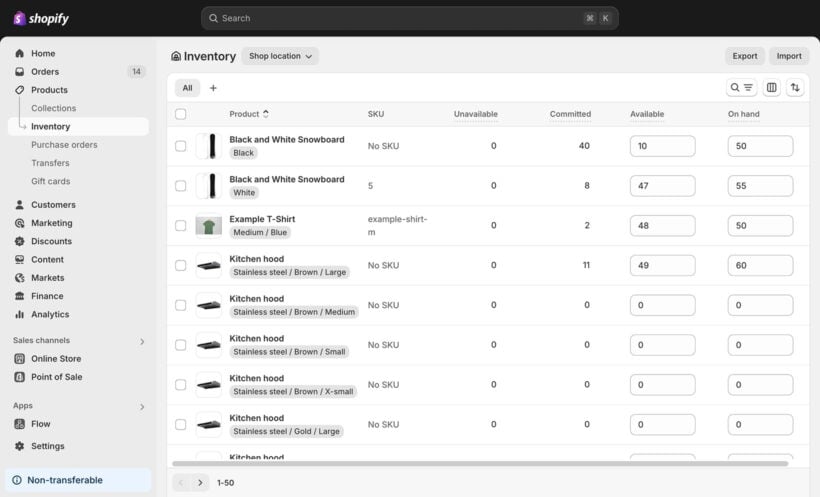
To bulk edit inventory levels in Shopify, go to Products → Inventory and update the quantity as needed.
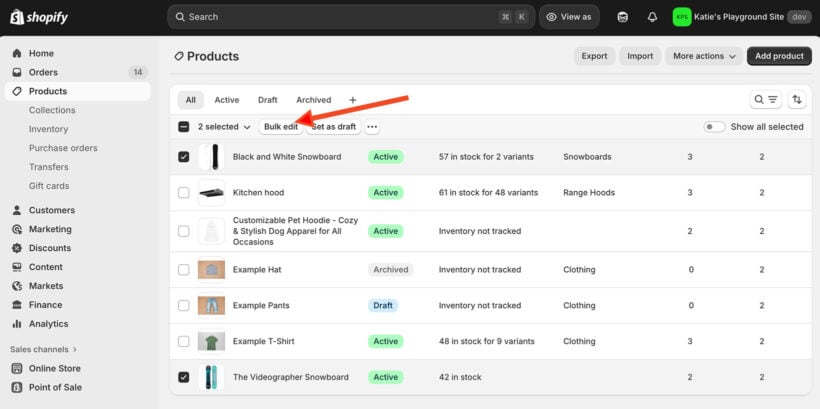
Shopify also has a basic bulk product editor for updating other types of inventory data beyond stock management, such as price. To access it, navigate to Products → All products in your Shopify admin. Select items using checkboxes (up to 50 at once). Click 'Bulk edit' to access the spreadsheet-style interface.
The bulk inventory editor lets you change quantities by clicking into cells and typing new values. You can use the drag handle to copy values down multiple rows. Copy and paste works too. These familiar spreadsheet actions make quick edits straightforward.

Save your changes with the button at the top right. This applies all updates simultaneously to your live store. Always double-check your entries before saving since there's no undo button.
How can I bulk edit product quantities of variants?
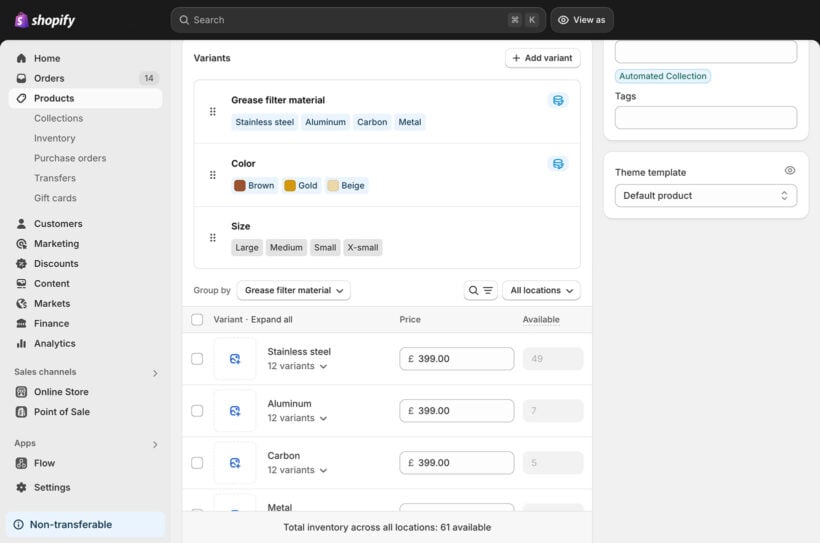
As you can see above, Shopify's bulk inventory editor lists each product and variant separately. Since Shopify has no parent-level inventory, you must edit each variant individually. A shirt with 5 colors and 4 sizes means 20 individual inventory entries. There's no "set all variants to 100" option. This variant-level tracking provides accuracy but requires more work to update.
There are two ways to bulk edit variant stock in Shopify:
Method 1: Through the bulk editor
Go to Products → Inventory and enter the new inventory level for each variant, as shown in the screenshot above.
Note that variants set to not track quantity won't display on the Inventory page at all. If you can't find a variant, check its tracking settings first.
Method 2: Through the product editor
- Navigate to the product editor page of the parent product.
- Select all variants you wish to edit.
- Click 'Bulk Edit' to change variant inventory individually.
- Click 'More Options' (three dots) and select 'Edit quantities' to assign the same inventory amount to all selected variants at once.
What are the limitations of the native bulk editing capabilities?
Understanding Shopify's native limitations helps you decide when to use alternative methods. The built-in tools have several constraints:
- Hard limit of 50 products per bulk edit session.
- Page refreshes lose unsaved work instantly.
- No undo function after saving changes.
- Cannot view multiple locations simultaneously.
Variant-specific limitations add more friction:
- Variant quantities must be edited individually with no parent-level shortcuts.
- Each variant appears as a separate row in the editor.
- No way to update all variants of a product simultaneously.
- Must edit each size, color, and option one by one.
For stores with under 50 simple products, these limitations are manageable. Once your catalog grows, you'll need a better approach to bulk edit inventory in Shopify. I'll share two alternative methods with you next.
How do I bulk upload inventory to Shopify?
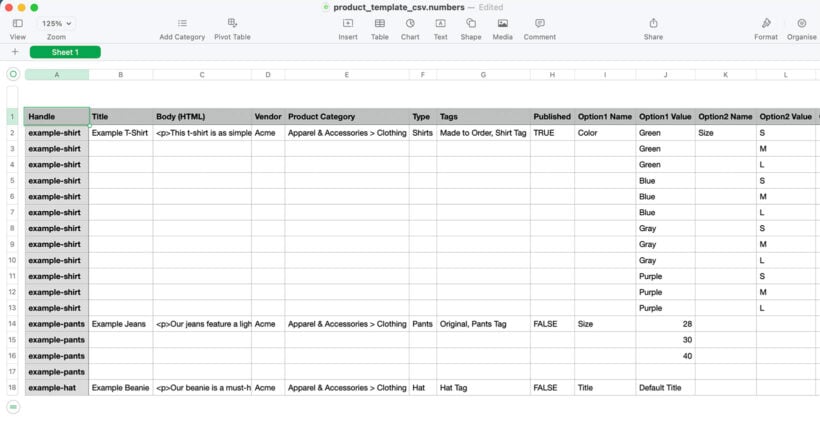
When people want to bulk upload inventory quantities to Shopify, they usually turn to CSV imports. A CSV file contains data that you created using a spreadsheet (e.g. Excel, Numbers or Google Sheets), such as products and stock levels.
The CSV method is Shopify's solution for large-scale inventory updates. Bulk uploading inventory to Shopify involves exporting your products to CSV format, modifying the 'Variant Inventory Qty' column with new quantities, then importing the file back through Products → Import. Select 'Overwrite any current products that have the same handle' to update existing inventory levels.
Each variant requires its own row in the CSV file. This matches Shopify's variant-level inventory structure.
The CSV method handles thousands of SKUs at once. It works offline, making it ideal for large-scale updates or migrations from other systems. Before making any changes, always export and save a backup copy in case you need to restore your original data.
Tip: Download a Shopify Sample CSV template to ensure your data format is correct.
The complete CSV workflow
Bulk importing inventory to Shopify from CSV lets you edit product quantities faster in a spreadsheet, outside of your store. It's safer because you can review and undo changes before uploading. However, the process requires close attention to detail. One formatting mistake can cause import failures or corrupt your product data.
It's also time-consuming because you have to export your products, update the inventory in the spreadsheet, and then re-import. That's why I prefer the Setary method, which we'll discuss in a minute.
The best time for CSV imports is during low-traffic periods. Schedule them before 10am or after 8pm to avoid conflicts with live orders. That's because if customers place orders during your import, inventory mismatches become almost inevitable.
Step 1: Export your current inventory
- Go to Products in Shopify admin.
- Click the 'Export' button.
- Select 'All products' or use filters.
- Choose 'Plain CSV' format.
- Save with a timestamp: inventory_2024_11_22.csv.
- Save a second copy as your emergency backup.
Step 2: Prepare your quantity updates
- Open the file in Excel or Google Sheets.
- Locate critical columns: Handle, Variant SKU, Variant Inventory Qty.
- Note that each variant appears as a separate row.
- Make your quantity changes per variant.
- Keep the file under Shopify's 15 MB limit.
Step 3: Import your updated inventory
- Navigate to Products → Import.
- Choose 'Overwrite any current products that have the same handle'.
- Click 'Upload and continue'.
- Review the preview carefully before confirming.
- Wait for the confirmation email.
How to bulk change inventory location in Shopify
For multi-location inventory, CSV files require exact column formatting. You must use 'Variant Inventory Available [Location Name]' with perfect name matching. One typo creates unwanted new locations in your system.
Each location needs its own column. Ten locations means 10 columns per variant to manage. The native bulk editor forces location-by-location updates through dropdown switching. This complexity multiplies with variants.
Consider a t-shirt with 20 variants across 5 locations. That's 100 individual cells to manage correctly. This is where tools like Setary become essential. They handle multi-location updates in a single view without the formatting risks.
Limitations and common errors with CSV imports
CSV imports offer power but come with significant risks. Here's why they can become problematic:
- Overwrites ALL product data, not just inventory fields.
- Accidentally blank cells erase existing information.
- Cannot make incremental adjustments like adding 10 to current stock.
- Processing takes 5 minutes to 2+ hours unpredictably.
- No way to pause or cancel once import starts.
- Store keeps selling during import, causing mismatches.
- Multi-location imports need perfect column naming or create new locations.
What causes Shopify CSV import errors?
CSV import errors most commonly occur from mismatched column headers. The system rejects files if headers don't match exactly, including capitalization and spacing.
"Variant inventory qty" fails while "Variant Inventory Qty" works. Hidden special characters from copying data between programs trigger cryptic error messages. Excel's auto-formatting converts SKUs like "00123" to "123", causing product mismatches.
Due to all this, bulk editing inventory via CSV isn't ideal. Next, I'll tell you about Setary: the live spreadsheet-based inventory manager that avoids these problems.
Transform your workflow with Setary's spreadsheet-style bulk editor
When native tools aren't enough, you need a better solution. After wrestling with Shopify's 50-product limits and CSV formatting errors, many merchants discover that third-party tools transform hours-long tasks into minutes.
The right tool eliminates the constraints that make bulk editing painful. This matters most for large catalogs, frequent inventory updates, and advanced editing needs.
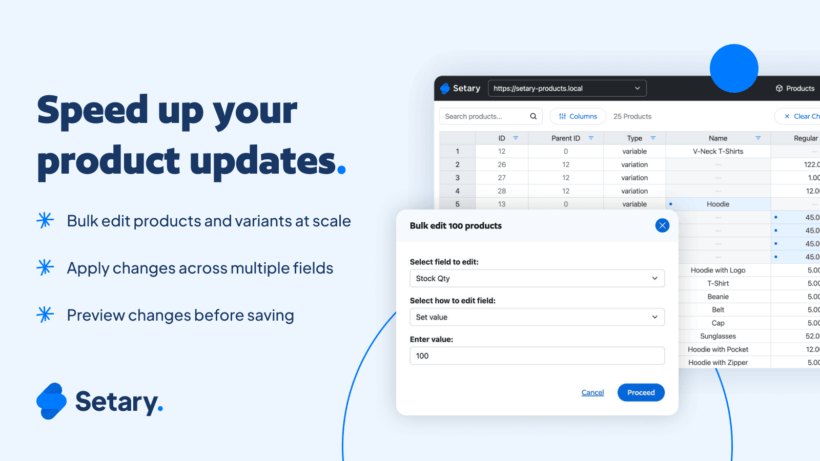
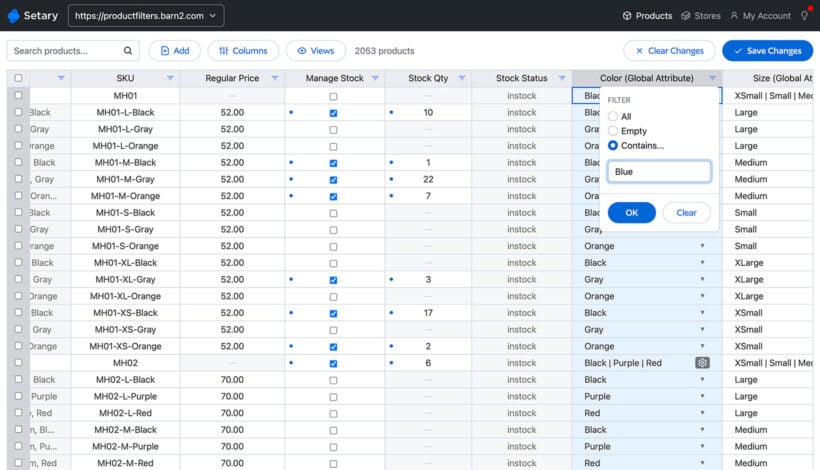
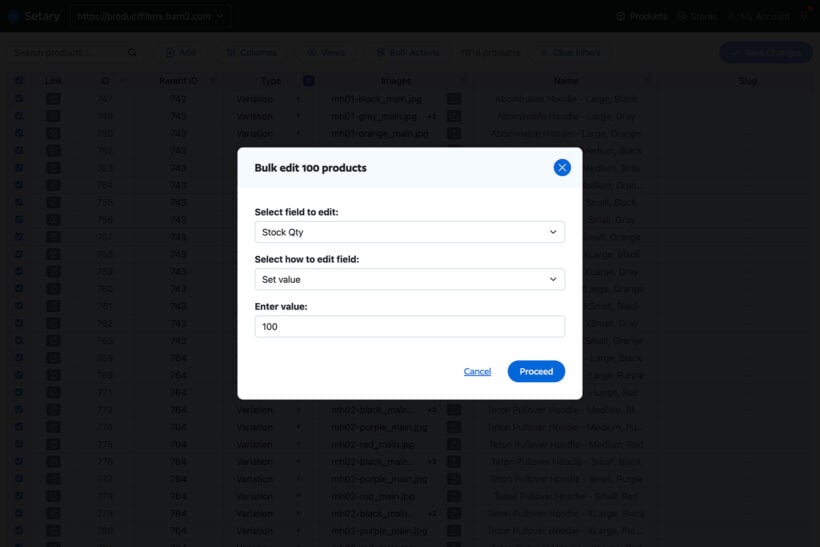
Setary is a powerful bulk editing tool that brings spreadsheet features to Shopify inventory management. You can edit hundreds of products and their variants as easily as updating a regular spreadsheet. No more clicking through endless pages to update inventory or wrestling with CSV formatting.
- See all your products, variants, and locations in one persistent view.
- Update inventory quantities directly in the spreadsheet.
- Filter multiple products and use bulk actions to update inventory for many variants at once.
- Create new products via CSV import or simply by adding or duplicating rows in the spreadsheet.
- No page refreshes, no losing your place, no browser crashes.
- Preview changes before they go live to catch mistakes early.
So far the best and fastest solution for product management. (with simple but useful features).
Setary userVerified Customer
How to bulk edit product quantities with Setary
Setary makes bulk editing inventory in Shopify straightforward. Here's how to edit stock with Setary:
- Install from the Shopify App Store or the Setary website.
- Open the bulk inventory editor spreadsheet. Your entire catalog loads in spreadsheet format automatically.
- Filter products and variants by any attribute you need.
- Either enter your inventory changes directly into the spreadsheet cells, or use the "Bulk actions" button.
- Preview before committing to catch any mistakes.
The interface feels natural if you've used Excel or Google Sheets. There's minimal learning curve because Setary uses controls you already know.
What makes Setary different
Setary offers features that native Shopify tools and CSV imports simply can't match:
- Percentage-based updatesIncrease all quantities by 20% with one action. No manual calculations needed.
- Smart filteringFind products with low stock instantly. Create saved views for daily inventory checks.
- Multi-select editingUpdate hundreds of variants simultaneously without pagination limits.
- Variant intelligenceEdit all sizes of a product in one view. See parent products and their variants together.
- Change historyTrack who updated what and when. Perfect for teams managing shared inventory.
- Queue processingSchedule updates for low-traffic times to minimize customer impact.
- Multi-store managementEasily switch and edit products for multiple locations from one dashboard.
Best practices for safe bulk inventory updates
Whichever method you choose to bulk edit inventory in Shopify, test your changes on a small batch of 5-10 products first. This catches errors before they affect your entire catalog. It's tempting to skip this step, but the time investment pays off when you avoid store-wide mistakes.
Schedule bulk updates during low-traffic periods. Early morning or late evening works best for most stores. Check your analytics to find your store's quietest hours. If something goes wrong, fewer customers will be affected.
Use tags and collections strategically to group products for easier selection. Create tags like "needs-restock" or "seasonal-items" for common update scenarios. This organization makes future bulk edits faster and reduces the risk of modifying the wrong products.
Document your changes by keeping a simple log. Record who requested updates, what changed, and why. A shared spreadsheet works well for team-based inventory management. This accountability helps when troubleshooting issues later.
And finally, use SKUs consistently across your catalog. Consistent naming conventions make filtering much easier in any tool. Establish these conventions early and enforce them across all products.
Start optimizing your inventory management with Setary today
Let's recap what we've covered about how to bulk edit inventory in Shopify. Native tools work but don't scale beyond 50 products per session. CSV provides power but requires precision and carries significant risk. Setary bridges the gap for most growing stores by combining power with safety.
To fully transform how you manage bulk inventory updates, Setary delivers the spreadsheet interface you've been missing. Quantity adjustments, multi-location management, and detailed product control all happen in one familiar spreadsheet with bulk actions. No more juggling between pages or worrying about CSV formatting errors ☺️