How to manage WooCommerce product attributes - Complete Guide (2026)

Product attributes drive filtering, variations and richer product pages in WooCommerce. Get them right and customers find what they need in fewer clicks.
So, what are WooCommerce product attributes, and how do they work? I'll cover everything you need to know about attributes and how to use them, plus the plugins that make managing them easier.
What is a WooCommerce product attribute?
WooCommerce product attributes are data fields that add details like size, color, and material to products. With the WooCommerce product attribute feature, you can create new product variations, group items by their specific attributes, or add more information to a single product. This information helps customers learn more about your products and select what they like.
Let's say you sell t-shirts. With the product attribute feature, you can add more information to each, depending on its unique characteristics. If you have a variety of sizes, colors, materials and brands, the attributes feature lets you categorize and group your items in a navigable way.
Read on or watch this video to start creating your own WooCommerce attributes and variations.
Why use WooCommerce product attributes?
Product attributes bring several real benefits to a WooCommerce store:
- Help customers filter and find products faster on the shop page.
- Add extra product details like material, dimensions or care instructions without cluttering the product description.
- Create variable products. Every size or color option needs an attribute behind it.
- Power the WooCommerce filter widget so shoppers can narrow results by size, color or any attribute you set up.
Global vs custom attributes: which should you use?
The two attribute types serve different jobs. Use global attributes when the same characteristic applies across many products. Use custom attributes when the detail is unique to one product.
Here's how they compare:
| Global attributes | Custom attributes | |
|---|---|---|
| Scope | Reusable across the whole store | Specific to one product |
| Filterable on shop page | Yes | No |
| Usable for variations | Yes | Yes |
| Best for | Apparel, electronics or any store where many items share the same options | One-off items with unique details, like vintage finds or limited editions |
If you're not sure which to choose, start with global attributes. They take a bit more setup, but you'll thank yourself the first time you need to filter the shop page or create a variable product.
How to add attributes to a WooCommerce product
There are two ways to add attributes to a product. You can use global attributes (set up once, reused across products) or custom attributes (added on the product itself).
Global attributes
Global attributes are available for all the products in your store. For instance, size and color are two global attributes you may use if you have an online apparel store. Brand names can also be a global attribute.
When to use global attributes
When should you use global attributes? Here are some common scenarios:
- You're selling one type of product, e.g. apparel.
- Multiple products across your ecommerce store share one or more attributes.
- You're an established brand.
- To help your customers navigate simple products fast.
How to create a global attribute in your WooCommerce Store
Creating global attributes on your WooCommerce store is straightforward. Here's how to go about it:
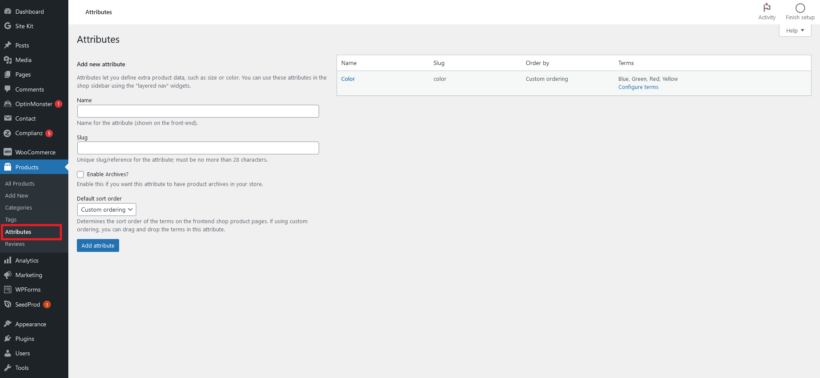
- On your WordPress dashboard, select Products → Attributes from the sidebar. From here, you can create and name new attributes. You can also edit and delete any existing attributes too.
Setting up a new attribute
To create a new attribute, you'll need to set up three fields: Name, Slug and Enable Archives.
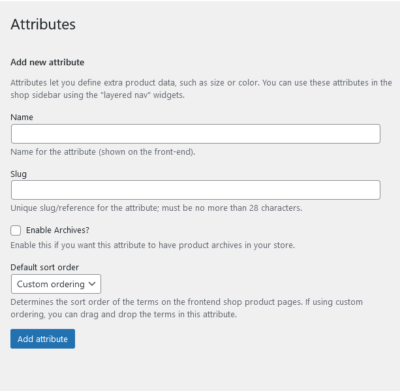
- First, add a name to the global attribute. It could be color, size, age, brand, or something specific to products in your store. A unique attribute name also makes it easy to find later on.
- Next, add a slug, a unique reference for the attribute that search engines can crawl. Ideally, keep it to less than 28 characters.
- Click on the Enable Archives checkbox to determine if the attribute will have a unique page on your store. That way, your store will display all the products associated with an attribute on a single page if selected.
Creating a sort order
How would you like these attributes listed? You can create a custom default sort order
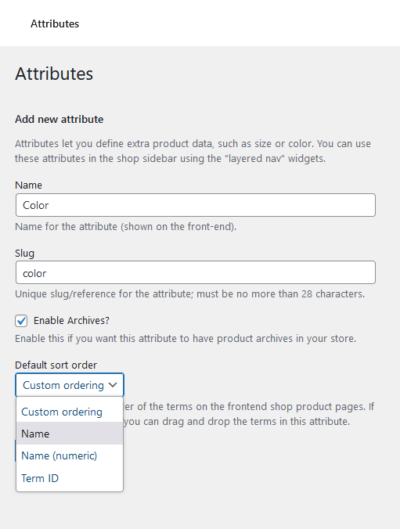
- You may select from four options: Custom ordering, Name, Name (numeric), or Term ID.
- With custom ordering, you can drag and drop items to create a custom order.
- If you choose Name as your sorting order, WooCommerce will list your attributes alphabetically.
- Name (numeric) will sort them numerically, and term id will sort them according to their term IDs.
After naming and setting up a custom attribute, click the Add attribute button to create it.
Adding terms to attributes
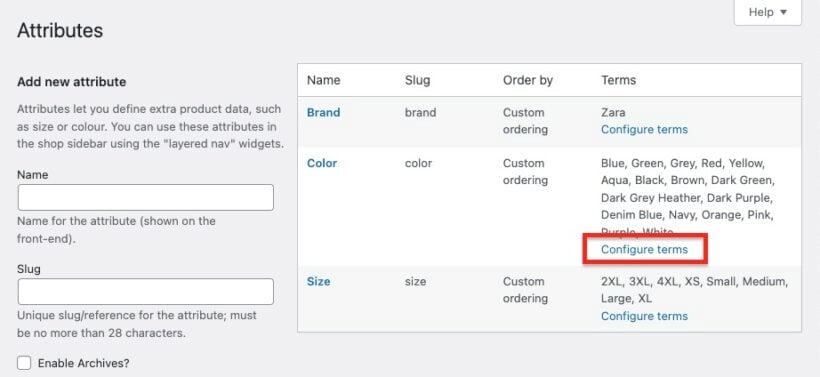
Once you create an attribute, WooCommerce adds it to the attribute table. But, it won't have any values. Your next step is to add values to the new attribute.

To create new values for an attribute, select the Configure terms option. In the color attribute example above, you can add all the colors available in your store. Add terms like 'red,' 'orange,' 'yellow,' and 'green' to define the attribute.

To configure an attribute term, you'll need a name, a slug, and a short description, so remember to include them. Once done, click the Add new color button.
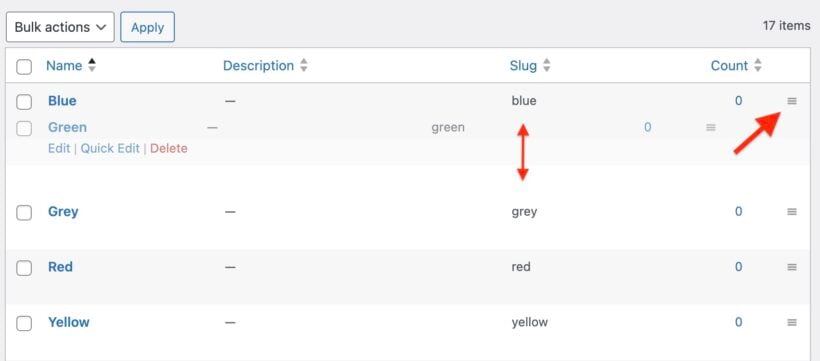
Reordering attribute terms
Reordering attribute terms helps you control how options appear to customers, making their shopping experience more intuitive. When you have multiple terms for an attribute, placing them in a logical order improves usability.
To reorder terms within an existing attribute:
- Navigate to Products → Attributes → Configure Terms.
- Use the drag and drop functionality to arrange terms in your preferred order.
- Move frequently selected options to the top of the list.
- Save changes to apply the new term order.
I find that organizing terms logically, such as sizing from smallest to largest or colors from light to dark, helps customers make decisions faster. The custom ordering remains consistent across all products using that global attribute.
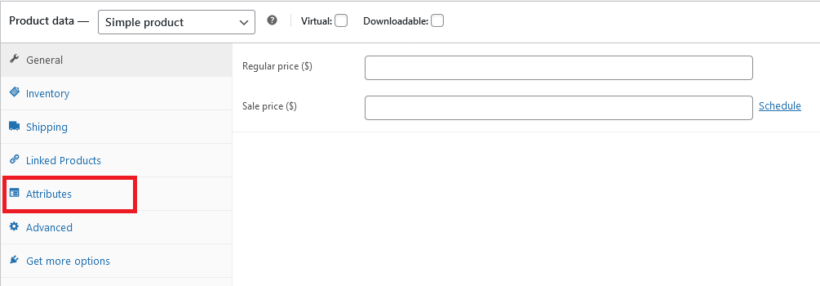
Adding a global attribute to a product
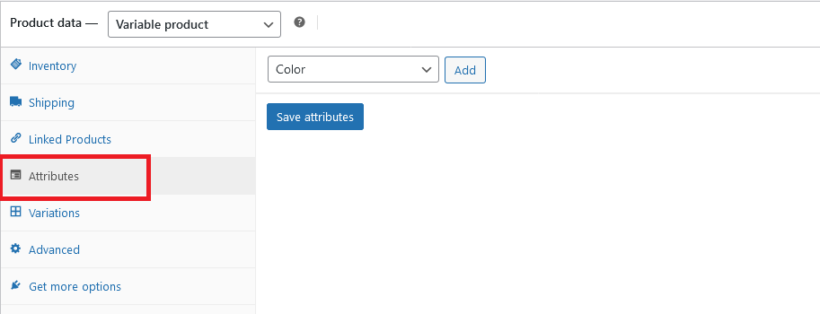
Go to the Product page and scroll down to the product data section. Under this section are several tabs, including Attributes. Select the Attributes tab.
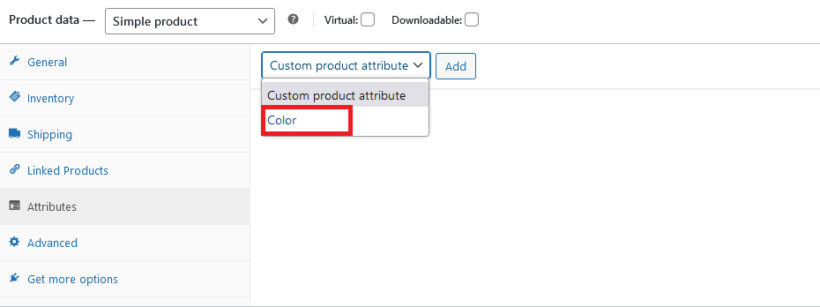
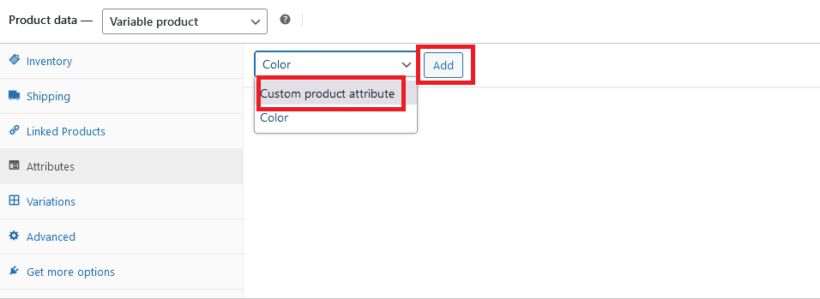
From the custom product attribute dropdown menu, select your global attribute (In our example, color).
Click the Add button to apply the color attribute to the product. Depending on your strategy, you may select single or multiple colors for a product.
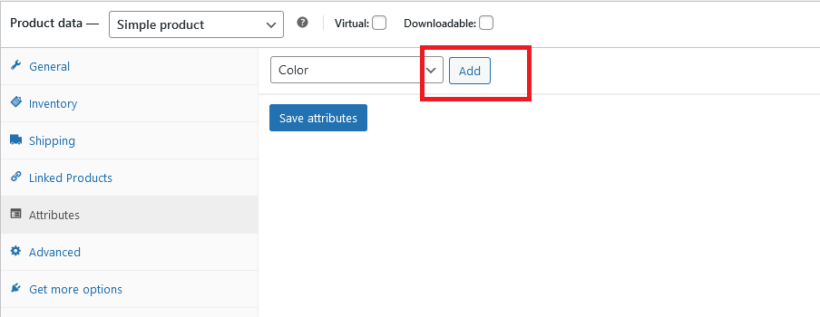
You can also tick a box to display the attribute on the single product page. That way, customers can see all the attributes on the front end of your website.
Custom attributes
Custom attributes are specific to products. That's what makes them different from global attributes. You can only use them on items with unique features or single products in your store.
You can use custom attributes to display information about the product, but you can't use it to display or filter products. For example, 'Limited edition' can be a custom attribute if you sell jewelry, watches, or other high-value items. This attribute will only apply to items with special features that other products in the store may not have.
When to use custom attributes
You may use custom attributes if:
- Each item in your store is unique.
- A feature applies to a specific product only.
- You can personalize certain store items for your customers.
- Certain products have extra features that others don't.
How to create a custom attribute in your WooCommerce Store
Since custom attributes apply to single products, you'll only edit the product data section of each unique item. There's no need to create the attribute separately from the product, like you do with global attributes.
To add a custom attribute:
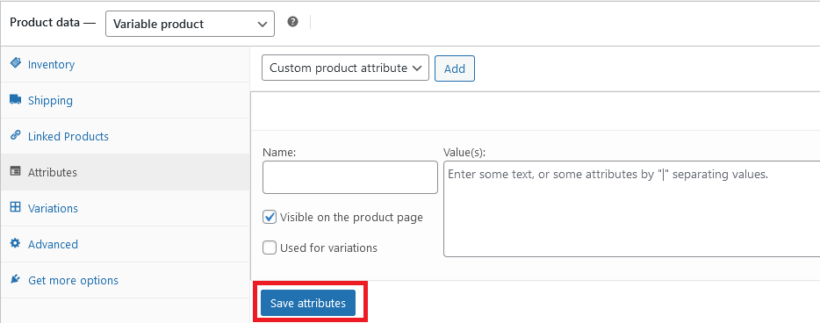
- Select the Attributes tab on the 'Edit Product' screen.
Product attributes tab - Click the Add button to create a new custom product attribute.
- That opens a name and value box.
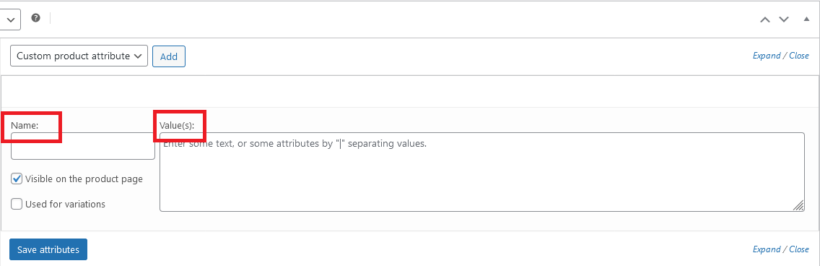
Adding names and values to custom product attributes - Add a unique name to the name box.
- Add multiple values to the Value(s) box and separate them with the "|" key.
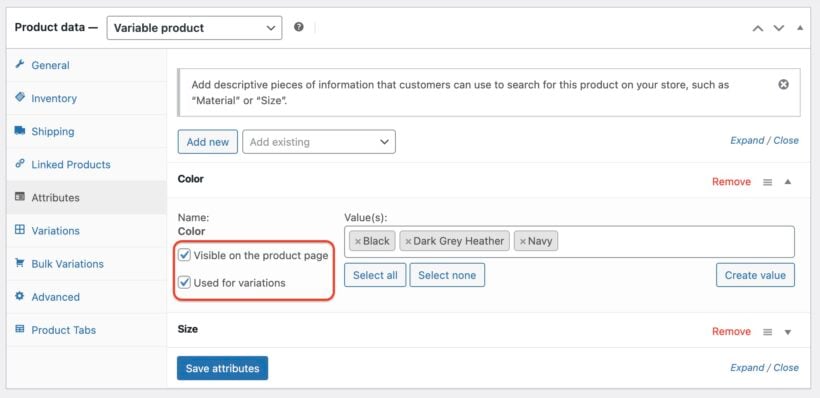
- Tick 'Visible on the product page' if you want to display the attributes on the front end.
- Once done, click the Save attributes button to save your changes.
How to use global and custom attributes to create variations
Product variations are different versions of the same product based on attribute combinations. As you've seen above, attributes can help you assign unique characteristics to one or multiple products in your online store. Attributes can also help you create variations for your products.
As you get accustomed to using product attributes to classify products in your store, you'll realize you can use them in two ways. First, you can use them to display extra product information, and customers can filter by them. The second way is to use attributes to create new product variations.
Variations allow your customers to choose between different options for a product based on its attributes. You need variations if you plan to offer multiple options of a particular product for customers to choose from.
For example, if you've added size attributes for a clothing product then you probably don't just want to display the attributes on the page. You need to use these to create variations so that customers can choose their preferred size.
So, how do you go about that?
First, create a variable product
To create variations, you must first convert your product type from simple to variable.

Once done, select the name and attributes you want the item to have. Also, click the used for variation checkbox to make the attribute available once you've added them.
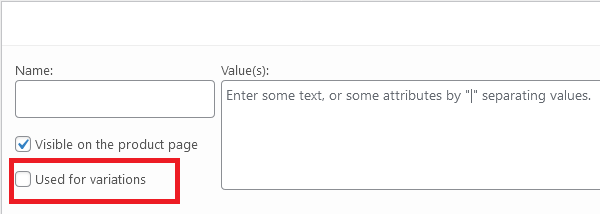
Once done, Click on the Save attributes button.
Now you're ready to create the product variations.
Next, use attributes to create product variations
So how do you create product variations using attributes?
In WooCommerce, you can only edit one variation at a time or make changes to all the variations of a product at once. For example, say you have a t-shirt product with five sizes and five colors. That's 25 variations in total.
All the 'red' t-shirts might have the same attribute price and image. But you don't want to add the price and image of all 25 variations individually. That's where the WooCommerce Bulk Variations plugin comes in.
The quick way to convert attributes into WooCommerce product variations
- First, install WooCommerce Bulk Variations.
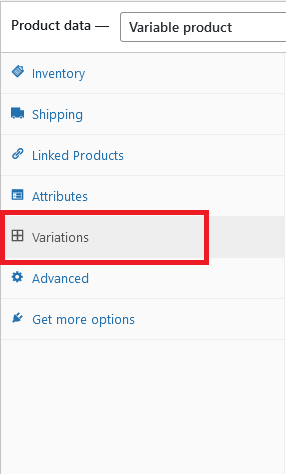
- From the 'Edit Product' screen for the variable product, scroll down to the 'Product Data' section and open the 'Variations' tab.
- Use the 'Add variations' dropdown to select 'Create variations from all attributes' and hit 'Go'. This will create a product variation for each combination of attributes.
- Next, use the WooCommerce Bulk Variations plugin to quickly set the variation prices, images, and other data. Look for a gray 'Filters' bar above the list of variations. Once you find it, use it to select the variations you'd like to edit:
- Select the first attribute that you want to edit from the main Filters bar (e.g. 'Red' if you're setting the image for all the red t-shirts). For more options, use the 'Advanced' button. You may use it to select variations based on price or inventory. Some other additional options, like the 'Add new filtering value', will enable you to choose the logic for each data point you wish to filter by. Here, you can add as many as you like.
- Once done, use the 'Update' button to apply the filters.
- After filtering through the list, so only the variations you wish to edit are visible, use the bulk actions dropdown (titled 'Add variation') to edit all the selected variations. Tick the 'Bulk actions affect the filtered variations only' to make all the necessary changes.
Need to get up to speed on how to use it? Check out our complete guide on setting up WooCommerce product variations.
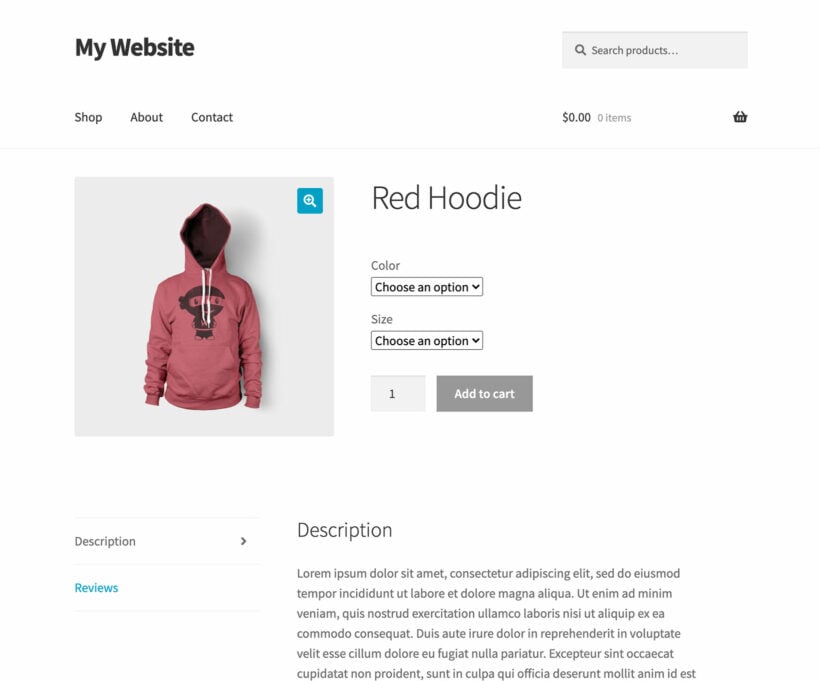
How variation attributes look in the front end
Once you've added the variations, they appear on the product page as dropdown lists. The customer picks a value for each attribute, then sees the matching price and image.
Alternatively, use WooCommerce Bulk Variations to display the variations in a quick attribute order form.
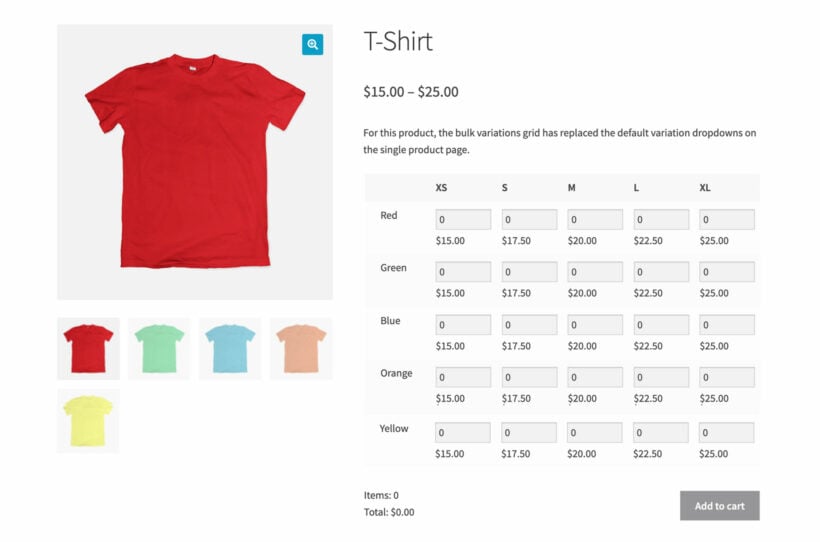
To do that, head to the Bulk Variations tab on the 'Edit Product' page and enable the bulk variations grid.
Further reading: How to design a WooCommerce bulk order form.
How to display product attributes on individual product pages
Once you've added attributes to a product, you can choose whether to show them on the front-end product page. WooCommerce uses the Additional Information tab to render visible attributes as a spec table beneath the product description.
To make an attribute visible:
- Edit the product and open the Attributes tab in the Product data section.
- Tick the 'Visible on the product page' checkbox next to each attribute you want to show.
- Click 'Save attributes', then update the product.
The selected attributes now appear in the Additional Information tab on the product page. Customers see a structured table of material, dimensions, brand, or whatever attributes you've ticked, without you having to repeat it in the description.
A clear spec table also reduces customer service queries. If the product page answers the common questions up front, fewer people email asking.
For more control over where attributes display (for example as columns in a product table on any page), the WooCommerce Product Table plugin handles this with shortcodes.
How to bulk edit WooCommerce product attributes
In the previous section, I showed you how to use the WooCommerce Bulk Variations plugin to bulk edit product attributes for a specific product. You do this on the Add/Edit Product screen. But what if you want to edit the attributes for multiple products at once?
You can do that with a different tool - Setary.
Setary is a bulk product editor which lets you update many products, attributes and variations from a single spreadsheet-style interface. It works like this:
- First, you connect the Setary app with your WordPress site by installing a simple helper plugin.
- All your products and variations appear in the bulk edit spreadsheet.
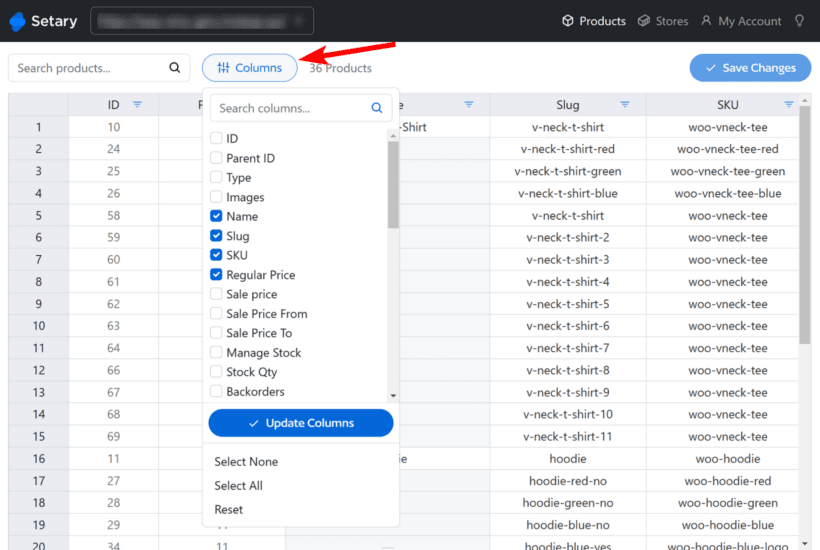
- Use the 'Columns' option to choose which product data you wish to edit. You can add columns for all your WooCommerce product attributes.
- Next, bulk edit the attributes data using one of these methods:
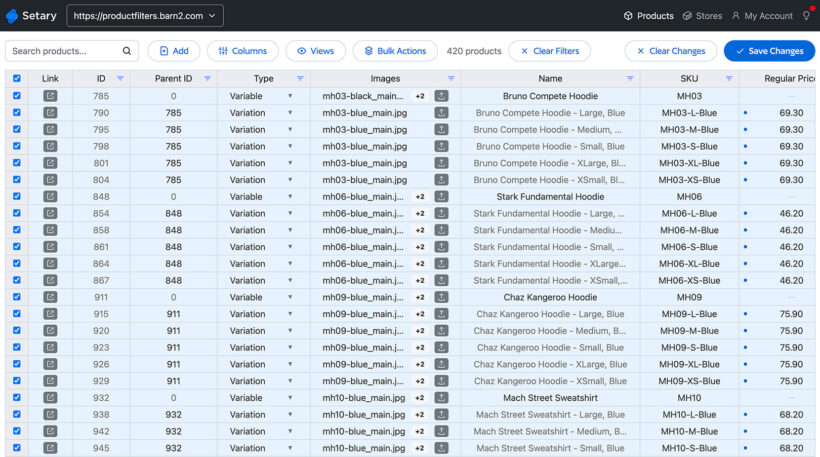
- Update the attributes inline by clicking and editing the spreadsheet cells.
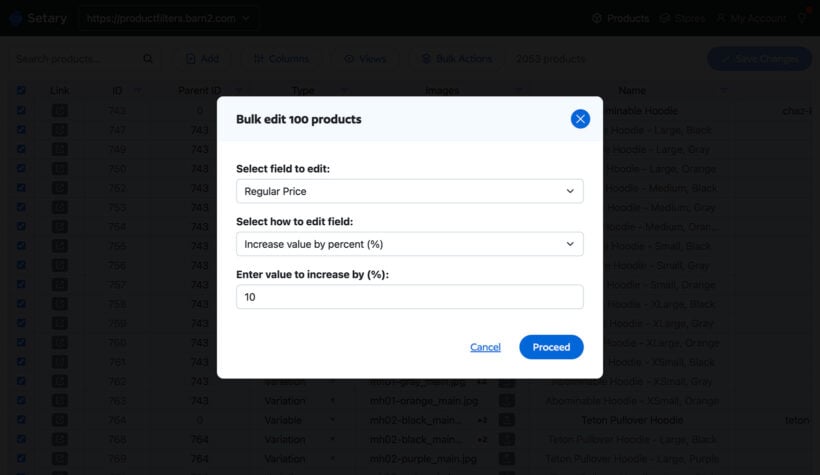
- Use the search box and filters to select multiple products (e.g. all products with a 'Blue' color attribute). Once you've done that, use the Bulk Actions button to apply bulk changes. This might include renaming the attribute, adding some extra text after it, adding or removing attributes from the selected products, changing the price etc.
- Your changes will appear in the spreadsheet with a dot alongside each edit. Check everything looks good before applying the changes to the attributes on your live site.
- Finally, click Save to make the changes live.
If you need to add lots of attributes, then Setary also has a CSV import tool. However, it's probably easier to add attributes directly in the spreadsheet editor.
As well as adding bulk editing to a single store, you can link Setary with multiple stores or WordPress multisites. That way, you can import and manage attributes across multiple WooCommerce installations - a huge time saver!
How customers can filter products by attribute
Once you've added attributes to your products, you'll want customers to use them. The WooCommerce Product Filters plugin adds proper attribute filters to the shop page. Shoppers get dropdowns, color swatches, checkboxes and sliders so they can narrow a big catalog in a few clicks:
WooCommerce already comes with an attribute filter widget, but it has a slight problem. It can be inefficient. The built-in filter only offers a dropdown menu or checkboxes, with no extra display options.
It also doesn't use AJAX, which means customers often have to refresh the page to see new results. Besides being old-fashioned, it hurts the shopping experience.
If you have an extensive catalog of products and variations, the default filter quickly stops being enough. Customers see too many products with a particular attribute, can't narrow further, and bounce. That's where a dedicated filter plugin earns its place.
WooCommerce Product Filters is beginner-friendly and you can configure it with drag-and-drop options in the backend. The filters are responsive, so they work on mobiles and all other devices.
Further reading: Complete guide to filtering by attribute in WooCommerce.
Display product attributes on the WooCommerce shop page
It's already possible to display product attributes on each WooCommerce product page. But if your store has hundreds of products, displaying attributes on either your shop or category pages could save plenty of your customers' time. The native WooCommerce plugin won't do that for you, but the WooCommerce Product Table plugin can.
Installing this plugin on your WooCommerce store can enable you to list attributes as variations or for informational purposes. To list your products in an order form with attribute columns:
- First, ensure you've created global and/or custom attributes and applied them to all your products.
- Next, install the WooCommerce Product Table plugin. You can get it here.
- When you activate the plugin, the setup wizard will open. Use this to set up your product tables. In particular:
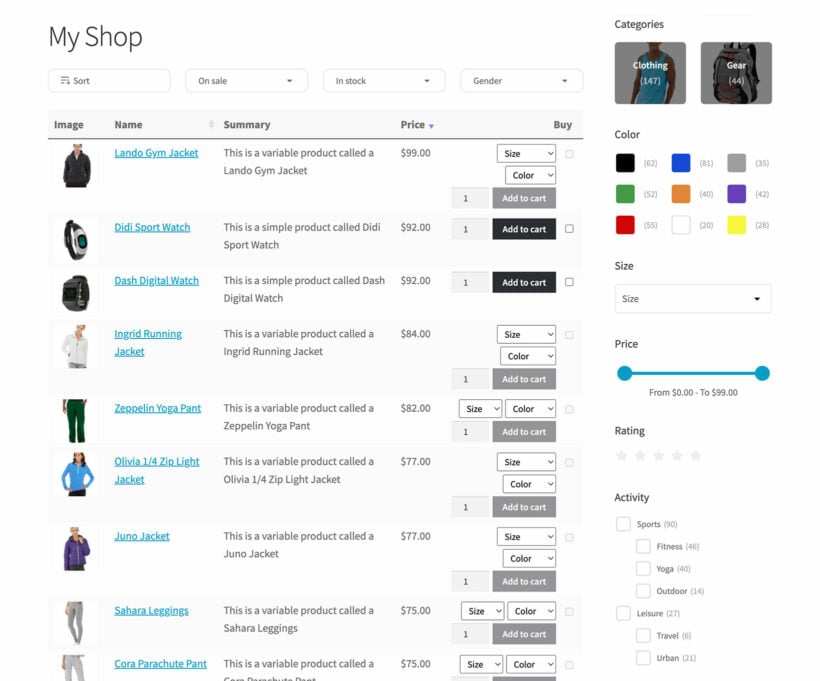
- Tick the box to enable the product table layout on your shop page. That's how to display product attributes on the WooCommerce shop page.
- To show attributes in the product table, add a separate column for each attribute using the column field. You can add them in whatever format you prefer, separating each value with commas. To add an attribute, add "att: slug" to the column field. In this case, replace "slug" with the slug of the attribute. So, if the attribute is color, then you may end up with the following:
Image, name, summary, att:color, att:size, price, buy
Once you set it up, here's what your table should look like on the WooCommerce shop page:
Further reading: Complete guide to showing attributes on the WooCommerce shop page.
List WooCommerce products by attribute
What if you want a dedicated page that lists every product with a single attribute, for example all blue items for shoppers who love that color? You have two options.
Method 1: WooCommerce core Product Collection block
WooCommerce ships with a Product Collection block that can render any set of products on any page, filtered by attribute. To set it up:
- Create or edit the page where you want the list to appear.
- Insert a Product Collection block from the block inserter.
- In the block settings, turn off 'Sync with current query' so you can define your own filters.
- Open the Filters section, enable the Attributes filter and pick your attribute (for example, Color) and term (for example, Blue).
The block then displays the matching products in WooCommerce's default grid layout, with images, prices and add-to-cart buttons.
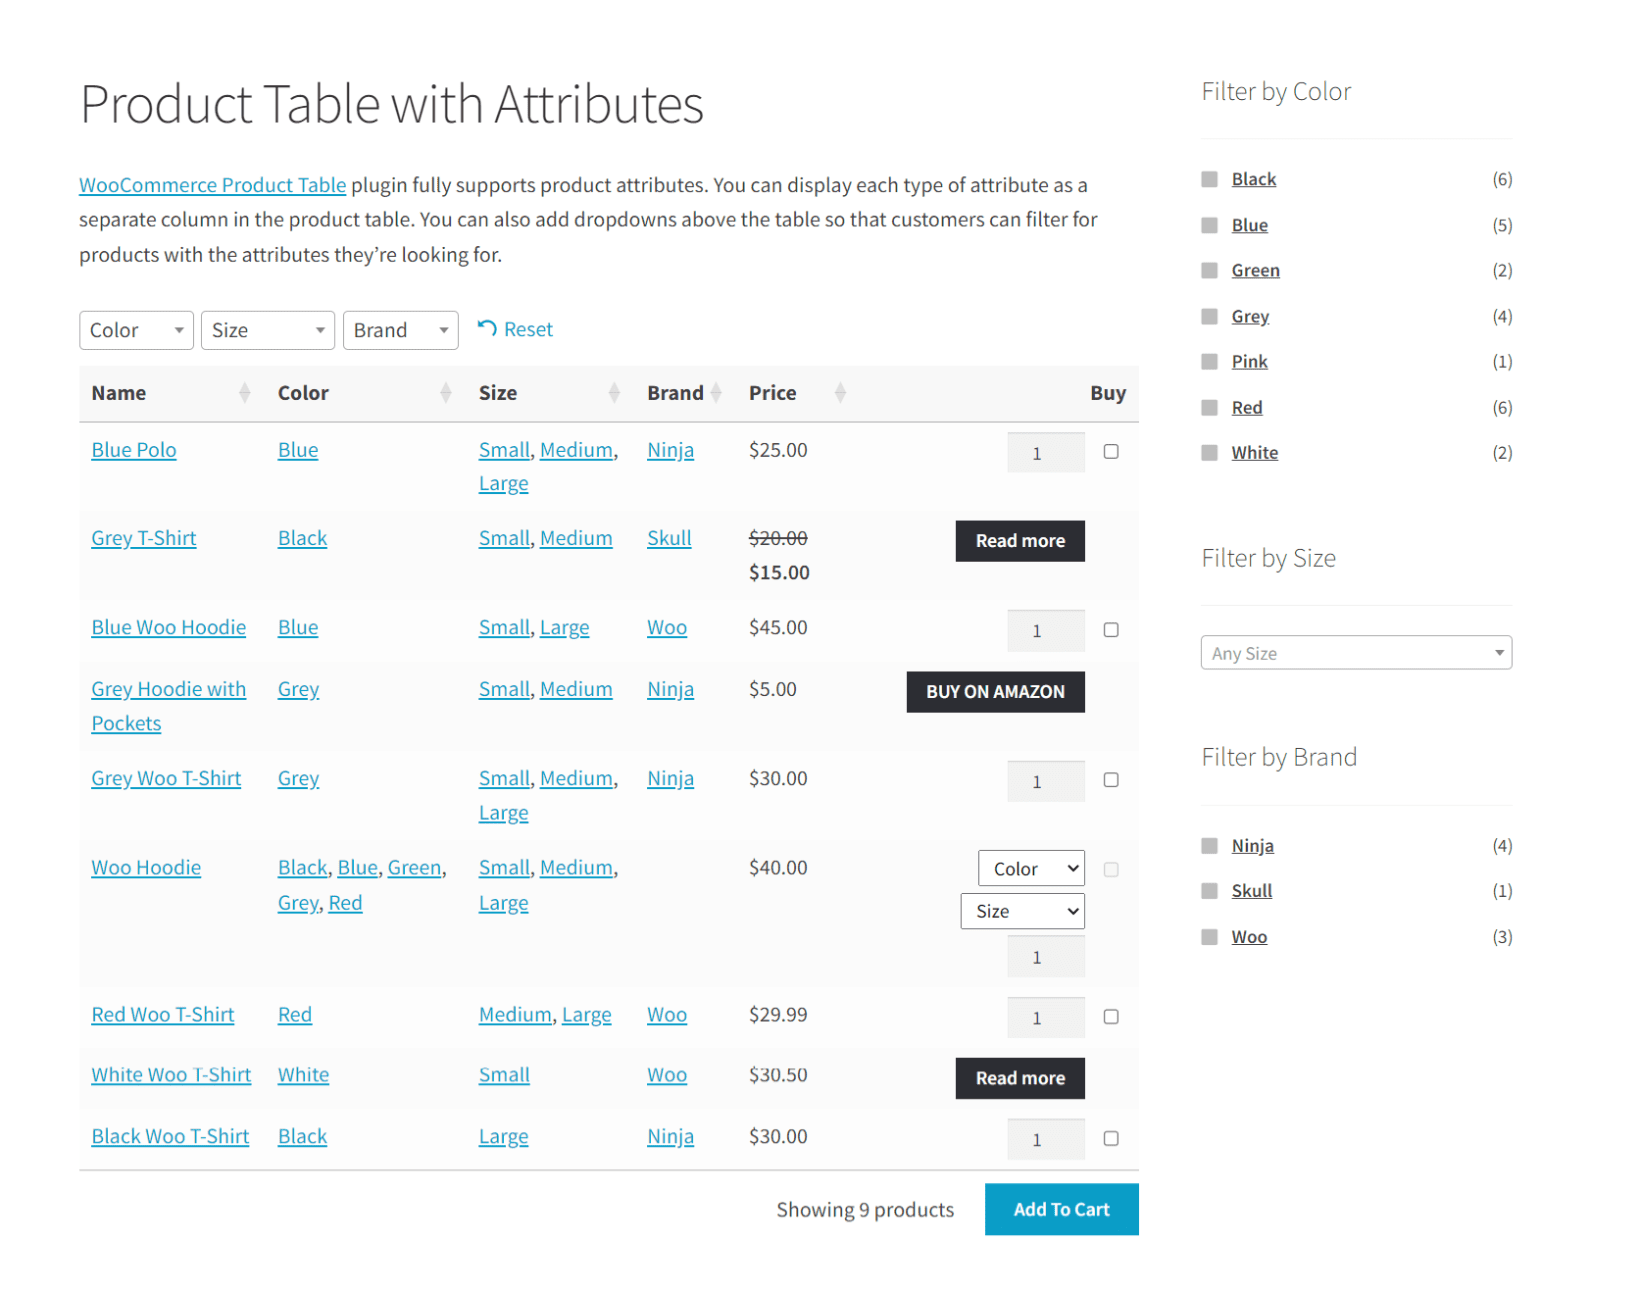
Method 2: WooCommerce Product Table (more control)
The native block sticks to the standard grid. For a sortable, searchable table layout with custom columns - attribute values, stock, SKU, custom fields or quantity boxes - use the WooCommerce Product Table plugin's table builder:
- Go to Products → Product Tables → Add New.
- Give the table a name, then choose the attribute and term you want the table to filter by.
- Set the columns you want to show. Include each attribute as its own column so customers can see and sort by it.
- Save the table, then add it to any page using the block or shortcode the builder generates.
Use this approach when a grid isn't enough and you need shoppers to scan, sort and filter rows quickly - parts catalogs, restaurant menus, wholesale order forms.
Frequently asked questions about WooCommerce product attributes
What are product attributes in WooCommerce?
Product attributes are data fields that hold extra details about a product, such as size, color, material, or brand. You can use them to create variable products, show extra info on the product page, and let customers filter the shop by attribute.
How do I add attributes to all products in WooCommerce?
Use global attributes. Create the attribute once at Products → Attributes, add its terms, then assign it to each product from the Attributes tab on the edit screen. For lots of products at once, use WooCommerce's built-in bulk edit screen or a tool like WooCommerce Bulk Variations.
What are the different types of WooCommerce product attributes?
There are two types. Global attributes are reusable across all your products, and you set them up under Products → Attributes. Custom attributes are specific to one product and you add them directly on that product's edit screen.
Can I use attributes to create product variations?
Yes. Set the product type to 'Variable product', add the attribute on the Attributes tab, tick 'Used for variations', then generate the variations from the Variations tab. For stores with lots of variations to manage, WooCommerce Bulk Variations lets you edit prices, images and other data in bulk.
Final thoughts on managing WooCommerce product attributes
Attributes turn a flat product catalog into something a customer can navigate. Set them up well and you get filtering, variations and clear product specs for free. Skip them and you'll be writing the same details into every product description.
A few Barn2 plugins make the work easier:
- WooCommerce Bulk Variations handles bulk editing of variations and lets you display them in a quick order form on the product page.
- Setary turns bulk attribute editing into a spreadsheet workflow across one or many stores.
- WooCommerce Product Filters adds dropdowns, swatches, sliders and other filter types that the native widget doesn't cover.
- WooCommerce Product Table shows attributes as columns on the shop page and lets you list products by a specific attribute on any page.
Pick the one that matches the next thing you're trying to do (bulk editing, filtering or shop-page display) rather than installing them all up front. Most stores end up using one or two.