An easy WordPress plugin to list category posts
Struggling with how to list category posts on your WordPress site?
Sometimes you need a list of posts in one specific category - you might want to:
- Showcase a particular author's work
- Display posts based on a key topic for your users
- Ensure greater visibility for the full range of content on your site (as opposed to just recent posts), boosting your content's rankings and therefore your whole site's SEO.
You could always just link to a category’s archive page, but that’s often not a workable solution if:
- You're looking to list category posts inside another piece of content (like a post or page)
- Do you prefer a simple list or table view to the full category archive layout in your theme
- You want pinpoint control over the exact information displays for each post in your list
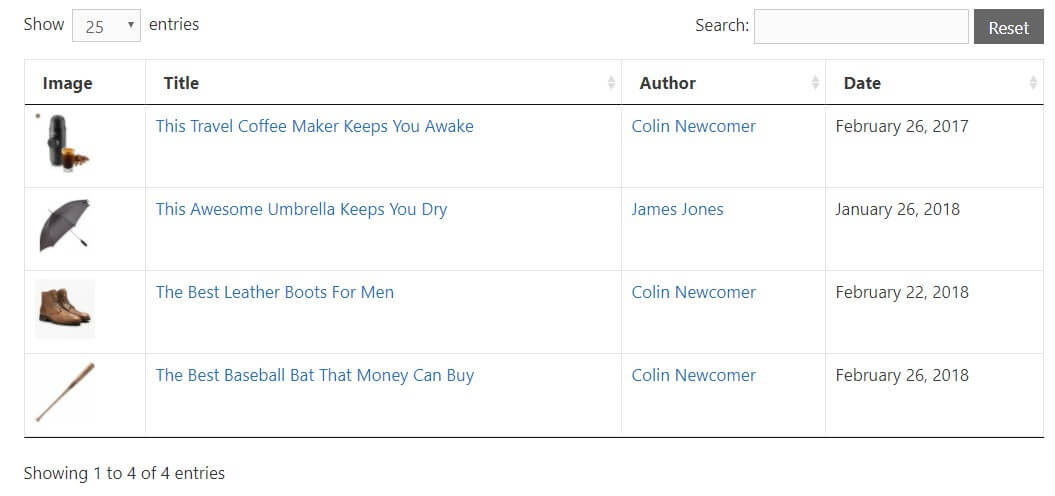
Instead, you might be looking for something like this:
Or perhaps a simple list of product names, like this:

You can find some plugins that give you a shortcode to list category posts. However, these plugins can often fall short when it comes to filtering which posts to display, choosing what content to display in the list (beyond a post's title), and allowing your visitors to interact with your list of posts.
Posts Table Pro, on the other hand, lets you list WordPress posts from a specific category (or categories) and includes far more in-depth functionality:
- Filter the list to only include or exclude specific posts from the category. You can even filter by custom fields or taxonomies for pinpoint control of what shows up.
- Add additional columns to display extra information like a post's author, publish date, or even custom fields and taxonomies.
- Optionally, give your visitors controls to filter, sort, or search your list of posts. AJAX search even allows visitors to view search results without a page reload.
Beyond that, Posts Table Pro can also help you list custom post types from a specific category or custom taxonomy.
In this article, you'll learn how to list category posts like the example above using Posts Table Pro.
For the tutorial, I'm going to create a list of posts that pulls from the Reviews category on my demo site and includes the review author, the publish date, and the post's featured image.
How to list category posts with the Posts Table Pro WordPress plugin
If you're looking for an easy way to display or list content from your WordPress website in a searchable and sortable table, Posts Table Pro is the perfect solution for you. Here's how you can install it:
- Once you've purchased Posts Table Pro, you'll receive a confirmation email containing your license key and a download link to the plugin. If you don't receive this email, please submit a support request.
- Download the plugin from the link provided in your order confirmation email. This will save a zip file to your computer.
- In your WordPress admin panel, navigate to Plugins → Add New → Upload Plugin.
- Select the posts-table-pro.zip file you just downloaded by clicking Choose File.
- After the file uploads, click Activate.
- Then, the Posts Table Pro setup wizard will automatically open and prompt you to enter your license key.
Tip: This help article has a full list of Posts Table Pro shortcode options.
Step 1: Creating Tables with Posts Table Pro
When you install the Posts Table Pro plugin, a setup wizard will automatically appear to help you create your first table. You can also create new tables anytime you want by going to Post Tables → Add New. Follow the next steps to learn how to create tables using Posts Table Pro.
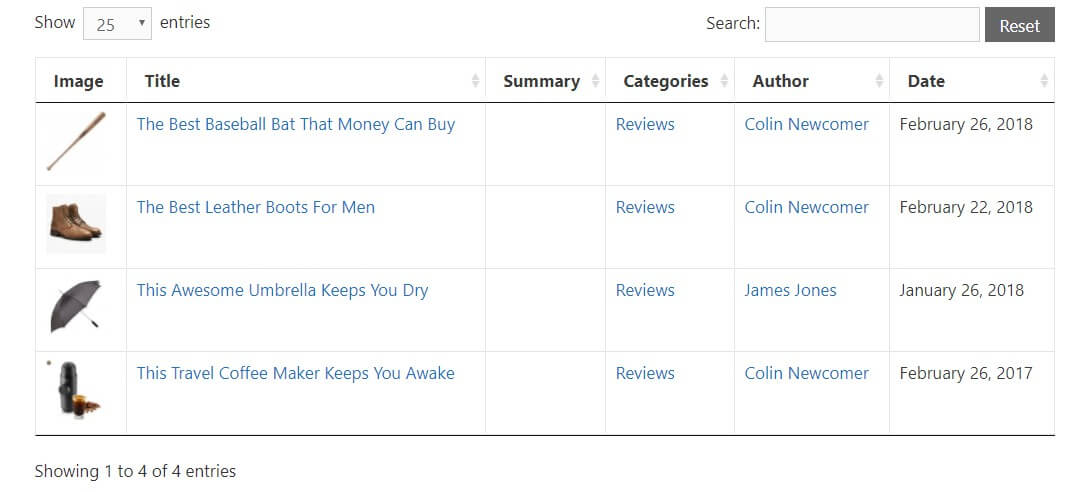
After completing this section, the list looks like this:
Step 2: Name and post type
To create a table using Posts Table Pro, start by giving it an internal name that will appear in the WordPress admin list of tables. Next, select the post type that you want to display. If you do not have a content type, create one quickly using the free Easy Post Types and Fields plugin. Just click on the "Create a new post type" link to get started.
Step 3: Select the type of content to show on your table
When adding posts or pages to your table, you can choose from posts, pages, and custom post types on the page. The options available will depend on the post type you selected in the previous step. If your post type has custom taxonomies, they will also be displayed for you to choose from.
Step 4: Customize columns
To modify the columns in your table, you can choose which columns to exhibit and arrange them in any order you prefer.
Posts Table Pro lets you display columns for:
- Post ID
- Title
- Content
- Excerpt
- Thumbnail Image
- Date
- Author
- Categories
- Tags
- Any custom field
- Any custom taxonomy
You can customize a column by selecting the column type from the dropdown menu and tapping 'Add'. The appended columns will emerge in the list of columns above, and you can rearrange them by dragging and dropping the sorting icon on the left or the column title. Furthermore, you can click the pencil icon to alter the column name or use the toggle to conceal the column name entirely. If you intend to delete a column, simply click the X icon adjacent to it.
Here's what it's going to look like when view on the front end:
Step 5: Filter options
You can enhance the user experience of your table by including filters that allow them to refine their choices. Consider what your target audience would consider the most beneficial. For instance, on a book review website, visitors would presumably like to filter by author and genre.
Filters will appear as dropdown menus above the table, and you can add as many as you need. The available filter alternatives will differ based on the post type chosen on the first page. For example, typical blog posts may have filters for categories and tags, as well as any added custom taxonomies.
However, other post types may not have built-in categories and tags, and consequently, they will only present the custom taxonomies included in them, which can be accomplished using the Easy Post Types plugin.
Step 6: Choose how to sort the table
You can customize the sorting options for your table by choosing the default sorting option and the sort direction. This allows you to control the order in which the table is displayed to your users.
You can sort by:
- Post ID
- Title
- Menu order
- Publish date
- Slug
- Last modified date
- Author
- Comment count
- Post type
- Random
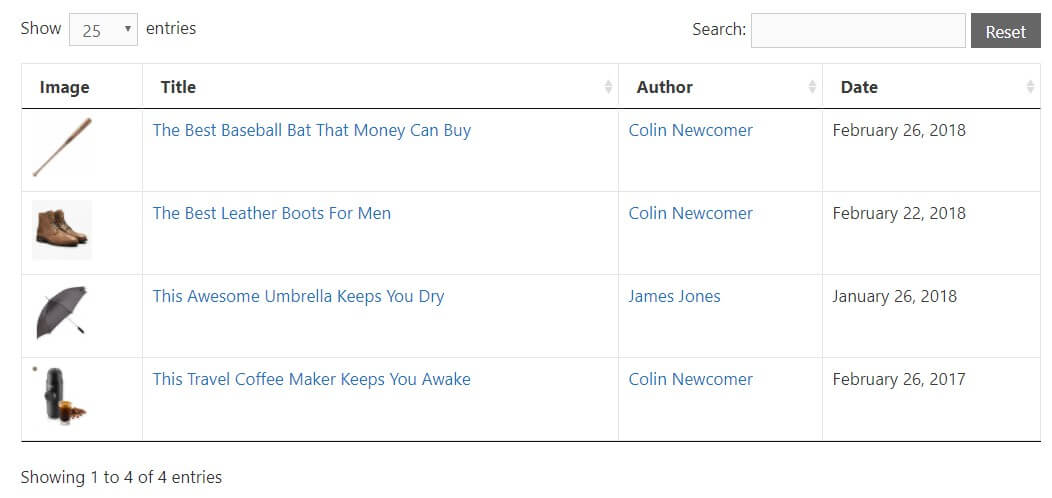
Here's what it's going to look like (notice that the order has changed since the last example):
Step 7: (Optional) Configure which filters to give users access to
Posts Table Pro gives you the option to:
- Add a drop-down filter for specific data. For example, if you display tags you could let visitors choose specific tags from a drop-down to further refine your list of category posts. To control this, you use the filters parameter.
- Hide the search box. By default, Posts Table Pro displays a search box. To move or disable the search box, you use the search_box parameter.
- Hide the pagination options. By default, Posts Table Pro displays a drop-down that lets visitors choose how many posts to list. To move or disable the drop-down, you use the page_length parameter.
Step 8: (Optional) Exclude individual posts from your list
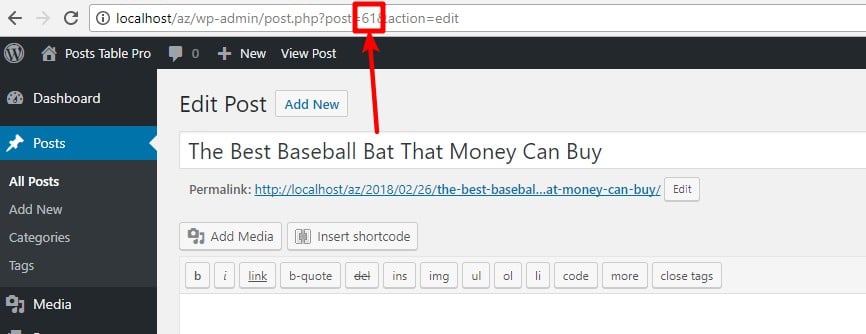
If you want to exclude specific posts in the selected category from the list, the exclude parameter lets you remove individual posts by their post ID.
To find a post's ID, look at the URL when you're editing a post:
Step 9: (Optional) Choose the number of posts to display
You can choose how many items are listed on each page of the table, as well as the total number of posts in the table. The rows_per_page option controls how many rows display on each page of results in the table, and the post_limit option controls the maximum number of posts displayed in your table.
Final Step: Insert your shortcode where you want your list to display
After finishing creating your table using the Post Table Pro plugin, the setup wizard will tell you that you're done and show you how to add the table to your WordPress website.
- You can use the "Post Table" block in the Gutenberg editor or
- Copy the shortcode from the table builder and paste it on any page on your website, allowing you to put the table anywhere you like, regardless of the page's content.
Taking your list of posts even further
Depending on your needs, you can get more creative with the list category posts WordPress plugin. Some helpful advanced tips you can implement are:
- Use custom fields to display a Buy Now button in your list (helpful for listing review posts or particular categories of products).
- Display custom post types to create a category list of events, audio files, podcast episodes, documents, staff members, and more.
- Upgrade the default WordPress Posts Archive sidebar widget to show posts in the tabular archive layout by adding the Posts Table Pro shortcode directly to a custom 'archive.php' template.
- Fast loading for long lists, one page at a time.
- Add a fallback message for when there aren't any posts to display for a given category name.
And that’s all you need to get started with the best list category posts plugin for WordPress. Any other questions? Leave a comment and we’ll try to help out! We're always happy to get Posts Table Pro running on your site.
2 Comments
nice but not work for me
Hi, Hadayat. I'm sorry to hear you're having difficulty with displaying the category posts on your site. Thanks for letting us know so we can help. So that we can assist you best, please could you submit a (technical issue) support request form from our Support Center either using the email address that you used to purchase Posts Table Pro or with your plugin License key and we'll get back to you as soon as possible.