Improve your conversion rate with a custom WooCommerce checkout page
Are you looking for ways to increase your conversion rate? Many e-commerce businesses fail because they don't have an effective WooCommerce checkout page editor. Do you want to get the most out of your customers? Then you need to customize your WooCommerce checkout page, it's as simple as that.
An efficient checkout page is essential for any e-commerce business. The default WooCommerce checkout is basic and limiting when it comes to customization options. This article will reveal the best plugin to help you learn how to customize WooCommerce checkout pages.
Creating an attractive and user-friendly WooCommerce checkout page is necessary for customer retention and increases conversions significantly. This article will walk you through the basics of customizing the WooCommerce checkout page. This will help improve customer experience, reduce cart abandonment rates, and boost sales simultaneously!
Why is customizing the checkout page important?
Setting up your online store can be challenging on its own. You need to figure out the most effective way to showcase your products. Between this and running marketing campaigns, store owners sometimes overlook learning how to customize the WooCommerce checkout page.
Customizing your WooCommerce checkout page is essential for the success of your e-commerce store. A well-designed checkout page makes it easier for customers to complete their purchases. This will help you eliminate any friction that could lead them to abandon their cart.
Further, a customized WooCommerce checkout page helps build trust. Customers can see you are serious about protecting their data and providing a secure shopping experience.
Improved user experience is just one benefit of customizing WooCommerce checkout. You will also:
- Make it easier (and faster) for your customers to make a purchase,
- Increase their trust in your e-commerce store, and
- Encourage customers to buy more from you.
With this in mind, we’ll review some of the different ways you can customize the WooCommerce checkout page. We’ll show you how to add extra checkout fields. Also, you will learn how to create a one-page checkout with a searchable product table at the top.
Before we begin, let’s explain why you should customize the WooCommerce checkout page and how it can benefit your business.
The benefits of having a customized WooCommerce checkout page
The UX design of any WooCommerce checkout page is important for customer satisfaction and e-commerce success. Creating a tailored custom checkout page can make all the difference in how they experience your store.
Using a WooCommerce checkout page editor allows for adding additional features to enhance the user experience. These features include social media log-in, address auto-complete, and more.
You can also help increase customer trust by ensuring your customers know their data is secure. Do this by adding an SSL certificate to your website and displaying a secure checkout logo on the page.
As an online store owner, your goal is to deliver a seamless shopping experience to your customers. One way to achieve this is by creating a frictionless checkout process.
Here are some of the key benefits of learning how to customize the WooCommerce checkout page:
Make it easier for customers to make purchases (Increase conversion rate)
Customers who navigate a lengthy purchase process are more likely to abandon their shopping cart. A single-page checkout will help increase conversions by reducing customers' steps to complete their purchases.
Encourage customers to buy more
Customizing your WooCommerce checkout page allows your customers easily add multiple products to their shopping cart. It also makes it easier for them to choose product variants without clicking through to the single product page.
Make sure added products are set for a default checkout. There the user can review and confirm their products, use a coupon code if applicable, and choose payment options of their preference.
This way, they'll be more likely to buy more of your products, enabling you to increase your average order value.
Ensure a safe transaction process
Ensure your customers feel safe when shopping online - implement a secure, trusted payment gateway to guarantee their contact and billing details are secure! Customizing the WooCommerce checkout page also helps improve customer loyalty.
You can add features such as account registration, guest checkouts, and order tracking to make it easier for customers to shop with you again.
Collect actionable data
Customizing the checkout page can also help you to capture more useful customer data. This data can be used to segment customers, target them with personalized emails, and improve customer retention.
You can add custom fields to WooCommerce that ask for specific information, such as the customer's birthday or preferences regarding products and services. Customer segmentation data helps to create a more personalized experience for each customer and ensure they are only presented with relevant products or services.
These features provide a better shopping experience and help build trust. Build brand loyalty by allowing customers to easily view past purchases, update their information, and track orders.
Now that we know the benefits of learning how to customize the WooCommerce checkout page, we will provide instructions on customizing the WooCommerce checkout.
Personalize the WooCommerce checkout page by adding custom fields
The WooCommerce Checkout Field Editor checkout manager plugin lets you easily customize the form fields. No custom CSS code is necessary for additional options (such as placeholders) on your WooCommerce checkout page. You can both add additional fields and remove fields to set up your own custom checkout fields.
Investing in the checkout field editor plugin allows you to customize the checkout page to meet your exact needs. This can further enhance your brand presence and speak volumes to the customers about the quality your WooCommerse shop offers.
Once you install and activate the plugin, you can add, move, edit, or remove any field from your WooCommerce checkout form. It lets you modify the WooCommerce checkout required fields, including their type, position, label, placeholder, and more.
To do this, head over to WooCommerce → Checkout Fields to add new fields or start editing.
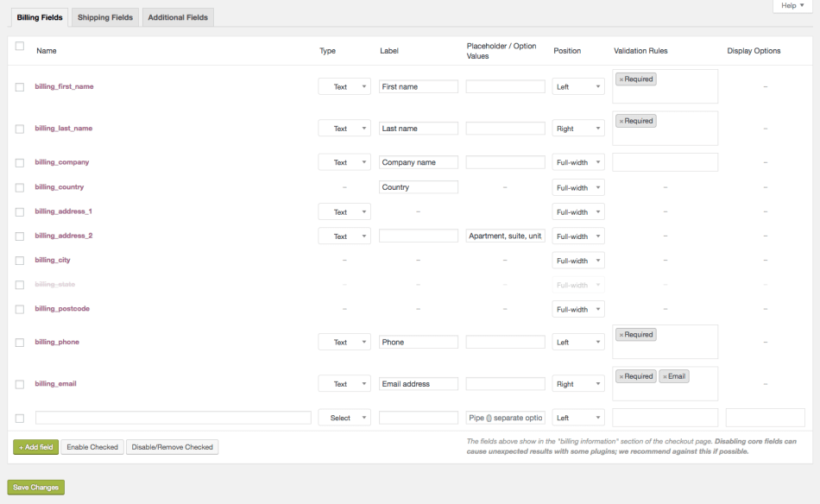
From here, you'll be able to edit three different sets of WooCommerce checkout fields:
- The payment fields and billing fields sections of the checkout form.
- You can edit the shipping fields, such as the delivery address if shipping is enabled.
- Order notes or other order details allow the customer to provide specific instructions on the delivery, etc.
In addition to this, you can add different types of custom fields to your checkout form, including:
- Text field, password field, and text area input fields
- Select and multi-select options
- Radio buttons and checkout checkboxes
- Date picker fields
- You can also specify the field name and labels.
Keep in mind that this process is not a one-time project. With time you will gain more insight into what your customers are interested in, and you can take this to your advantage while adjusting the customization elements and field types.
In the next step, let's look at ways to implement it in your own WooCommerce-based WordPress site.
Streamlining the WooCommerce checkout to enhance the user experience
You can improve your conversion rate and increase sales by making it easier for customers to add information, place orders, and complete transactions. Consider removing any unnecessary fields from your WordPress theme that can complicate the customer checkout process.
You can also simplify the checkout process by adding a single-page checkout feature, allowing customers to review and confirm their order on a single page without switching between different pages.
Add custom fields to the checkout
With WooCommerce, out of the box, it's not possible to add or remove form fields from the checkout form. There's no option to do this using a drag-and-drop form editor or point-and-click options. It can be a huge limitation for some online store owners.
For example, if you're selling digital goods (like e-books, PSDs, or other downloadable resources), you don't need to collect some customer details, like shipping information. If you leave the field in, customers might be confused about why you're asking for their billing address for a digital product! That's why it's important to optimize the WooCommerce checkout for digital products.
Conversely, you might need to customize the WooCommerce checkout page to add an extra field or two. For example, if you're selling customized jewelry and watches, you'd need an add-on custom field to let customers enter the words or phrases they'd like to have engraved. If you're taking restaurant food orders, then you might want a checkout field for the customer to enter special dietary information. Most importantly, adding a discount or coupon code field to the checkout is one of the most important elements potential customers are interested in, as it can increase their purchase value.
Divide the checkout form into multiple steps
Depending on the types of products you sell, consider dividing your checkout form into multiple steps. Multi-step checkout forms make it easier for customers to complete the checkout form for two main reasons:
- They group similar fields together, making the form look shorter.
- Customers are less likely to miss a field or make errors which minimizes potential frustration.
This is a great way to simplify checkout and deliver a frictionless shopping experience.
Create a one-page checkout with a searchable product table
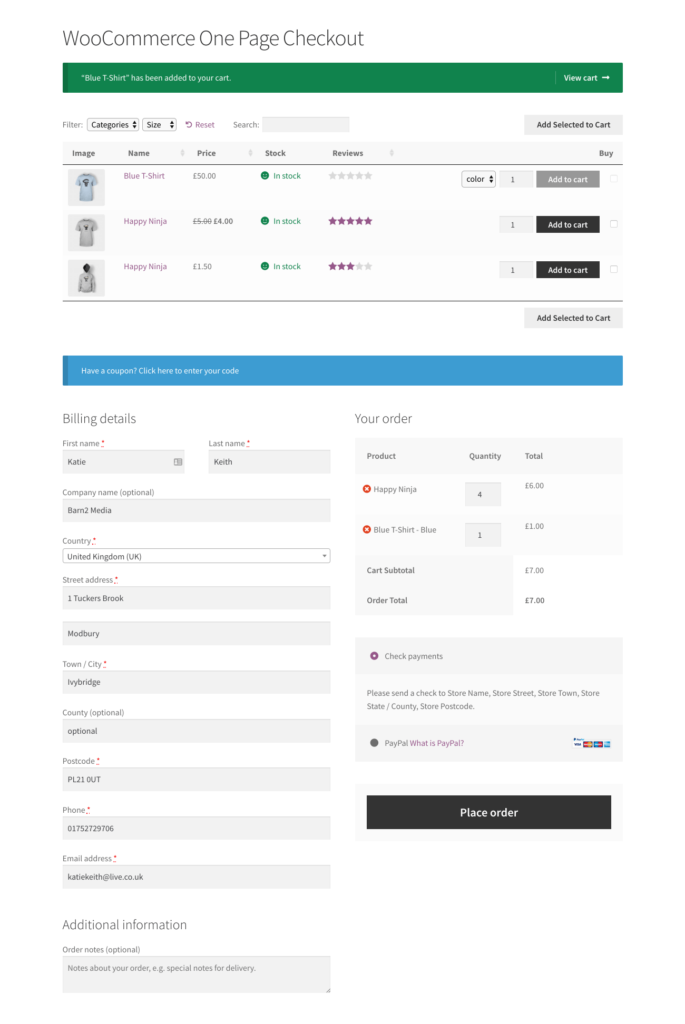
 One of the easiest (and most effective) ways to simplify checkout is by allowing customers to select products and variations, add them to the cart, and checkout from the same page. Essentially, it optimizes the order process and speeds up the buyer’s journey.
Of course, the number of clicks is a significant factor here. If customers have to click through several pages to add products to their cart and place their order, their likeliness of completing the transaction drops significantly.
You can speed up the customer journey by listing your products on the same page as the WooCommerce checkout. This will improve the customer's shopping experience, increase your sales, and improve conversions.
Add payment options to WooCommerce checkout
One of the most important elements of a successful checkout process is offering customers various payment options. By doing this, you can make it easier for customers to complete their purchases without leaving your site.
You can add multiple payment options using the WooCommerce payment gateways extension and include various popular payment options such as PayPal, Stripe, and Amazon Pay.
Make the checkout page mobile friendly
Optimizing the WooCommerce checkout page for mobile devices is important, as they account for over half of web traffic. Create a mobile-specific checkout page that is easy to navigate and has an appropriately sized display is recommended.
Design elements to keep in mind
Like any good customer experience element, design plays an important role in checkout. The checkout page should be easy to use and aesthetically pleasing. Remember to keep the same branding elements on the checkout page to keep a consistent look.
The background color of your website should be solid so it does not interfere with images and product descriptions. Font consistency is equally important.
Also, try to keep the design simple and organized. Too many elements on the page can make it hard to read and understand. Minimize distractions by removing unnecessary text or images that could interfere with the customer’s focus.
You can also add a progress bar to show customers how far along they are in their orders. This can help customers better understand what action needs to be taken next and how far along they are in the payment gateway.
Theoretically, these elements are easily understandable, but putting them into practice is another thing. In the following sections, you will learn how to update the purchase process making it user-friendly.
How to create a one-Page checkout with a customizable product table
The customized table largely depends on product selection. With WooCommerce, you have two main options when it comes to creating a one-page checkout:
Option 1: For listing a handful of products
With the official WooCommerce One Page Checkout plugin, you can create a single-page checkout for your online store without requiring code tweaks. This can save time when you need to edit the WooCommerce checkout page.
In addition, it lets you position the checkout form directly under your product tables on the cart page. If you're looking for a way to let customers modify product quantities from the checkout form, we'd recommend using this great plugin to create a one-page checkout experience.
This extension has several product layout options allowing you to list products above the checkout form. However, these options are limited. For example, it doesn't allow you to showcase dozens of products, add filters, or even a search box to the product listing section.
The benefit of such a checkout page template is that it will not allow unnecessary fields in the checkout flow. This is a great option for listing a few products, but you will probably need a different single checkout solution if more products need to be showcased.
Option 2: For listing dozens of products
The official One Page Checkout plugin is only really suitable for listing a few products on the checkout page. If you want to list dozens of WooCommerce products on the checkout page, we recommend using the WooCommerce One Page Checkout plugin with WooCommerce Product Table.
The WooCommerce Product Table allows you to list your products much more sophisticatedly. More specifically, you'll be able to:
- Add search, sort, and filter options to make it easy for customers to find exactly what they're looking for.
- Display product variation dropdown menus directly in the product table.
- Choose which columns you want to show and hide.
- Make it easy for customers to add multiple products to the cart in one go.
All of these options will be integrated directly into the one-page checkout form.
You'll need a WordPress website with the WooCommerce plugin installed, and a few products added. Once you have everything in place, here are the steps you need to follow to add a one-page checkout page to your WooCommerce site:
Step 1: Install and activate WooCommerce product table
Get the WooCommerce Product Table plugin and install it on your website. Once that's done, head over to Products → Product Tables and create your first table.
Pay particular attention to these settings on the Add to Cart page of the table builder:
- Make sure that the Quantities option is ticked. This allows customers to purchase more than one product (or variation) at a time.
- Set the Add to cart button option to Checkbox only or Button and checkbox to allow customers to add multiple products to cart at once. This adds a clear multi-select option, enabling customers to add many products to their cart simultaneously.
- Set the Variations option to either Dropdown lists in the add to cart column or Separate rows in the table (one per variation) if you want to showcase variable products in the product table. This allows customers to choose product variations from within the order form instead of clicking through to the single product page.
- Additionally, you can prevent customers from leaving the one-page order form by clicking through to the single product page. You can do this in the advanced settings for each column.
Once you've done that, go to Products → Product Tables → Settings and disable the 'AJAX cart' option. This way, whenever customers add products to the shopping cart, the page will reload, showing the one-page checkout below with the correct products.
Step 2: Create the checkout page
Now that we've configured the WooCommerce Product Table plugin, all that is left is to create the page you'd like to add the WooCommerce product list and one-page checkout to.
To begin, head over to Pages → Add New and create a new page.
Here's what you need to do:
- Add a few instructions on the top of the page for customers. For instance, this could be a friendly line that tells them to pick their products, add them to the shopping cart, and scroll down the page to checkout.
- Next, add the product table that you created in Step 1 to the page. Do so using one of these methods:
- Gutenberg editor - Add a Product Table Gutenberg block and select the name of your table.
- Other page builders and editors - Add the shortcode from the final page of the table builder. You can also get this from Products → Product Tables.
- Finally, add a shortcode below the product table block/shortcode to display the checkout form. You can do this by adding a new shortcode block and adding
[woocommerce_one_page_checkout]to it.
When you’re done, your WooCommerce order form page will look something like the image below on your site’s front end. Customers can choose items at the top. Then, they'll get an order review and checkout form below, where they can enter their customer details and choose payment methods.
Here's a screenshot of how it might look:

Alternative method: Set up a popup one-page cart and checkout process
Another way to customize the checkout page is by using a popup checkout plugin to set a single-page cart and checkout page for faster order processing.
As mentioned above, the checkout process for any ecommerce store needs to be seamless, and having a one-page checkout mechanism makes it perfect for this. You can either do this by listing the checkout form underneath your products, as described earlier, or by adding a popup checkout.
WooCommerce Fast Cart makes the checkout process for any store as swift as possible. Customers can easily review their cart, enter their mailing details, and complete the payment from a single page.
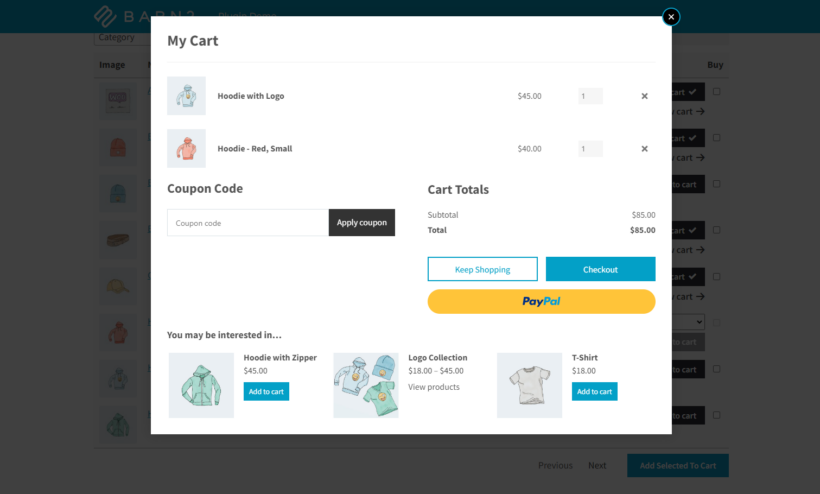
The plugin is super easy to get started with as well. Here's a simple tutorial on how you can set it up.
Install and activate WooCommerce Fast Cart on your website. If you don't have the plugin, you can get it here. Once the plugin is activated, you'll be redirected to a setup wizard. Enter the plugin license keys and follow the wizard to set up the plugin.
Once you are done, and the settings are saved, WooCommerce Fast Cart will get triggered when a customer adds a product to their cart or initiates the checkout process.
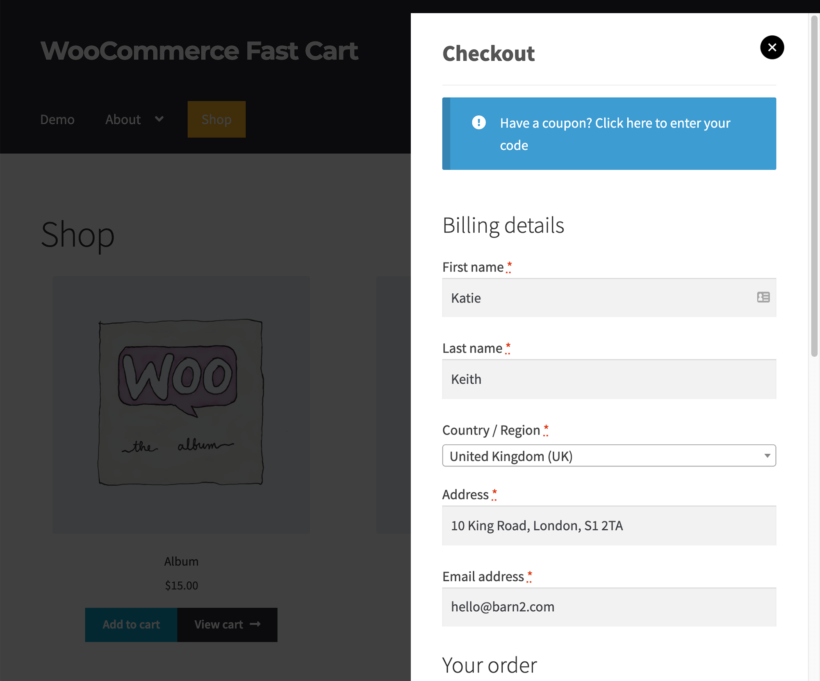
You can always return to the plugin settings page and change how the fast cart functions and behaves.
If increasing conversions and reducing cart abandonment is one of the primary goals, we highly recommend giving WooCommerce Fast Cart a try. You can also see it in action on the plugin demo page.
In the event that you are experiencing difficulties with our written step-by-step guides, make sure to check out our YouTube channel, where you can find video tutorials for your plugins.
Using a plugin vs code customizing the checkout page
Custom checkout templates will easily personalize all aspects of your online store, from the content tab, conditional fields, and checkout stage elements to the branded cart button. There are virtually no elements that can't be customized.
Knowing how to customize the checkout page in WooCommerce can give your online store a meticulous advantage against competitors. It can greatly increase conversions and ensure customers have a smooth order experience.
Doing the customization on your own is often a meticulous and time-consuming task. On the other hand, using plugins provides you with safe and tested ways to customize and optimize the WooCommerce checkout page. These plugins provide a range of features to help you create the checkout page that best suits your store's needs.
It is important to remember that the UX experience should flow easily, where the customers can navigate the website and understand what further actions should be taken to complete a purchase. Using simple language reduces the chance of the customer abandoning their purchase.
Changing text on the WooCommerce checkout page
Changing the text on the WooCommerce checkout page is important because it gives businesses greater control over the customer experience. For example, you can customize the call-to-action (CTA) to encourage customers to complete a purchase or solicit feedback on the product they are buying.
Using language specific to the business and its products allows ecommerce sites to personalize their checkout page and communicate core messages. Changing text also enables you to highlight company-specific features, such as discounts or brand values, which may be beneficial and influential for customers making purchase decisions.
There are a few ways to change the text on your WooCommerce checkout page in a few different ways. First, you can edit the default text fields directly within the WooCommerce settings. This is the most straightforward approach, allowing businesses to update existing text or add additional fields quickly. For more advanced customization, you can use a plugin that enables altering specific elements on the page.
Avoid using jargon
Focusing on microscopy when it comes to the words used on the checkout page is important for any ecommerce business. Using language that customers can quickly understand will help prevent confusion, reducing the chances of cart abandonment and incomplete purchases.
Avoid using industry terms such as Card # or CSC when it comes to jargon. Instead, opt for simpler words like “Card Number” and “Security Code” instead. This often confuses users when entering data for validation. So make sure to use simple action verbs that are easy to understand, such as “Submit” or “Continue.”
How to manually customize the WooCommerce checkout page with code
You can manually override and edit your checkout template if you're a developer familiar with PHP files and JavaScript. Do this by using custom code and editing the WooCommerce checkout page. However, it's important to note that this cannot be done without a developer's help.
To insert additional content into your checkout template, you can edit the functions.php file for your store's child theme and use WooCommerce's built-in checkout hooks.
By default, WooCommerce offers 9 action hooks on your checkout page:
- woocommerce_before_checkout_form
- woocommerce_checkout_before_customer_details
- woocommerce_checkout_billing
- woocommerce_checkout_shipping
- woocommerce_checkout_after_customer_details
- woocommerce_checkout_before_order_review
- woocommerce_checkout_order_review
- woocommerce_checkout_after_order_review
- woocommerce_after_checkout_form
You can use these hooks to insert your own content or fields.
For example, to insert content or display fields before the customer details fields, you could use this code snippet:
add_action( 'woocommerce_checkout_before_customer_details', function() {

echo '<p>Content you want to display before customer details fields</p>';

});
To simplify managing these code snippets, you can use a free version plugin like Code Snippets rather than adding them directly to your functions.php file. In practice, these steps can be handy when adding another shipping address or payment method to the WooCommerce checkout page.
Things to keep in mind
WooCommerce doesn't offer the best shopping experience out of the box. Depending on the types of products you're selling, you might consider learning how to customize the WooCommerce checkout page to:
- Make it easy for customers to choose the products they want to purchase easily.
- Quickly find the products they're looking for and add multiple products to cart in one go.
- Select products and variations, add products to cart, and checkout from a single page.
- Display extra fields or hide irrelevant fields to improve conversions.
A WooCommerce checkout page editor plugin can be used to customize your checkout page without any coding knowledge. Regardless of the method you choose, it's important to ensure that customers understand the checkout process. This way, they can complete their purchases quickly and easily.
With plugins like Checkout Field Editor, WooCommerce One Page Checkout, and WooCommerce Product Table, you can customize the WooCommerce checkout page in no time! The experience is similar to using any page builder. And as a result, you'll be able to increase your sales and boost conversions.
What strategies do you use to deliver a better online shopping experience to customers? Do you have any other questions on how to customize the WooCommerce checkout page? We’d love to hear from you, so let us know by commenting below!