If you want to create a restaurant website with online ordering for home delivery, there are plenty of services built to help you do that...for a hefty commission! A WordPress restaurant plugin lets you skip the commission and keep your margins for yourself.
People want to be able to get food delivered over the Internet. Online food ordering more than doubled between 2010 and 2015, and those trends are continuing - especially due to the COVID-19 pandemic. Customers prefer ordering online rather than over the phone, and the right WordPress restaurant plugin will satisfy that demand without needing to pay a 15% commission rate.And this won't just be a desktop affair - like all the best WordPress plugins, this one works seamlessly on mobile devices as well.
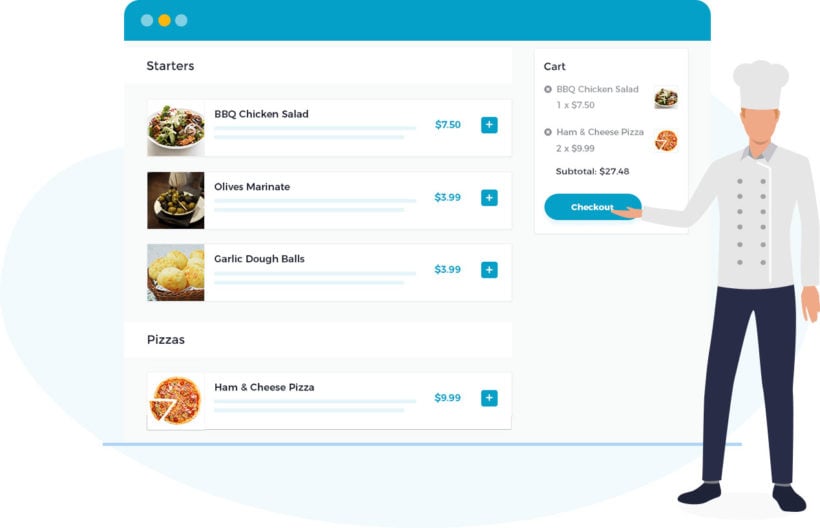
In this post, you'll learn how you can use the best WordPress restaurant plugins to create your own online restaurant ordering system like the example above, complete with:
Menus
Delivery options and time slots
Pickup options
Notifications (so that you know when a new food order comes in)
You'll be able to customize it to your needs, and you won't need to be a tech savant just to get it working!
The two big benefits of using a WordPress restaurant plugin over the alternatives
There are two huge benefits to using a WordPress restaurant menu plugin over alternatives like GrubHub, JustEat and Uber Eats.
1. You'll save money
First, the big one - saving money!
Just for getting listed at GrubHub, you're giving up a whopping 15% commission rate. And if you want a sponsored listing, you'll give up 20% or more. That's crazy!
The typical margins for food just high enough to justify these commissions. Giving up 15% commission makes a huge difference to your bottom line.
With a WP restaurant plugin, there are no ongoing commissions. Instead, you'll pay a one-time or annual fee for the plugins that you need. After that, everything is profit.
So how much will it cost for a good restaurant plugin for WordPress? The two core tools you'll need - WooCommerce and WooCommerce Restaurant Ordering - will cost you under $150/year.
After that, you might want to further enhance your system with some extra plugins for delivery options or menu customization. However, even with these, you'll probably only spend $200-300 to get the whole system up and running. And again, there are no ongoing commissions after that.
2. You can offer a better user experience
Sites like GrubHub or Deliveroo are, for the most part, one size fits all. That is, your menu and listing pages look exactly like other restaurants.
However, what if your restaurant is unique? What if you make these awesome customizable burgers and you want to create a custom way for people to choose their ingredients and toppings?
With the other tools, you're out of luck. But with a WordPress restaurant plugin, you can tweak things to make them perfect, which helps you create a better ordering experience.
The best WordPress restaurant plugin system
To create your WordPress website's online restaurant ordering system, you'll need two key tools:
An eCommerce plugin This is the backend system that will help you manage food items, accept orders and payments through Stripe, Paypal, etc.
A food order form plugin This is the frontend system that will create a user-friendly restaurant menu for your hungry visitors to browse. It lists your foods in a one-page table layout. You can divide your menu up into different categories, offer customization options, etc.
For the eCommerce part of the equation, the most popular option is WooCommerce. This open-source, free plugin comes from Automattic (the billion dollar company behind WordPress.com) and is the most popular way to build an eCommerce store.
For the food order form, you'll use WooCommerce Restaurant Ordering. It makes it easy to create a customizable frontend food menu that you can adapt to your restaurant's unique needs:
In today’s environment of having to act nimbly for clients, the WooCommerce Restaurant Ordering plugin is the perfect solution for getting a website running quickly. We were able to launch on day one with the help of this plugin. It took all the heavy lifting out of the equation and let us focus on design. If you are debating whether or not this is the solution for getting a restaurant going — look no further, this is the plugin you want. The support is also top-notch!
Use your eCommerce plugin to manage food items and orders
To get started, you'll need to install and configure your chosen eCommerce plugin. For example, WooCommerce.
From there, you can add all of your menu items as "products". For example, if you sell a pepperoni pizza, you'd add that pizza as a product:
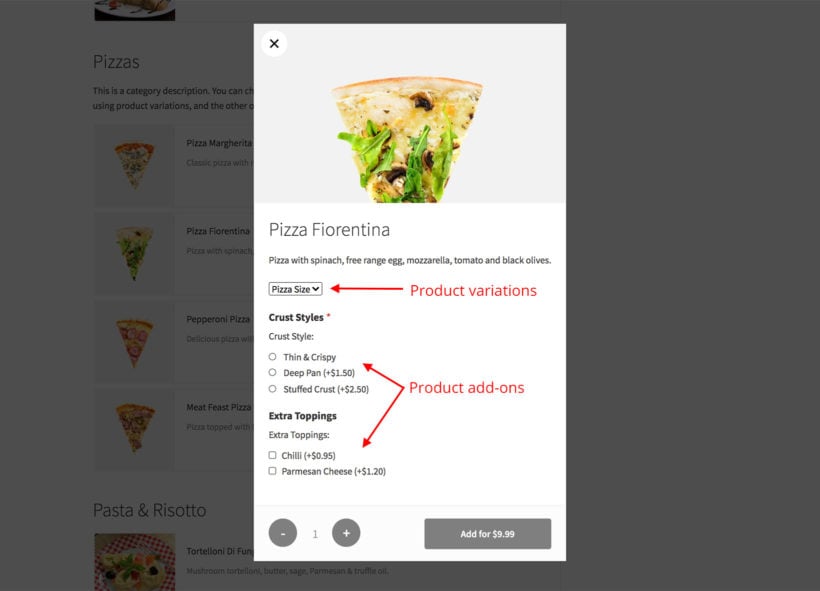
If your menu item is customizable, you can use either product variations or product add-ons to give visitors the option to customize their orders:
VariationsVariations are good if people will select a single option from a list. For example, the size of a pizza.
Add-ons Add-ons are good if people can select multiple items. For example, selecting one or more options from a list of toppings. If you want to use product add-ons, you'll need the Barn2 WooCommerce Product Options plugin.
Use the WordPress restaurant plugin to create your front-end menus
Once you've added all of your food items as WooCommerce products, you're ready for the next step. It's time to create your online menu using the WooCommerce Restaurant Ordering plugin.
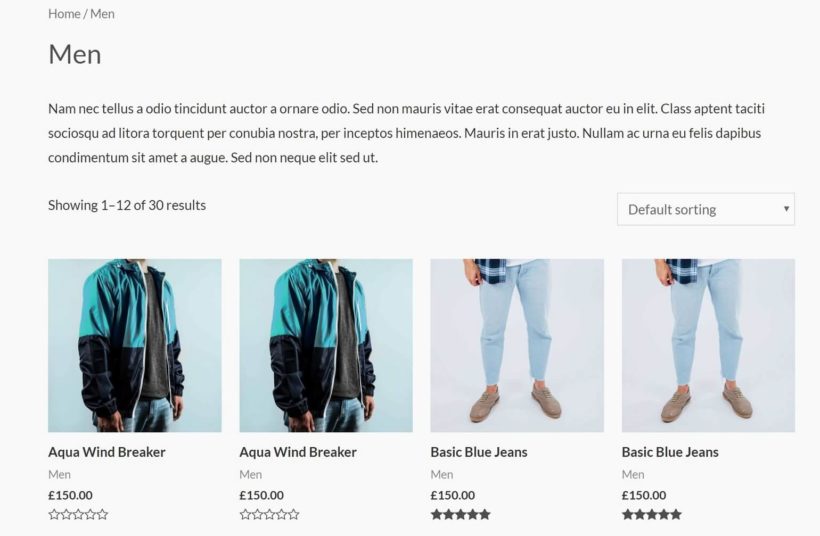
See, by default, WooCommerce displays your "products" in a traditional eCommerce layout. For example, something like this:
Now, that's fine for an eCommerce store, but it's not a good option for a restaurant menu!
That's where the WooCommerce Restaurant Ordering plugin comes in.
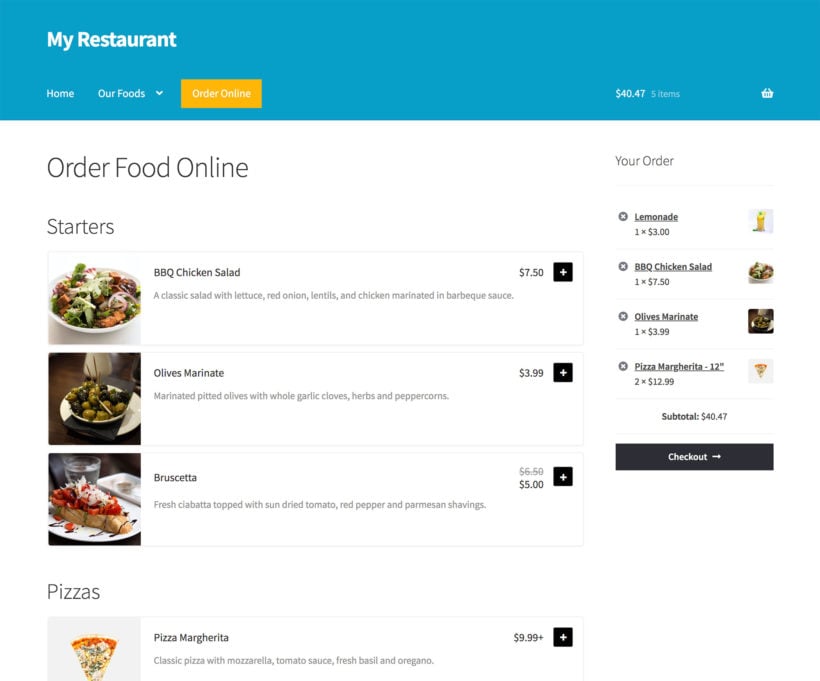
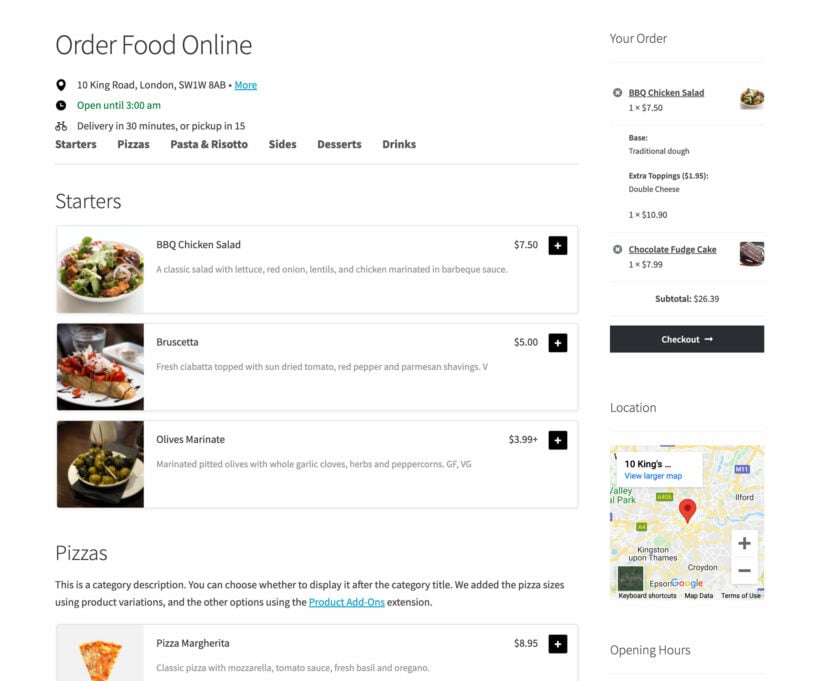
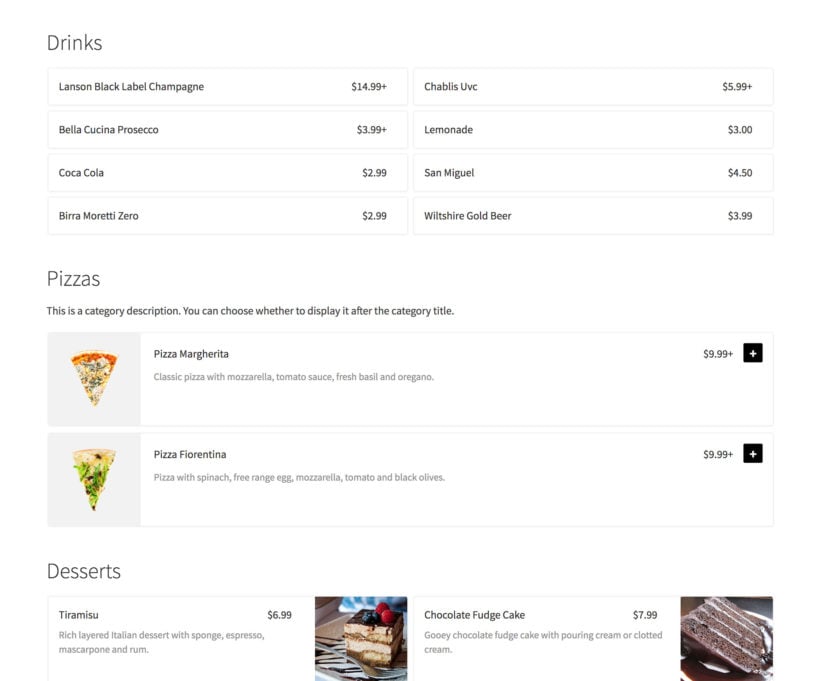
This WordPress restaurant plugin lets you take all your items and display them in a user-friendly food and drink menu layout like this:
Shoppers can add simple food products straight to the cart, or open a lightbox to select variations and add-on options.
As you can see from the above screenshot, the plugin also works perfectly with the WooCommerce 'Cart" widget in the right sidebar, provided your WordPress theme supports templates that allow this functionality. You could also include a widget with a note about your site's delivery area, or even a custom Google Map that shows the area you serve.
The great thing about WooCommerce Restaurant Ordering is that you have 100% control over the information that displays.
Want to add a description column that marks vegan or gluten-free options, or the calorie count? You can do it! 🥗
Want to show, hide or reposition the image of each food? Yup, you can do that, too! 💯
What's more, WooCommerce Restaurant Ordering comes with a shortcode that allows you to incorporate your food ordering system anywhere on your site.
You can even add opening times and prevent people from ordering while you're closed.
[/checkmark_list]
The end result is that you can create a restaurant ordering system that's totally unique to your restaurant's needs and offerings.
Do our FREE restaurant ordering e-course!
FREE COURSE
This online course is 100% free of charge. You'll learn everything you need to know about making your restaurant pandemic-proof by taking food orders online - no experience needed.
Enhance your WordPress restaurant plugin system with other plugins
Get more sales by using WooCommerce Restaurant Ordering with other plugins like Fast Cart
At this point, you'll have a working WordPress restaurant plugin system. However, you still might want to adjust things to tweak how your ordering system works.
WooCommerce Restaurant Ordering is designed to work with many different plugins - not just WooCommerce - and any WordPress theme. That means it integrates as well with your page builder, SEO or multilingual plugins (WPML, WeGlot, etc.), as it does with more obvious pairings - restaurant reservation plugins, food delivery plugins, and so on.
Here are some good options for third-party plugins to enhance your system:
Delivery Slots Allow people to order specific time slots for delivery or collection.
WooCommerce Fast Cart Add a popup cart so that customers can complete their order from the food ordering page.
Dynamic Pricing Lets you create special deals, like buy one get one free.
Twilio SMS Notifications Lets you receive SMS notifications for new orders (by default, WooCommerce only sends email notifications).
WooCommerce BookingsLets you set up a table reservation system alongside your menu to allow your customers to fill out an online reservation form and pre-order their food at the same time.
Build your own WordPress restaurant ordering system today!
Stop giving up your hard-earned margins to middlemen!
With your own WordPress restaurant ordering system, you'll be able to offer the convenience of Internet ordering to your customers, without paying a 15% commission.
Do you have any questions about these WordPress restaurant plugins? Ask away in the comments!
If you’re looking for a simple solution for taking food orders at the counter or table using an iPad/tablet, look no further! This tutorial will teach you how to create a WooCommerce POS food ordering system for your restaurant’s waiting or behind-the-counter staff – with no technical expertise.
If you run any kind of restaurant or café, having software that facilitates taking food orders is a must-have. The idea is simple: instead of writing down the customer’s order on paper, the waiting staff simply input it into the food ordering system. This facilitates taking food orders at the counter or table using an iPad/tablet.
A WooCommerce POS food ordering system simplifies the order taking process. It makes it easy for the waiting staff and behind-the-counter staff to add and remove items from the order and select variations. The food order is then instantly sent to the kitchen.
I’ll show you how to use WooCommerce and the WooCommerce Product Table plugin to create a one-page restaurant ordering system that allows staff to take food orders from customers. They can use the system on an iPad or tablet, which is much more convenient and customer-focused than traditional methods.
First, I’ll show you how to install and setup the WooCommerce Product Table plugin on your WordPress website.
Next, you’ll learn how to use this plugin to create a user-friendly, one-page ordering form. Your restaurant's waiting staff can use this form to browse, select, and customize the customer’s order.
And, finally, we’ll share some tips on how you can improve the order taking process through advanced features like sending orders directly to the kitchen from your WooCommerce store.
Let’s begin.
Why your restaurant’s waiting staff needs a WooCommerce POS tool to take food orders
Traditionally, a restaurant’s waiting or bar staff takes customer orders on a notepad and inputs it into a static computer screen. This creates a record and forwards the information to the kitchen. Unfortunately, this method for taking orders causes a number of problems:
Most restaurants run outdated software on their computers that's difficult to use, instead of something modern and user-friendly (like WordPress and WooCommerce).
Waiting staff usually take the customer's order on paper (or memorizes it) then inputs it into the computer. This often leads to inaccurate food orders being placed. I'm sure everyone has experienced being served the wrong dish, or an important request being overlooked!
Since there's usually only one computer, waiting staff often have to queue to input the customer's food order. This causes delays in sending food orders to the kitchen. In addition, it prevents wait staff from using their time efficiently. The same applies to over-the-counter food orders, for example at a deli or takeaway restaurant.
Desktop computers take up valuable space at the counter or behind the bar.
The solution is to set up a WooCommerce POS food ordering system to take food orders directly at the table, bar or counter using an iPad/tablet.
It makes life easier for both your staff and you as a store owner.
How your restaurant can benefit from an automated POS food ordering system
A WordPress website with a WooCommerce POS ordering system will simplify store management and allow your waiting staff to take customer orders quickly. It's easy to set up, and uses the market-leading WooCommerce plugin with a few tweaks and extra plugins.
An automated food ordering system not only makes it easy for the waiting staff to take customer orders but it also creates operational efficiencies in your restaurant. Essentially, it works like a portable point of sale (POS) system. Instead of jotting down the customer’s order, the waiting staff simply has to select the right food boxes. This improves food order accuracy and makes it easy for them to read the customer’s order back to them.
And after the customer’s order has been placed, it’s automatically sent to the kitchen staff. This way, the waiting staff can move on to the next table or the next customer in line, instead of having to go to the kitchen first.
Finally, whenever you're ready to take things to the next level, you can extend this functionality to build an online food ordering system for your restaurant or offer customers a takeaway option.
What you'll need to get started
WooCommerce is the world's leading e-commerce platform. Ideal for selling absolutely anything, you can use it to organize food items on your menu as products, display a shopping cart, place orders, and checkout. It's a free plugin that you can install on any WordPress website. For those of you who don't already have a WP website, there are tons of online resources you can use to get started with WordPress.
In addition to a WordPress site with WooCommerce installed on it, you'll also need the WooCommerce Product Table plugin. This is what transforms a normal Woo store into a POD food order system.
Introducing the WooCommerce Product Table plugin
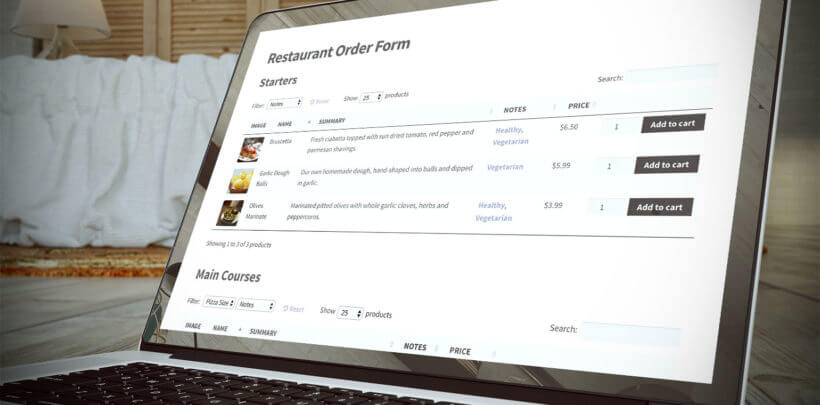
Although the free WooCommerce plugin comes with a built-in layout, it's not really suitable for POS food ordering. The WooCommerce Product Table plugin displays your food items in a simple, one-page table layout that doubles as a quick food order form.
Unlike traditional WordPress food delivery plugins, it allows waiting staff to take customer orders. They can search, sort, and filter the food items in your restaurant’s order form to quickly find each food and place orders. They can:
Choose food item variations or add-on options directly from the food order form.
Use the quantity selector to order a particular food order for many people.
Add extra notes about the order, such as special dietary requirements (requires an additional WordPress plugin.)
Make a note of the customer's table or queue number, which is sent to the kitchen for fulfillment.
How it works
Completed orders are automatically sent via email and can appear on a computer screen. Alternatively, you can install a WooCommerce order printing plugin to automatically print orders in the kitchen.
If the customer is dining at the restaurant, they can pay at the end of their meal in the usual way. At the counter, new customers can pay for their orders using your existing payment methods. This is done separately from the food ordering system, which is used to take orders and send them to the kitchen. (If you'd rather take credit card payments directly in the WooCommerce point of sale system, that's fine too.)
The best part is that if you already have a WordPress website for your restaurant or food business, you can simply create a hidden area on it for your online store POS system instead of investing in a separate system.
How to create a food ordering system for your restaurant’s waiting staff
Once you’ve got a WordPress website with a WooCommerce-ready theme installed, you can step through this tutorial to begin creating a food ordering system. The food ordering system is designed to help the waiting staff take customer food orders from behind the counter (or bar) or at the table. Either follow it from start to finish or jump straight to a specific step:
Once you've installed the WooCommerce plugin on your WordPress website, add your restaurant's menu items as WooCommerce products:
Navigate to Products > Add New from the WP dashboard and enter the following product details:
Product name. This is the name of the menu item that will appear in your WooCommerce POS food ordering system.
Product description. Enter the full description of the menu item in the main text editor.
Product data. Enter the menu item’s price, type, SKU, attributes, and variations here.
Product short description. You can create a short description for the menu item if you’d like.
Product categories. Organizing menu items into categories helps keep everything organized. You can create categories like Main Course, Starters, or Beverages.
Product tags. Similar to categories, tags help you further organize your food items and make it easier for waiters and waitresses to find particular food items. For instance, you could use tags like Vegetarian, Healthy, or Non-Vegetarian.
Product image. This is the food item’s image that you can choose to display in your food ordering form.
In the 'Product Data' section, use the 'Simple Product' type for foods where there are no options or choices. Use 'Variable Products' for adding choices. For example, if you are creating a 'Rump Steak' product then you could add a variation for 'Rare', 'Medium Rare', 'Well Done', etc.
If you have a limited number of an item, you can also set up product inventory management so that your staff knows when an item is finished for the day.
Once you’re done, click the Publish button. Repeat this process until you’ve added a new product for all of your menu items.
Bonus tip: Add text boxes and other extra fields to your food items
You can use the Product Options add-on to add a text box for each product that allows the waiting staff to add notes next to each food item. Let's say a customer requests extra cheese on their pizza or informs the staff that they have a nut allergy. The waiting staff can add their request (or information) as a note against the food item.
Product Options is also a good alternative to product variations in case you want more flexibility. For example, you can add extra checkboxes and various other options.
Step 2: Install and activate the WooCommerce Product Table plugin
Next, you can start displaying your foods in a one-page WooCommerce POS food order form:
Navigate to Plugins > Add New from the WordPress dashboard and upload the plugin’s zipped file to your website. Once that’s done, hit the Activate.
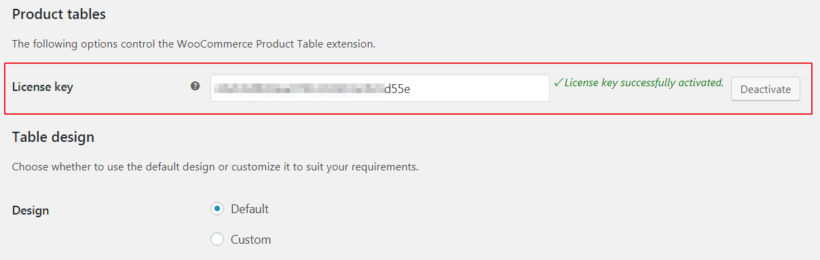
Head over to WooCommerce > Settings > Products > Product Table and paste your license key into the License Key input field.
Step 3: Configure the WooCommerce Product Table settings
Now that you have the WooCommerce Product Table plugin installed and activated on your website, you can configure various options on its Settings page. This will make the WooCommerce POS food order form look the way you want it to on the front-end.
3a. Decide which columns you’d like to display in the table
Since you’re creating a quick order form for your restaurant’s waiting staff, choose columns that will make the food ordering process most efficient for them. As a bare minimum, include columns for the food item’s name, price, and add to cart button. For this, you can simply add name, price, add-to-cart to the Columns option.
You can also choose to include an image of the food item if that would make it quicker for the waiting staff to identify an item on the menu. Simply enter image, name, price, add-to-cart to the Columns option.
You might also consider including the menu item's SKUand stock in your POS food ordering form. Customers often request foods by referencing a code on the printed menu. For example: "We'd like two number 9's and a number 14 for dessert". This way, your restaurant's waiting staff can add the menu item's SKU to the search box or sort by SKU to quickly find the dish the customer would like to order.
I also recommend including a stock column in your food processing form. This is a great way for the kitchen staff to keep the waiting staff up to date with the availability of each dish. Just make sure kitchen staff have access to the WooCommerce back end in the WordPress admin, so they can update stock availability in real-time.
Here’s a complete list of available columns that you can pick from and display in your WooCommerce POS food order form.
3b. Configure additional settings
There are a number of different options that you can configure from the WooCommerce Product Table’s settings screen. However, our goal is to make it as quick as possible for the waiting staff to select products and place a customer’s order. For this reason, I’d recommend making the following configurations:
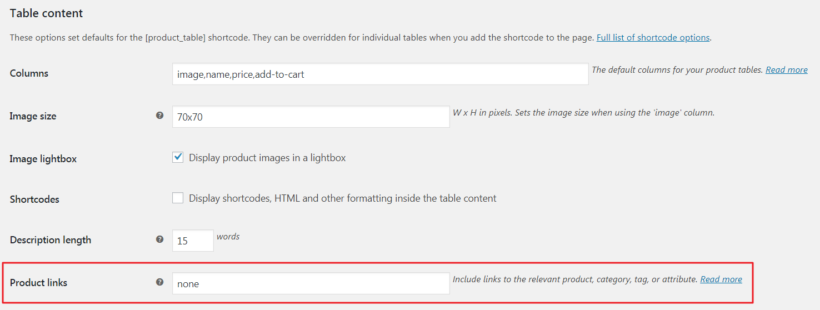
Under the Table content section
Enter none in the Product links section. There's no need for waiting staff to visit the single product page, and disabling the links prevents accidental clicks/taps.
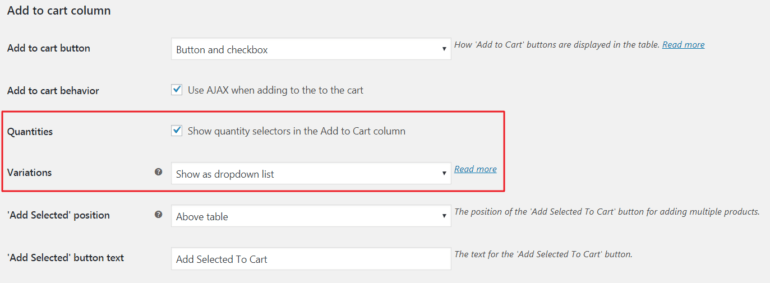
Within the Add to cart column section
Make sure the Quantities checkbox is ticked so that staff can increase the quantity for each item.
Set the Variations option to Show as dropdown list. If you're using variable products, this will add a dropdown listing the options to the add to cart column.
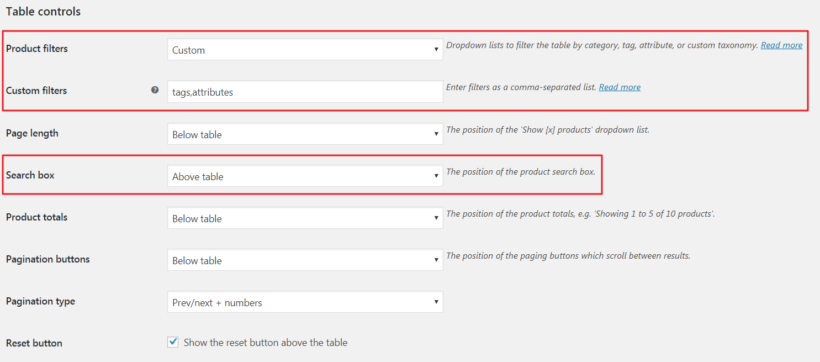
Under the Table controls section
Set the Search box option to position the product search box Above table. Your restaurant's waiting staff can use the search box to quickly find the dish the customer ordered. For example, they can enter the food item's name or SKU.
Use filters for efficient service
I recommend adding filters for the information you've added about your menu items such as product tags, categories, or attributes. Filters make it easy for the waiting staff to quickly find specific types of dishes. To do this, set the Product filters option to Custom and then add tags, and attributes to the Custom filters option.
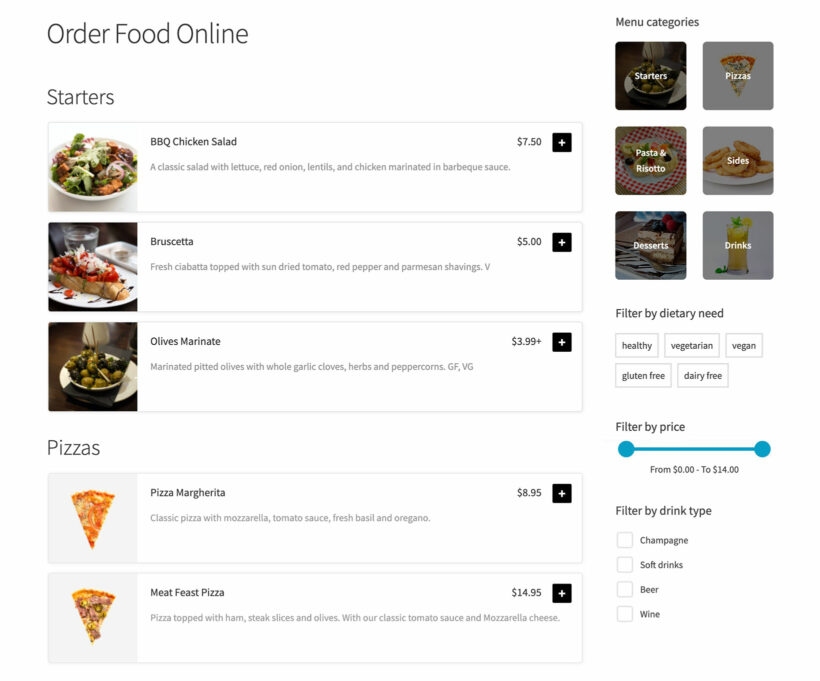
In addition to the custom filters that can be set up within WooCommerce, using the WooCommerce Product Filters plugin can provide even more advanced filtering options for your food order form. Here's an example of a WooCommerce food order form with a range of attractive filter options:
Add filters with [WooCommerce Product Filters](https://barn2.com/wordpress-plugins/woocommerce-product-filters/?utm_source=barn2&utm_medium=salespage&utm_campaign=salespage&utm_content=salespage-wro-wpf)
With this plugin, you can add filters based on categories, tags, attributes, prices, and more. This makes it even easier for your staff to find specific dishes and for customers to quickly locate the items they want to order.
Here’s a complete list of the other various filter options you can set for your food order form.
These configuration settings are optimized to deliver a good user experience for taking WooCommerce POS food orders at the counter or table using an iPad/tablet.
Step 4: Create a one-page WooCommerce POS food order form for waiting staff
By now you’ve set up the WooCommerce Product Table plugin on your WooCommerce restaurant site and configured its settings. Next, we’ll create a simple, one-page food order form for waiting staff to take food orders at the counter or table using an iPad/tablet. We’ll do this by adding the WooCommerce Product Table plugin’s shortcode to our food ordering system page.
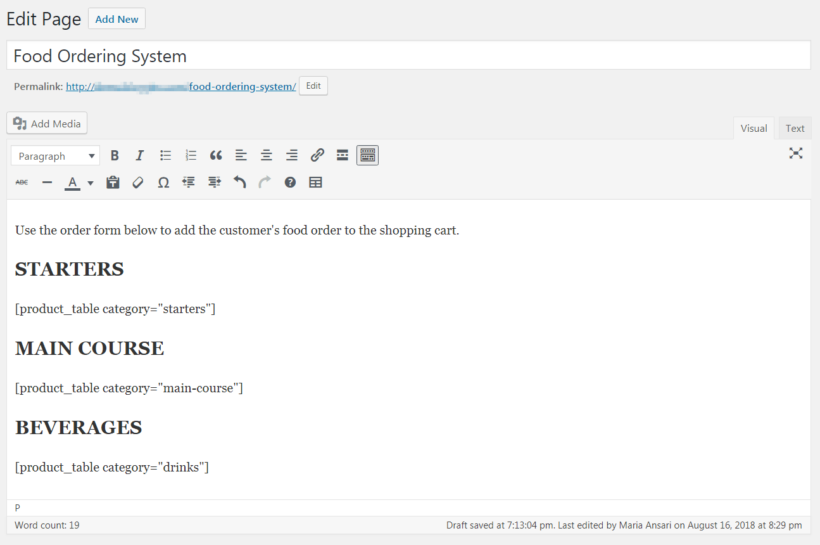
Create a new page for your WooCommerce POS food order form by navigating to Pages > Add New from the WordPress admin. Waiting staff will use this one-page food ordering form to select foods, add them to the shopping cart, and place an order.
Give the new page a title. I’ve called mine Food Ordering System.
Add introductory text in the text editor if you’d like to display information on the order form.
Create sub-headings (Starters, Main Course, or Beverages) for each section of your menu.
Under each sub-heading, add the shortcode [product_table category="category-slug"] to display food items from the relevant category. If you wanted to display items categorized under Starters, you’d use the shortcode [product_table category="starters"].
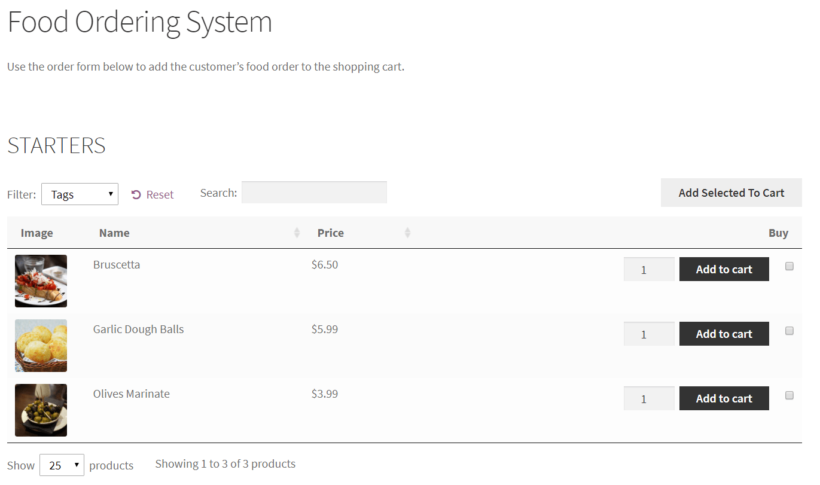
Publish the page and click the Preview button to view it. It should look something like this:
Step 5: Simplify the checkout process for waiting staff
Since we’re using WooCommerce, the waiting staff will have to complete the required checkout fields and click the Place Order button to place the customer’s food order. That's because WooCommerce is normally used for taking customer orders. Our needs are slightly different because waiting, bar or behind-the-counter staff are using it to take orders on behalf of the customer. Therefore, we want to make the checkout process as fast as possible.
You can do this by configuring the checkout page to accept payment after placing the order. This way, the waiting staff doesn’t have to make a payment when they place the order. Here’s what you need to do:
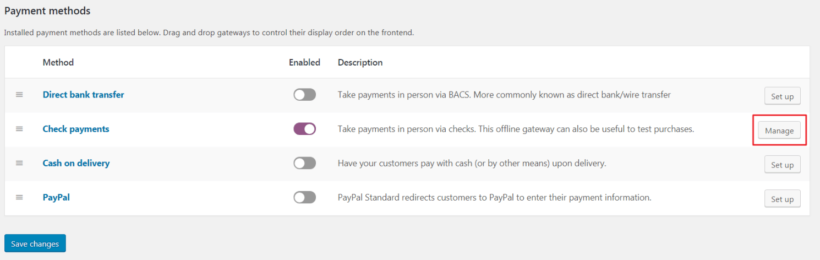
Head over to WooCommerce > Settings > Payments from the WordPress admin panel.
Select an offline payment gateway such as Check payments or Cash on delivery. This way, the waiting staff will be able to place the customer’s order without actually having to pay.
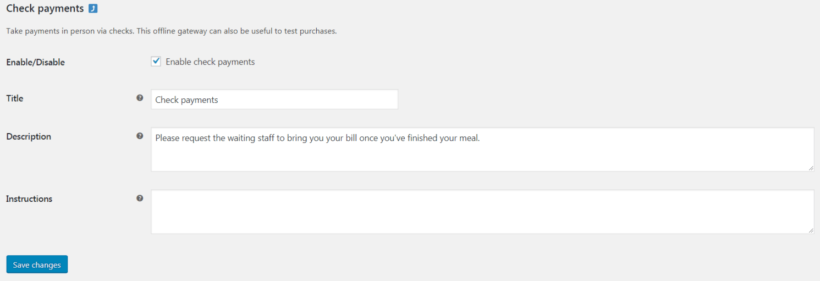
Click the Manage button to rename the payment method or add a description. For example, if you have selected 'Check payments' then you can rename this to something like 'Payment required at end of meal'.
Click the Save changes button to proceed.
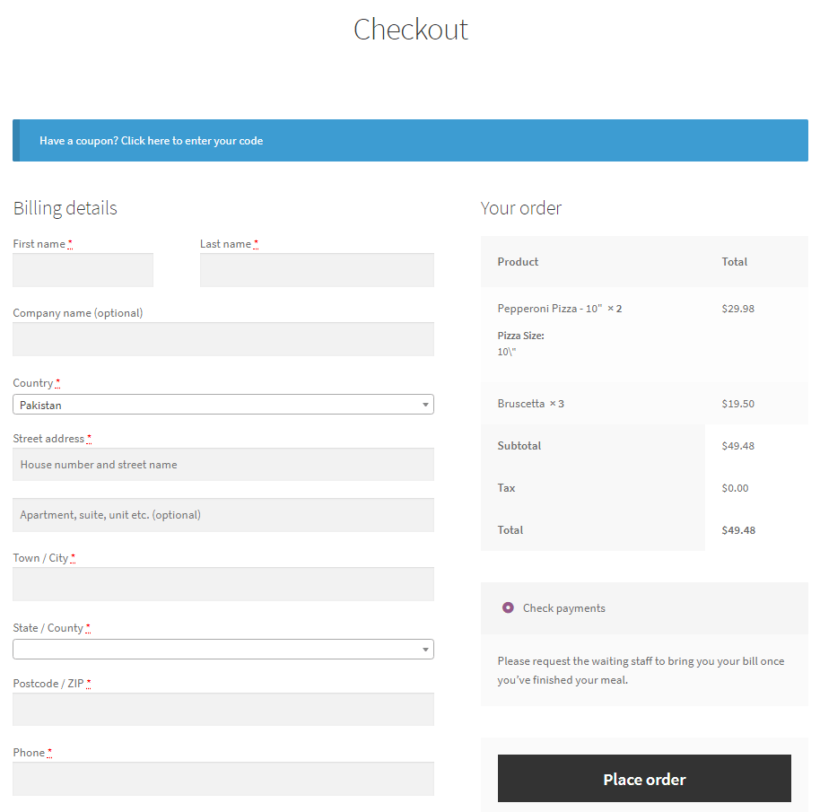
Now, your checkout page should look something like this:
By default, WooCommerce requires the waiting staff to fill out the Billing details form. You can use the Checkout Manager plugin to remove the Billing details fields and make the checkout process even faster for the waiting staff. Alternatively, create a shared user account for your staff to use, and enter the default billing details for your restaurant. That way, this information will be auto-populated for each order and they can ignore this page and just click the 'Place order' button to send the order to the kitchen.
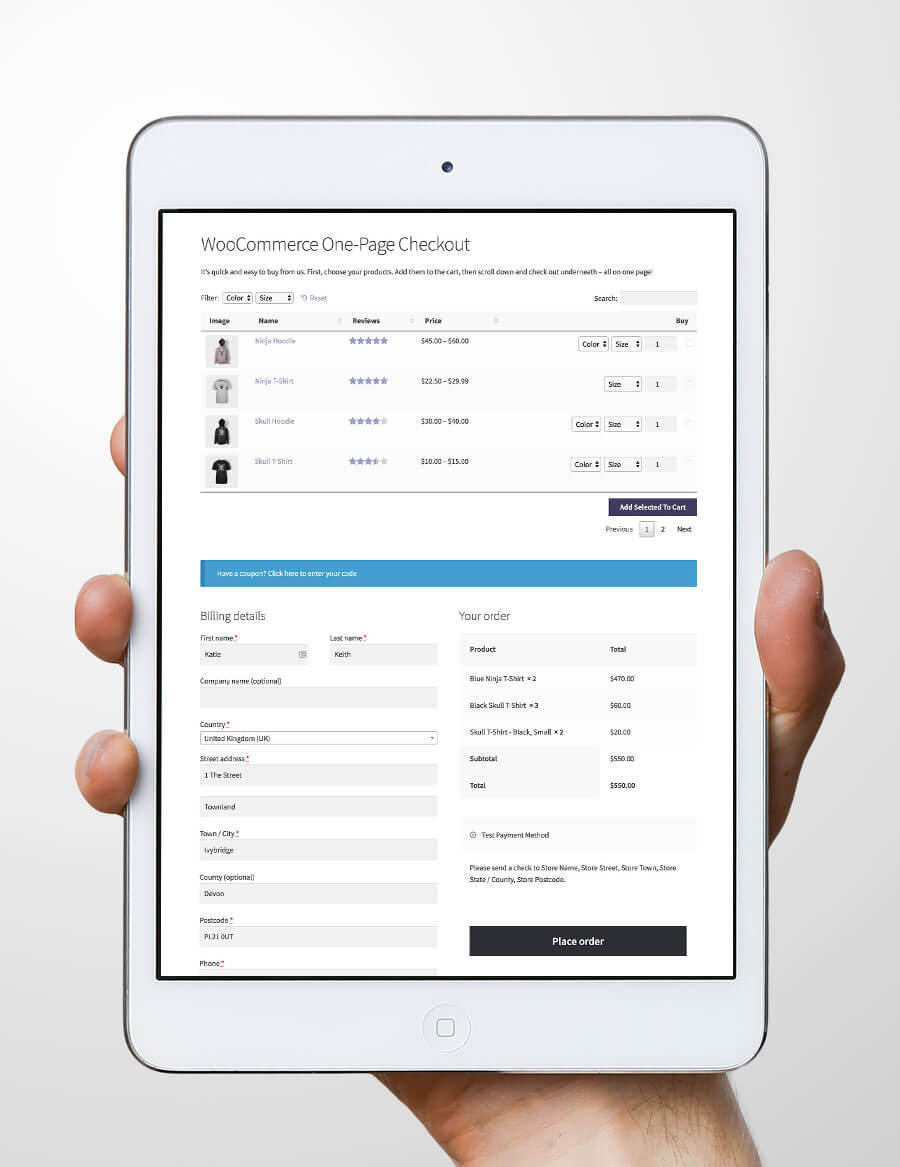
Bonus tip: Use one-page checkout to put the POS order form and checkout on the same page
Want to speed up your WooCommerce POS plugin even further? You can do this by adding the WooCommerce checkout to the same page as your WooCommerce Product Table order form. This removes the need to waste time clicking through to the cart and checkout pages.
There are two ways to do this:
Add the shortcode [woocommerce_checkout] underneath your POS order form. This will add the default WooCommerce checkout immediately underneath the order form.
Alternatively, you can use the official WooCommerce One Page Checkout plugin with WooCommerce Product Table. This has extra features, such as the ability to edit the contents of the cart from directly within the one-page checkout.
If you want customers to be able to make a credit card payment directly into the WooCommerce POS system, that's fine too. There are a few ways to do this:
Add an additional payment method such as Stripe, and customers can enter their credit card details directly into the checkout page. (If you want to be able to scan their card, then you'll need to use a separate card reader and process payment outside of the WooCommerce order system.) Obviously, this only applies when you are taking orders from customers in person and not for phone orders!
If the customer will be reading out their credit card details over the phone, then you still need to add a credit card payment method such as Stripe. Add the products to the cart and proceed to the checkout as usual, and then enter their payment details on the checkout while they're still on the phone. Submit the order and only end the call when you see the order confirmation page - this means that the credit card payment has been processed successfully.
For in-person payments, you can order a card reader which integrates with the website. There are 2 good options for this:
Bonus tip: Add extra fields to store the customer’s table number, token number, or name
Taking POS food orders at the counter or table using an iPad/tablet becomes even easier if you can add additional information directly to the order form. If the waiting staff need to note down any additional information, they’ll need an extra field or two. This could be:
Customer's name.
Customer’s table number.
Token number.
The Checkout Manager plugin allows you to add, edit, and remove the fields shown on the WooCommerce checkout page. Use this to add an extra field to the checkout form which allows the waiting staff to input the customer’s table number, token number, or name.
Bonus tip: Allow barcode scanning
If you also let customers place takeaway orders via your restaurant ordering system, you can set it up so that customers can pay online and your staff or support team can verify their order by scanning a barcode with a tablet or smartphone. There are lots of free barcode scanner apps for iOS and Android that let you do this.
To add a barcode to each order, you'll want the official WooCommerce Order Barcodes plugin, which offers an easy WooCommerce POS integration.
Each customer will get a unique barcode for their order that they can show to your staff on their own smartphone (or they can print it out).
Step 6: Automatically mark orders as complete
WooCommerce normally requires payment before it will mark orders as complete. This isn't relevant to you, because you will be taking payment outside of the website at your physical store - e.g. at the end of the meal.
Use the Custom Order Status WooCommerce plugin to automatically mark all orders as complete. This ensures they are correctly sent to the kitchen without any further manual steps.
Step 7: Send orders to the kitchen
By default, there are 2 ways for the chefs in the kitchen to see new orders:
WooCommerce will send new orders to the email address added in the settings.
If the kitchen has access to the WordPress admin, they can keep the WooCommerce orders page open and refresh it regularly to see new orders.
If you'd rather have new food orders printed automatically to the kitchen printer, then you can do that too. You can pair your WooCommerce-based food ordering system with a GPRS printer. This way, you’ll be able to automatically print new food orders straight to the kitchen printer as soon as the waiting staff has placed the customer’s order.
You can do this using the excellent Bizprint plugin.
Step 8: Hide the food order system from public view
You might be adding your WooCommerce POS food order system to an existing WordPress site. For example, maybe you use WP for your public restaurant website.
If this applies to you, then you'll want to use the food ordering system from public view. It should only be available to staff who take orders at the table, bar or counter.
A quick solution is to password protect the page containing the POS food ordering system. This way, only staff with the correct password will be able to access the food ordering system.
However, your food 'products' will still appear on other parts of your site such as in search results. To fully hide all parts of the WooCommerce POS order system from public view, you'll also need the WooCommerce Private Store plugin. This adds the extra security you need.
In the WooCommerce Private Store plugin settings, choose the same password as you used to protect the food order form page. That way, staff just need to enter one password and it will unlock the ordering page and all other parts of WooCommerce.
A feature-rich WooCommerce POS food ordering system for your restaurant or food business
It's easy to create an efficient (and accurate) POS food ordering process for your waiting staff, counter and bar staff.
With the WooCommerce and WooCommerce Product Table plugins, you can create a searchable, sortable food order form for your restaurant. This makes it easy for waiting staff to take food orders at the counter or table using an iPad/tablet.
You can take things to the next level whenever you’re ready. Simply upgrade your restaurant’s food ordering system by pairing it with some of the other plugins we mentioned.
What are some of the features you’d like to see in a WooCommerce POS food ordering system that facilitates taking food orders at the counter or table using an iPad/tablet? Let us know by commenting below!
If you're looking to create a food delivery or takeaway service for your restaurant, WooCommerce for restaurants is a great solution. With a WordPress food delivery plugin and WooCommerce, setting up an online ordering system on your website is easy. Keep reading to learn how you can implement WooCommerce for restaurants and create a seamless online ordering experience for your customers.
In this tutorial, we'll be focusing on how to create a restaurant ordering system using WooCommerce for restaurants. Restaurants can greatly benefit from having an online food ordering system because:
It allows customers to place their orders directly from the restaurant's website, saving them time and effort.
Best online ordering for restaurants can also help manage their orders more efficiently and reduce the workload on their staff.
Whether you're a seasoned WooCommerce user or just starting out, this free tutorial will guide you through the process of setting up a restaurant ordering system step by step. By the end, you will have a fully functional online food ordering system. It will allow customers to place their orders, select their pickup or delivery options, and make payments securely.
And the best part?
Your WooCommerce for restaurants ordering system will be 100% yours. You own your data, and you get to keep 100% of your profits.
Sound good? Let’s get started!
Why a WooCommerce for restaurants plugin is the best (and cheapest) way to take food orders online
Before we dive into the tutorial, let's look at why a WooCommerce food plugin for restaurants is the best option for taking food orders online.
Many restaurants use hosted third-party services like Just Eat, Uber Eats, Deliveroo and Grubhub. By listing your restaurant with these platforms, you have access to a huge market of potential online food delivery customers. However, it’s not ideal for everyone.
Hosted platforms take a big cut of the revenue from your online restaurant orders. For example, Just Eat takes 14% at the time of writing. Whilst they have a massive user base, you're competing with other restaurants on the same platform, so it's easy for your restaurant to get lost.
As with any hosted system, you don't have full control over your customer data. You have no control over the functionality of your online restaurant ordering system - you can't customize it or add new features.
If you’re looking for a low-cost Just Eat alternative without the fees, this tutorial will teach how you to create a bespoke online food ordering system.
We'll do it using a WordPress food delivery plugin. This means that you don't have to worry about the problems of affiliating to a third-party platform. In addition, having a WooCommerce for restaurants food ordering system on your main restaurant website will make your business appear more professional. It encourages customers to spend more time on your site, building loyalty.
What will my WooCommerce for restaurants ordering system cost?
There are financial advantages to getting a WordPress site for your restaurant. Almost all of the costs are fixed one-off, upfront fees. As a result, rather than losing a percentage of every sale, the benefit improves with every order you receive. You start saving money almost immediately.
These are the costs of building the food ordering website described in this tutorial:
WordPress content management system – free of charge.
WordPress theme – free of charge (you could buy a premium WooCommerce restaurant theme for ~$65, but this tutorial will show you how to add the best online ordering for restaurants website using a free theme).
Ongoing web hosting – web hosting comes at all different price points to suit any size of business. We recommend Kinsta's premium WordPress hosting which is ideal for an ecommerce website with an online restaurant ordering system. For lower budgets, SiteGround is also good.
Payment processor fees – if offer online payment methods (which isn’t essential) then your payment gateway will take a percentage of the fees. This is normally a few percent - much cheaper than Just Eat’s 14%.
As you can see, setting up a WordPress food delivery system plugin yourself is far cheaper than using a third-party platform such as Just Eat.
Still not convinced? Let me show you how simple it is to set up a WooCommerce for restaurants ordering system.
Should I create a DIY WordPress food delivery website, or hire a developer?
Below, I'm going to tell you how to create a WooCommerce for restaurants ordering website using a simple WordPress food delivery system plugin. This is a great option and you don't need any technical know-how.
If you'd rather have someone else set up the website for you, just forward this tutorial to any WordPress developer.
To build your own WooCommerce for restaurant order system, keep reading and I'll show you how.
How to create a WooCommerce for restaurant ordering website
In this video tutorial, you can watch me create a restaurant online food ordering system. Build yours alongside me, or read the written tutorial below.
The following tutorial covers every step of setting up a WooCommerce restaurant website:
Create a WordPress websiteWordPress is the world's web building platform. It powers your overall website and makes it easy to add pages and edit content.
Install WooCommerceWooCommerce is the world’s top e-commerce platform, powering over 41% of online stores. We'll use WooCommerce to add products and categories, take payments online (including PayPal and credit card), and add delivery and collection.
Install WooCommerce Restaurant OrderingThis plugin converts your WooCommerce store into a fully-fledged food ordering system, displaying your products in a user-friendly one-page restaurant ordering system so that customers can browse, pick, and customize their orders. It also lets you set opening times and prevent ordering when you're closed.
Add options to your food productsI'll show you 2 easy ways to add extra options for your food items, such as size choices or selling pizza toppings.
Delivery and collectionWe'll discover how to add a range of delivery and collection options.
Bonus tipsFinally, I'll share some extra tips on perfecting your WooCommerce restaurant ordering system. This includes accepting tips online to increase your average order value; selling discounted meal deals; and online ordering for multiple restaurant chains.
1. Create a WordPress website
This tutorial assumes that you already have a WordPress website for your restaurant. If not, there are loads of online resources to help you get started with WordPress.
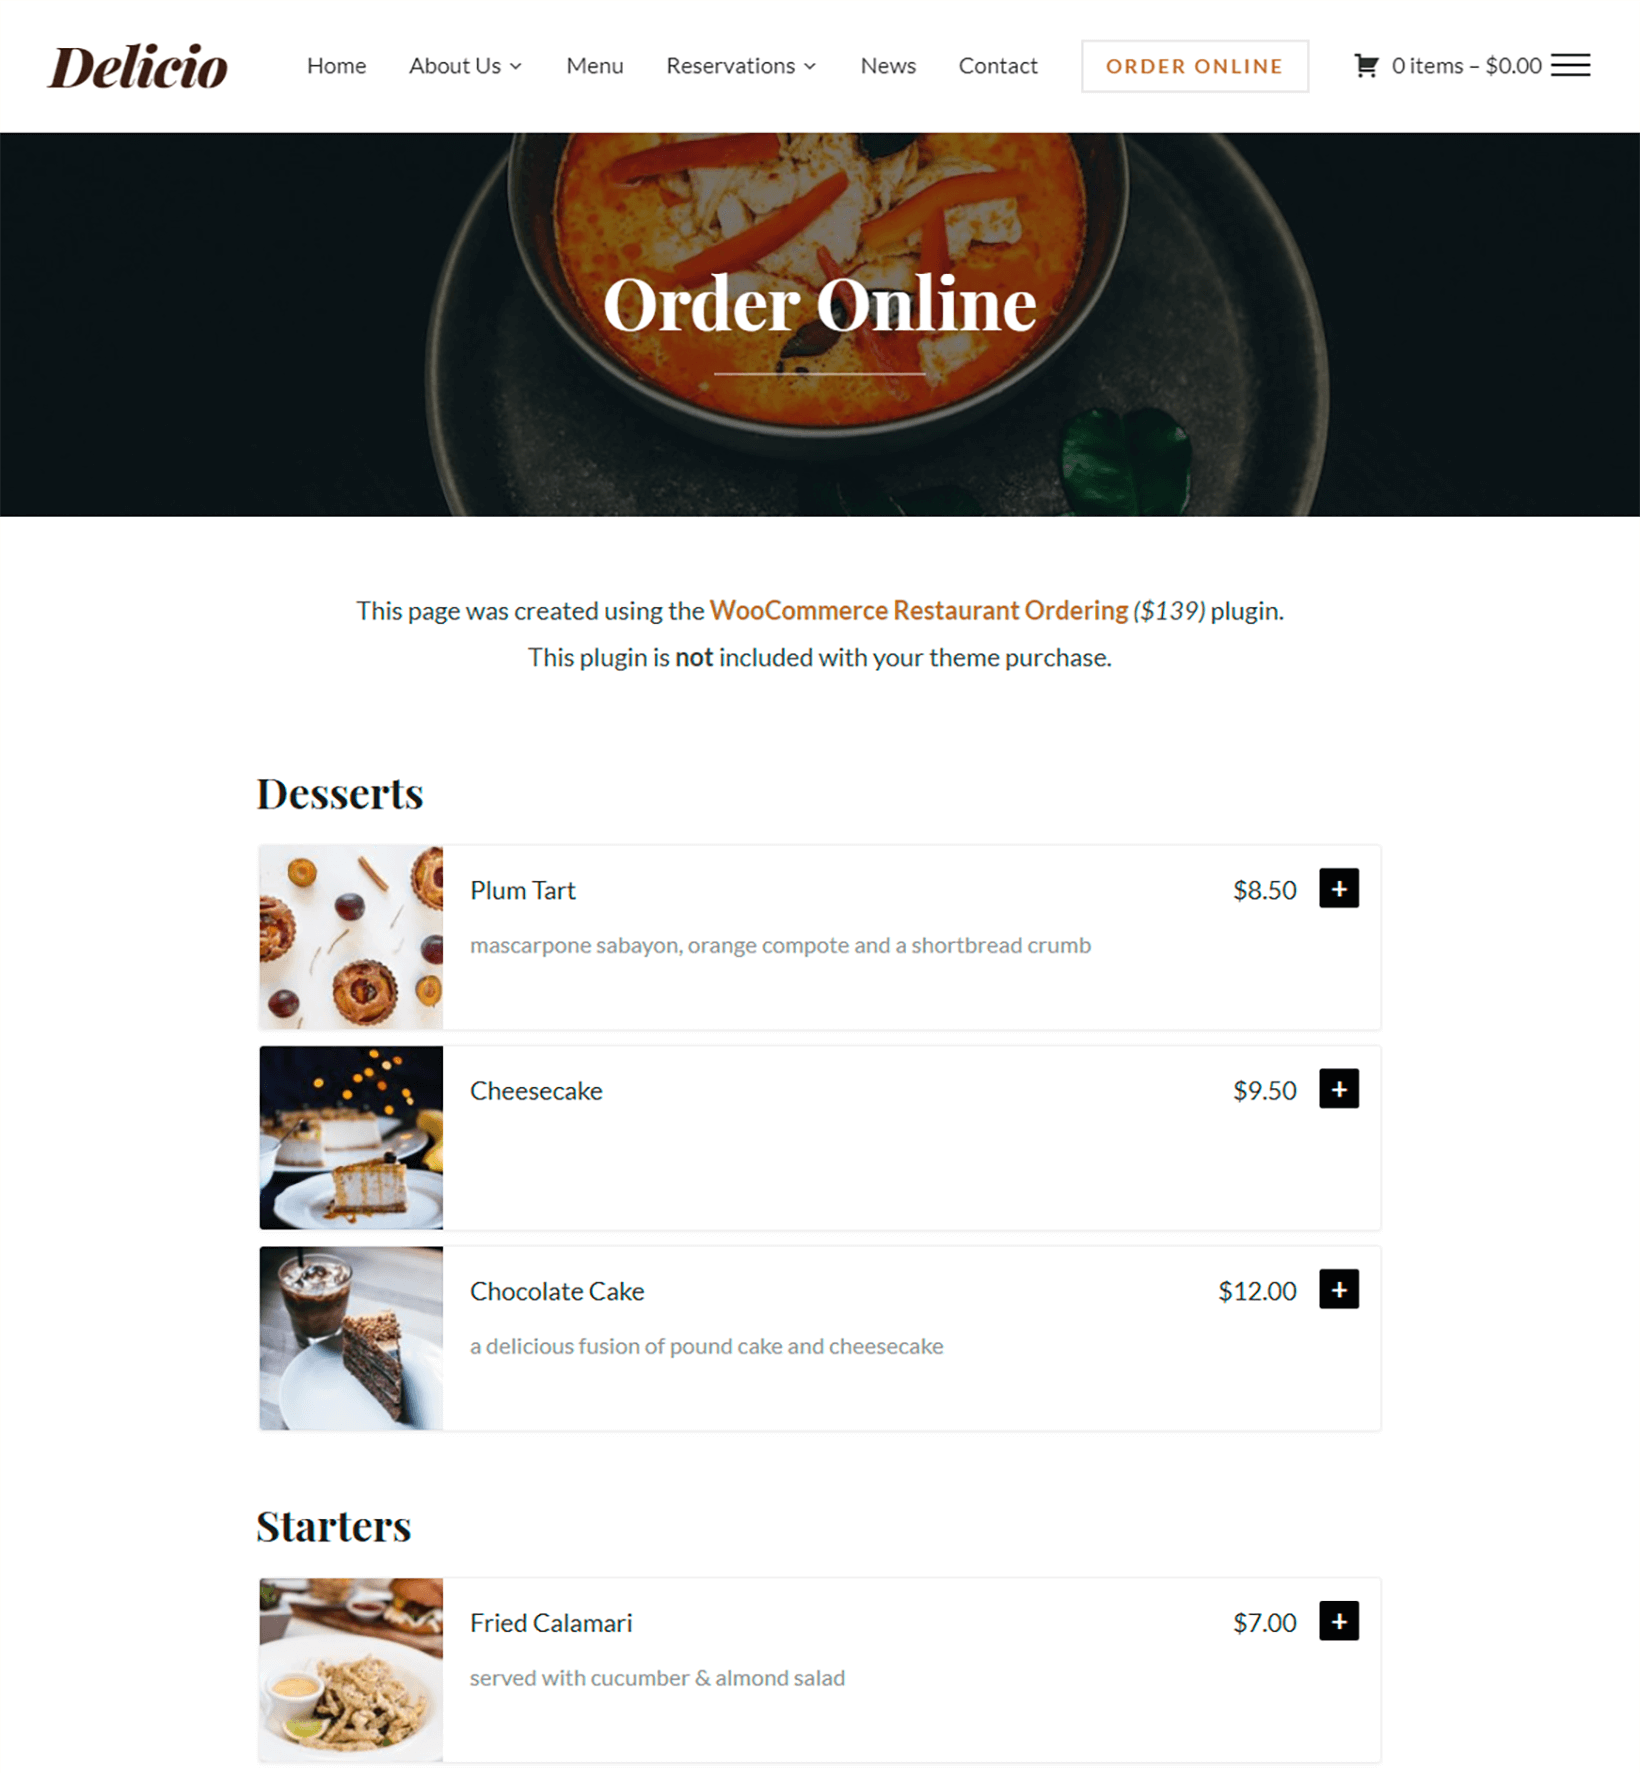
Since this tutorial is aimed at non-coders, I recommend using a WooCommerce-ready theme for the design of your website. The screenshots in this article were all created using Storefront. This is a high-quality, free WP theme from the makers of WooCommerce. If you prefer, then you can use a WooCommerce restaurant theme such as Delicio.
The WooCommerce Restaurant Ordering plugin with the Delicio theme
2. Install and set up WooCommerce
Once you’ve got a WP website with a WooCommerce-ready theme installed, it's time to install WooCommerce. This will be the core of your online restaurant food ordering system and the basis for installing your WordPress food delivery system plugin, providing behind-the-scenes e-commerce features such as the shopping cart, checkout, and online payments.
Log into the WordPress dashboard for your website.
Go to Plugins → Add New.
Search for 'WooCommerce', and install and activate the plugin.
A button will appear towards the top of the WordPress admin prompting you to enter the WooCommerce setup wizard. Go through the wizard and enter your currency, tax details, etc. (Ignore shipping as we'll do this in step 5). Tell the wizard to create the basic pages needed for WooCommerce such as Shop, Cart, and Checkout.
In the payment options section of the setup wizard, choose 'PayPal Payments Standard' and enter your PayPal email address. This is the quickest way to get started and you can always set up other payment options later. If you don’t want to take online payments, select 'Cash on delivery' and your restaurant staff or delivery drivers can take payment instead. To take credit/debit card payments without PayPal, then select 'Stripe' and follow the onscreen instructions.
2b. Create product categories for your restaurant menu
Most restaurant menus are divided into sections: Starters, Pizza, Salads, Desserts, Drinks, and so on. You need to create a separate WooCommerce product category for each section of your restaurant menu:
Look at how your food delivery menu is structured and write a list of categories.
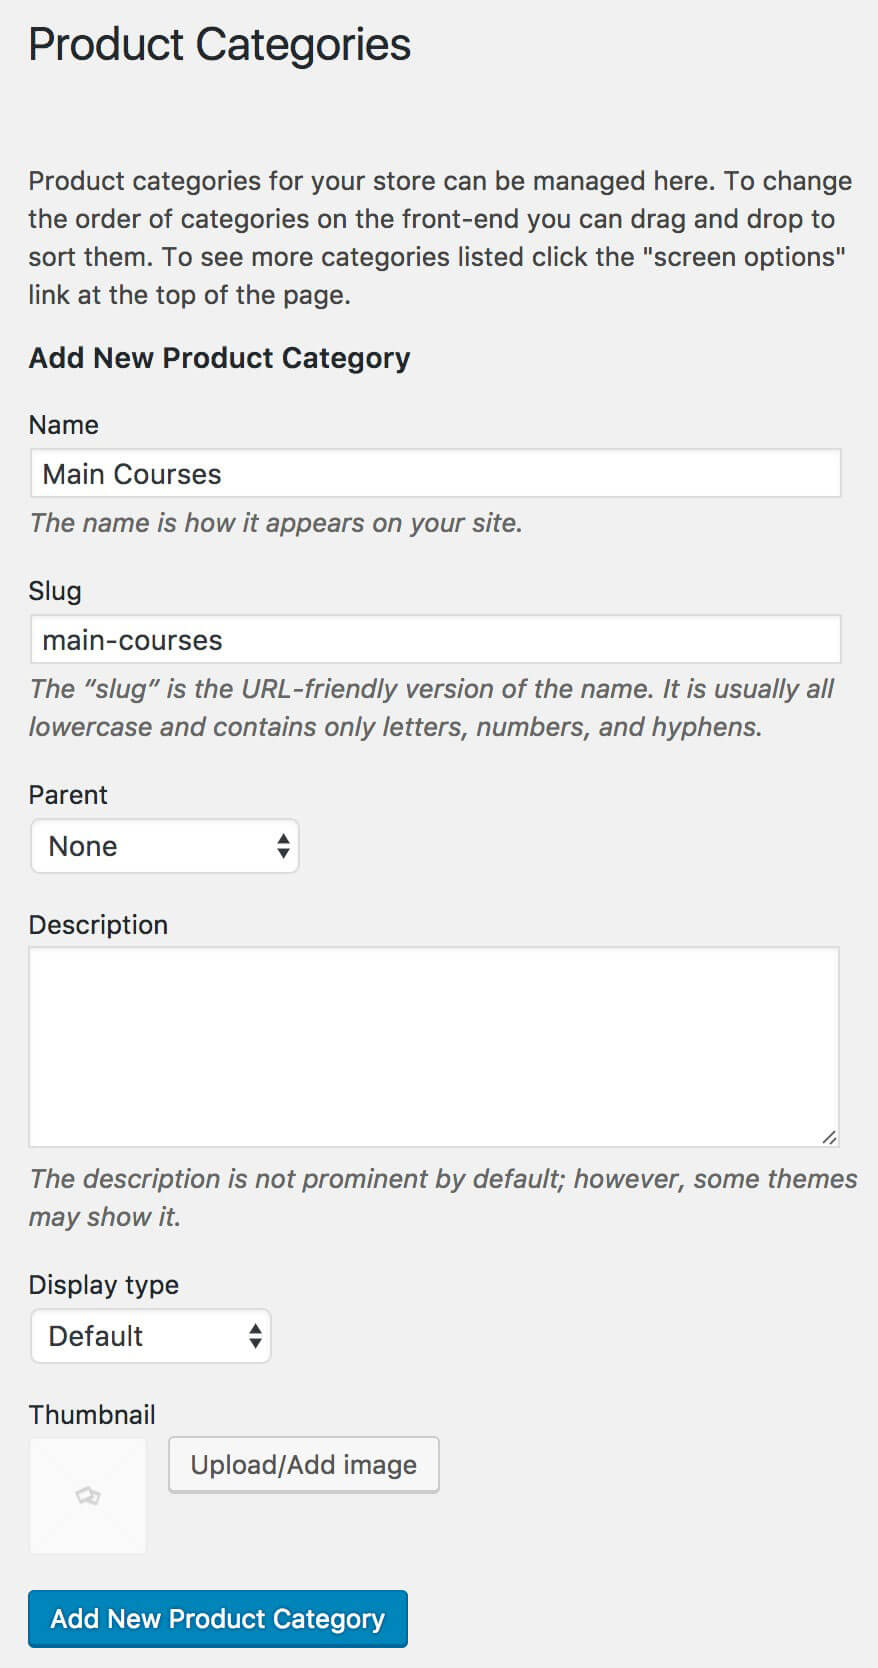
In the WordPress admin, go to Products → Categories.
In the 'Add New Product Category' section on the left, create a category for each section on your online menu. Add a Name and Slug, plus a description if you want to display some introductory text for the category on the food order form.
Click the blue 'Add New Product Category' button.
The WooCommerce product categories you’ve just created for your menu will appear in a list on the right-hand side of the page.
2c. Add each dish or meal as a WooCommerce product
Next, add each food from your restaurant menu as a WooCommerce product.
In the WordPress admin, go to Products → Add New. Add the information highlighted in the screenshot below:
Title – The name of the dish to appear in the online restaurant ordering system.
Long Description (optional) – This can appear in the lightbox popup for each food (if you enable lightboxes in step 3). It's ideal for listing allergens and nutritional information.
Product Data – Choose a product type. If your restaurant only offers 1 version of the dish then choose 'Simple Product' and add the price. If you offer choices (e.g. Small, Medium, and Large), choose 'Variable Product' and add the remaining information in step 4.
Product Short Description (optional) – Use this to display extra information about the meal. This can appear on your one-page restaurant order form. It's a good place to list nutritional symbols, such as "GF, VG" for a dish that is Gluten Free and Vegan.
Product Categories – Tick the menu category that the food should appear in. (WooCommerce lets you select multiple categories but most online restaurant ordering systems would have 1 category for each food, just like a printed menu.)
Product Image (optional) – Click 'Add Featured Image' and upload a picture of the food. Restaurant food photography is a skill and it’s worth getting this done professionally. If your online restaurant order form will have small images then keep the file sizes small.
Publish – Click the blue 'Publish' button.
3. Install WooCommerce Restaurant Ordering
By now you've set up WooCommerce, added your dishes and structured them into the sections on your restaurant menu. Next, it's time to create a one-page food order form so that hungry customers can quickly build their meals and order online.
We'll do this using the powerful WooCommerce Restaurant Ordering plugin. WooCommerce provides its own layouts but they're not suitable for an online food ordering system. As a WordPress food delivery plugin, WooCommerce for Restaurant Ordering lists your menu in a one-page order form which is perfect for food ordering.
Download the plugin files and copy your license key from the order confirmation page or email.
In the WordPress admin, go to Plugins → Add New → Upload.
Upload the zip file for WooCommerce Restaurant Ordering and activate the plugin.
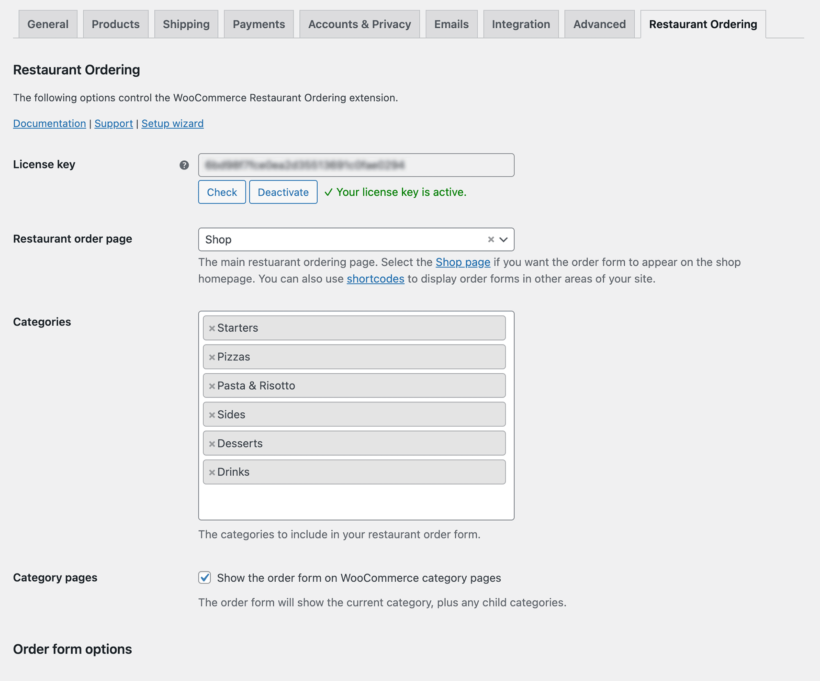
Go to WooCommerce → Settings → Restaurant and enter your license key. Here, you can also choose the default settings for your restaurant food order forms. Use these to configure the order forms. Also add opening times so that people can only order food while you're open.
3b. View your restaurant ordering page
When you activated WooCommerce Restaurant Ordering, the plugin automatically created a one-page food ordering system for you. This lists all your food products, divided by category.
Find the page under the Pages section of the WordPress admin, and see how it looks!
These are just some of the many ways you can list foods with WooCommerce Restaurant Ordering
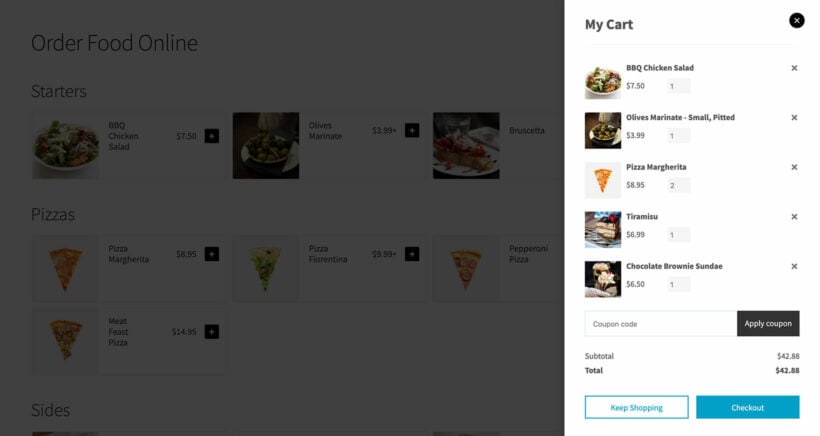
Next, you need an easy way for customers to review and complete their restaurant orders. The best way to do this is to install the WooCommerce Fast Cart plugin. This adds a floating cart popup so that customers can make changes, enter their details and check out without leaving the page. It's really flexible and you can choose whether to open the popup automatically as soon as customers add foods to their order or to display a clickable floating cart icon instead.
A website using WooCommerce Restaurant Ordering with the Fast Cart plugin.
2c. Create more food order forms (optional)
So far, you've learned how to use the default restaurant ordering page, which lists all your foods by category. If you need more flexibility, then you can also create food order forms individually.
You can do this by adding a [restaurant_ordering] shortcode anywhere on your site. Use the shortcode options to choose which categories to include, and customize the settings. This might be useful if:
You're listing foods on more than one page of your website, for example with one page per category.
You'd like to use different settings for each food order form, such as showing images or descriptions for some categories and not others.
4. Add options to your food products
If you only offer 1 version of each dish, you can ignore this section. If you want to give customers a choice – for example to choose a size or select pizza toppings – then you need product variations or add-ons.
Variable products are built into WooCommerce. You can list each type of variation as a dropdown list alongside each product in your online restaurant ordering system. Customers can select 1 variation from each list.
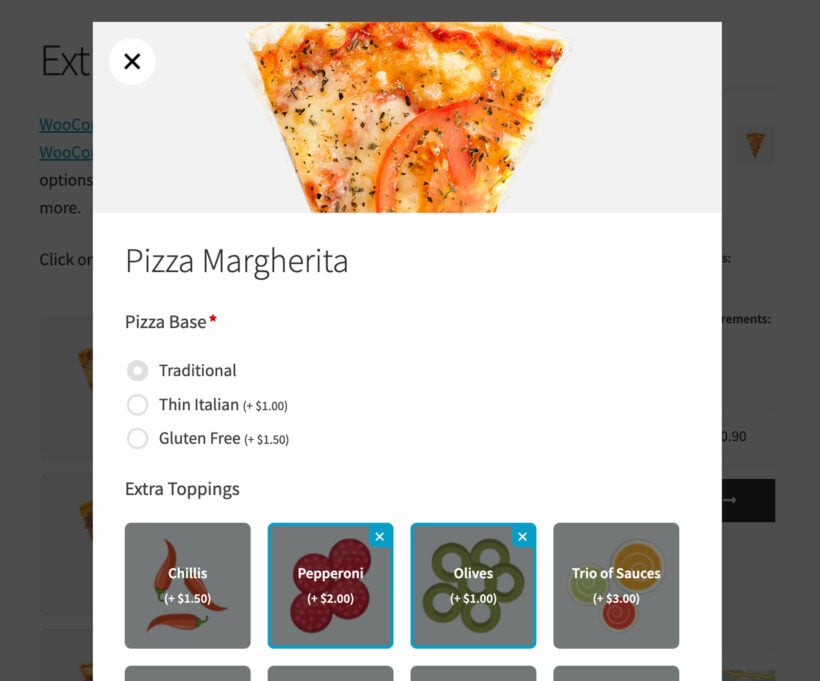
If you want customers to be able to make multiple selections, then you need add-ons instead. You can add more flexible options with the WooCommerce Product Options plugin. It works perfectly with WooCommerce Restaurant Ordering plugin we're using for the food order system. You can use it to add checkboxes, radio buttons, multi-select dropdowns, text input fields where the customer can type a special message, and more. For example, a WooCommerce pizza restaurant will need Product Options so that customers can order as many extra toppings as they like.
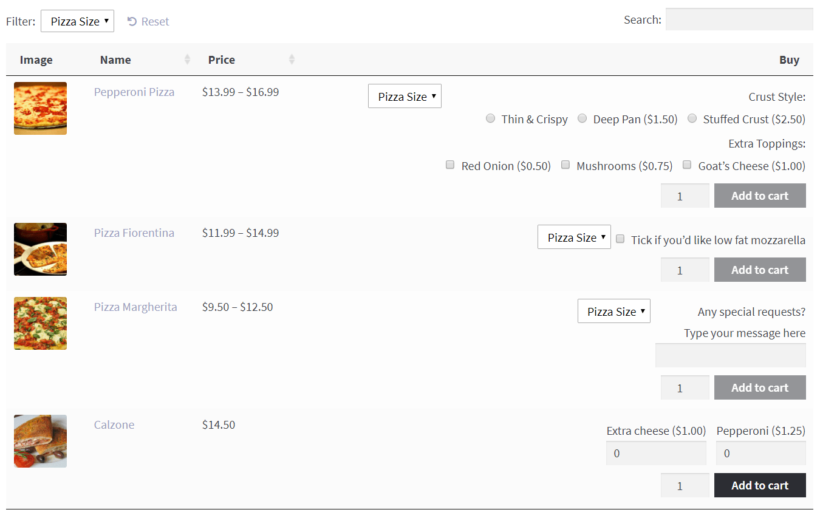
An example of a pizza with product variations for Pizza Size, and add-ons for Crust Style and Extra Toppings.
Next, I'll show you how to add both types of extra product options. You can use them separately or together in your WooCommerce restaurant ordering system.
Adding product variations
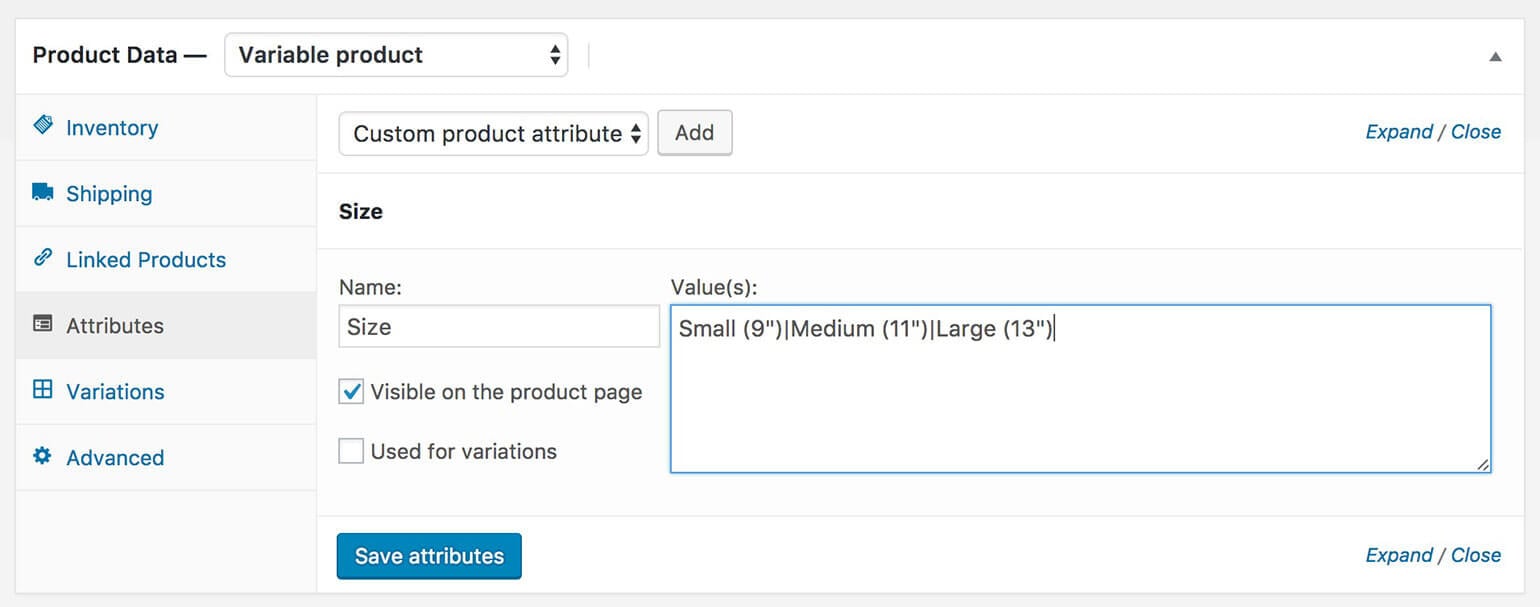
Select 'Variable product' in the 'Product Data' section of the 'Add/Edit Product' page.
Go to the 'Attributes' tab, add the product information that customers will be choosing between, and tick 'Used for variations'.
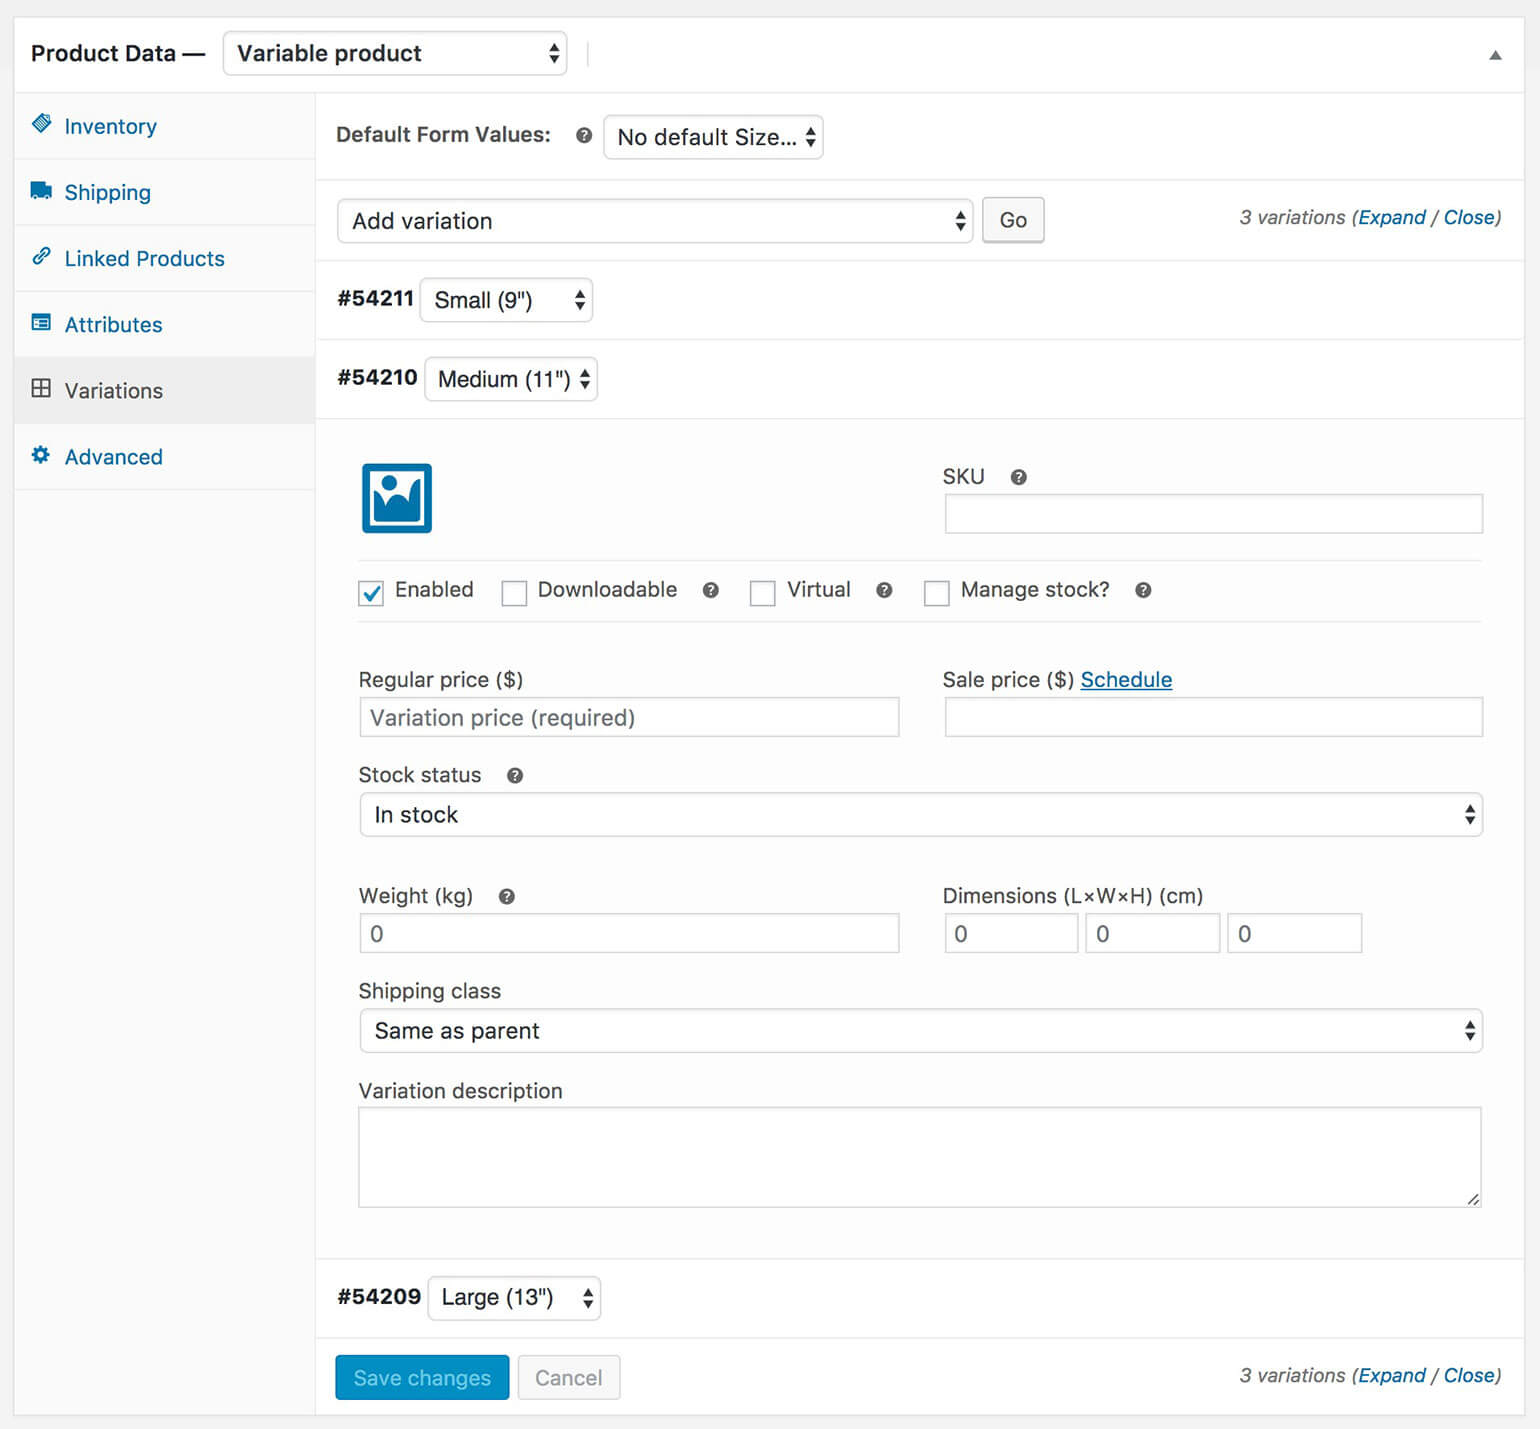
Go to the 'Variations' tab.
Either select 'Create variations from all attributes' from the dropdown, or add each variation individually and click 'Go'.
Click the little triangle arrow that appears when you hover over a variation and add the variation price and any other information.
Finally, click 'Save changes'. When customers click on food in the restaurant order form, they can choose the variations from a lightbox before adding it to the cart.
Go to Products → Product Options in the WordPress admin.
Add as many options as you like, structured into groups.
When customers click on a food product in your WooCommerce restaurant order form, the add-ons will appear for them to select in a lightbox.
5. Set up delivery, collection and delivery time slots
WooCommerce offers lots of delivery options, which are perfect for restaurants. The free WooCommerce plugin lets you set up delivery areas and delivery or collection options. You can also use an additional plugin to let customers choose a specific delivery time or collection slot.
5a. Delivery areas and options
You can find these in the WooCommerce → Settings → Shipping section of the WordPress admin.
Here are some suggested shipping options that are useful for online restaurant ordering:
Shipping zonesCreate one or more shipping zones for your different delivery areas. For example, if you offer free shipping for certain zip codes and charge for delivery in other areas, then set up 2 shipping zones. If you also offer collection, add a third shipping zone so that people can 'click and collect' wherever they live.
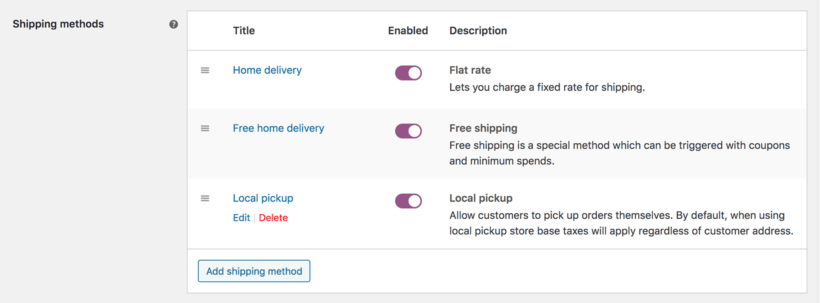
Shipping optionsAdd one or more delivery options for each shipping zone. For example, your 'Local Delivery Area' shipping zone might have a 'Free Delivery' option for orders over $20, a $5 'Flat Rate' option for lower value orders, and a 'Local Pickup' option for customers wishing to collect their takeout meal.
An example of WooCommerce delivery options for a typical restaurant
Let customers check the delivery area before they start ordering
To make your online restaurant ordering system more user-friendly, I recommend adding details of your delivery area elsewhere on your site. Here are some ideas on how you can do this:
Add a 'Delivery Area' page to your restaurant website.
If your website has a sidebar (right or left column), add a widget about your restaurant's delivery area. Or even better, add a custom Google map showing your online food delivery area.
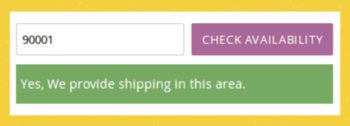
Install the Woo Delivery Area Pro plugin so that customers can check they're in your delivery area before they start building their meal.
5b. Delivery time slots
Some restaurants like to deliver their online orders as soon as they're ready. Others let customers order in advance and choose a specific time slot. As a restaurant, you might want to take up to 5 online food orders in each half-hour period, and make sure they order at least 15 minutes in advance of their time slot. You can do this with the WooCommerce Opening Hours & Chosen Times plugin.
This excellent plugin lets customers choose a delivery date and time slot, subject to your restaurant's opening hours and capacity. You can restrict the number of bookings per time slot. You can specify how long customers must place their orders before their time slot, giving the kitchen plenty of time to prepare the meal.
6. Bonus tips
Before we finish, I'll share some more top tips for perfecting your WooCommerce restaurant ordering system. You'll learn how to accept tips online, sell meal deals, and more. If you operate a chain of restaurants, then you'll also learn how to adapt this tutorial to set up the best online ordering for restaurants for multiple sites.
Encourage customers to leave a tip
All over the world, restaurant customers expect to leave a tip. Don't miss out just because you're selling online! You can add tipping to your WooCommerce restaurant website using the WooCommerce Donation Or Tip On Cart And Checkout plugin.
This handy plugin adds a 'Tip' field to the WooCommerce checkout page. Customers can enter the value of their tip, significantly increasing your average order value.
Most restaurant customers add a tip of 10-15% of the total order value, depending on your country. Use the plugin to set a default tip as a percentage of the order value. To encourage bigger tips, set the default tip at the upper end of the usual amount in your country. Customers can then override the suggested tip as required.
Manage your delivery drivers
Most WooCommerce restaurant ordering systems use local drivers to deliver the orders.
You can manage your delivery drivers outside of the website. Alternatively, you can save time with the free Delivery Drivers for WooCommerce plugin. This WordPress plugin automates many of the manual tasks, connecting your drivers with your online systems and the customer.
Sell restaurant meal deals
Lots of WooCommerce for restaurants websites provide special offers and meal deals. These are fantastic incentives to encourage customers to buy more.
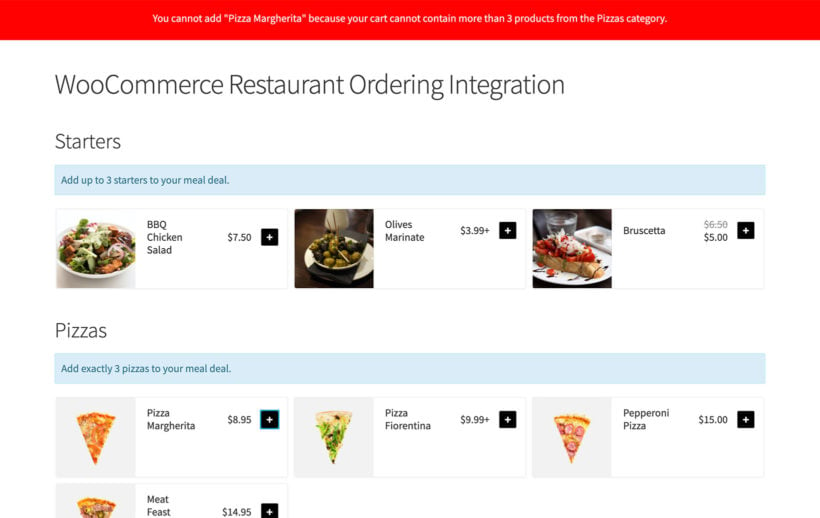
Use WooCommerce for restaurants ordering with the Quantity Manager plugin to control how many items customers can buy from each category. For example, you might sell a meal deal for two people where they can buy 2 starters, 2 mains, and spend up to $15 on side dishes.
You can also use the official WooCommerce Dynamic Pricing plugin to create restaurant deals and special offers. For example, you can create buy one get one free (BOGOF) meal deals, or buy one pizza and get 50% off your second one. These deals can be global or specific to a category, so you can offer deals on pizzas or sandwiches while keeping the side dishes and desserts at full price, and so on.
Mobile ordering for restaurants
WooCommerce doesn't come with a mobile app for customers to order via their smartphones. However, most WordPress themes are fully responsive, which means they're mobile-friendly and look great on any device.
This means that your customers can view your foods and order from your restaurant online using their device of choice - no need to worry about setting up a separate mobile app!
Managing orders in your WooCommerce for restaurants' food ordering system
There are many ways to manage the online food orders that your restaurant receives in WooCommerce:
Email notification of new restaurant orders
When you receive an order, you will receive an email notification from WooCommerce. Your kitchen staff can monitor this email address and be notified as soon as an order arrives.
If you have a busy restaurant with many online orders, then keep the WordPress admin open on your screen during your restaurant opening hours. Train your staff to refresh the WooCommerce → Orders page regularly so they can take action as soon as a food delivery order is received.
WooCommerce for restaurants mobile app
The official WooCommerce iOS mobile app lets you view and manage restaurant orders from any Apple iPhone or iPad. It's often more convenient for restaurant owners and staff to use mobiles or tablets than desktop computers.
Auto-print new food orders to the kitchen
You can integrate your WooCommerce for restaurants' food ordering system with a GPRS printer. This will automatically print new online restaurant orders as soon as they're received. We recommend the WooCommerce Automatic Order Printing plugin.
Receive an alert when you receive a WooCommerce for restaurants order
Use YITH WooCommerce Desktop Notifications to automatically play a sound alert on your desktop computer, laptop, or tablet whenever you receive a new order.
If you'd rather receive a text when you receive a new order from your WooCommerce for restaurant website, try the SMS Alert Order Notifications plugin. You can also use the Twilio SMS Notifications plugin to send the customer a text when their order is ready.
WooCommerce can be integrated with many external systems. If you're using a specific system to manage your restaurant orders, look up how this can be integrated with WooCommerce.
Think creatively and you'll be surprised how easy it is to integrate your WooCommerce for restaurant ordering system with your existing kitchen processes.
Online ordering for multiple restaurants
So far, we've talked about creating a WooCommerce restaurant ordering system for a single location, using a WordPress food delivery plugin. With a couple of tweaks, you can extend this to take orders for multiple restaurants or entire restaurant chains. There are 2 ways to achieve this:
Method 1 – WordPress multisite, with a separate site for each restaurant
You may want to keep your WooCommerce for restaurants really separate, with unique content for each one (e.g. a different homepage, about page and contact us). If so, you can use WordPress multisite to create a separate sub-site for each restaurant in the chain. This is better than having completely separate websites because you get the best of both worlds: a single WordPress food delivery plugin installation with shared hosting and maintenance costs; with unique content for each restaurant.
WooCommerce for restaurant ordering will be active on each site. However, each site will have its own set of products and order notification settings, avoiding any crossover.
Method 2 – Single website, with separate categories & order notifications for each restaurant
A simpler option is to take orders for each restaurant from your main WordPress website. There are two ways you can do this:
Create separate product categories for each restaurant. On the online food ordering system page for each restaurant, use WooCommerce Restaurant Ordering to list products from the appropriate categories.
Alternatively, use either the official Product Vendors add-on or the Dokan Multivendor plugin to add products from multiple vendors (treat each restaurant as a separate vendor). Each vendor has their own product categories. Enable the 'Category pages' option in WooCommerce Restaurant Ordering and the beautiful food order form layout will be used for each vendor's products.
Whichever method you choose, you can use the WooCommerce Multiple Email Recipients Notifications plugin to send order notifications to a different email address depending on which category the customer has ordered from. This lets you ensure that the new order emails are sent to the correct restaurant. As a result, your entire WooCommerce restaurant online food ordering system remains on a single website - while taking orders from multiple restaurants.
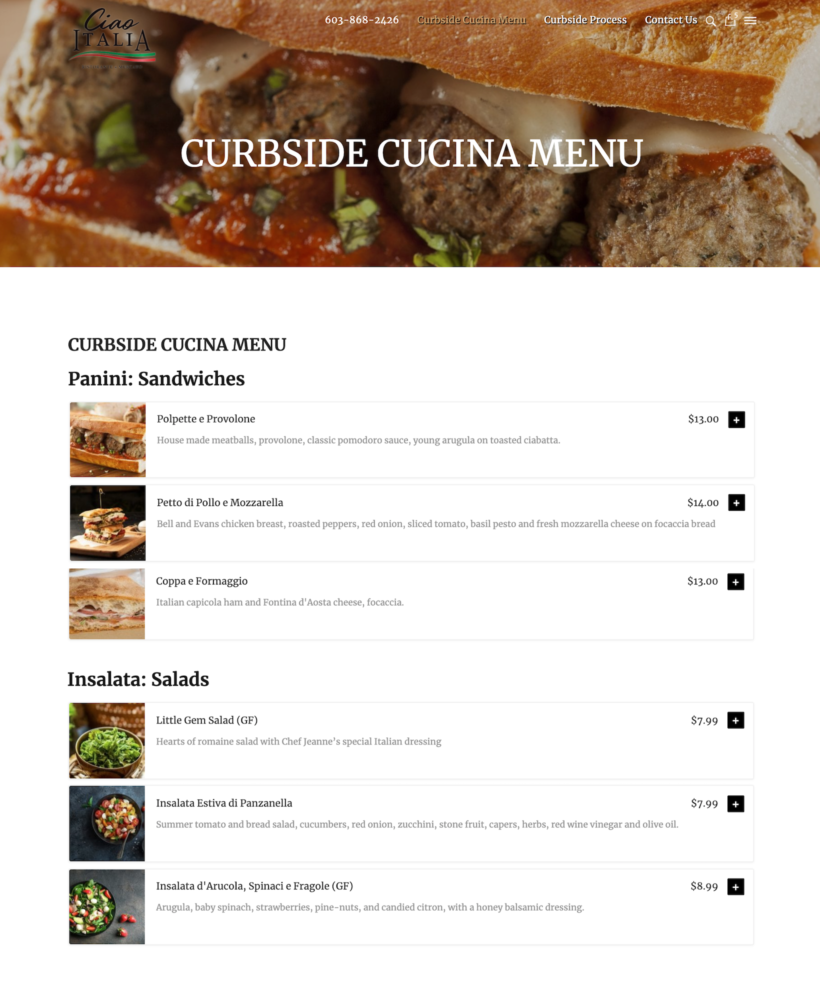
Case study: Online Ordering for Ciao Italia
Ciao Italia is an Italian restaurant in the US that started offering curbside pickup to its customers during the COVID-19 pandemic. They use our WooCommerce Restaurant Ordering plugin to let customers place their orders online from home.
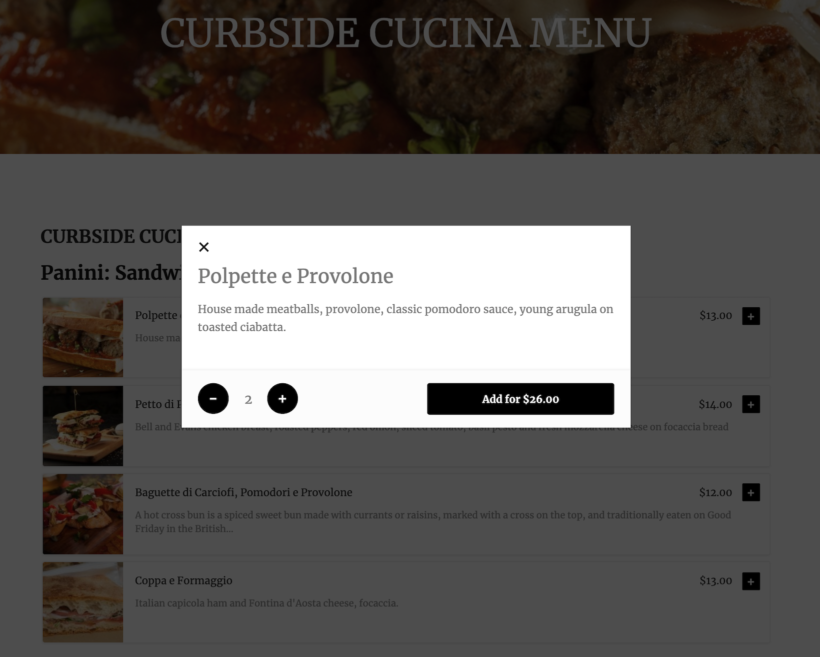
The restaurant displays its entire menu (including food, beverages, and a gift card) on a one-page order form. It does this by sorting the food items under different categories and displaying all of the categories on the menu page. Customers can simply click the (+) icon to add food items to the cart. When a customer adds an item to their cart, they see additional purchasing options in a lightbox.
For example, you can use the lightbox to choose the quantity of food or beverages. If you're buying a gift card, then you can choose the value in any denomination. (Tip: They sell gift cards using the 'Customer Defined Price' option in the Product Add-Ons plugin.)
The one-page food order form makes it quick and easy for customers to place their orders and proceed to the checkout page.
Adam Tracksler from Bryce Creative developed the website. He was delighted with WooCommerce Restaurant Ordering:
In today’s environment of having to act nimbly for clients, the WooCommerce Restaurant Ordering plugin is the perfect solution for getting a website running quickly. We were able to launch on day one with the help of this plugin. It took all the heavy lifting out of the equation and let us focus on design. If you are debating whether or not this is the solution for getting a restaurant going — look no further, this is the plugin you want. The support is also top-notch!
Want to set up online ordering for your restaurant in 15 minutes?
And there you have it! If you follow all the steps in this tutorial then you can create a complete online food ordering system with an easy-to-use WordPress food delivery plugin.
You've learned how to install and set up the WooCommerce platform to handle all of your menu's food products. You've also seen how you can use the WooCommerce Restaurant Ordering plugin to create customizable food order forms. Customers can choose their selections from each customer, and then place their order and pay online.
By using a WordPress food delivery plugin and WooCommerce as an alternative to Just Eat or other systems, your restaurant can save many thousands of dollars or pounds. It's easy to set up, easy to manage and will look really professional.
Easy plug-and-play setup.
Comes with full support and expert advice.
30-day money back guarantee - love it or your money back!