Most WordPress websites need some sort of publications library, documents database or knowledge base. Here's how to create your very own WordPress publications library.
There are many reasons why you might want to add a WordPress publications library to your website. Here are a few common examples:
WordPress publications library of items your company has published, e.g. brochure, magazines and newsletters.
Document library of staff policies and procedures for your employees.
Database of documentation and instructions for your products.
Keep reading to discover the best plugin for creating a WordPress publications library, and how to set it up.
What is the best WordPress publications library plugin?
Inexperienced website owners often set up a WordPress publications library as static content - for example a basic list of links to PDF downloads. This is ok if you don't have many publications for your library, but can easily get out of control as the list gets longer. Before you know it, visitors are struggling to find the publications they're looking for. It also becomes a nightmare for you to maintain.
Document Library Pro is the perfect solution. It's easy to set up and manage, yet offers a sophisticated WordPress publications management system with user-friendly features such as advanced search and filtering.
This publications library plugin lists your publications in a fully searchable, sortable HTML table with filters. Alternatively, it can list documents in a stylish grid layout where each document has its own tile.
Whichever layout you choose, it takes minutes to set up and works brilliantly on mobiles and tablets. It's very flexible so you can adapt the WordPress publications library to suit your website.
You can either store the publications in the WordPress Media Library so that people can download them. Alternatively, you can link to publications which are hosted on other websites like Dropbox, or link to other web pages. Either way, they appear in your searchable publications library.
Use Document Library Pro to list any type of publication, document or resource
How to create a publications library in WordPress
For step-by-step instructions on how to create a WordPress publication library, watch this video or read the written instructions below:
Do our FREE document library e-course!
FREE COURSE
This online course is 100% free of charge. It will teach you everything you need to know about how to add a publications library to any WordPress website - no experience needed.
First, install the plugin and add your publications
Once you've bought Document Library Pro, install it on your WordPress website and activate your license key. You can find this in the 'Getting Started' email, along with a link to download the plugin.
Next, you can start adding publications to WordPress. You'll find a 'Documents' section on the left of the WordPress admin. You need to add each document as a separate document. There are several easy ways to add publications:
Add publications manuallyGo to Documents → Add New and add each publication. This is similar to adding pages or posts to a WordPress site. For each publication, add all the information that you want to display, such as the title and a brief summary. If you like, then you can actually embed the publication in the main content area - for example, as a page turning flipbook. You can also use the 'Document Link' section to upload the publication so that people can download it, or link to where it is located online.
Select from Media LibraryIf you already added your publications to the WordPress Media Library, then you can tick them in the 'Media' section of WordPress and use the bulk action dropdown to convert them to documents. You might need to do this if you previously created a static publications library page, and are converting to Document Library Pro. They will then be listed in the 'Documents' section, where you can make changes and add any extra information to display for each publication.
Drag and drop file uploadQuickly add publications by going to Documents → Import and using drag and drop to add the publications to WordPress.
Bulk upload from CSVTo add publications to WordPress in bulk, you can prepare a CSV file and upload it. There are instructions and a sample CSV in the plugin knowledge base.
Next, create a library listing your publications
When you install the Document Library Pro plugin, is creates your first WordPress publications library for you! Find this by going to the 'Pages' area in the WordPress and finding a new page called 'Document Library'. (You can change the name to 'Publications Archive' or anything else.)
Click 'View' to see the page in the front end. You will see a searchable library listing all your publications in a table or grid format.
You might be happy with how the publications library looks by default, in which case you can sit back and relax now. If not, you can make some simple changes to change how the publications are displayed.
To do this, go to Documents → Settings → Document Libraries and make any changes as required.
Recommended settings for a publications library
There are lots of settings (read about them all here) and you can tailor it in lots of different ways, such as:
Choose the content of the library. You can display various data about your publications. This might include featured image, title, content, excerpt, publication date, category, tags, and more.
Enable the folders option to display the publications from each category within a clickable folder layout.
Control the links to your publications, such as whether to allow users to access a separate page for each one, and whether to display links as buttons or file type icons. You can even customize the button text to access each publication.
How many rows to display on each page before pagination links appear at the bottom.
Enable lazy load if you have many publications.
Add filter dropdowns above the WordPress publications library in the knowledge hub. Choose between filters for categories, tags or custom taxonomies.
And there's more!
You can also control:
Which column to sort by when the publications library first loads. The default is 'date' but it might be more logical to sort alphabetically if your publications aren't date-dependent.
Whether to sort in ascending or descending order when the library first loads.
If you want people to be able to click on a category name in order to filter for all publications in that category.
The length of the excerpt from each publication.
And more...
Use the options to create your own unique WordPress publications library. Once you've finished, view the page again, and it will now show the settings you just chose.
Finally, add the page to the menu so that people can access it!
Creating multiple publications libraries
At this point in the tutorial, you know how to list all your publications on the same page - either as a single list, or divided into folders.
If you prefer, then you can use a shortcode to list specific publications in different locations. For example, you might create a different page for each category. You might want to create custom layouts using a page builder plugin, with different publications listed on different parts of the page.
The shortcode is incredibly flexible, so have a play and create new and exciting structures for the publications library!
Can I use the WordPress publications plugin for anything else?
Absolutely! Once you've invested in Document Library Pro for your WordPress publications library, there's plenty more you can do with it. Basically, it can display any type of resource in a sortable table. This includes:
Here's something you might not be aware of regarding WordPress and its abilities. If you want to create a WordPress intranet - a hidden area for your company - you don't need a separate website to make it work.
With just a little tweaking under the hood, you can have both your official, customer-facing website and your staff-only website working on the same instance of WordPress.
In this post, we're going to tell you how to build a private WordPress intranet step by step. You'll learn why you'd want an intranet in the first place, and how you can use it to make your organization's day-to-day more streamlined.
What's a WordPress intranet anyway?
Okay, let's start with the main question, so what is an intranet and why would a business need one?
Simply speaking, a WordPress intranet - in a way we're tackling it here - is a private website that is only accessible to you and the people in your organization/business. It could also be a private area within a website that is otherwise public.
Why your business needs an intranet
Maybe it doesn't. But I dare you to read through the following list of possible use cases and not find at least one that gets you excited:
A WordPress intranet can be your place to store staff documents, contract templates, policies, and other documents that come in handy. Also a great place to keep them updated all in one spot.
An internal community for your company. Something like your own Facebook, just private (cough!).
An internal knowledge base. An extensive directory of procedures, advice, and processes on how to handle various common tasks in your organization.
A customer support code of conduct. Most businesses have at least some customer support aspect to them. You can use an intranet to write down all the best practices for handling customer requests.
An in-company news channel. A place for you to share what's been going on within the company. The kind of stuff that you don't necessarily want to share with the whole world on a public forum.
Internal forms. For example, annual leave form to book holiday breaks, overtime, set team meetings, etc.
A place to store training materials for new and existing employees. Those can be staff induction articles, videos, or anything else that works for your business.
An internal forum for your team to discuss things, as an alternative to Slack.
A staging platform for new content before it goes live. For instance, you can publish a new blog article privately on the intranet, get feedback from your team, and only then make it available to the world.
A private intranet can help you foster team building and onboard new employees. Not to mention that they make it clear where to go if a team member has questions on anything related to how the company goes about conducting its business.
How to build an intranet on WordPress
With the why out of the way, let's now discuss the how of building a WordPress intranet.
There are lots of reasons to use WordPress to create your intranet site. For starters, WordPress will save you many, many thousands of dollars compared to using an enterprise solution like SharePoint. And despite being free to use, WordPress also wins the SharePoint vs WordPress debate due to its huge flexibility 💪.
Here's what you need to get started:
A working WordPress website with a suitable theme. You can use any WordPress theme, or you might like an intranet-specific theme such as Woffice. And;
That's what you'll use for your intranet. The rest of your website remains public as usual. The Password Protected Categories WordPress intranet plugin works by letting you create one or more private categories of posts or other content.
The great thing about this is that you don't have to create a separate website for your main company website and your intranet. You can run both from the same WordPress installation.
Your staff and other colleagues can access the WordPress intranet in a choice of 2 ways, depending on how you set up the intranet plugin:
Basic password protection - Staff and colleagues unlock the private intranet by entering a password. You can create 1 password for everyone to share, or multiple passwords. The important point is that you don't need to worry about creating a separate WordPress user account for each employee, so it's easier for you to manage.
Individual user accounts - If you prefer, you can protect your WordPress intranet so that it's hidden from guests and automatically becomes visible to logged in users depending on their role. This option is more secure but you have to create a user account for each employee, so you may or may not want this.
Here's how to get the plugin and set it up with either option:
1. Get Password Protected Categories and install it on your site
You can get the plugin by clicking here:
When you complete your order, you'll get access to the download page for the plugin. Alongside the download link, you'll also see your personal license key. Take note of that; you'll need it in just a minute.
Getting the plugin to run on your site is simple. With the ZIP archive of the plugin ready on your desktop:
Log in to your WordPress dashboard, go to Plugins → Add New.
Click on the Upload Plugin button.
Select the plugin's ZIP file, click on Install Now and then on Activate.
Lastly, go to the plugin's settings panel in Settings → Protected Categories, and enter your license key.
You don't need to go through all the other settings on this page (unless you want to). The plugin will work just fine on its default settings.
2. Begin building your WordPress intranet
The first thing that needs doing is some good ol' brainstorming. Look through the list of the possible WordPress intranet use cases from above, and note down the ones that make the most sense in your organization.
Do you need an internal social network? Or just a knowledge base? Maybe an internal catalog of training videos?
Whatever that might be, list them all!
Your next task is to figure out which content types you'll use to create the intranet with.
Like with most things WordPress, you get to use posts, pages, and custom post types.
Now, one important thing - or two:
If you're not using any additional plugins to create the intranet with - meaning, you're just taking standard content and putting it on your intranet - then you'll most likely utilize only posts and/or pages.
If you want to use third-party plugins (for a knowledge base, for example) then those will probably come with their own custom post types. This is great news, actually, because the Password Protected Categories plugin works with those no problem.
Let me give you two examples:
A) If you want to build a simple internal knowledge base for your organization then you'll probably stumble upon a plugin called Heroic Knowledgebase. It's a neat solution, and it does its job. Once you install and activate it, you'll see a new custom post type in your sidebar called Knowledge Base. You can hide intranet articles within this custom post type via Password Protected Categories. I'll show you how in just a sec.
B) If you want your own, manually created custom post types, then you can do that as well. For this, we recommend using the Easy Post Types and Fields plugin. It allows you to create any number of custom post types, and then use those post types as part of your WordPress intranet. This scenario might be a better solution if you want to keep your intranet and normal website sections separate in the WordPress Dashboard. We have a whole tutorial on how to set up custom post types with Easy Post Types and Fields plugin here.
Again, at the end of your brainstorming session, you should have a general list of the things that you want to make part of your WordPress intranet. Your list will also include the content types that you're going to use.
3. Put it all together
Here's a possible use case when building a WordPress intranet:
Let's say you've done your brainstorming and you've decided to use just posts and pages as the core of your intranet. You're going to feature some training videos there (for onboarding new employees) along with text articles on how to handle customer requests coming in through your contact channels. A fairly typical setup for a business that's growing.
First, a word on how the Password Protected Categories plugin works:
Quite simply, it hooks up to your site's category structure and allows you to protect any number of those categories. You can make them either password protected (people need to know the password to access), or role protected (they need to have an account on your site to access with the appropriate user role).
In either scenario, what we're actually going to be doing is creating new categories, assigning your intranet content to them, and then making them invisible to the public.
This is arguably the simplest way of building an intranet, for a couple of reasons:
you don't need to be able to code - you can just check off a couple of settings boxes and you're done,
you don't need to know server settings or understand access rights on a server level - how intranets used to be handled old school in more traditional enterprises,
and you can create new intranet content freely just like you're creating your other WordPress content.
4. Set your intranet categories
If you're just using posts for your intranet, simply go to your WordPress dashboard and then Posts → Categories.
The Password Protected Categories plugin has added some new options here:
Those radio buttons are where all the magic happens!
Start by creating your intranet categories. It's best to make them stand out from the standard blog categories. Some possibilities:
intranet-videos
intranet-knowledge-base
etc.
Example:
So far so good. Now let's look at the main setting.
Creating password protected intranet categories
If you check Password protected, you'll be able to assign a password to your new category. Click on "+" if you want more than one universal password for everyone to share.
In this scenario, only the visitors who know the password will be able to see the content assigned to the new intranet category. Just give the password to each staff member.
If you want multiple categories for your intranet, just add sub-categories to your main password protected intranet category. Leave them set to 'Public' and the plugin will automatically be protect them with the same password as the main category.
Restricting intranet categories to logged in users
Alternatively, you can select the 'User roles' box. This will make the intranet category visible to logged-in users with the selected roles only.
You can select any of the standard WordPress roles, such as 'Subscriber', and add each staff member to that role. Alternatively, you can install a free plugin called User Role Editor to create a special role for your employees and give them access to private intranet content. We have a separate guide on how to set it up.
The User Roles option makes the most sense if all the people in your organization have their user accounts on the site. If that's not the case, you're probably better off sticking with the Password protected option, since you can give the password to anyone, or even create separate passwords for separate categories that make up your intranet.
Finish creating your intranet categories
Once you set the password or restrict your new intranet category based on user role, click Add New Category. From this point on, every post that you assign to this new category will become part of your intranet and not accessible to anyone from the outside.
This is what an unauthorized person will see when trying to access your password protected WordPress intranet content:
This sort of intranet structure works well for storing training videos that you can then share with new employees. You can simply embed those videos inside new blog posts (e.g. from YouTube) and then assign them to your WordPress intranet categories.
But there's one thing missing:
5. Create a hub for your intranet content
Having a set of blog posts for your intranet content is all fine and dandy. However, we also need a hub to link to all those posts and make them available from a single location.
One option is just to use the default category pages that come with your WordPress site. Something like, yoursite.com/category/intranet-videos/. This will work automatically. No need to tweak it in any way. In other words, you can share a link like that with your team members and they will be able to access all the content just fine. It will automatically update as you add new intranet content to that category in future.
6. Include pages on your intranet
As I mentioned earlier, your intranet doesn't need to only consist of posts. You can use custom post types and pages as well.
Making custom post types part of your intranet is pretty similar to how you work with posts. When you navigate to any custom post type in the WordPress dashboard, you will see a similar option in the sidebar menu, labeled Categories:
You can either password protect or make those categories private just like you did with posts.
For pages, though, there's an additional step required. By default, there are no categories for pages in WordPress. To add them, follow this guide.
Essentially, this will allow you to assign your pages to categories, and thus make some of those categories private / password protected. So whether you want to create a WordPress intranet using posts, pages or a custom post type, we've got you covered.
List your WordPress intranet content in a searchable table with filters
By default, when your staff and colleagues unlock your private intranet categories, the posts inside will be listed in the default layout for your theme. This will normally look the same as your blog page, with posts listed in reverse date order.
Most WordPress intranets need to be displayed in a more structural way. This needs to include extra data, quick-find filters, and direct download links.
Here are two plugins that can help with this, depending on the type of content in your WordPress intranet site.
List posts and pages with Posts Table Pro
You can list any type of intranet information with Posts Table Pro
If your intranet contains normal WordPress pages, posts or a custom post type you've created, then you can list them in a searchable table using Posts Table Pro.
It's simple to set up and perfect for all kinds of text information. This table structure is also great for displaying multimedia content such as training videos.
People can quickly find and watch the videos directly on the intranet page.
For full instructions, follow our WordPress document library plugin tutorial. Use it with the instructions above to make your document library private on the intranet site.
Where to get the WordPress intranet plugin
At this stage, you have your intranet fully created and available to anyone who either has the password or sufficient access credentials (user account on your site).
No matter if your intranet is just one additional category, or a full, 100-page long repository, the Password Protected Categories plugin can handle it and make things easily customizable.
What do you think of the whole WordPress intranet concept? Does it sound like something your business can benefit from?
Again, click on the button below to get the Password Protected Categories plugin and start building your WordPress intranet now:
When you think of starting an online store that sells digital goods, selling documents probably isn’t the first thing that comes to mind. What most people don’t realize, however, is that digital documents are still one of the best-selling digital products.
In this in-depth guide, we’ll show you how to get started with selling documents online using the most popular WordPress e-commerce plugins. We’ll look at everything you’ll need to get started and walk you through step by step instructions on how to set up an online store that sells documents in WordPress.
You’ll learn how to create a fully functional e-commerce website to sell documents online using either WooCommerce or Easy Digital Downloads, with the documents listed in an easy-to-find table layout ideal for maximizing sales. We'll talk about how to sell digital documents, and how to sell printed documents that you will post to customers.
But before we begin, let’s take a look at why you should sell documents online.
Why should you sell documents online?
It’s no surprise that documents are some of the most popular digital products. They’re easy and cheap to create and the take up very little storage space on your virtual shelves.
Creating a digital document to sell online requires nothing but a computer, your time, and some mental energy. If you have some ideas in mind and little bit of time to invest then there’s no limit to what you can create and sell. Not to mention there are tons of online tools that can help you out in the design department.
And because documents are digital products, storing them on your website’s server takes up very little space. Unlike physical goods, you don’t have to worry about carrying and maintaining large inventories when you sell digital documents online. Documents are sustainable and incredibly easy to distribute (we’ll take a look at this in a minute).
Why documents are valuable
For starters, you’ve put together something that can be downloaded.
Downloadable products, like documents, give users the option to store them directly on their devices and access them offline whenever they’d like. In the case of templates, users can print them out as many times as they’d like without having to worry about losing quality or converting them to different formats.
This saves users valuable time in having to do it themselves which makes downloadable documents excellent products to sell online.
Protecting documents from being copied
One major concern that most online retailers have with selling any form of digital products (especially documents) is piracy. Specifically, how do you protect digital copies of your products from being re-produced? A clear solution is to apply Digital Rights Management (DRM) controls to the documents you sell. DRM controls work to prevent various forms of copying. To name a few:
Locking-in documents to registered devices.
Disabling Save As, Select All, CTRL + C, CTRL + V, right-click + Copy, right-click + Paste, and print screen commands.
Stopping screen capturing tools from taking screenshots.
Applying automatic, custom watermarks to the document.
If done right, selling documents online in WordPress can be an incredibly lucrative business venture. At this point you may be wondering what types of documents you can create. And more importantly, what types of documents sell online.
What types of documents can you sell online?
Let me answer your question with another question: what types of documents do you want to be creating?
When it comes to creating marketable documents, there’s something in store (pun intended) for just about everyone. If you’re a creative, you could sell design templates or sheet music. And if you’re in the legal business, there are tons of legal templates people search for from tenancy agreements to living will and bill of sale to non-disclosure agreements. In B2B circles, white papers, case studies, and industry reports are always in demand.
More often than not, documents that are sold online are either informational pieces or templates. They might be listed in an Easy Digital Downloads or WooCommerce document library so that users can quickly find a suitable documents and buy online. Here’s a list of just some of the different types of documents that you can sell online:
Informational pieces
Industry reports
How-to guides
Manuals
White papers
Swipe files
Templates
Proposals
Resumes and CVs
Legal letters
Stationery
Letterheads
Business cards
Bill of sales
Balance sheets
Others
Sheet music
Manuscripts
There’s so much you can do when it comes to selling documents online that, in some cases, you won’t even have to create content from scratch.
For instance, you can repurpose existing blog posts into manuscripts or how-to guides and save readers time from digging them out on your own. There’s a lot of value in curating and packaging high-quality content in just about every niche.
Selling documents online using WordPress e-commerce plugins
E-commerce plugins give you the option to sell your documents in a choice of file formats, languages, or color schemes, depending upon the document type.
For instance, if you were selling calendar templates that you had custom designed in Adobe Photoshop, you might want to offer them in a variety of colors. Or if you were to sell a project proposal document that you created in Adobe InDesign, it might be a good idea to offer it in both .indd and .idml file types.
In the next section, we’ll show you how you can use two of the most popular WordPress e-commerce plugins – WooCommerce and Easy Digital Downloads – to sell documents online. Both plugins are excellent e-commerce solutions for selling digital products and both offer outstanding customer support. You'll also learn how to list documents in an easy-to-find document library format which will help you to sell more documents.
WooCommerce
WooCommerce is the best (and most popular) e-commerce solution for WordPress websites. In fact, over 44% of all online stores – selling both physical and digital goods – are powered by WooCommerce.
One key benefit of selling documents online in a WooCommerce document library is that it lets you sell variable products. What this means is that you have the option to sell both print versions and downloadable versions of your documents.
Easy Digital Downloads
Easy Digital Downloads is another popular e-commerce plugin for WordPress that specializes in selling virtual and digital goods. Most people use the plugin to sell downloadable products like software, e-books, audio files, and documents.
Choosing an e-commerce plugin for selling documents online
Since WooCommerce and Easy Digital Downloads are both great options for selling documents online, deciding which one to go with can be pretty difficult.
Here a few scenarios where it makes sense to go with a WooCommerce document library over Easy Digital Downloads:
If there’s a chance that you’ll be selling print versions of your documents then go with WooCommerce. This is because you’ll likely be charging for postage. Easy Digital Downloads doesn’t offer delivery and shipping options.
It’s easier to list documents in a table if you’re using WooCommerce. We’ll walk you through a tutorial on how to do this with both WooCommerce and Easy Digital Downloads in the following sections. There’s an extra step involved if you’re using Easy Digital Downloads which happens automatically if you’re using WooCommerce.
WooCommerce also has a better choice of extensions to improve the way you sell documents. For example, if you want to add product quick view then you're better off with WooCommerce.
Documents for sale in a table layout with WooCommerce
Documents for sale in a table layout with Easy Digital Downloads
So, if you’re looking to keep things simple or perhaps want to be selling print versions of your documents then you should use WooCommerce. However, if any of these scenarios don’t apply to you then you should read a bit more about each plugin and see which one is best for your specific business needs.
How to use WooCommerce to sell documents online
Here, we’ll walk you through a step by step tutorial on how to sell documents online using WooCommerce in WordPress.
We’ll start off by setting up WooCommerce, add documents to the library, list the documents on our website, and start selling. We’ll also share some helpful tips on how you can sell more by using some tried and tested strategies for selling digital products.
Step 1: Set up WooCommerce
Log into your WordPress website’s admin panel, navigate to Plugins > Add New, and search for WooCommerce.
Install the WooCommerce plugin and activate it to your website.
Once the plugin is activated, you’ll be prompted to run the Store Setup Wizard. Run the wizard and configure your online store’s payment and shipping options. It’ll ask you: What type of product do you plan to sell?
Select the I plan to sell both physical and digital products option if you want to be delivering and shipping your documents in addition to offering downloadable versions.
However, if you simply want to offer downloadable documents, select the I plan to sell digital products
On the payment gateways screen, enter your PayPal email address. If you want to offer credit and debit card payments then we recommend going with Stripe. It’s a good idea to offer both a PayPal option and a credit/debit card option so that it’s easy for customers to make payments.
Click the Create a Product button to continue.
Step 2: Add documents to WooCommerce
You’ll be redirected to the Add new product screen to add the document you want to sell through your online store.
Add a product name, description, categories, and tags for your document. If it makes sense for your document, upload a product image for it using the Product image
Scroll down to the Product data section:
Make sure Simple product option is selected.
Tick the Virtual box and the Downloadable
Add a price for your document.
Click the Publish button to proceed.
Navigate to Products > Add New and repeat these steps to add all of the documents you want to sell through your online store.
Step 3: List WooCommerce documents on your WordPress website
Now that you have your documents added to your WooCommerce store, you need to display them on your site’s front-end so that potential customers can view their details and buy them.
Although WooCommerce comes with the free Storefront theme in addition to some built-in options for displaying your products on the front-end, these layouts aren’t suitable for selling documents. If you’d like to go for a more professional look, it’s a better idea to list your documents in a table-style layout.
You can do this in a few simple steps using the WooCommerce Product Table plugin. Since you’ve already added your documents to your WooCommerce store, the WooCommerce Product Table plugin will automatically create a responsive table and list your documents in it.
The key benefit of listing your documents in a table-style layout is that it is information-centric and puts the focus on your documents’ specifications instead of on product images. In addition to this, it makes it easy for potential customers to search for the document they’re looking for using built-in filters and a keyword search box. Customers can view document pricing information, select options, and add documents to their cart directly from the document table.
How to list documents in a WooCommerce table layout
Navigate to WooCommerce → Settings → Products → Product tables from the admin panel and enter your license key.
Configure the product table’s options based on your personal preferences and click Save changes to continue.
Head over to Pages > Add New and create a new page where you want to list the documents.
Click the Insert product table button in the toolbar to add the following shortcode to your page: [product_table].
All of your documents should automatically be added to the page. It should look something like this:
Bonus tip #2: Add product quick view for quicker shopping
If you want to provide more information or multiple images, then customers can click through to the single product page. However, that's not ideal because it takes the customer away from your list of documents. There's a risk that they could get lost. As a result, they might only buy one product from you. And of course, you want them to buy multiple documents!
Instead, you can use quick view to show extra information and images in a popup window. Customers click on the quick view links or buttons to open a lightbox. This keeps them on the main list of documents, and there's no chance they will get lost.
Customers can close the quick view or add the document to the cart directly from the quick view lightbox.
Bonus tip #2: Use product variations to sell multiple options for your documents
Up until now, we’ve shown you how to create a simple product with a fixed price. WooCommerce also supports variable products which means you can setup variation options for each product. Here’s how:
Follow the instructions outlined in Step 2 to create your product. When you get to the Product data section:
Make sure Variable product option is selected.
Create attributes for the product from the Attributes For instance, we could set an Instrument attribute for our sheet music document.
Set variations for the products from the Variations Following our example, we might set three instruments – piano, flute, and clarinet.
Add a price.
Add a product name.
Select the downloadable file.
Click Save changes to proceed.
It might look something like this on the front-end:
Perfecting your WooCommerce document library
And that's not all! The WooCommerce Product Table plugin comes with a number of handy features to make your documents table visually appealing and improve your customer's user experience.
For instance, the filter options make it easy for potential customers to find documents. You can also choose the columns you'd like to display on the front-end. And it's also got options for replacing the Add to cart button with checkboxes so that people can easily buy multiple documents from you and add them all to their shopping cart together.
How to use Easy Digital Downloads to sell documents online
In this section, we’ll walk you through a step by step tutorial on how to sell documents online using Easy Digital Downloads in WordPress.
Step 1: Set up Easy Digital Downloads
Log into your WordPress website’s admin panel, navigate to Plugins > Add New, and search for Easy Digital Downloads.
Install the Easy Digital Downloads plugin and activate it to your website.
Once the plugin is activated, head over to Downloads > Settings and configure the plugins’ settings based on your personal preferences.
Step 2: Add documents to Easy Digital Downloads
Navigate to Downloads > Add New from the WordPress admin panel.
Add a download name, description, categories, and tags for your document. If it makes sense for your document, upload a product image for it using the Download image
Add the document’s price in the Download Prices
Upload the downloadable document from the Download Files
Click the Publish
Repeat these steps to add all of the documents you want to sell through your online store.
Step 3: List Easy Digital Downloads documents on your WordPress website
Next, it’s time to display the documents on your site’s front-end. Since Easy Digital Downloads is a designed specifically for selling digital products online, you can simply choose to go with its default layout.
However, if you want to kick things up a notch and offer potential customers a better user experience then you can your documents in a filterable, searchable table-style layout using the Posts Table Pro plugin.
With Posts Table Pro, you get a dynamic table plugin that lets you list your documents neatly in a table view. The table view is fully configurable and you can use it to display important information about your documents. This way, your potential customers will be able to view the document’s name, description, price, and a button to add them to their shopping cart.
How to list documents in an Easy Digital Downloads table layout
Install and activate the Posts Table Pro plugin on your WordPress website.
download the zip file from the link in your order confirmation email and upload it to your WordPress admin by going to Plugins → Add New → Upload Plugin, then click Activate. The Posts Table Pro setup wizard will then initiate automatically and guide you through creating your first table.
Once you’re done, your table might look something like this:
Bonus tip: Use variable pricing to sell multiple options for your documents
Easy Digital Downloads comes with a Variable Pricing option that gives you the option of adding different options for a document. You can use this option to offer product add-on fields or other document variations.
For example, if you’re selling sheet music, you might want to give your customers the option to purchase an audio recording or a training video of it from you, as well.
To begin, follow the instructions outlined in Step 2 to create your product. When you get to the Download Prices section:
Make sure Enable variable pricing option is selected.
Add as many price options as you’d like and give each one a price.
Click Save changes to proceed.
It might look something like this on the front-end:
Bonus tip - Make sure your EDD store meets European tax rules
If you're selling digital products (including documents) to customers in Europe, then you have to collect European VAT from them - even if you're not actually based in the EU. That's the law.
When you set it up Easy Digital Downloads, it's therefore essential to collect the correct VAT based on the customer's location. You can easily do this with the Easy Digital Downloads EU VAT plugin.
Selling documents online can be a lucrative business if you have the right tools to help you set up and manage a documents library in WordPress that customers can buy from directly.
WooCommerce and Easy Digital Downloads both offer features that allow you to automate your sales process. Pair them with either the WooCommerce Product Table plugin or the Posts Table Pro plugin to display them in a filterable and searchable table view complete with Add to Cart buttons.
Have you used any of the methods outlined in this tutorial to sell documents through your online store? We’d love to hear from you, so let us know by commenting below!
Looking for a way to create a front-end WordPress media library that your visitors can browse? You've come to the right place!
What you need to know:
The Document Library Pro plugin can display the WordPress Media Library on the front end of your website.
You can choose what information to display in the front end Media Library, and which file types to display.
Full setup tutorial below.
Managing and displaying media files on the front end of your website can be a challenging task, as the WordPress Media Library normally only appears in the WP admin.
In this guide, we'll explore an unusual use case for the Document Library Pro plugin - how to use it to display files from the WordPress Media Library. This powerful plugin that revolutionizes the way you handle documents and other file types in WordPress. From organizing and categorizing files to customizing the front-end display, we'll provide you with step-by-step instructions and practical tips to make the most out of your front end WordPress Media Library.
A front end Media Library created with the Document Library Pro plugin
Whether you're a business, an educational institution, or a content-driven website, this guide will equip you with the knowledge and strategies to efficiently manage and showcase your Media Files to the public. This makes them easily accessible to your audience.
Why display files from WordPress Media Library on the front end?
If you want to display files and multimedia content on your website, then a lot of people immediately look for a gallery plugin. However, this brings several disadvantages to compared to displaying the WordPress Media Library directly on the front end:
It adds an extra step to the process. With a gallery plugin, you have to manually create a gallery. The files displayed in the gallery are stored in the WordPress Media Library, but you have the extra step of creating the gallery and bulk selecting the files.
It only supports certain file types. The WordPress Media Library stores any file type, whereas a gallery is all about image files. What about displaying other types of Media Library file, such as documents and PDF uploads?
It's harder to update. With no built-in version control, it's easy to lose track of which version of each file you're displaying.
Benefits of a front end media library
While the core WordPress Media Library does a solid job of organizing files in your dashboard, sometimes you might want those files to be directly accessible to website visitors as well.
A front end WordPress media library can come in handy for displaying:
Large numbers of files (especially images)For example, you might need to display more images than a gallery can handle. In this case, a front end media library with search, filter, and sort options will be more user-friendly.
Non-image filesIf you need to display files like PDFs or audio files, a frontend media library provides an easy way to make those files accessible. You can even use it to create a document library.
Some examples
There are lots of websites that can benefit from displaying some or all of the WordPress Media Library on the front end. Here are some examples:
Photography/videography websites: For photographers and videographers, their work is their product. Displaying high-quality images and videos directly on the front end allows potential customers to easily browse and appreciate their work.
Document database: If you need to share resources with your users, then displaying PDF's and other documents from the WordPress Media Library can be really helpful.
E-commerce sites: Product images, user reviews with photos, tutorial videos - all these can be organized in the media library and displayed on the front end for potential customers to see.
Educational sites: These may need to display media files like lecture videos, images, diagrams, and infographics on the front end for easy access to students.
News and magazine sites: These websites often need to display numerous images and videos in their articles. A front-end media library helps to keep these organized and easily accessible for readers.
Music websites: Musicians or bands can display their media library on the front end, showcasing album artwork, performance videos, and more.
Community and forum sites: These sites often allow users to upload their own content to share with the community. A front-end media library can facilitate this sharing and interaction.
Art portfolios: Artists can showcase their work by displaying their media files on the front end, creating a virtual portfolio for visitors to browse.
Corporate websites: Businesses often use images, videos, and other media to demonstrate products, share testimonials, or highlight company events. Displaying these files on the front end enhances user experience.
Event sites: These can display galleries from previous events, promotional videos, or user-generated content to promote upcoming events.
Non-profit sites: They might display images and videos highlighting their work and impact, encouraging visitors to donate or get involved.
Why Document Library Pro is the best front end WordPress media library plugin
The Document Library Pro plugin is the ideal solution for creating a front end WordPress Media Library. While its name focusses on documents, you can use it to display any type of media file in a searchable database on the front end of your website. This might be images, presentations, videos, PDFs, audio files, etc.
Unlike gallery plugins, Document Library Pro displays Media Library files directly on your website. You don't have to manually create a gallery first or use FTP.
It works like this:
First, you bulk select all the WordPress Media Library files which you want to display on the front end.
Next, you select the option to convert them to documents. At this point, Document Library Pro creates a 'Document' post for each file, which you can use to add any extra information that you want to display about each media file. The document posts link to files in the WordPress Media Library so that you can display them in the front end.
Finally, you use a simple shortcode to insert any or all of your 'Documents' (i.e. WordPress Media Library files) onto the front end of your website.
When you've finished, you'll have set up a professional-looking library with optional features like instant AJAX search, lazy loading, and sort/filtering. You can display media library without having to learn coding languages such as CSS, JavaScript, and HTML. Users can click on a link, button, or file type icon to instantly view or download the media file.
Key features of Document Library Pro
With its intuitive interface and powerful functionalities, this WordPress Media Library plugin offers a seamless solution for organizing, managing, and showcasing your documents on your website. Here are some key features:
Instant search, sorting, and filtering: Document Library Pro provides robust search capabilities, allowing users to quickly find specific files based on keywords, categories, or tags. Sorting and filtering options further enhance the browsing experience, enabling users to navigate through your front end Media Library effortlessly.
Flexible layout options: Choose between table or grid layouts to display your documents. These flexible layout options ensure that your library looks visually appealing and well-organized, providing an optimal user experience.
Customizable appearance: With Document Library Pro, you have full control over the appearance of your front end media library. Customize the display of download buttons, links, or icons to match your website's design and branding. This customization feature allows you to create a cohesive and visually pleasing user interface.
Categorization and folder management: Efficiently organize your documents by categorizing them into WordPress media folders. This categorization system makes it easy for users to navigate and locate specific files within your library. Simplify file management and streamline user access with this intuitive WordPress media folder management feature.
Support for various file types and 3rd party URLs: Document Library Pro supports a wide range of file types, including documents, images, videos, and more. Additionally, it enables you to include 3rd party URLs, such as embedded audio and video players, expanding the possibilities for media file display and interaction.
Integration with password protected categories: Take advantage of the enhanced security features offered by Document Library Pro. By using it with its sister plugin Password Protected Categories, you can create private Media Libraries, granting exclusive access to authorized users. Protect sensitive information and ensure confidentiality with this powerful integration.
How to display files from WordPress media library on front end
Next, I'll tell how you to use the Document Library Pro plugin to directly display files from your WordPress Media Library on the front end of your site.
You'll learn how to create a table which lists any (or all) of the following information in the front end:
File name - with or without a link to view the file on a separate web page.
Title - the filename.
Image - a featured thumbnails image to represent the media file with different image formats like gif, jpeg, and webp images.
Caption - this is a useful way to show a description or summary of each file.
File size and file type - these are both generated automatically.
Dates - e.g. the date the media file was added to the library, and the date it was last modified.
Any additional categories, custom fields, metadata or taxonomies that you choose to add. You can use these to store information such as the file size, and file type, add any extra descriptive text, and even add extra links, images, icons, or download buttons.
Download link - A link, button, or file type icon to download the media file or open it in the browser.
You'll also learn how to organize WordPress Media Library in a more simple grid layout, with each file displayed in its own tile.
First, I'll tell you how to convert media library WordPress folders and files into 'Documents' so that you can display them on the front end. Don't worry about the word 'documents' - you can do this with literally any type of file! This might be images (e.g. jpg or png), spreadsheets (e.g. csv or xls), or even audio or video (e.g. mp3 or mp4)!
You can do this by selecting files that are already in the WordPress Media Library. You can also drag and drop new files into the WordPress admin.
Before you start, install the Document Library Pro plugin and follow the on-screen instructions to activate your license key. You can then get started with adding your media files to the front-end media library.
Add existing media files
Go to the Media section of the WordPress admin.
Make sure you're on the list view and not the grid view. (You can toggle the two views using the blue icons on the top left of the WordPress media library.)
Tick all the media library files that you want to display on the front end.
Click the 'Bulk actions' dropdown and select 'Add to document library'.
Next, go to the Documents section of the WordPress admin. You'll see that each media library WordPress folders file has been added as a 'document'. Make any changes as needed. For example, if you're planning to display the filename in the front-end WordPress Media Library then you might want to edit the title of each document to make it more readable.
Drag and drop new files
Alternatively, if the files aren't already in the WordPress Media Library then you can drag and drop them straight into Document Library Pro. This converts them to 'Document' posts straight away, also saving them to the main Media Library.
Go to the Documents → Import section of the WordPress admin.
Drag and drop the files directly onto the page, or click to browse and select them.
This will add the file to the Media Library, and will also add each one as a document that you can display in the front end - complete with links to download the files. Again, make any changes to the data that you're planning to display about each one.
Step 2 - List Media Library files on the front end
First, I'll tell you how to create a front-end WordPress Media Library that uses the information that WordPress itself stores about each file. Afterward, I'll tell you how to store extra information about your files and display it in the media library.
In the WordPress admin, go to the plugin settings page at Documents → Settings.
Go through the settings and choose how you want the front-end media library to look and behave.
Key settings to optimize your front-end media library display
There are lots of settings, and here's a summary of the ones that are most important for listing media files on the front end:
Columns - Choose which columns to display the media files. Make sure you include a 'link' column so that people can download the media file. If you have added a featured image for each media file then include the 'image' column too. You can also include columns like image size and file type.
Folders - Enable this option if you want to structure the WordPress media files into folders, based on their categories. This helps people to find files by category.
Link options - There are several options for choosing how the download links work in the front-end WordPress media library. If you're displaying different file types then it's a good idea to enable the 'Icon' option. This displays file type icons so that people know what type of file they're about to download. You can also choose whether or not to open links to media library files in a new tab.
Filters - If you've added media library categories and tabs (under Documents → Categories and Documents → Tags), then add doc_categories,doc_tags. This will add category and tag filter dropdowns above the front-end media library.
Lazy load - Enable this if you have more than a couple dozen media files to display.
WordPress frontend media library that looks something like this:
This screenshot includes an image column displaying the featured image, which we have renamed 'Content'. If you are only displaying the WordPress image library and don't want to have to add a featured image for each document, then you might prefer to use this method which uses the Posts Table Pro plugin.
You can also display non-image files (e.g. PDF, XLS or DOCX), for example like this:
Categorize your front end WordPress media library
The WordPress Media Library plugin lets you categorize your media library files (i.e. documents) and add tags. These allow you to keep things organized in the back end, while allowing visitors to filter by media category and tag.
To set up your Media Library categories and tags, go to Documents → Categories and Documents → Tags. Add your categories and tags as needed, and then apply them to each document as needed. If you're using the bulk import feature then you can also include a categories and tags column to do this automatically.
Add extra fields to your WordPress Media Library and display them in the front end
You can add as much information as you like to display in your front end WordPress Media Library.
First, I recommend using the fields that come built into Document Library Pro. To do this, go to the 'Documents' section of the WordPress admin and click on the one that you want to add extra data to. Fill in the fields which are available, such as the name, description and excerpt. There are also options to categorize and tag the WordPress Media Library files.
If that's not enough, then you can also use the free version of the Easy Post Types and Fields plugin to add extra fields. You can add:
Custom fieldsUse these to list unique information about each file. For example, if you wanted to add an extra summary or descriptive text about each file, or to store a reference number, then you'd need a custom field.
Custom taxonomiesUse these for information that you want to be able to filter by and use to group your files. For example, if you wanted to store the year for each file and add a Year filter dropdown above the front-end media library, then you'd need a taxonomy for this.
How to add custom fields and taxonomies to WordPress media files
Go to the 'Post Types' section which appears on the left of the WordPress Dashboard.
Go to the 'Other Post Types' tab and find the 'Documents' post type. Click on either 'Custom Fields' or 'Custom Taxonomies'.
Add the required information to add as many custom fields and taxonomies as you like.
Now go to the 'Documents' section and you will see the new fields on the 'Add/Edit Document' screen. Add the data for each media file.
Now go back to Documents → Settings and edit the 'Content' section to tell Document Library Pro to include your new custom fields and taxonomies as columns:
To add a custom field column, add cf: followed by the custom field name (e.g. cf:reference)
To add a custom taxonomy column, add tax: followed by the custom taxonomy slug (e.g. tax:document_year)
For example, your list of columns might be: title:Name,excerpt,cf:reference,tax:document_year
Best practices for organizing, displaying, and managing Media Library items
Organizing, displaying, and managing your WordPress Media Library items can help improve your site performance and user experience. Here are some best practices to consider:
Use descriptive filenames: When uploading files to the Media Library, use descriptive filenames that accurately describe the file's content. This can make it easier to find files later and improve SEO.
Categorize and tag files: Organize your files into categories and tags that make sense for your website. This can help users find related files more easily, and improve website navigation.
Delete unnecessary files: Regularly review your WordPress Media Library and delete any files that are no longer needed. This can help save storage space and improve WordPress website performance, and site speed.
Optimize images: Compress or resize images to reduce their file size and improve website load times. Image optimization can be done using plugins like WP Smush, ShortPixel, or other image editing services.
Backup your Media Library: Regularly back up your WordPress Media Library to ensure that your files are safe in case of a website crash or data loss.
Monitor file sizes: Keep an eye on the file sizes of the files you upload. Large files can slow down ecommerce website loading speed and increase hosting costs.
The easy way to create a front end media library in WordPress
The WordPress Media Library is fantastic, and it's a shame that it's normally only available in the back end.
By using the Document Library Pro plugin, you can take your existing files and display them on the WordPress frontend media library of your WooCommerce website for everyone to see. Use the advice and tips in this tutorial, and you'll find huge flexibility in controlling how your frontend WordPress media library functions.
Have any other questions about using Document Library Pro to create a front end media library in WordPress? Leave a comment and we'll try to help out!
A WordPress PDF library plugin adds a library of downloadable files to a WordPress site. The searchable PDF library can be open for public use, or secured by a password for employee or member access only.
Creating a PDF library in WordPress is simple and easy, thanks to the Document Library Pro plugin. It lets you add and manage your PDF library straight from the WordPress admin. You can then list PDFs in a searchable table or grid on the front end.
It is simple and straightforward create a PDF library, and you can customize it to suit your own needs. Download the WordPress PDF plugin and start building your document library today.
Why use a WordPress PDF library?
A WordPress PDF library organizes the PDF files on your WordPress website. This makes it simple to search for individual PDF documents or to browse a comprehensive list of all PDFs.
When it comes to file management, the standard WordPress admin system doesn't always meet the needs of businesses and their users. For example, you can add PDFs to the Media Library but there's no way to create a searchable PDF database in the front end. With a WordPress PDF library plugin, you can automatically generate a comprehensive database of downloadable files for your users.
The Document Library Pro PDF library plugin lists documents on the front end for staff and contractors, service users or customers. Users can read the file immediately online, or download it for later.
Here are some popular uses for a WordPress PDF library:
Policy knowledge banks
Human Resources information
Downloadable forms
Publications and white papers
General information
Benefits of a WordPress PDF plugin
When PDFs are simply uploaded to the WordPress media library, there's no way for users to view them in the front end. They're mixed up with all your other files (images, videos, etc.) and are only accessible for people with access to the WordPress dashboard.
A PDF library plugin for WordPress brings all PDF files onto a single page, formatted in a user-friendly table or tiled grid layout. They're listed on the front end of your WordPress website, so anyone can view them. (Unless you choose to restrict them to specific people - more on this later.)
The built-in WordPress search isn't capable of reading the content of PDF files. With a WordPress PDF library plugin, you can use extra fields to label your PDFs. Using this data, your users can then search, sort and filter the PDF library to find what they want. For example, you can create custom taxonomies so that users can filter by category, topic etc. You can also use custom fields to store specific information about each PDF such as file size or a unique reference code.
In addition, a WordPress PDF library is a cost-effective, straightforward way to provide access to vital documents. You can save hundreds of forms, resource guides and other PDF files to one central point and all files can be accessed live through the site or downloaded to be used later.
For companies that need to provide information, a public-facing resource library allows for extensive amounts of knowledge to be distributed without taking up huge amounts of space on your web server. For internal business use, PDF document libraries are the ideal way to disseminate information between employees, including forms for employees and links to policy documents.
How to create a PDF library in WordPress
For full step-by-step instructions, watch the video or see our full tutorial on how to create a WordPress document library. Keep reading for written instructions on building a PDF library. For even more in-depth guidance, you can also sign up for our free online course:
Do our FREE document library e-course!
FREE COURSE
This online course is 100% free of charge. It will teach you everything you need to know about how to add a PDF library to any WordPress website - no experience needed.
Get Document Library Pro and install it on your WordPress website.
2. Add PDFs to the library
There are 4 easy ways to upload PDFs to WordPress. Each of these methods will store the PDF file in the WordPress Media Library, while also creating a post in the 'Documents' section of the WordPress admin to store extra information. You can display all of this information in the front-end PDF library, along with a download link.
Use whichever upload method will save you the most time. This depends on how many PDFs you need to add and whether they are already stored in the WordPress Media Library:
First, option 1 - Add PDFs manually via Documents → Add New. Enter all the data that you plan to display about the PDF, such as the title and a brief description. Use the 'Document Link' section to upload the actual PDF file to WordPress.
Option 2 - Select PDFs already in the Media Library and use the bulk actions dropdown to add them to the document library.
Option 3 - Drag and drop PDFs to WordPress via Documents → Import.
And finally option 4 - Import PDFs from CSV by adding all the data plus the URL of the PDF to a CSV file. You can then upload it via Documents → Import.
The PDF plugin documentation contains full instructions on all these methods. You can even download a sample CSV file to help you format the data before importing it.
Think about how much information to add about each PDF file. Add plenty of information, including relevant search phrases, document types and other references. The more time you take over uploading and labelling your PDF documents, the better the user experience will be at the front end.
3. Display PDFs in the library
Once you've added some PDFs, you can list them in the front-end WordPress PDF Library.
To do this, go to Pages in the WordPress admin and view the page called 'Document Library'. Rename this to something else like 'PDF Library' if you like.
You can then go to Documents → Settings → Document Libraries and tweak the settings to customize the PDF library. For example, you can choose either a table layout, or a tiled grid like the one in the image above. You can choose what data to display about each PDF, and whether to structure the PDF library into folders based on their categories. You can also add filter dropdowns to help people to find PDFs by category or tag.
Depending on the type of PDF documents your library contains, you may wish to create a password protected PDF library to secure the files and ensure only those authorized for access can read them.
Finally, remember to preview the documents and the library itself before you publish. This is an opportunity to tackle any display or formatting problems before the WordPress PDF library goes live.
How to search the contents of PDF files
Some WordPress PDF libraries need a way for users to search within the content of the PDFs. You can do this by using Document Library Pro with the SearchWP plugin. Use Document Library Pro to create the PDF library, and SearchWP to enable searching within the attached PDFs.
For even more detailed instructions, you can use our full document library tutorial to create a fantastic WordPress PDF library for your website.
A WordPress knowledge base plugin is the perfect way to provide online documentation for your customers.
In this tutorial, I'll explain why the Posts Table Pro table plugin is ideal for this purpose. You'll learn why it's better than 3rd party knowledge base platforms. I'll even show you how to set it up, from start to finish. You don't need any technical expertise or knowhow and you don't need to write any code. Simple!
Do I need a knowledge base or online documentation?
Before we start, it's worth considering whether you need a WordPress knowledge base plugin at all. As a general rule, you should provide online documentation for your customers if:
You sell products (whether online or physical) that require instructions.
Customers regularly ask questions about how to use your products.
You find yourself answering the same question more than once.
You'd like to reduce the burden of customer support.
If you've answered 'Yes' to 1 or more of these questions, then a WordPress knowledge base or documentation plugin could be just what you need.
Should I use a 3rd party help center platform such as Zendesk?
When I first researched knowledge base solutions for our own WordPress plugins, I assumed that I'd need something outside of our company website. I couldn't have been more wrong. I'll explain why.
The reason I was seeking a 3rd party solution was that a website can be slowed down by too many free plugins. I do it if there's a valid business case for incorporating a function into our website. However, I believe that some things should be kept outside of your WordPress website. For example, customer invoicing, CRM and accounting have no place on your main company website.
I originally thought that our WordPress plugin knowledge base would fall into this category. We trialed some 3rd party help desk solutions such as the ones from Zendesk and Help Scout. Lots of other WordPress plugin companies (e.g. WP Engine) use these help desk systems for their support ticketing, so why shouldn't we?!
So, we set up a draft knowledge base with each of these companies. We tweaked the colors and images to suit our brand. We set up the knowledge base structure and added lots of articles. Finally, we set up the built-in customer support request form.
Unfortunately, we weren't satisfied with any of these 3rd party help centers. They all had the same drawbacks:
Inconsistent branding
While you can tweak the colors and header images on the hosted knowledge base platforms, they didn't truly match our main website. For example, the fonts and overall look and feel were different. Sure, they looked clean and modern. But the user experience was disjointed as you switched between the two.
You can pay more for further customization options and the ability to add custom CSS. However, these elements are already in place on our main website. Styling a 3rd party knowledge base to match our main website felt like reinventing the wheel. And frankly, a waste of time.
Our Zendesk Help Center homepage - looks fine, but slightly off-brand
Fully integrated WordPress knowledge base using Posts Table Pro plugin
Harder to find articles
I had expected that a dedicated help center platform has more features than a WordPress knowledge base plugin. However, all the ones we tested were lacking in basic functionality. The options for searching the documentation were very basic, making it hard for customers to find the needed articles.
For example:
There was no option to sort articles by name, topic, etc.
There were no filter options.
The articles could only be categorized by a single level of category. As a long-time WordPress user, I'm used to being able to structure information into more complex hierarchies. For example, I wanted to create a top-level category for each of our WordPress plugins, divided into 2 levels of sub-categories. Strangely, this wasn't possible with the hosted solutions we tested.
Inferior support request forms
The 'Request Support' form was incredibly basic. You could add custom fields, but nothing more dynamic. Our support request form is sophisticated and collects different data depending on the customer's answers to each question.
For example, if a customer selects the 'Bug report' option then they're prompted for their login details so that we can investigate. This is a great way to get the information we need, while only displaying fields that are relevant to each customer. It was a shame to be forced to lose all this.
Our Zendesk support request form (very basic, no conditional logic)
The Gravity Forms support form on our main website
More expensive
As with any hosted solution, you have to pay a monthly fee for a 3rd party knowledge base. It comes free if you use their support ticketing system too. However, we provide personal customer support via email and don't want to hide behind support tickets.
Less good for SEO
With external knowledge base platforms, your documentation will either be on a subdomain of your main domain (e.g. support.barn2.com) or a different domain (e.g. barn2.zendesk.com). If you set your WordPress knowledge base to the public (which you should do!) then it can be crawled and indexed by search engines. However, its rankings will be separate from your main website.
We've spent years building a good search engine ranking for our WordPress website. It seemed a shame to have to start again with the knowledge base.
Incorporating a knowledge base into your WordPress site gives you the best of both worlds:
Your main WordPress site benefits from the huge amount of SEO-friendly content in your documentation and knowledge base. This can potentially improve Google search results.
The WordPress knowledge base articles benefit from the wider authority of your main domain name, so they're more likely to get good rankings.
With a WordPress knowledge base plugin, you get full control over your SEO data. For example, if you use a WordPress SEO plugin then you can add custom title tags, descriptions, etc. Just like you can with the rest of your website!
You don't own your data
Another downside of hosted platforms is that you don't own your own data. Everything is lost if the company goes out of business.
You get more control by hosting a knowledge base on your own WordPress website. Ideally, you should also take regular off-site backups to be doubly secure.
No integration between the knowledge base & support system
When I send a support request on WooCommerce.com, it automatically searches the knowledge base and suggests articles. It forces me to confirm the articles aren't relevant before I can send a support request. This is a great way of encouraging customers to self-serve and reduce support tickets!
I know that WooCommerce uses Zendesk for its support tickets, so I assumed that this feature was available. On trialing Zendesk, I discovered that this is only possible via custom API integration. That puts this feature out of reach for most people.
To date, I haven't found ANY off-the-shelf solution to auto-search the documentation before you can request support. Instead, I recommend structuring your knowledge base and documentation to make it really easy for customers to self-serve. Make the link to request support less prominent and put it below the list of articles.
Using a WordPress knowledge base plugin gives you more flexibility to do this. Whereas a 3rd party knowledge base puts the support link right at the top, so customers use it without thinking.
Your knowledge base should be part of your website!
By using a WordPress documentation plugin, you can instantly overcome a lot of the drawbacks listed above. Your knowledge base will be part of your WordPress website and not an afterthought.
Everything will integrate seamlessly, boosting your SEO and providing a much better customer experience.
But which WordPress knowledge base plugin to use?
Surprisingly, the plugin I'd recommend for your documentation isn't a dedicated knowledge base plugin! It's a WordPress table plugin - Posts Table Pro.
Posts Table Pro is popular for displaying information in a wide range of ways. For example, it's one of the most popular AJAX based WordPress document library plugins. Following the steps later in this tutorial also provides the perfect knowledge base for any WordPress website.
It automatically lists your knowledge base articles in an interactive table layout. The table gives your customers more ways to find the information they need, compared to typical knowledge-base plugins.
Behind the scenes, you can either use normal WordPress posts for your knowledge-base articles. Or you can create a dedicated custom post type for your articles (my recommendation). Adding a WordPress knowledge base article is as easy as creating a new blog post – no technical know-how required!
Why is Posts Table Pro so great for online documentation?
Easy-to-find articles
There are multiple ways to navigate the WordPress knowledge base, so people can choose the method that suits them. For example:
The table plugin can list all your articles, with columns for categories, tags, and even custom taxonomies. Customers can filter by category, tag, or custom taxonomy to narrow down the list.
Alternatively, you can divide the knowledge base into categories and display the articles from each category in different parts of your site. Since your knowledge base articles will be WordPress posts (or custom posts), you can create hierarchical categories with multiple levels. You can either list everything on a single page, with a separate table for each category. Or, you can spread your WordPress knowledge base across multiple pages - each listing different articles. It's hugely flexible and you can structure your knowledge base as you would structure any WordPress website or blog. But with the added benefit of searchable, sortable tables listing your documentation articles.
There's a keyword search box above the list of knowledge-base articles. Customers can use this AJAX search to find exactly what they're looking for.
Customers can sort by any column by clicking on it. You don't get this feature with any dedicated WordPress knowledge base plugin.
You can display filter dropdowns above the table to let customers refine the list of articles. Customers can also refine the list by clicking on a category, tag, or taxonomy term. It's AJAX based which means customers won't have to refresh the page to see filtered results.
Everyone works in different ways, so it's good to offer customers a choice.
Easy to make changes
A successful knowledge base should evolve constantly. Whenever a customer requests support, you should think about why they had to ask the question. Consider how you could improve the knowledge base to prevent people from asking the same thing in the future.
As a result, you're likely to be making constant changes to your WordPress knowledge base. Especially in the first few months.
With Posts Table Pro, your documentation is added as a series of posts that you can easily add and edit via the WordPress admin. If you're a website owner like me, then you're probably logged into the WordPress admin most of the time anyway. It's ridiculously easy to tweak a WordPress knowledge base while you're dealing with support requests. This is much better time management than adding changes to a long 'To Do' list and hoping you find the time in the future!
Once you've updated your knowledge base content, the tables listing the articles will automatically update in the front end. You don't need to do this manually.
You get all the benefits and flexibility of WordPress
Since your knowledge base articles are essentially WordPress 'posts', you can benefit from all the fantastic features that WordPress has to offer. There's no learning curve because you already know how to use WordPress. You can do everything you're used to, such as:
Use the full WordPress editor - with all the usual formatting options, Add Media button, and extra features added by other plugins. For example, we added a standard WordPress gallery to our knowledge base article about lazy load. The gallery contains 2 animated gifs showing how the plugin works with and without lazy load. You couldn't do this with most knowledge base programs.
Display global content from other parts of your website, such as the header, footer and widgets.
Integrate with other features, such as live chat and contact form plugins. (We use Gravity Forms for our customer support requests.)
Works with knowledge base WordPress themes.
Enhance your documentation with embedded video
Posts Table Pro supports embedded video players. This is a great opportunity to improve your online documentation.
Create a video for all your main documentation topics. You can add them to the individual articles. Or even better, you can display the videos directly on the list of articles.
Customers can watch short videos which answer their questions directly from the main WordPress knowledge base page. They don't even need to click through to read the full article!
How to use Posts Table Pro as a WordPress knowledge base plugin
By now, you've discovered the benefits of having a knowledge base as part of your main website. You've also seen why Posts Table Pro is ideal as a WordPress knowledge base plugin. Now, I'll show you how to set it up!
Prerequisites
Before you can do this tutorial, you will need these things. If you don't have them yet, get them before you start:
The Posts Table Pro plugin, is installed according to the instructions from your order confirmation email.
A knowledge base theme for WordPress.
That's all!
1. Create a WordPress 'knowledge base' custom post type
First, you need to create the basic infrastructure for your knowledge base content and documentation. If you're feeling lazy, you can use normal WordPress posts for this. This is fine if you're not using posts for anything else. Even if you're using posts for your blog, you can create some dedicated knowledge base categories within Posts → Categories.
However, for most WordPress knowledge bases, I would recommend creating a dedicated post type. This will give you a proper section for your documentation on the left of the WordPress admin. It keeps everything neat and easy behind the scenes. Much more future-proof for you, especially as your knowledge base grows.
There are several ways to create a custom post type in WordPress. If you're a developer, then you can do this programmatically. If not, here is a free and easy-to-use plugin:
You can use this plugin to create custom post types, custom fields, and custom taxonomies. Some knowledge base themes come with custom post types out of the box.
How to create a custom post type
Here are instructions for creating a WordPress knowledge base post type using Easy Post Types and Fields plugin. You can call it anything you like, e.g. Knowledge Base, Articles, Documentation, etc. I think 'Articles' works well for both the singular and plural versions.
Go to Post Type → Manage in your WordPress dashboard.
Click Add New.
Once the setup wizard loads, enter the singular and plural post type names. For example:
Plural name – e.g. Articles
Singular name – e.g. Article
Click on the Next button.
Select the type of information you need for the Article post type. Click on the Create button.
Now, you will see a link to your WordPress knowledge base post type on the left of the dashboard.
2. Create knowledge base categories
Next, you need to plan the structure for your WordPress knowledge base plugin or online documentation. For this, you need to add a custom taxonomy to your post type.
To add a custom taxonomy, go to Post Type → Manage. Click on the taxonomies button for the respective post type you wish to customize (Here, Knowledge Base). On the Manage taxonomies page, click on the Add New button.
Enter the singular and plural names and the slug for your new taxonomy.
If you want your categories to be in hierarchical order, tick the checkbox. Enabling this will allow you to structure your content on multiple levels.
Once you are done, click on the Create taxonomy button.
Once you have created the taxonomy, hover over the knowledge base section on the left of the WordPress admin, and click the 'Categories' link. The name might be different if you named your taxonomy differently.
Add as many categories as you like. This can be a simple list of categories, or you can create hierarchical categories with sub-categories, sub-sub-categories, and so on. As with WordPress posts, there are no limits here!
The important thing is to think logically about the best knowledge base structure. Try to think from your customer's perspective. You want to make it as easy as possible for them to find the article they need. Otherwise, they're more likely to contact you for the support! So don't rush this bit.
Tip: Make a note of the category slug as you create them. You'll need these later if you're planning to create tables listing articles from specific categories.
3. Add articles, documentation, and FAQ's to your WordPress knowledge base
This is the most time-consuming part of creating a knowledge base. It's time to add the actual content to your online documentation.
To do this, hover over the knowledge base link (or whatever you decided to call it) on the left of the WordPress admin. Click the 'Add New' link that appears underneath. The 'Add New' page is just like the screen for adding normal WordPress posts. You can add a title, the main content, categories, tags, etc.
If you're migrating written instructions or a single page of documentation to your knowledge base, break it down into multiple articles. Categories and tag each article to make them easy to find.
The good news is that you don't have to do this all in one go. To launch your WordPress knowledge base, you just need to provide the basic information for customers to use the product. Over time, you can add more and more articles and provide more extensive documentation.
A knowledge base should be flexible and constantly evolving. This means that you shouldn't worry too much about perfecting it straight away.
Add new article screen
Front end view of the article
Tip #1 - Structure long articles with a knowledge base table of contents
Knowledge base articles can often get quite long, divided up by multiple subheadings. If this applies to you, I'd recommend installing Table of Contents Plus.
This free WordPress plugin lets you create instant lists of all the headings in your knowledge-base article. You can either add the list to the top of the article or as a sidebar widget.
You can see a knowledge base table of contents in the screenshot above. The 'In this article widget was created automatically and lists the headings from the article. It's a great way for customers to quickly find the section that will answer their questions.
Tip #2 - Add a widget promoting your product
Most people aim their knowledge base at their existing customers. This can lead to missed opportunities to attract new customers.
Your documentation is published on your public website, so it's available for the world to see. Potential customers might be searching the web for a specific solution, and find a specific knowledge base article without having any background knowledge about your product. Therefore, every page of your knowledge base should contain some basic information about your product and how they can get it.
Did you spot the "Not bought the plugin yet?" sidebar widget in the screenshot above? Here it is again.
The widget doesn't dominate the page for existing customers but puts the article in context for potential customers. Entering a website directly in a knowledge base article can be confusing as you don't know what you're reading about. This simple widget provides an overview of the plugin that the article relates to, with a subtle call to action. The image of the product in action will attract people who are looking for the solution you're offering.
Tip - Display different widgets in different parts of the knowledge base
You can use the Widget Options plugin to show the relevant widget in the appropriate knowledge base category. That way, you can showcase different products in different sections of the WordPress knowledge base. Whichever product the article is about, customers always see the widget for the correct product.
Tip #3 - Create a WordPress wiki where users can edit your documentation in the front end
If you need a collaborative knowledge base, then transform your documentation into a wiki! You can use a WordPress front end editor plugin to let your users make changes to your knowledge base articles.
The way it will work is that the Posts Table Pro plugin will automatically list your documentation articles in a table layout. Users will click through to the single article page. From there, they can click 'Edit' to edit the article content. Their changes will automatically appear in the table and on the single article page.
5. Display your knowledge base content in interactive tables
By now, the overall infrastructure for your online documentation is in place. The only remaining task is to display the articles in an easy-to-find format on your public-facing website. We'll do this by using Posts Table Pro as your WordPress knowledge base plugin.
If you haven't already done so, buy posts Table Pro. Check your order confirmation email and find the link to download the plugin.
Download the zip file and save it on your computer.
Access your WordPress admin dashboard and navigate to Plugins → Add New → Upload Plugin.
Click on "Choose File" and select the zip file you just downloaded.
Click "Upload" and wait for the plugin to finish uploading, then click "Activate".
After activation, the Posts Table Pro setup wizard will automatically open and guide you through entering your license key.
6. Configure your knowledge base tables
Upon installing the plugin for the first time, a setup wizard will automatically open up, guiding you through a step-by-step process to create your first table. This process will allow you to customize your table's appearance. You can also create new tables any time by navigating to Post Tables → Add New.
To begin creating your table, you'll need to provide a name for it and select the post type that you want to display. In this case, you would want to choose the custom post type "articles".
After that, you can choose the posts or pages that you wish to include in the table. The plugin allows you to choose from a range of options, including posts, pages, and custom post types.
Once you have selected the content to include in your table, you can proceed to customize its appearance. The plugin offers a wide range of customization options, allowing you to determine which columns to display and in what order. includes columns for name, content, categories and tags. You can include lots of other columns in the table. This includes featured image, excerpt, date, author, custom fields, custom taxonomies, and much more. If you want to add a new column, you can choose the column type from the dropdown menu and click "Add."
To make it easy for your users to find what they're looking for, you can add filters to your table. For your table, you can use article categories and tags as filters.
Additionally, you can customize the sorting options for your table, selecting the default sorting option and the sort direction that you prefer. This gives you complete control over the order in which your table is displayed.
If you're dealing with a large amount of data, you can enable lazy loading to improve the table's performance. This ensures that even when your table contains hundreds or thousands of items, it loads quickly and smoothly.
Lastly, you can choose how to sort your table, setting the default sorting option and the sort direction that you prefer. With all these options, you can create a table that is functional, easy to use, and visually appealing to your users.
Once you’re done, your knowledge base table should look something like this:
Displaying your knowledge base tables
After successfully creating your table using the Post Table Pro plugin, the setup wizard will confirm that you've completed the process and provide clear instructions on how to insert the table onto your WordPress site. The plugin offers different options for adding the table to your site, depending on your preference.
You can use the "Post Table" block in the Gutenberg editor to add the table directly to your page. Alternatively, you can copy the shortcode from the table builder and paste it onto any page on your site. This provides you with the flexibility to place the table wherever you want, regardless of the content on the page.
If you're creating a knowledge base and want to list all your articles on one page, you can go to Pages → Add New and create the main homepage for your knowledge base. This page will serve as the hub for all your articles, making it easy for your users to find what they're looking for. However, if you prefer to list different articles on different pages, you can create as many pages as you like and customize each page's content to suit the articles you're featuring.
Overall, the Post Table Pro plugin makes it easy to create functional and visually appealing tables that are easy to integrate into your WordPress site. With the flexibility to customize and place the table anywhere you want, you can create an organized and user-friendly experience for your audience.
7. Enable customers to request support
However useful your knowledge base is, customers will still need to contact you for support. Getting this right is a delicate balance. On the one hand, customers should be able to contact you when they need to. On the other hand, you'll benefit from gently encouraging them to help themselves where this is realistic.
You can achieve this by making your documentation user-friendly, easy to navigate, and easily searchable. Using Posts Table Pro as your WordPress knowledge base plugin will help with this. This will help customers to self-serve and find answers themselves.
Choose a suitable support platform
Think of the best way for customers to contact you for support. This might be a live chat plugin on your website. It might be a phone helpline. Or it might be a support request form, created using a contact forms plugin such as Gravity Forms or Contact Form 7. This might send you an email, or it might feed into a full ticketing system. You can integrate any of these options with your WordPress knowledge base.
Whichever option you choose, make it accessible to your customers without being too easy. I know it sounds harsh, but making it too easy encourages them to be lazy. Research suggests that most customers self-service, as this is quicker than contacting you and waiting for a response.
Place the 'Request Support' links AFTER your knowledge base articles and search results. Customers should have to search for a solution and look through the articles. They should only contact your support team if this process fails. Don't shoot yourself in the foot by making the support link too obvious!
8. Create a hidden, password-protected WordPress knowledge base
Finally, I'll provide some tips on how to hide your knowledge base from the public view. This is useful if your knowledge base is part of your main website, but you want to restrict the documentation to existing customers only.
The Password Protected Categories WordPress plugin hides your knowledge base and documentation. Simply install this simple plugin, create a main category for your knowledge base, and select the 'Password protected' option. You can then add 1 or more passwords - customers must enter a correct password to access the restricted knowledge base.
Your password-protected WordPress knowledge base category can have as many sub-categories as you like. They'll automatically be protected with the same password as the primary parent category. They will be completely hidden from the public parts of your website.
After that, it's up to you how to share access to the knowledge base. You could include the password in the order confirmation email or include it with your product. Or you could use a plugin such as Contact Form 7 to add a 'Request access' form to your website. People can submit the form, and provide evidence of their purchase, and you can then send them the password. Either way, this is a simple way to hide and protect your WordPress knowledge base.
It's time to create your own WordPress knowledge base!
Using the best WordPress knowledge base plugin can make a huge difference to customer satisfaction AND your bottom line.
Remember - the easier it is for customers to find answers to your questions, the less likely customers are to request support. They'll be happier, more likely to recommend your products, and more likely to buy from you again. This frees you up to build your business rather than spending all your time on customer support.
So, now you can get started and create your own WordPress knowledge base with the Posts Table Pro plugin. Set it up and make life easier for customers and you at the same time. And if you like the plugin, become a Barn2 affiliate and earn a 30% commission for recommending it!
I'd love to hear how you get on with your knowledge base plugin. Please leave your comments below.


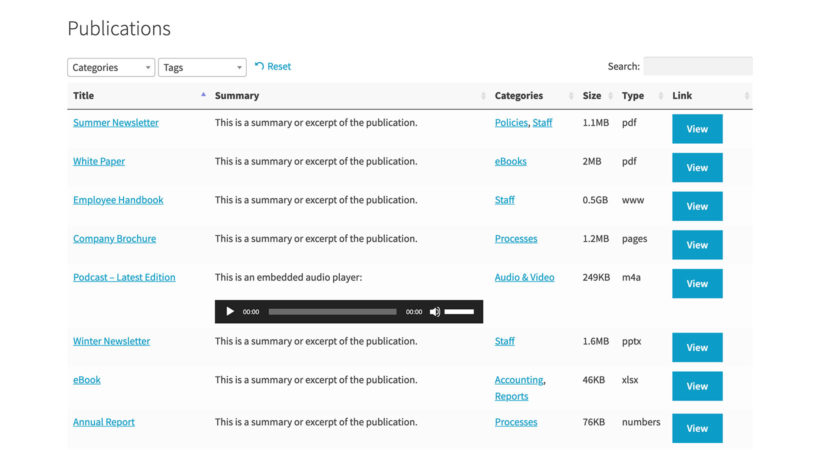
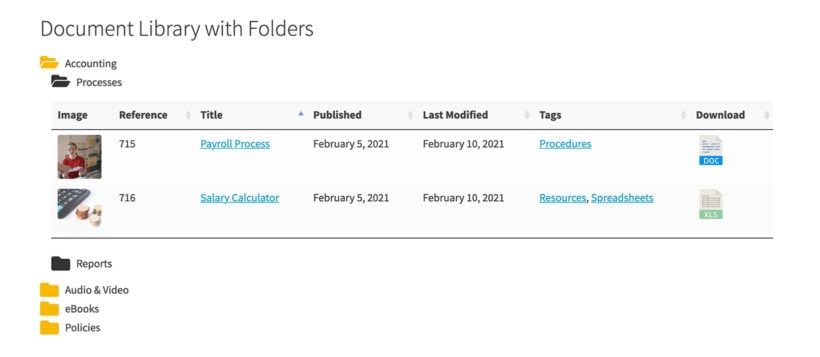

 With the why out of the way, let's now discuss the how of building a WordPress intranet.
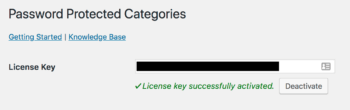
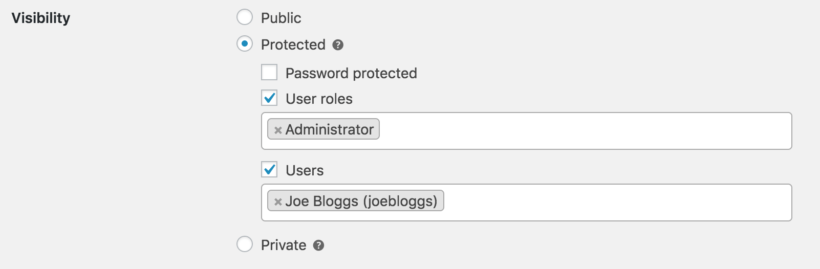
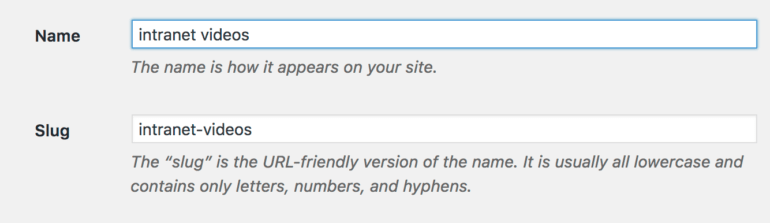
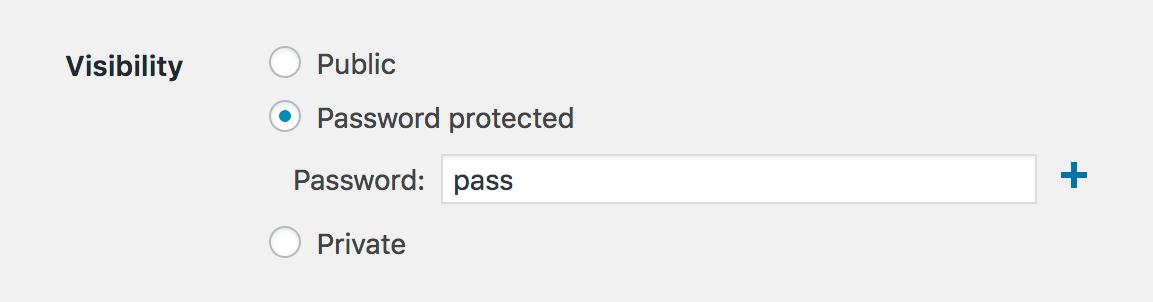
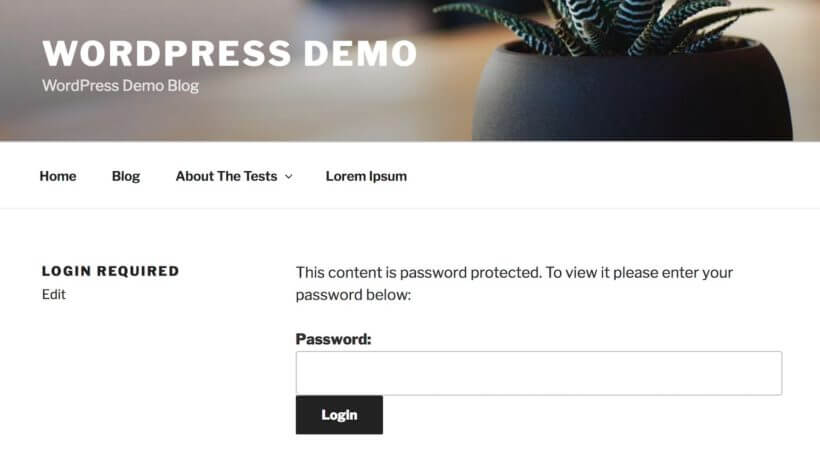
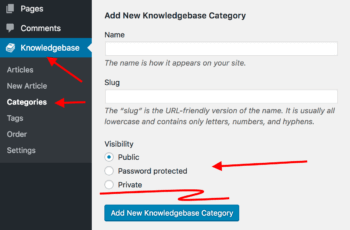
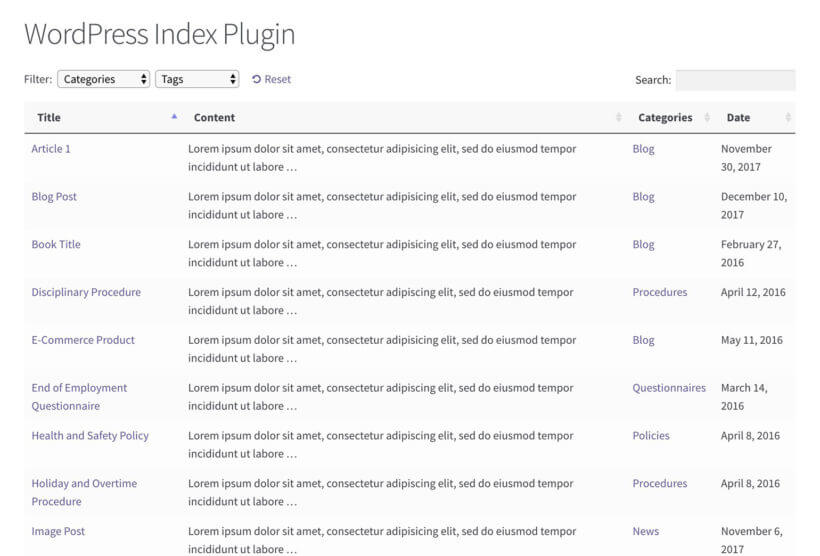
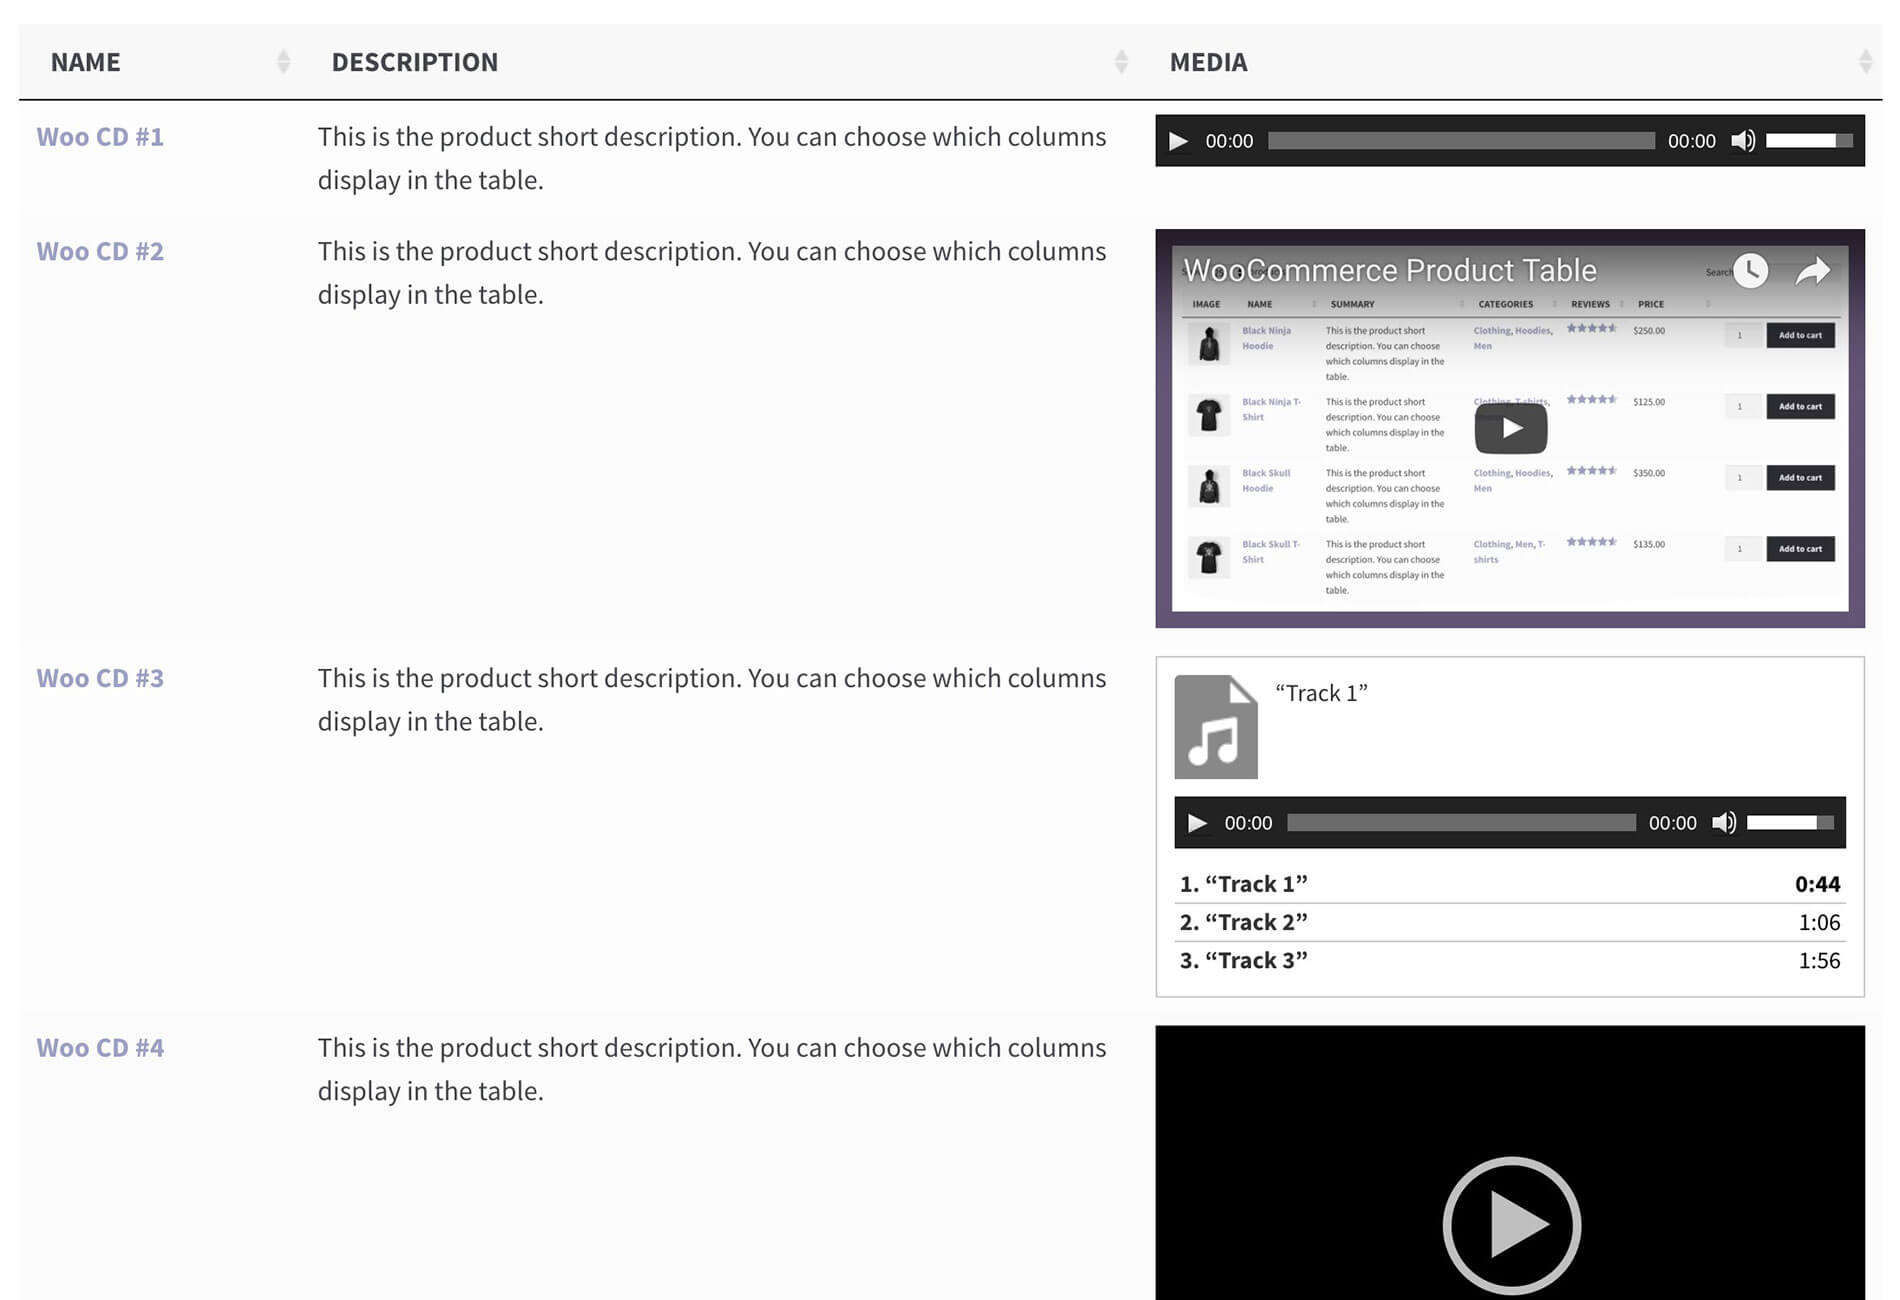
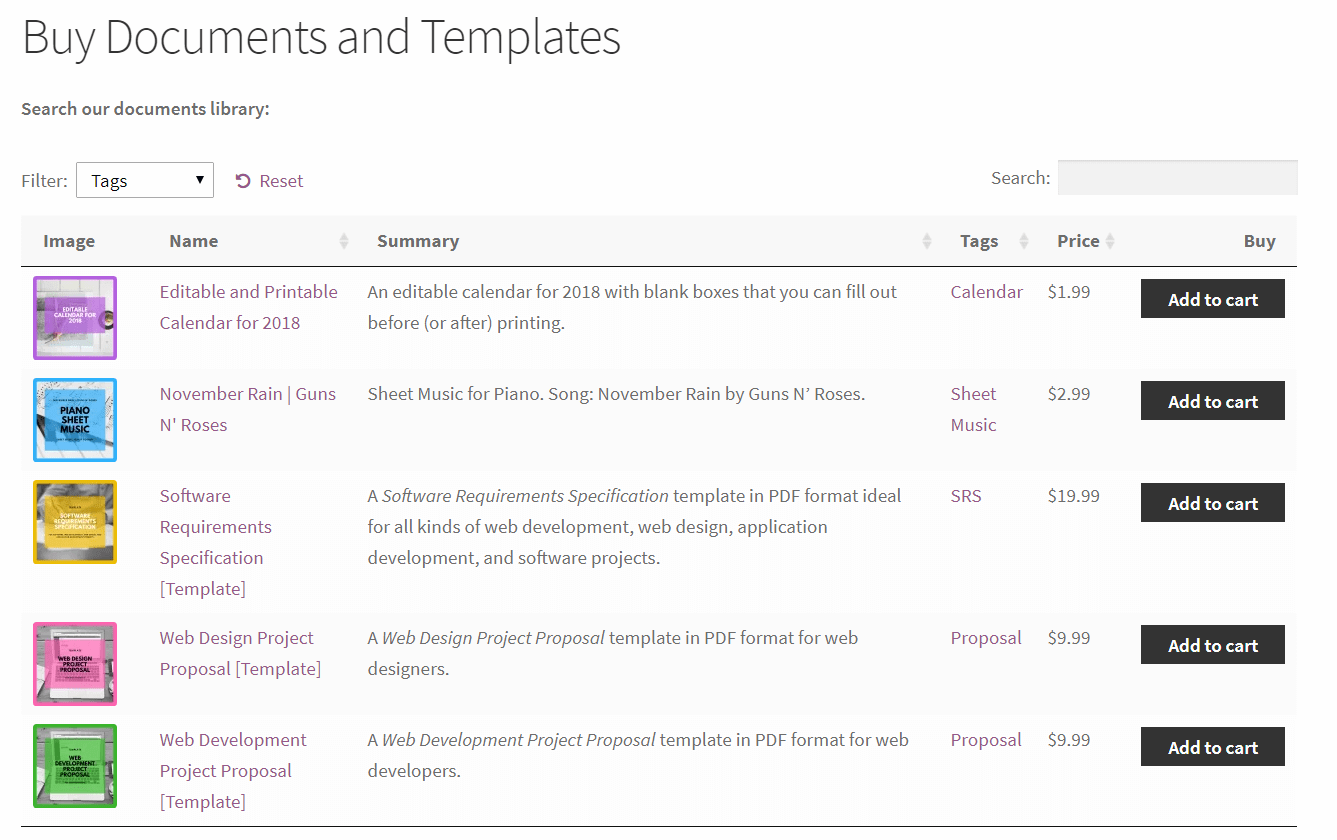

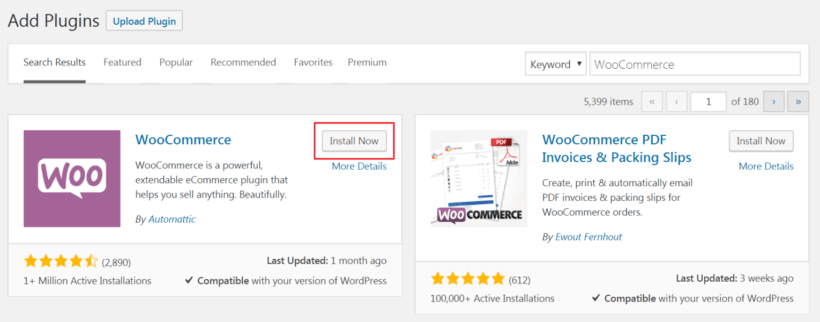
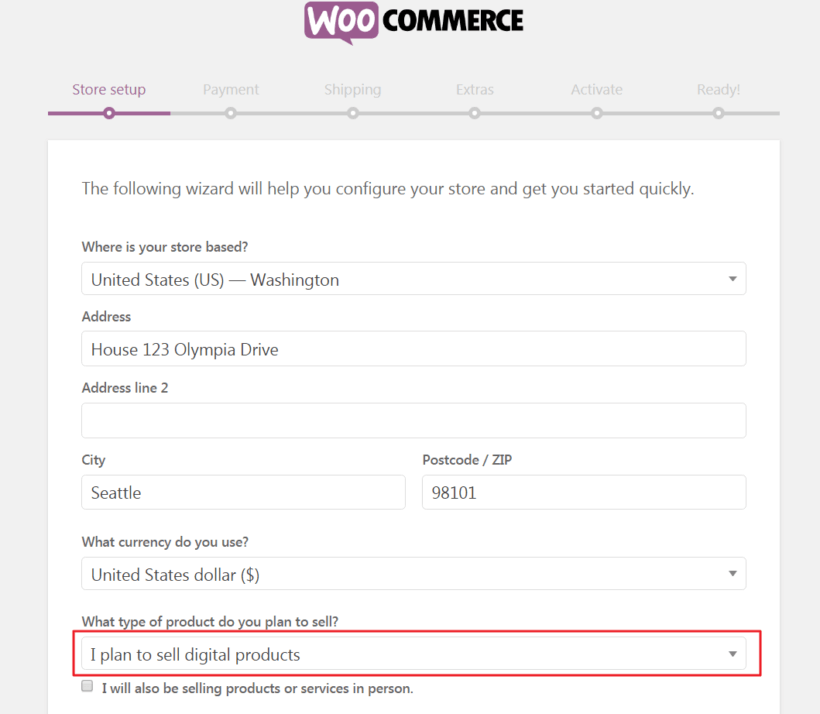
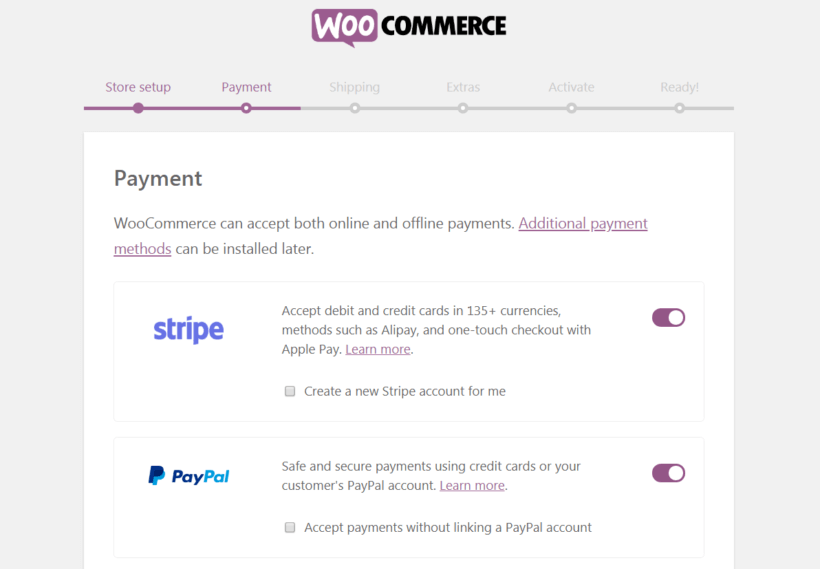
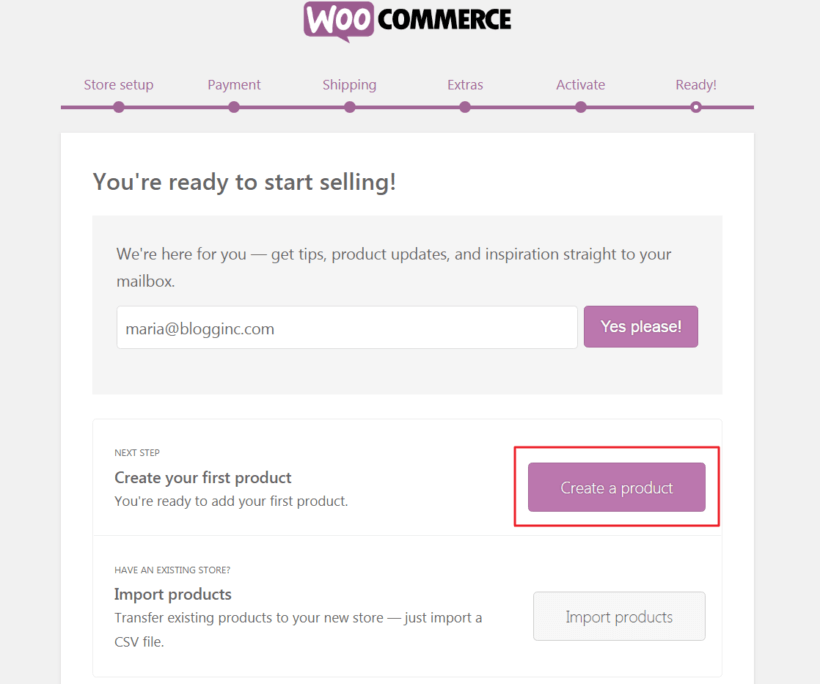
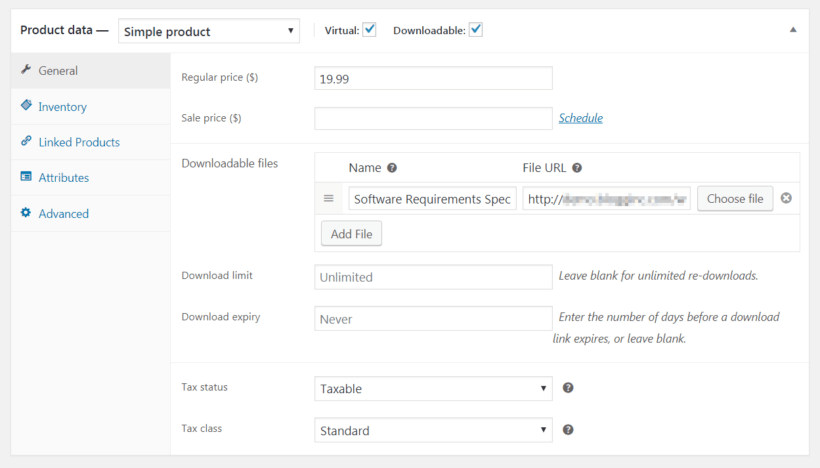
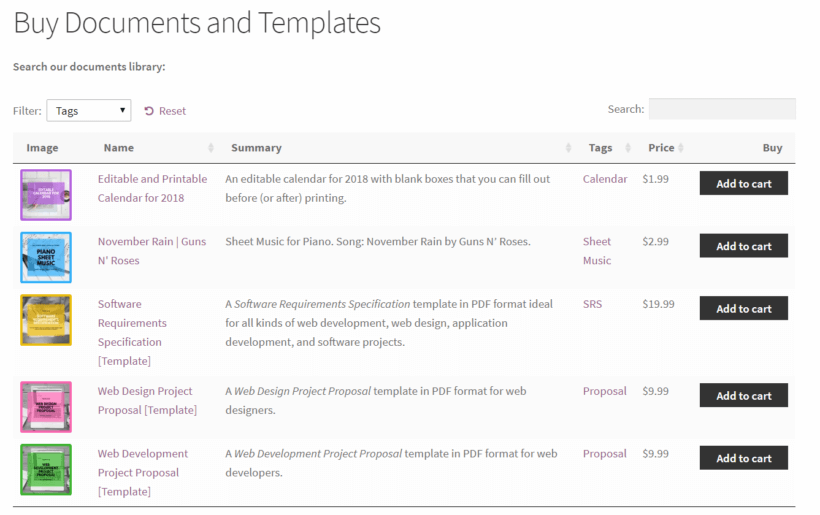
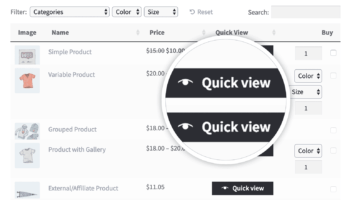

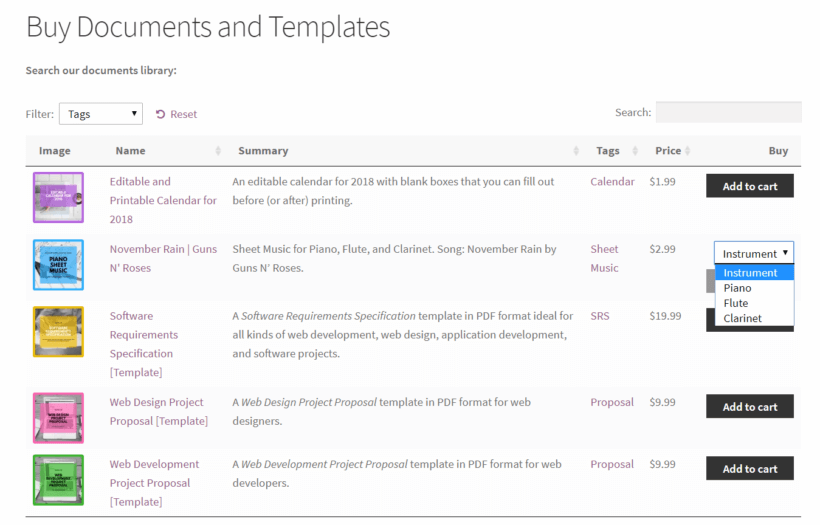
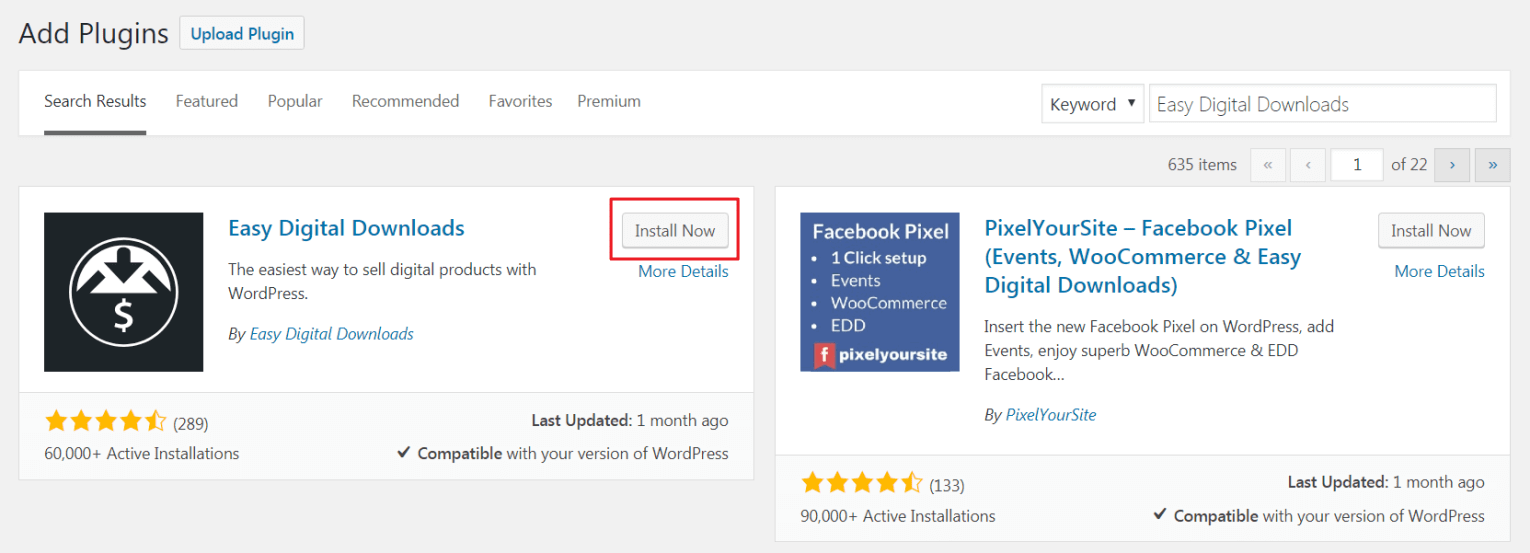
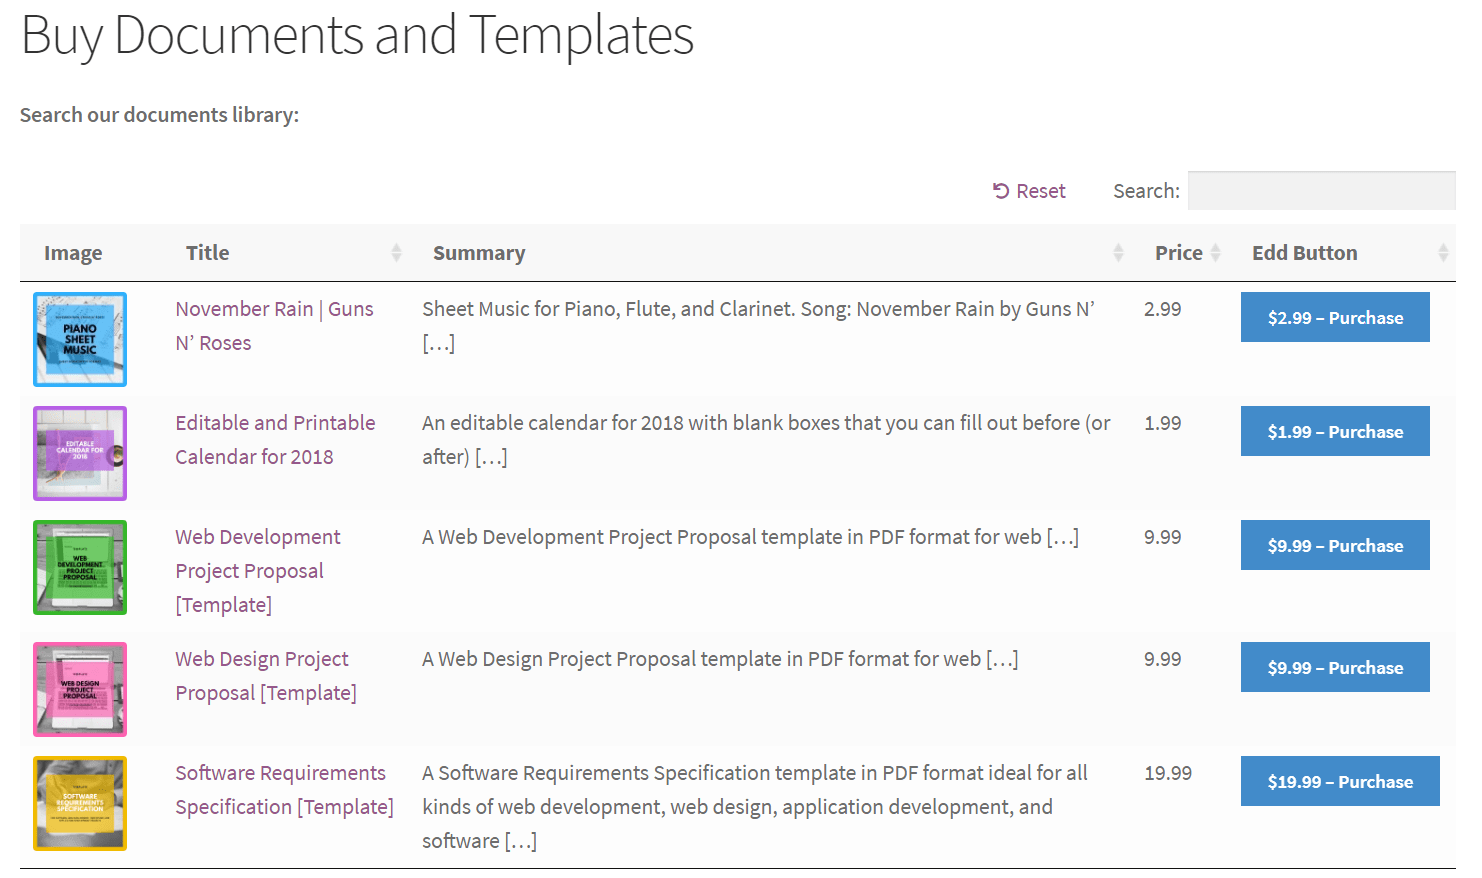
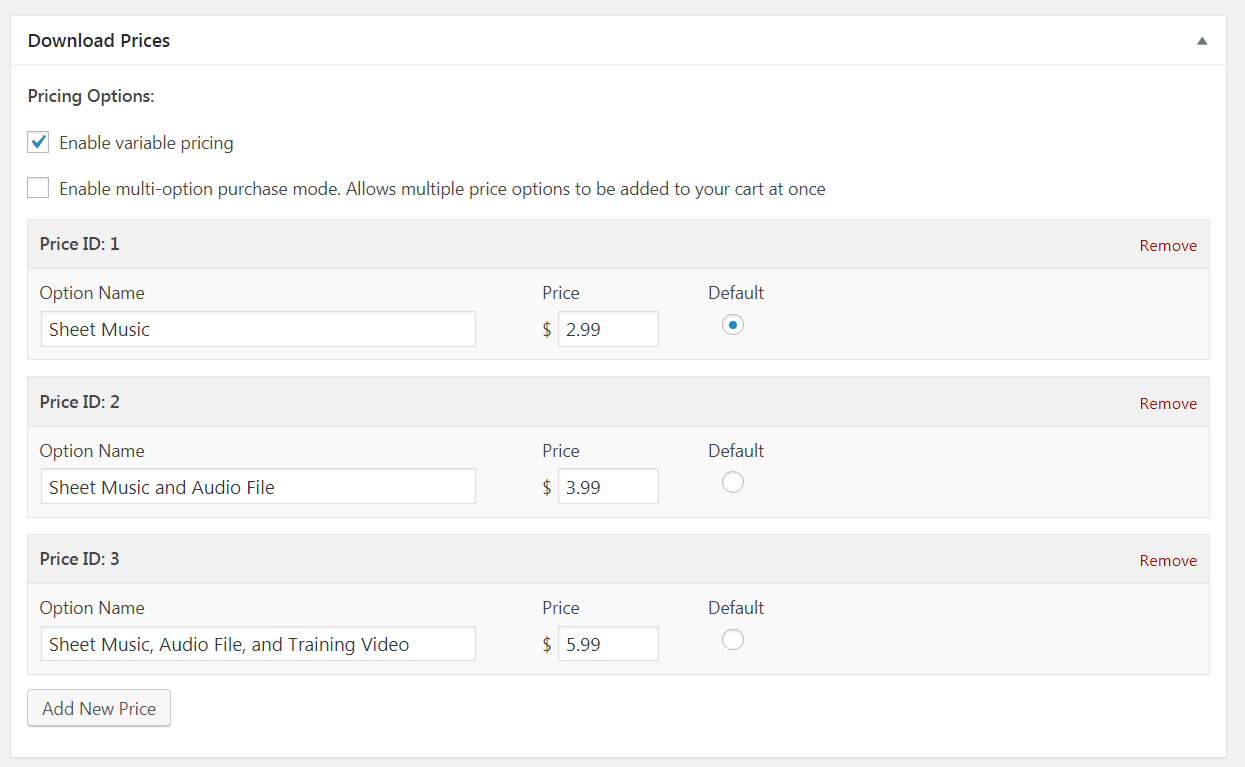

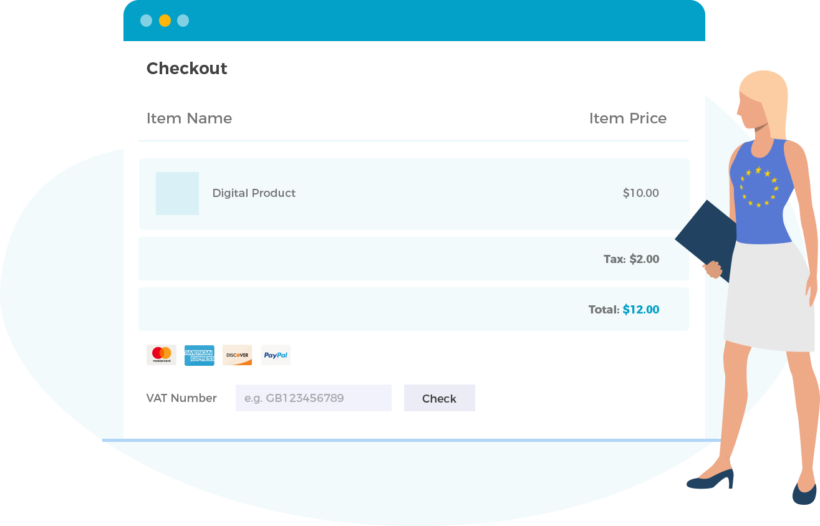
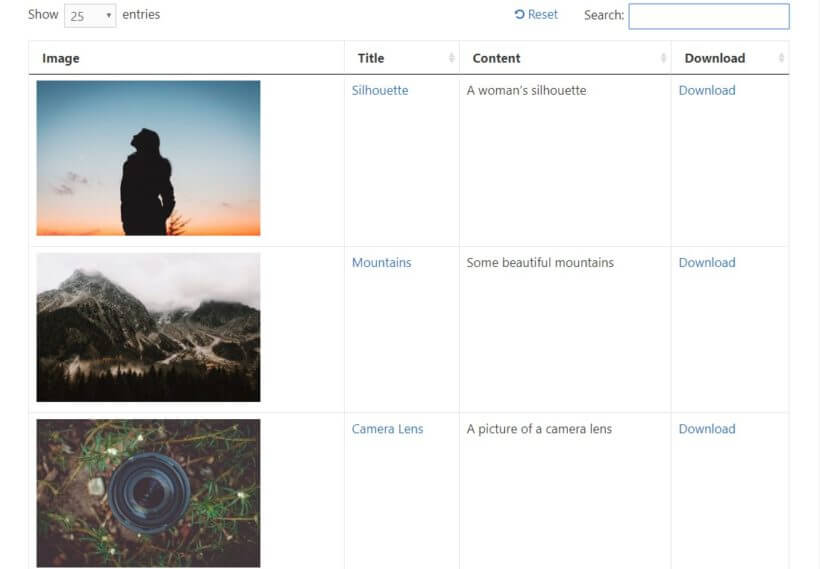
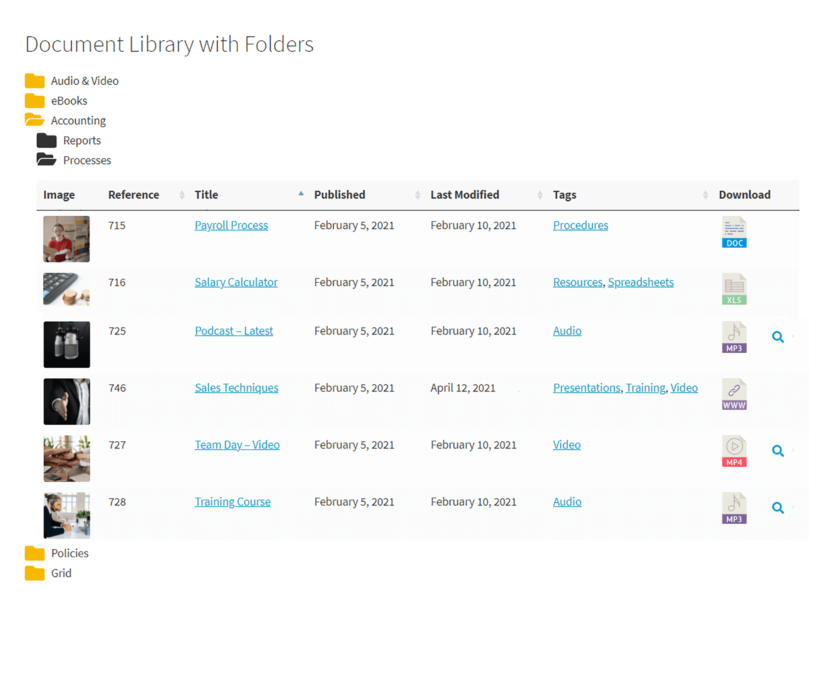
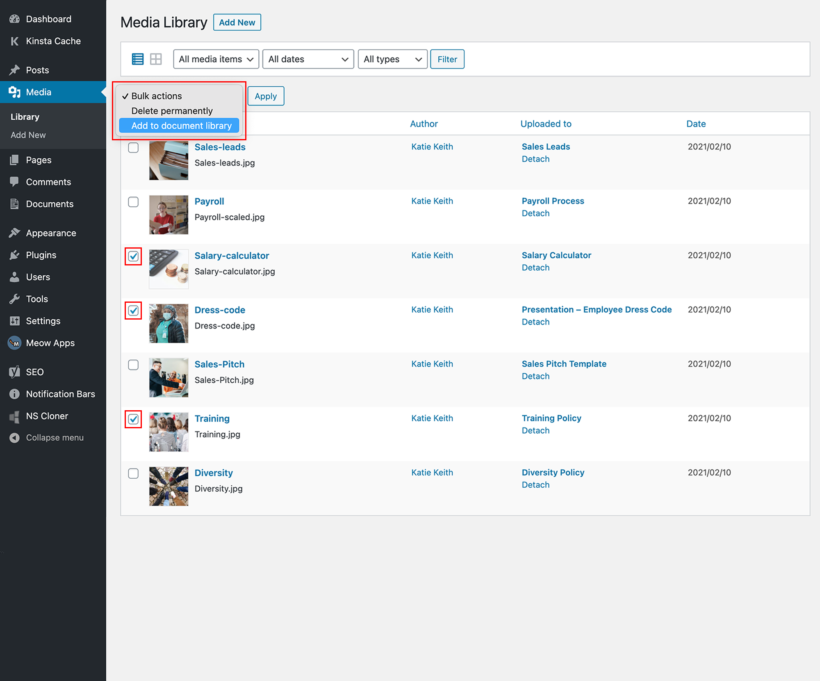
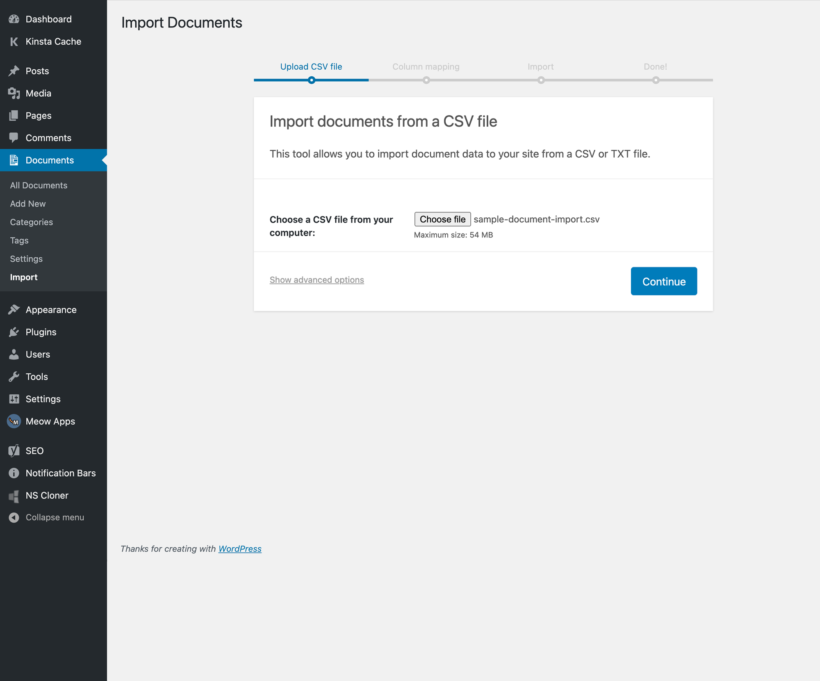
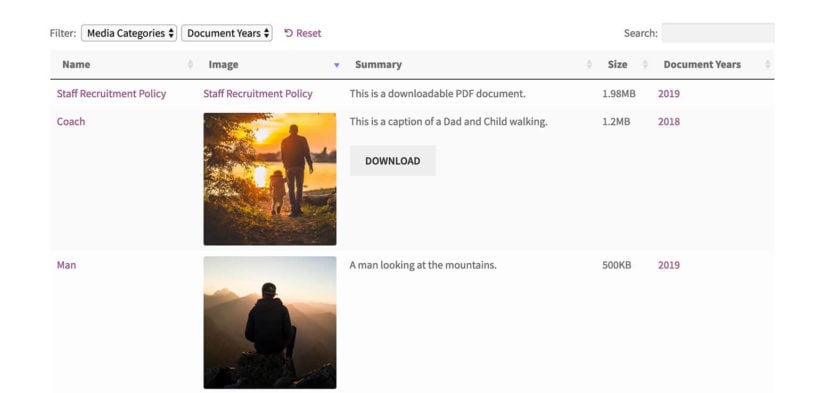
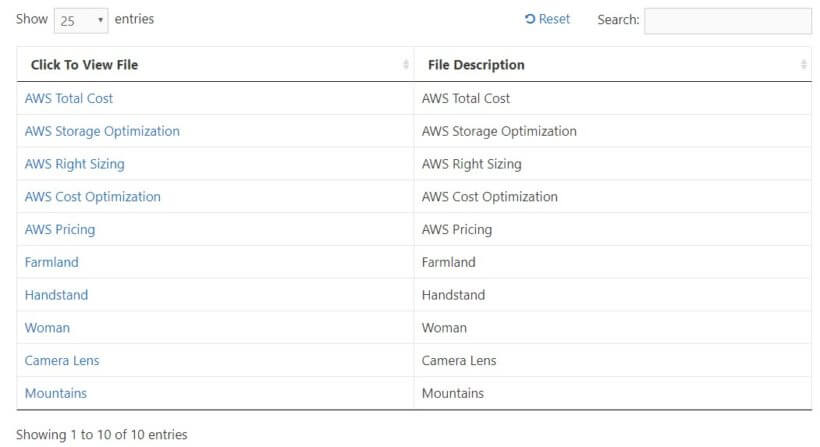
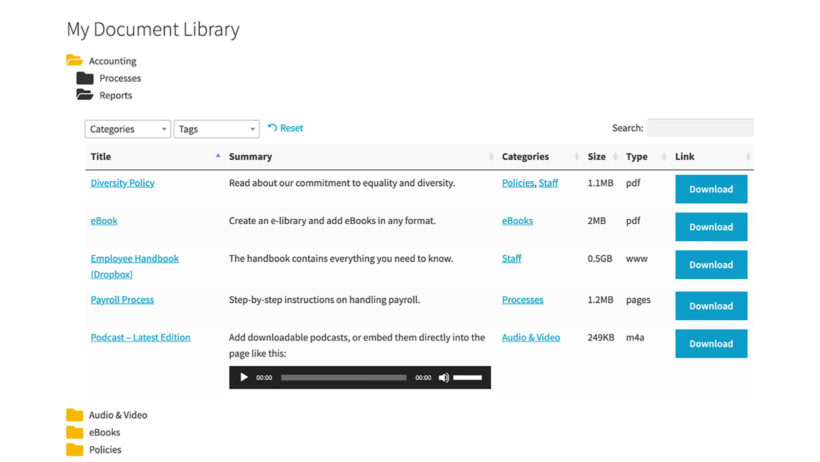
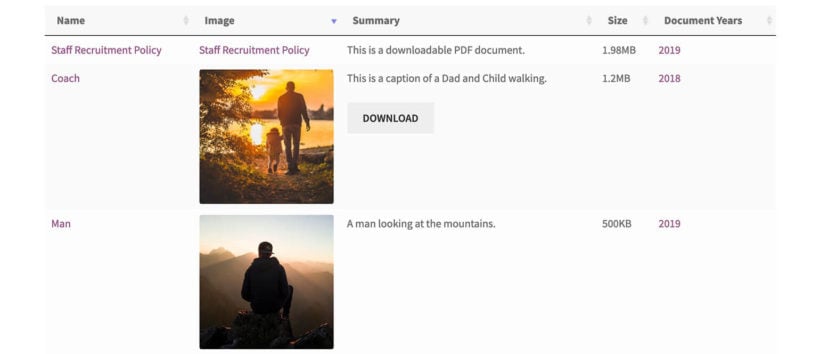
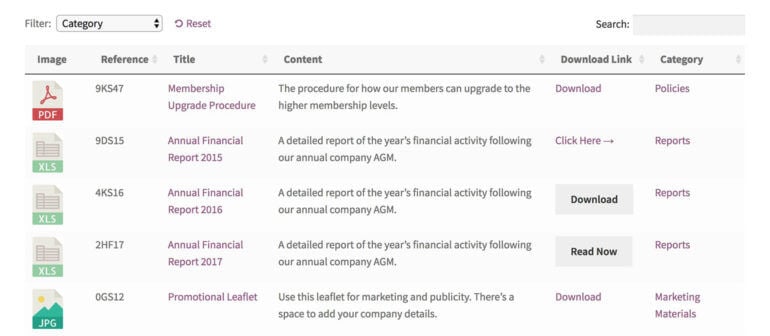

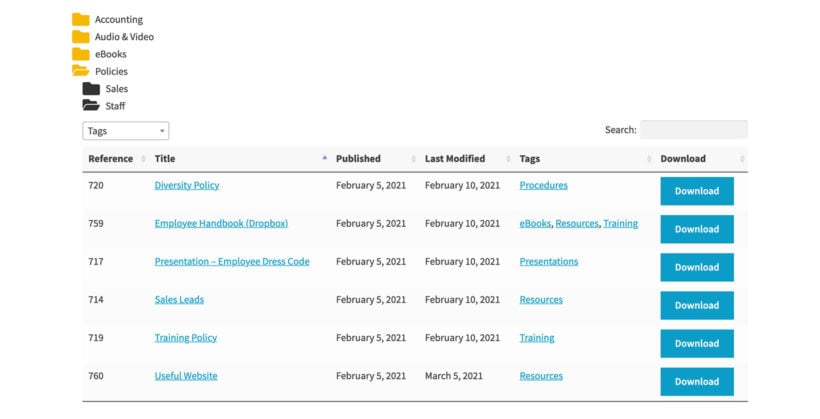


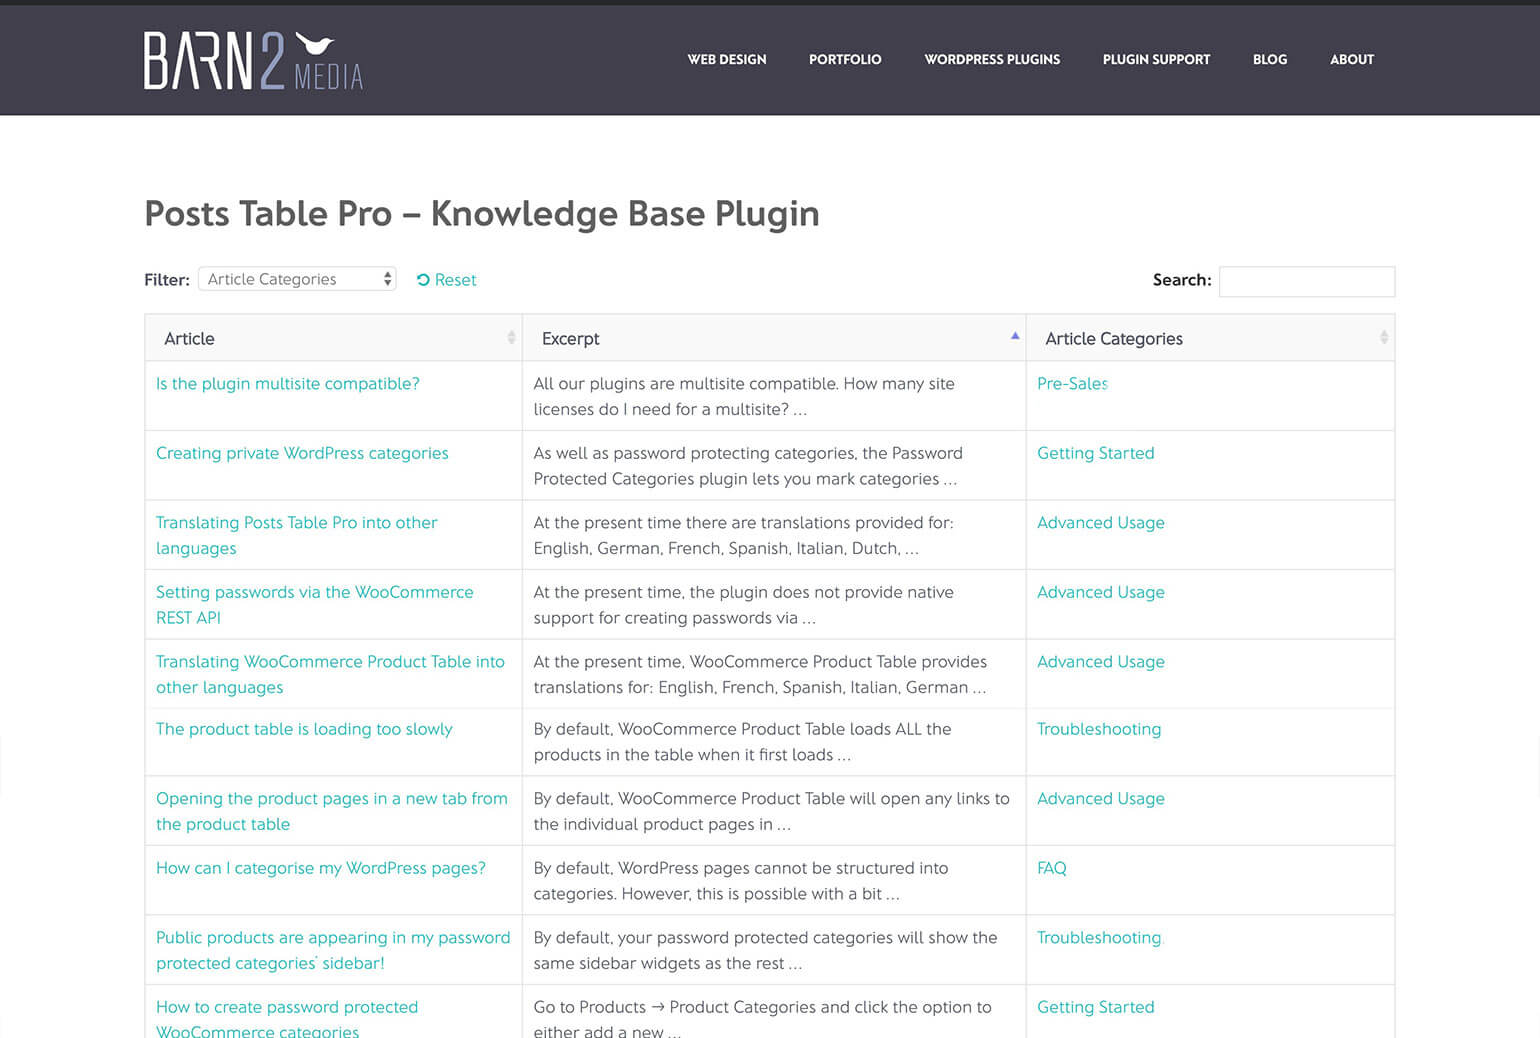
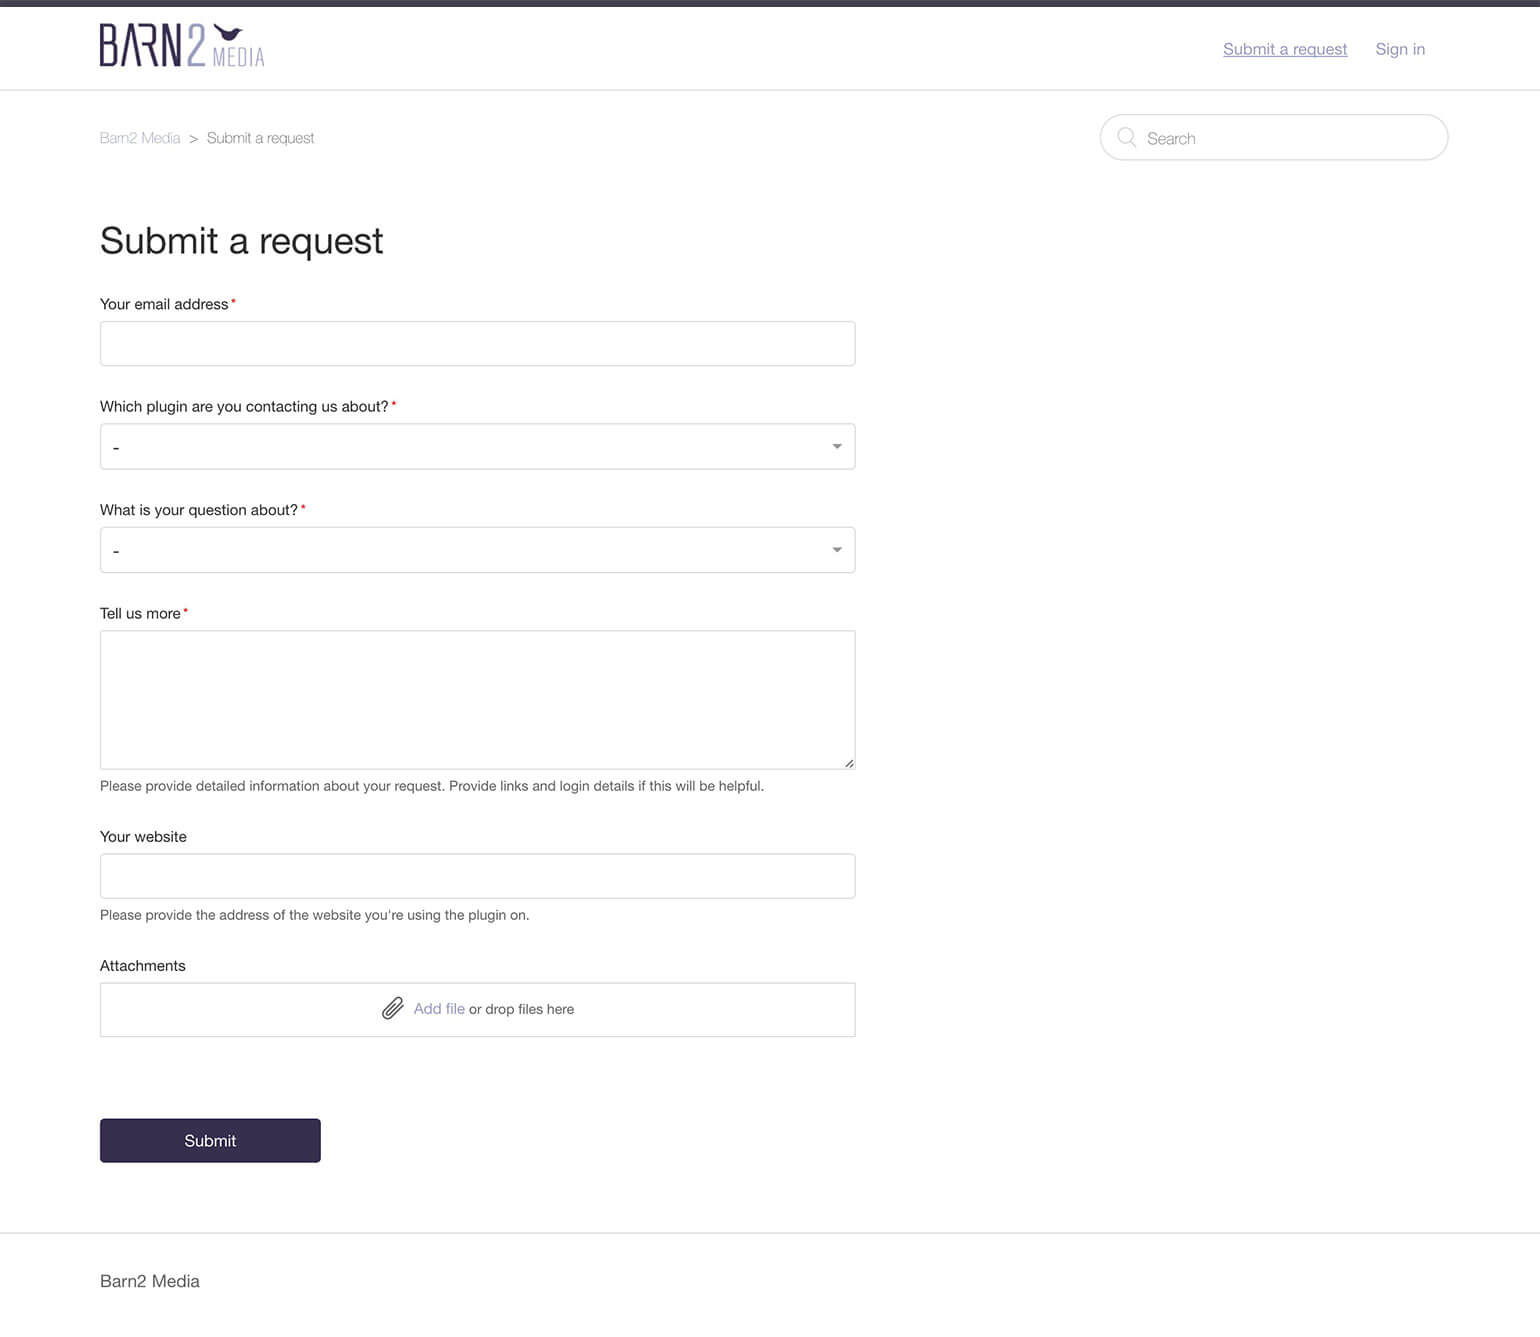


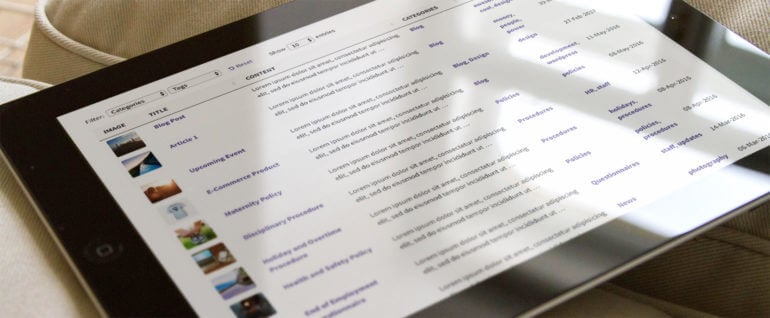
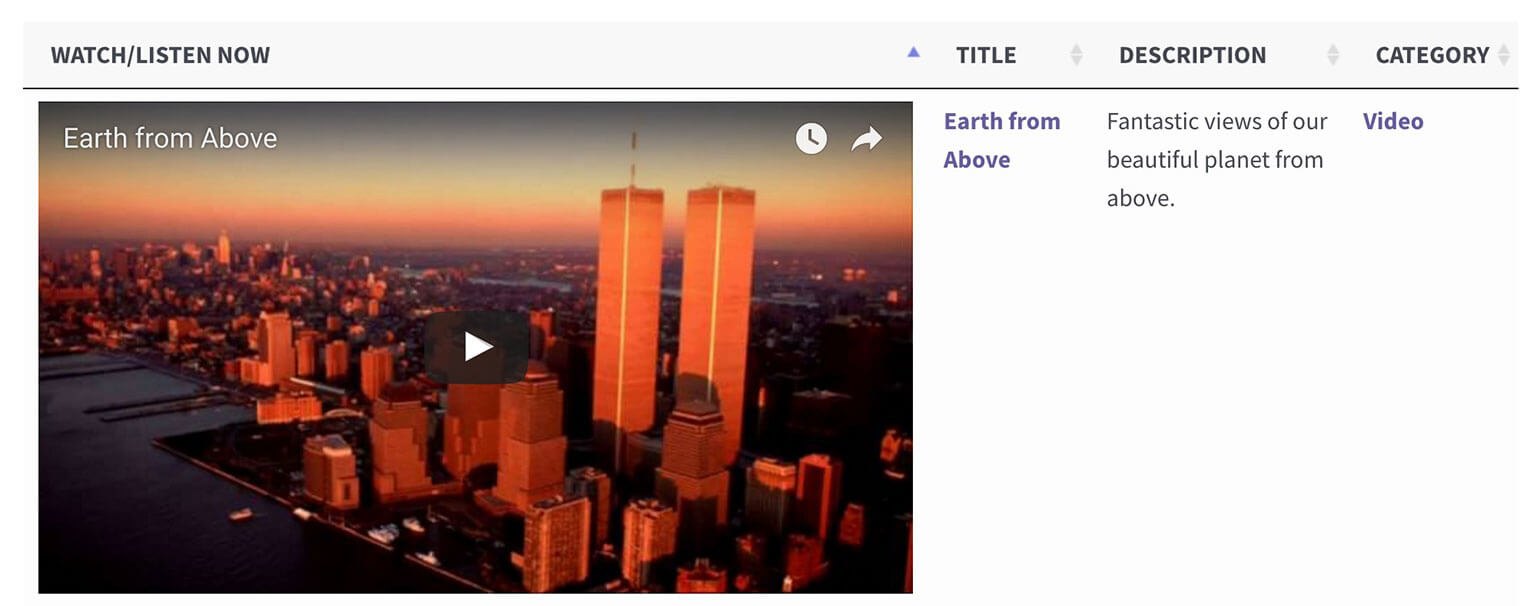
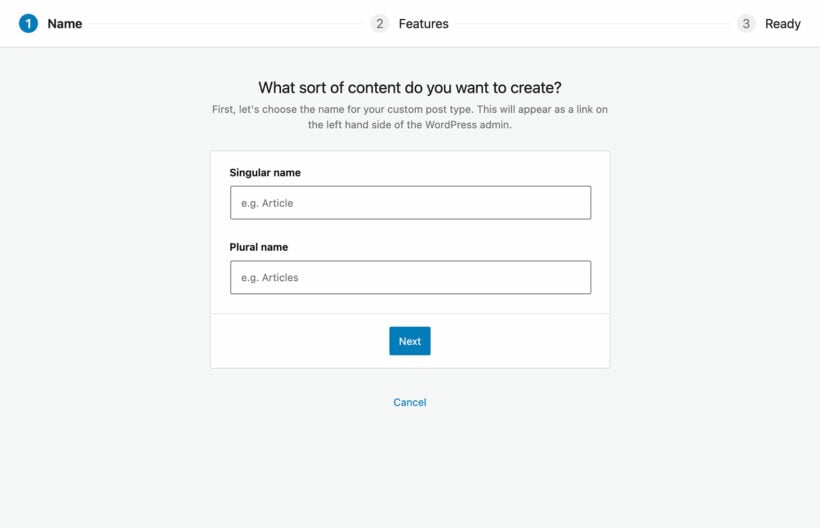
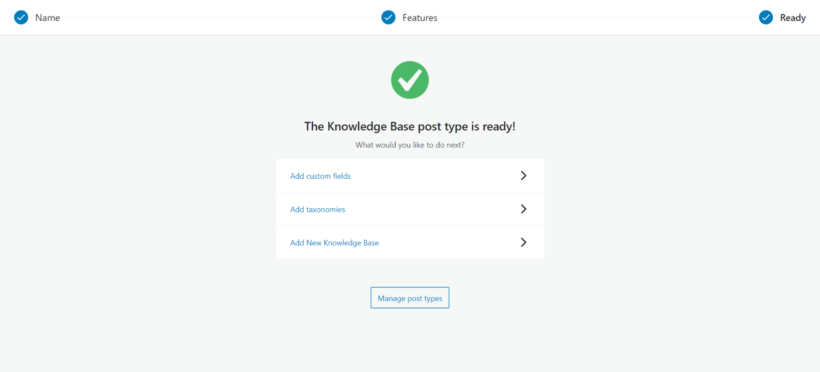
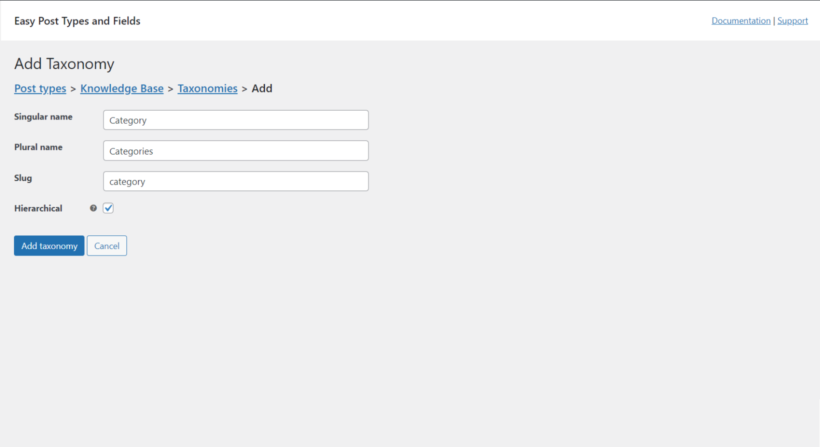
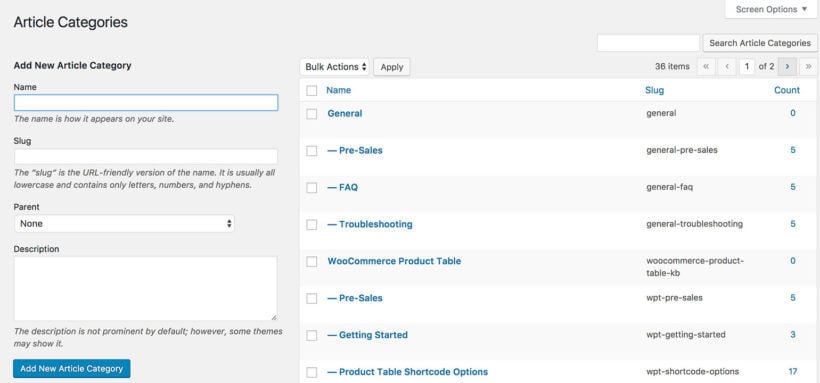
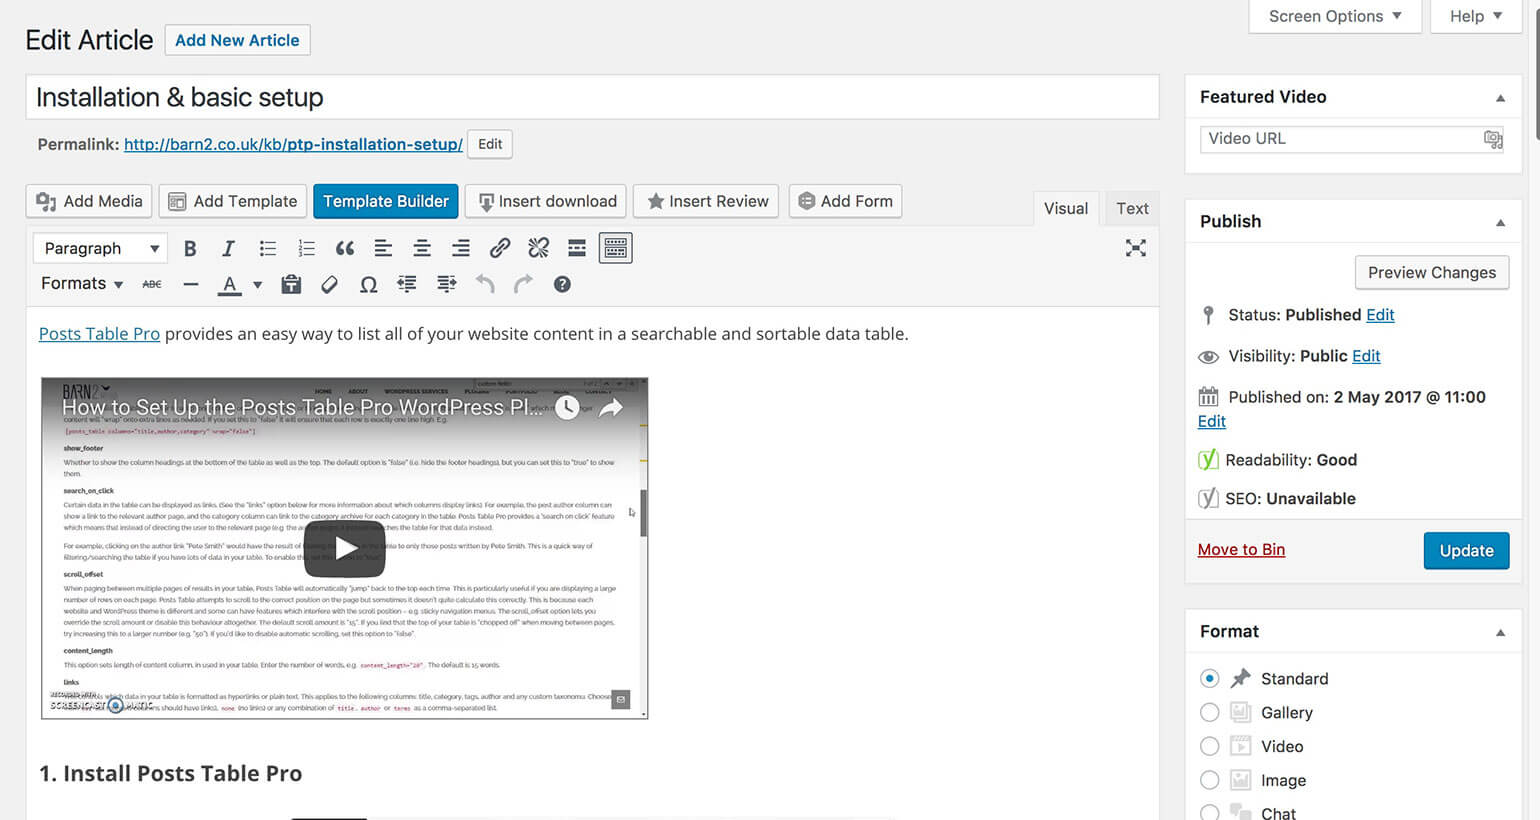
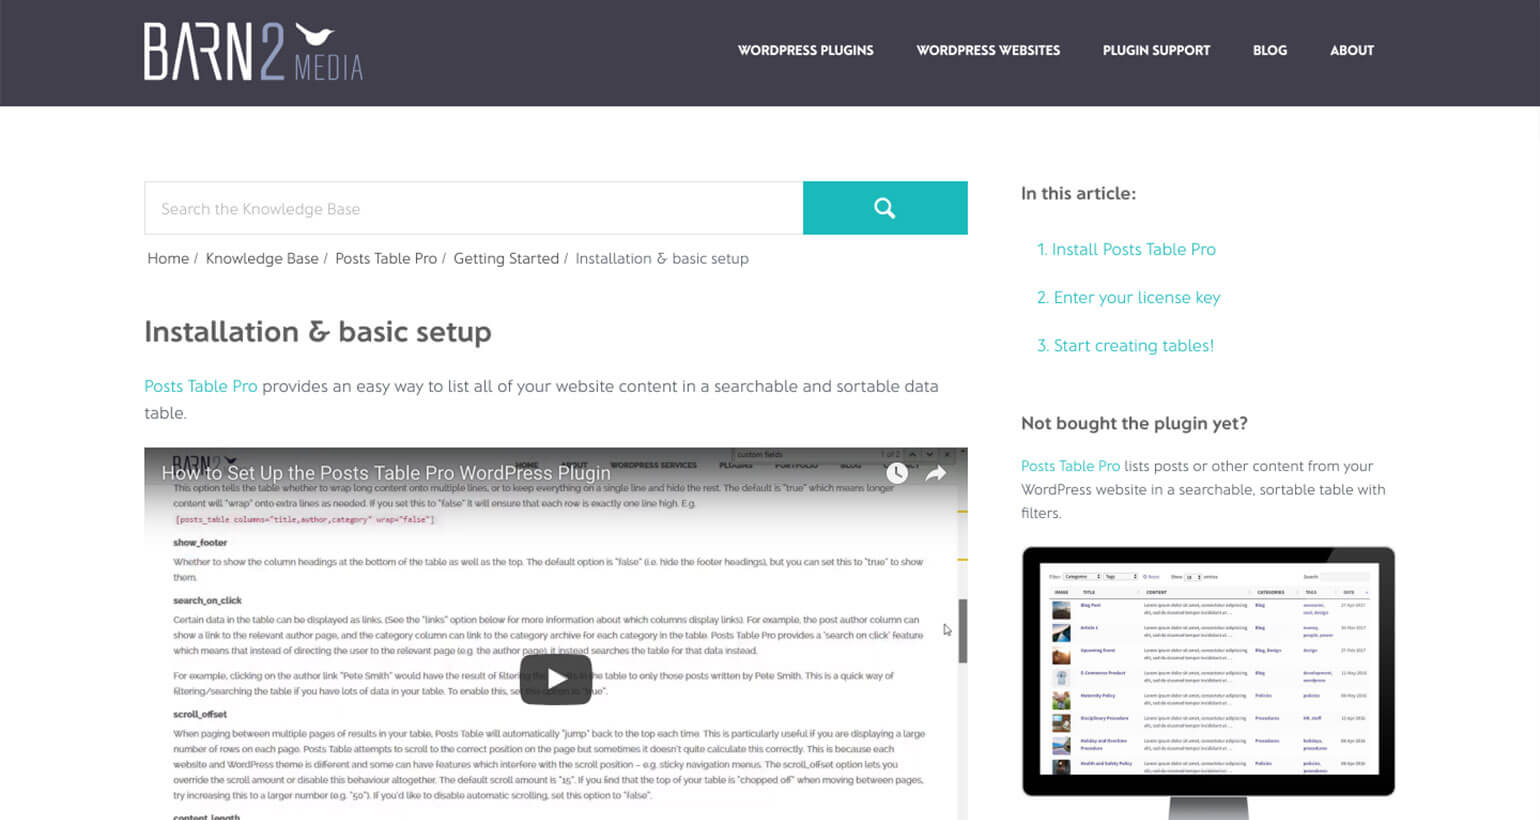
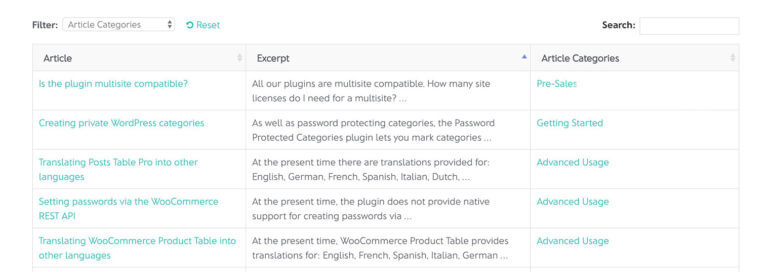
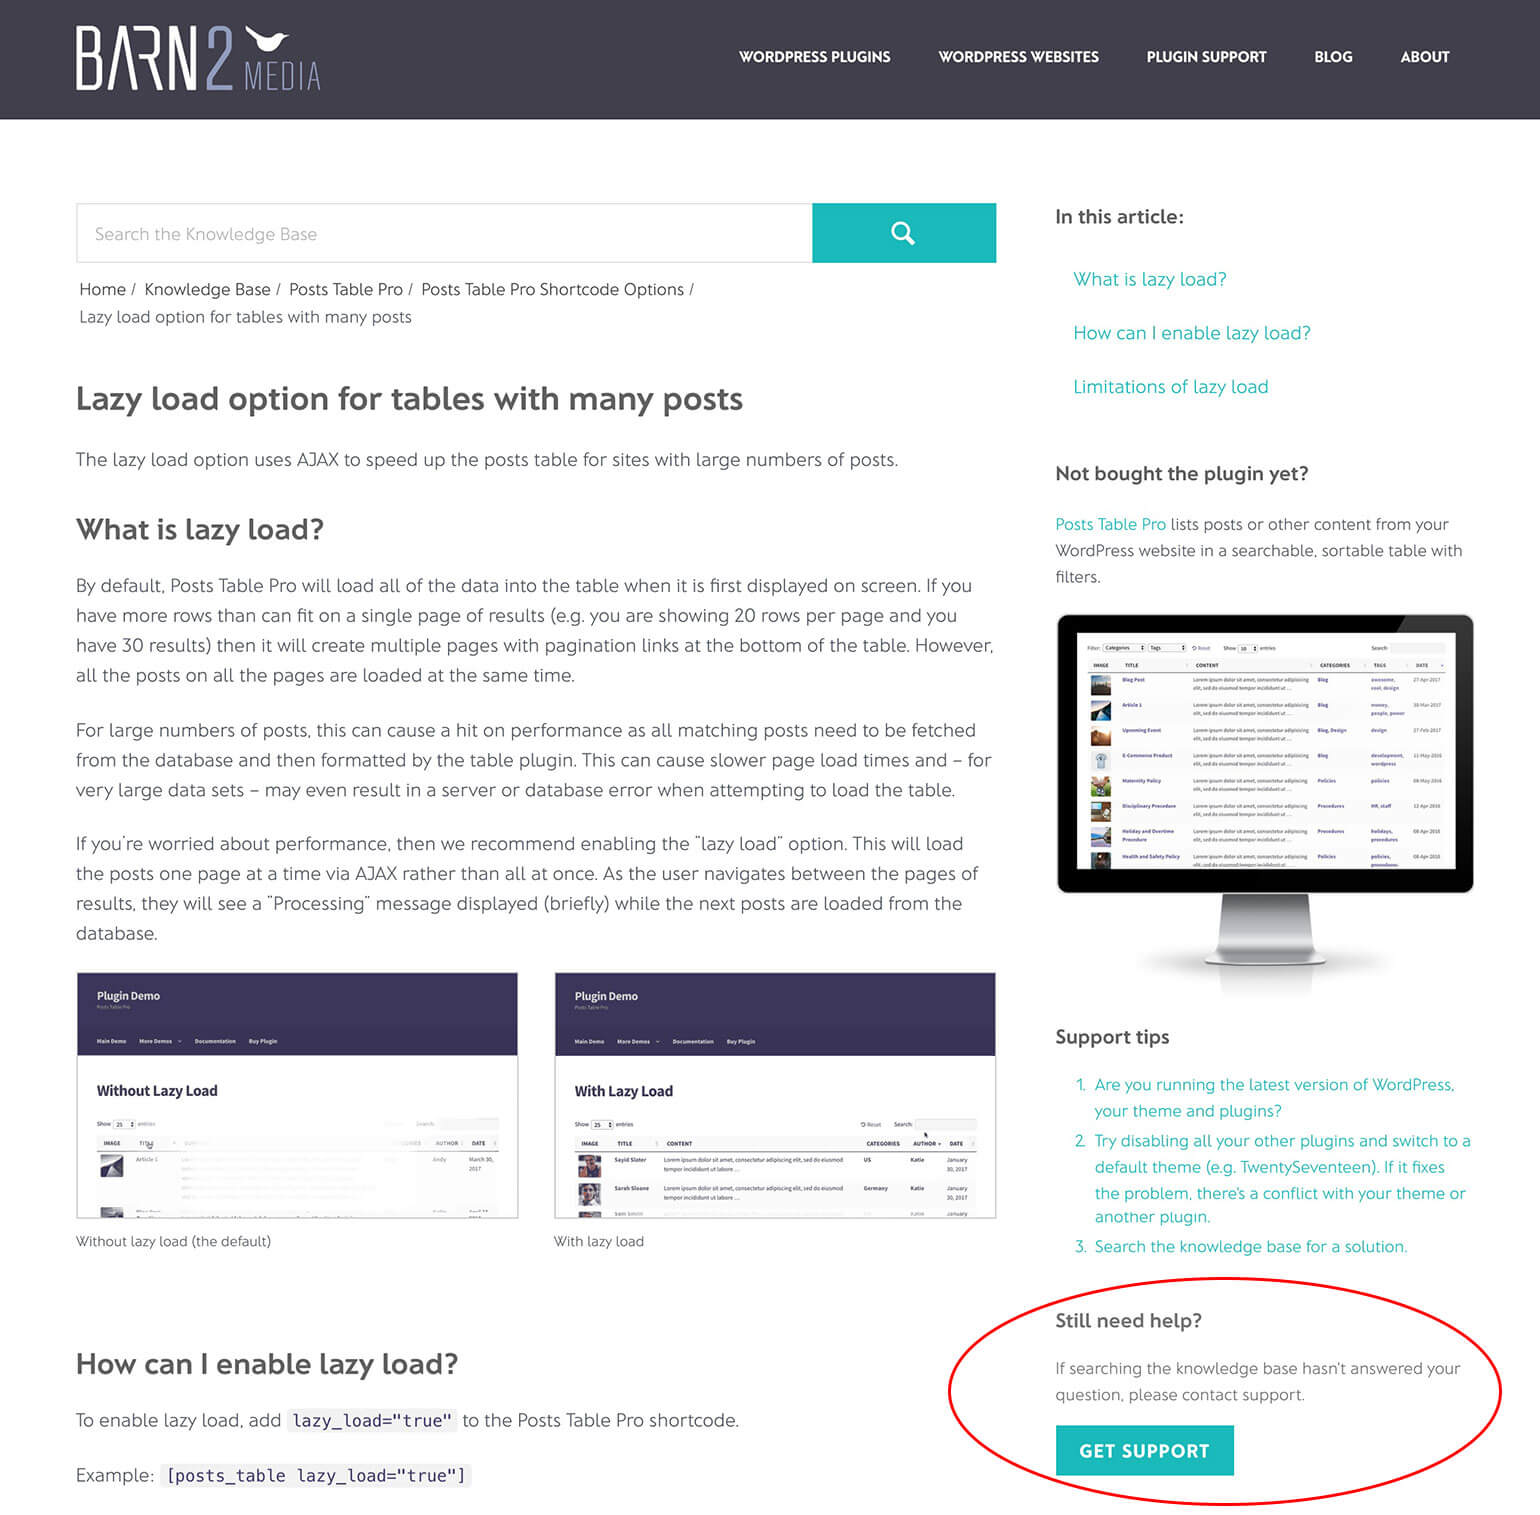
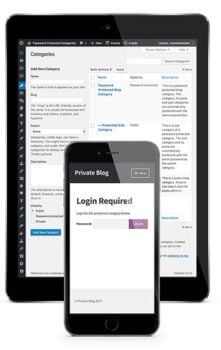 Finally, I'll provide some tips on how to hide your knowledge base from the public view. This is useful if your knowledge base is part of your main website, but you want to restrict the documentation to existing customers only.
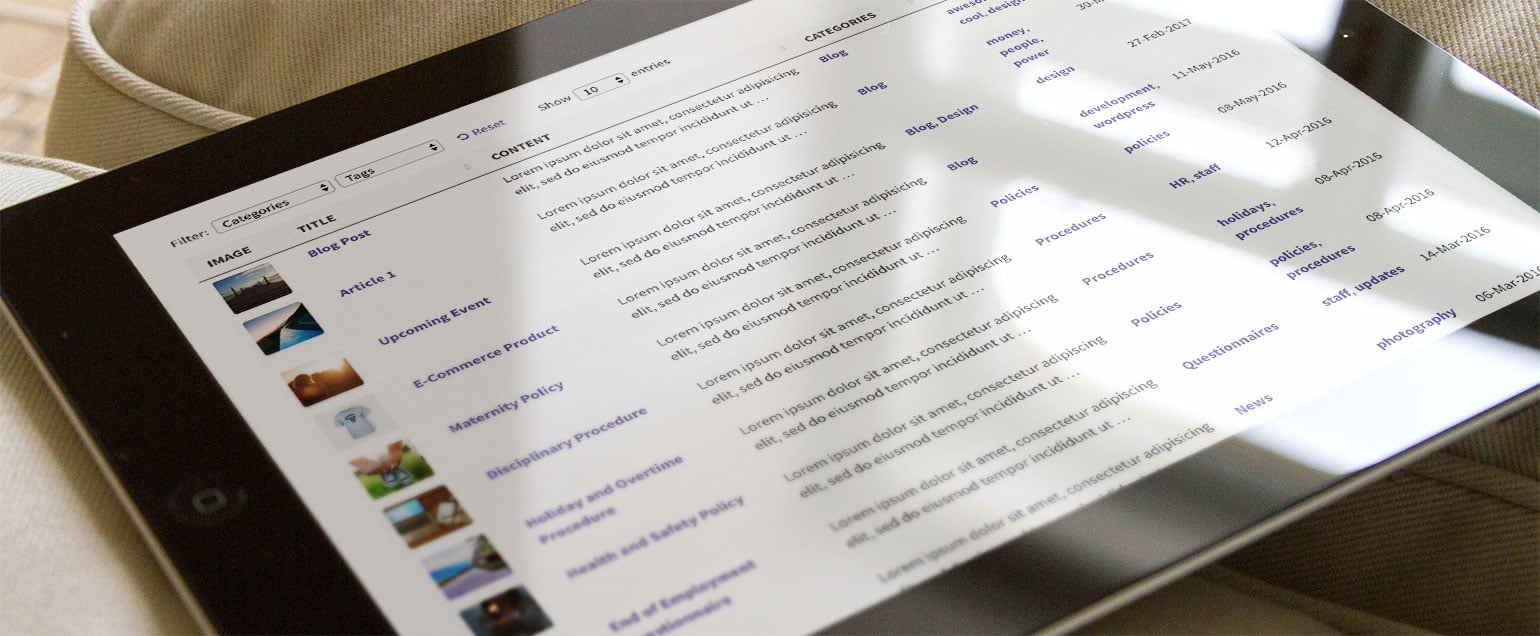