Free E-Course: How to build a restaurant ordering website
This page contains a complete online course created by Barn2's Co-Founder Katie Keith. It will teach you everything you need to know about how to create an online restaurant ordering system for your website.
- No third party commissions - you keep 100% of the profits!
- No technical expertise needed.
- We'll use the free WordPress and WooCommerce platforms, plus a couple of premium add-ons such as WooCommerce Restaurant Ordering. You'll also need to pay for a domain name (website address) and web hosting. These are small one-off or annual costs, and it works out much cheaper than platforms like Uber Eats or Grubhub.
- You stay in control and can choose the design of your website, add features, and more.
- Ideal for restaurant owners or web developers.
With over 90 minutes of video tutorials, plus full written instructions, you'll be ready to start taking food orders online today. You'll even receive a fun certificate at the end!
Introduction
Lesson 1: About this course - you're in the right place!
Welcome to our free e-course on how to create a restaurant ordering website. You’ve come to the right place if you're a:
- Restaurant owner and need to start taking online orders.
- Food shop owner and want to sell your food online.
- Web designer or developer building a food ordering site on behalf of a client.
The course will talk you through every stage of the process, step by step.
We’ll be using the free WordPress and WooCommerce platforms, along with a couple of premium plugins to add extra features such as creating food order forms. It’s an advanced system, but really easy to set up and you don’t need any technical knowledge.
By the end of the course, you’ll know how to create a website with fully functional online food ordering, tailored to your needs and to your brand. You’ll learn how to:
- Customize your food order forms.
- Set up payments, either online or in person.
- Set up shipping options so that people can select free or paid shipping, you can restrict the delivery areas, and let customers choose a slot for delivery or collection.
- Manage orders.
I hope you enjoy the course – I can’t wait to get started!
Katie Keith
Co-Founder - Barn2 Plugins
Getting started
Lesson 2: Create a basic WordPress website
To do this course, you need a WordPress website. If you already have one then you can click 'Mark Complete' and skip straight to the next lesson - or if you don't have a website yet, keep watching.
In case you don't know, WordPress is a platform for building website. It's the biggest web building platform in the world, and about 1/3 of all websites globally are powered by WordPress.
WordPress makes it really easy for you to manage your website because you can easily add pages and other content without needing any technical knowledge. That's why WordPress is an excellent basis for any type of website.
Instead of showing you how to install WordPress directly, I'll recommend a web host which will come with WordPress pre-installed on it. That makes it a bit easier for you. This lesson is about buying a domain name, which will be your website address, and adding a web host that has WordPress on it.
1. Buy a domain name
Your domain name is your website address. If you already own one then you can edit the DNS settings for your existing domain name and point it to your WordPress website so that when people type that into their web browsers or look for it on the internet, then they will view your website with the online ordering that you have set up on it.
If you haven't got a domain name yet, then you can go to any website that sells domain names such as Namecheap.
2. Sign up for web hosting
Once you've got a domain name, you also need web hosting. This actually keeps your website on the internet. We recommend a manage WordPress host called Kinsta, which we use for all the Barn2 websites. Kinsta is great because it makes everything easy for you. It automatically installs WordPress for you and it has loads of extra features like:
- Daily backups, so you can very easily roll back to your latest backup if anything ever goes wrong.
- Free staging sites where you can test out any changes without affecting your live site.
Kinsta has various plans. Most people doing this course would be fine with their Starter plan which is just $30/month. If you want to go even cheaper then there are cheaper hosts, and we would recommend Siteground. However, with a managed host like Kinsta that specializes in WordPress, the whole process will be easier for you and your website will load faster and generally be more reliable and easier to manage. Standard hosts like Siteground are perfectly good and will keep your website online no problem, but I would say go for Kinsta because it's that much easier for you. That's why we use them.
Sign up to a hosting plan with Kinsta and once you've done that, they will give you a Dashboard. If you're using a different host then just follow their instructions. This is how to do it in Kinsta.
3. Create a WordPress site
a. Create the site
- In the Kinsta Dashboard, click on the 'Sites' link on the left, and then on the 'Add Site' button in the top right corner.
- This opens a window which you'll use to create the general settings for your website, and also install WordPress:
- Leave the 'Install WordPress' option ticket and this will install WordPress for you.
- If you already have a domain name then enter it there, for example mywebsite.com. If not, don't worry - Kinsta will create a temporary website address for you and you can get a proper one later.
- Add a website name.
- Choose the location that is nearest to where your customers are based. For example, if you're in the UK and targeting the US market then you should choose a US data center. If you're in the UK and targeting the UK market then choose 'London, UK' and so on. This affects the speed of your website. If the website data center that stores the data for your website is nearer to your customers then it will load more quickly.
- The WordPress site title, username and password are only used for you to load into the WordPress Dashboard and won't be seen by your customers. You will use the username and password to log into the WordPress admin area.
- Enter your email address, which will be used for admin-related notifications such as new comments if you have comments enabled on your site; information about errors; etc.
- Choose a language.
- Ignore the multisite option unless you specifically want that.
- Ignore the 'Install WooCommerce' option because we will do that later in the course along with some extra steps to make it easier for you.
- Tick 'Install Yoast SEO' because this will help with your search engine position.
- Next click 'Add Site'. Kinsta will then set up your website, which will then appear on your list of sites.
b. Point your domain name to the site
- Now, click on the site in the Kinsta Dashboard. This displays information about the website. You don't need to know most of this, but if you already have a website address then you'll need to add a domain to the 'Domains' section, if you didn't do this in the setup process.
- You need to point your domain name to the website in order for it to work at that address. To do that, go into the 'Info' tab in Kinsta and copy the Site IP Address to the clipboard. You need to enter this into the DNS settings for your domain. I recommend that you look at the documentation or ask for help from your domain name company to find out exactly what the record should say. Tell them that you want to point your name to the website at the IP address you just copied. They will help you to get this set up so that when people visit it, that domain name will show your website.
4. Log into the WordPress admin
To log into your WordPress website, go to your domain name followed by /wp-admin, for example https://mywebsite.co.uk/wp-admin. If you don't have a domain yet, then you can find the temporary website address in the 'Domains' section of Kinsta. You should then enter the username and password that you chose when you created the site a minute ago. You can then start adding information to your website!
Lesson 3: Choose a theme
Now you've got your overall WordPress website set up with web hosting and a domain name, the next step is to install a WordPress theme. If you know all about that and already have a theme for your website then click 'Mark Complete' and skip to the next lesson, otherwise keep watching.
Choosing a theme
A WordPress theme controls the design of your website, such as the colors, fonts, and overall how it looks and how well it fits with your brand. We want a theme that will work well for restaurants. It should either be generic so that it works for any industry, or you can use a theme that is specifically designed for restaurants. Find some recommendations here.
For this course, I'm using the free Storefront theme which is the official theme from the company behind WooCommerce itself. It's really good because it has the features you need without any extra bulk or unnecessary features to confuse you. It's a nice clean design and we use it for all our plugin demos.
If you like the idea of Storefront but don't know how it looks then you can use one of its child themes, such as Bistro and Deli. I also recommend the Delicio theme from WP Zoom which is a more slick and modern design specifically for restaurants. Or if you want something different, for example because your restaurant has quite a specific brand, then there are any number of restaurant themes available.
You can use any theme you want. Find one you like the look of, and use that. Whatever theme you choose, it will work with everything else in this course. Just make sure it says that it's compatible with WooCommerce. Most themes are, but it's worth making sure.
Install a theme
- Log into the WordPress admin for your website.
- Go to Appearance → Themes and click 'Add New'.
- You'll see an 'Upload Theme' option. If you bought a premium theme, then upload the zip file here. Otherwise, type the name of the free theme that you want to search for, e.g. 'Storefront'.
- Click 'Install' and then 'Activate'.
- When you go to the front end of your website, you'll see a very basic version of the theme. You can then customize it. Most themes either have a theme options panel in the WordPress admin, or you can customize it under Appearance → Customize.
- For the Storefront theme which I'm using for this course, there are lots of options in the Customizer. You can go through each section and configure them as needed, for example adding a restaurant name to appear at the top of your website or uploading a logo; uploading a site icon which will appear at the top of the browser tab; changing details such as the header, link and button color to match the branding of your restaurant.
Save your changes. In the next lesson, we'll start creating pages and a menu to go across the top of the website.
Lesson 4: Add your main pages and menu
Next I'm going to show you how to create the basic navigation structure for your website, before we start adding more advanced features such as online ordering. In WordPress it's really easy to add content to your website. You can do really nice things with text, images and different layouts just using WordPress as it comes.
Create pages
- In the WordPress admin for your website, go to Pages → Add New.
- Add a title to the top of the page.
- Add some content which will appear on the page. You can use the Gutenberg editor, which is the name of the page builder that comes with WordPress itself. You can use this to add lots of different types of blocks and common layouts such as headings, paragraph text, images, bullet lists, multiple column layouts, and more. To add a block, click the little + icon and choose from the different options.
- Publish your page in the top right hand corner, and then click 'View Page' to check it on the front end of your website.
- To set the page as your homepage, go to Settings → Reading and select it as the homepage from the list of static pages.
- Also on Settings → Reading, it's a good idea to temporarily tick the 'Search Engine Visibility' box to hide the site from search engines while you're working on this. However, it is essential that you remember to disable this when the site goes live!
- Go to Pages → Add New and continue adding as many pages as you like, for example your 'About' and 'Contact' pages.
Add a navigation menu
When you've added some pages, it's time to add a navigation menu which will allow people to find their way around your website. Most themes display this across the top, but some display it elsewhere such as on the left hand side.
- Go to Appearance → Themes.
- Click 'Create Menu' and select the display location to make sure it appears in the correct place on your website. Your theme may have multiple locations where menus can appear.
- You will see a list of pages on the left. Select the ones that you want to add to the menu, and click 'Add to Menu'. This will move them to the right.
- On the right, drag and drop to re-order the items in your menu. You can also indent menu items under other menu items to create dropdown lists in your menu.
- Once you've installed WooCommerce later in this course, you will be able to see more options on the left so that you can add products, categories etc. to the menu.
- Click 'Save Menu' to publish it on your site, then view your website to see what it looks like.
As we go through the course, we'll start adding more links to your menu so that it grows over time and creates a comprehensive navigation structure for your website.
Create your restaurant ordering system
Lesson 5: Add E-Commerce
So far in this course, you've set up a WordPress website and you've added some basic pages and a menu. Next, we're going to turn it into an e-commerce website so that people can place orders online. We'll do that using WooCommerce, which is a free plugin that powers a huge percentage of the world's e-commerce websites.
a. Install WooCommerce
- In the WordPress admin, go to Plugins → Add New.
- Search for 'WooCommerce' by Automattic.
- Find the plugin and click 'Install Now'.
- Once installed, click 'Activate'. This will open the WooCommerce setup wizard. This is really useful because it takes you through the main settings that we need for our restaurant ordering system. WooCommerce can be very simple to use, or very sophisticated, because it has so many options. The setup wizard helps us to focus on the most important options that everybody needs.
- Enter your address details.
- Select your industry. For a restaurant, select 'Food and drink'.
- On the 'What will you be selling' page, a restaurant should normally only select 'Physical products'. These are products that the customer actually receives in real life, as opposed to something like a download or training course which is virtual.
- If you're creating a subscription service then you can tick 'Subscription options'. This is compatible with everything in this course, although we're not specifically covering subscriptions in this course.
- Select from the remaining options as needed (only enable things you definitely need!).
b. Add payment options
- After the setup wizard, you'll be taken to the Home page of the WooCommerce Dashboard. You'll see some recommendations of what to set up next. We'll be covering adding products in the next lesson, so skip 'Add products' and go straight to 'Set up payments'.
- With WooCommerce, you can offer a choice of ways for customers to pay you:
- PayPal is a really simple way to take payments online because nearly everyone has a PayPal account. Even if they don't have an account or don't want to use it, then they can actually use PayPal to pay directly with credit or debit card. If you choose to set up PayPal, it will ask you for basic information about your PayPal account so that when customers pay on your website, this will send the money through to your PayPal account.
- You can also use Stripe, which is very easy to set up and allows customers to pay with credit or debit card. Go to stripe.com and create an account. You then pay a small percentage to Stripe for each transaction - it's similar or slightly less expensive than PayPal.
- It's a good idea to let customers choose between PayPal and Stripe. That's what we do on our own website barn2.com.
- With restaurants, you may want to enable 'Cash on delivery' so that people can pay when they collect their order, or if you're offering home delivery then they might pay the delivery driver direct. You can either insist on cash on delivery and not offer any online payments, or you can add it as an option alongside online payment methods.
- Once you've finished adding your payment methods, go back to WooCommerce > Home. We'll do a lesson on shipping later, so ignore that for now. Tax is self-explanatory, so set up tax if it is required in your country.
Now we've set up WooCommerce and people can pay online. However, it won't be not much use until we have some products! In the next lesson, I'll show you how to add your foods as WooCommerce products.
Lesson 6: Add products and categories
The next step is to add and categorize some products.
Essentially, if you think about your printed restaurant menu, each item needs to be added as a separate 'product' in WooCommerce. You can have options for each product - let's say you're selling pizza and you might have Large, Medium and Small; 9", 13" and so on. You might also want to add extra options like extra toppings, the ability to upgrade your pizza crust, etc.
Add categories
Before we start adding products, I'll show you how to categorize products because this helps you to keep your menu more organised.
Your printed restaurant menu is almost certainly divided into categories, such as Starters, Mains, Desserts, Sides, Drinks, Kids, and so on. This is also how you should structure your online food ordering menu.
- In the WordPress admin, go to Products → Categories.
- Create a new category by adding the category name which will appear on your website, and a slug which should be lowercase and all one word (e.g. 'starters' or 'main-courses'), then click 'Add New Category'.
- Repeat the process to add as many categories as you like.
Add products
- Now to go Products → Add New.
- Add all the information about the product:
- Product name
- Description
- Select a category on the right
- Upload a Product Image on the right, if you plan to include images of each food in your online menu. I recommend using square images for a professional result.
- Scroll down to the 'Product Data' section:
- If it's a simple product with no options, add the price in the 'General' tab.
- If you want to add multiple options for the product, such as a choice of sizes, then you need to set it up as a variable product:
- Change the 'Product Type' to 'Variable product' and then go to the 'Attributes' tab.
- If you're using the same options for multiple products then set up your attributes (e.g. size options) globally under Products → Attributes and the select them in the 'Attributes' tab of the 'Add Product' screen. Otherwise, select 'Custom product attribute' and add the attributes here. For example, you might have an attribute called 'Size' with 2 options: 9" | 13". This will allow customers to be able to choose either of these two pizza sizes. Tick the 'Used for variations' box for each attribute.
- Next, go to the 'Variations' tab and use the option to 'Create variations from all attributes'. Accept the warning and WooCommerce will add each option as a variation, based on the attributes you just created.
- Now enter a price for each variation and then click 'Save changes'.
- Click 'Publish' in the top right corner of the page.
Adding more advanced options
In the previous section, I showed you how to create product variations where the customer can choose between different options from a dropdown list.
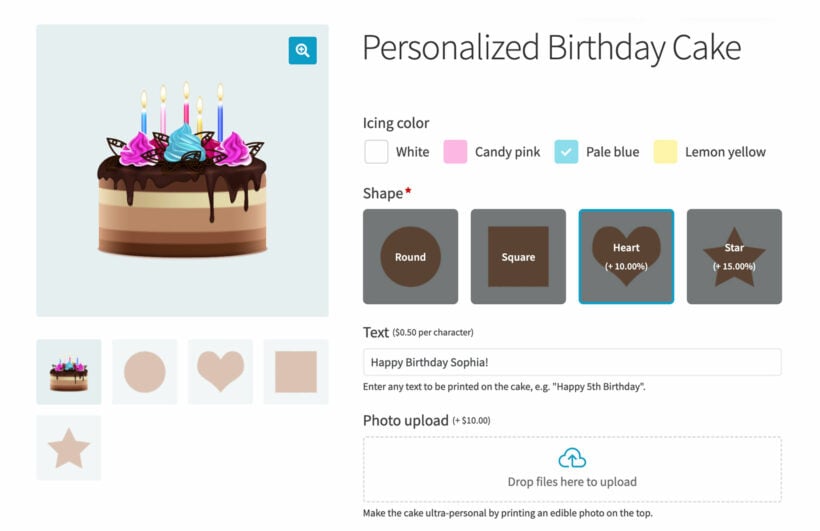
Next, I will show you how to create a different type of product option. Variations are built into the free WordPress plugin. If you buy an additional plugin called Product Options then you can add different types of option. For example:
- You can add tick boxes, for example to let customers select a 'Gluten free' option or choose extra pizza toppings to customize their pizza, which each topping adding to the basic price of the product. This would be time-consuming and not very user-friendly to do with product variations.
- You might also want a text field where customers can write custom text information such as dietary requirements or a birthday message.
Product Options allows you to do all of that.
Setting up Product Options
- Buy the plugin and download the zip file to your computer.
- Go to Products → Add New in the WordPress admin.
- Click 'Upload' and select the zip file, then click 'Install'.
- Once uploaded, click 'Activate plugin'.
- Create add-on options globally under Products → Product Options and choose which products/categories to show them on. Add as many options as you like. Each one can have a price, or you can leave the price field blank and allow customers to select add-ons without affecting the price of the product. Read the plugin documentation to learn about all the different types of add-on.
In summary, variations are good if you want people to be able to choose different options from a dropdown list, and add-ons are good if you want to offer different types of options such as checkboxes.
Add more products
Now you've created one product, it's time to add the rest of your products. Once you've done that, return to this course and take the next lesson, where we'll start creating food order forms for our website.
Lesson 7: Install WooCommerce Restaurant Ordering
WooCommerce itself is brilliant for adding your products, managing them, taking payment online, and basically having an e-commerce website. However, it's not very good at displaying your food products in the public-facing website.
By default, WooCommerce creates a grid of all your food products - either on the main 'Shop' page which is created when you install the plugin, or on a separate page for each category. This layout isn't a good way to sell food because people typically want a one-page order form experience where they view a list of your food products, and then choose quantities and variations without having to visit a separate page for each product.
This simply isn't possible with WooCommerce as it comes. They have to visit a separate page for each food product they wish to buy, it takes a long time to put your order together, and it's easy to get lost.
That's why you need the WooCommerce Restaurant Ordering plugin. It works with the products you've already added in WooCommerce, and it creates a much faster food order form layout for them.

How to install the plugin
- Buy the plugin, then check your email.
- Download the plugin zip file from the email, and copy the license key to your clipboard.
- In the WordPress admin, go to Plugins → Add New and click 'Upload plugin'. Select the zip file that you downloaded from the email.
- Click 'Activate Plugin'.
- Go to the plugin settings page at WooCommerce → Settings → Restaurant.
- Paste the license key that you copied in step 2, and click 'Activate' it.
- The plugin has already created a main food order form page for you, which will list the products from all your categories. If you just want to include certain categories, then you can select them here.
- Save the changes and then go to your main restaurant ordering page to see what it looks like. To find it, go to the 'Pages' section of the WordPress admin and find the page called 'Restaurant Order'. Use the 'Quick Edit' link to rename it to anything you like, and then click to View the page.
- Have a play with the food order form, add some products to the cart, and make a note of anything you would like to change.
- Return to the plugin settings page and tweak the settings to get the food order form exactly as you'd like it.
In the next lesson, I'll show you how to create more advanced food order forms with even more options.
Lesson 8: Create flexible food order forms
So far, you've learned how to enable the food order form layout automatically so that all your products are listed on one page, divided by category.
The WooCommerce Restaurant Ordering plugin also comes with a shortcode which lets you create more flexible food order forms, so that you can list foods from a specific category only, or perhaps add more information between the lists of foods. We'll learn how to use the shortcode in this lesson.
Setup instructions
- In the WordPress admin, go to Pages → Add New.
- Add a title for your page, for example 'Meal Deals'.
- Write an introductory sentence, if you want some information to appear on the page above the food order form.
- Add a heading above where you plan to list your first category of food products, for example "Starters".
- Next, add a shortcode: [restaurant_ordering] to list all your products, or [restaurant_ordering category="starters"] to list products from the 'starters' category only.
- Next add another heading, followed by shortcode for the next category that you wish to list the foods from, for example: [restaurant_ordering category="mains"]
- You can also list multiple categories in a single shortcode, for example: [restaurant_ordering category="mains,pizza,pasta"]
- Now click the 'Publish' button in the top right corner, and view the page.
If the food order forms aren't quite how you'd like them, then use the shortcode options to customize each food order form individually. For example, you might want to list some categories in a 1-column layout and other categories as 2 or 3 columns. You might want to include images or descriptions for some categories and not others. You can do all of this using the shortcode options.
The shortcode method is good because you can create multiple food order forms, each one different. You'll need to use the shortcode if you want to structure the food ordering system into multiple tabs, for example by using the tabbed layout in a page builder plugin (learn how here).
Bonus tip: Adding quantity rules
You can use WooCommerce Restaurant Ordering with another plugin that lets you physically control how many of each product customers can buy: WooCommerce Quantity Manager.
For example, if you wanted to force people to buy 2 starters and 2 mains then you can use the quantity plugin to set a minimum and maximum quantity of 2 on the Starters and Main Courses category.
Lesson 9: Add a cart and sidebar
So far, we've created a main restaurant ordering page and learned how to use shortcodes to add food order forms manually. However, there's no sidebar, and there's no way for customers to see what is in their cart. You might also want to display extra information on the page, such as your opening hours.
In this lesson, I'll show you how to add a sidebar to the main restaurant ordering page and add various useful information. I'll also show you some other ways to display the cart on the page, in case you don't want to add a sidebar.
Add a sidebar
You can only add a sidebar to the page if your theme comes with a page template that supports a sidebar. If you're not using the Storefront theme like I am in the video, then it's worth reading the theme documentation to find out the best way to add a sidebar. Most themes support a sidebar, but the method might be slightly different.
- Go to Appearance → Customize in the WordPress admin.
- Open the 'Widgets' section and open the sidebar that appears on your normal pages. This is called 'Sidebar' in the Storefront theme, but other themes may use different wording.
- Add a 'Cart' widget. (This might be called 'Basket', depending on which country you are in.) Change the name if required, and decide whether or not to display the widget when the cart is empty.
- To display your opening hours in the sidebar, add a 'Text' widget and list your opening hours there.
- Add any further widgets that you wish to display in the sidebar.
Adding a popup cart and checkout
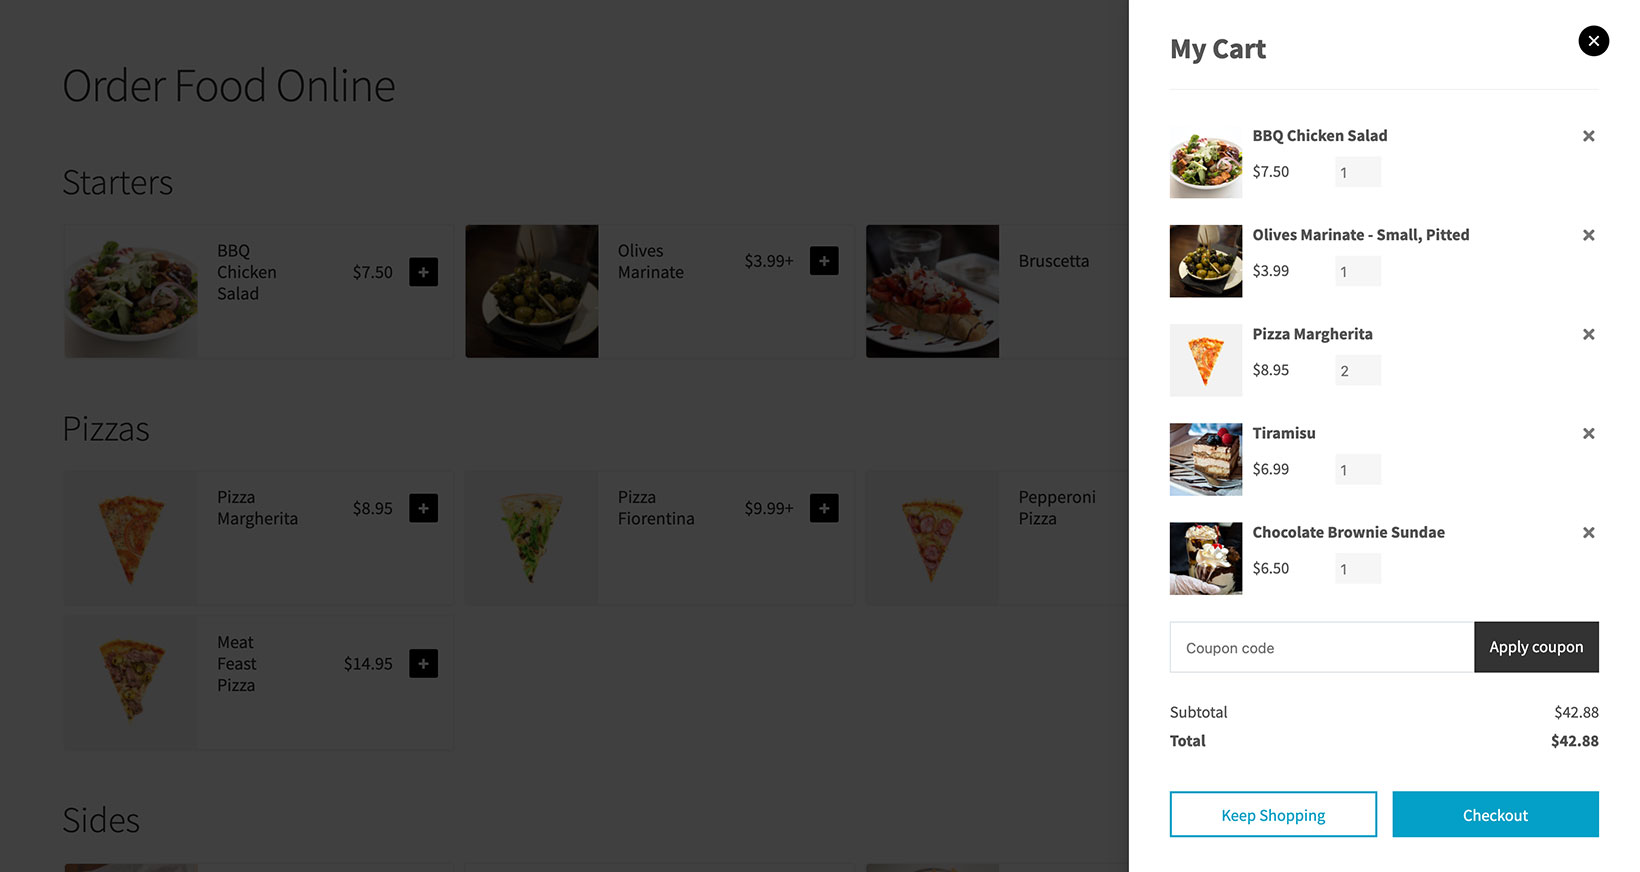
If you don't want a sidebar on your food ordering page - for example, because you need more space to list the food products - then that's fine. Instead, you can display a floating or popup cart on the page, without needing a sidebar. Customers can instantly see their selections and review their order directly on the food ordering page.
Please note that the video for this lesson features a different side cart plugin because the video was created before WooCommerce Fast Cart was developed. We now recommend using WooCommerce Restaurant Ordering with Fast Cart because they are tested and guaranteed to work together. It also has a popup checkout, allowing customers to complete their order without even leaving the page.
- Get the WooCommerce Fast Cart plugin.
- In the WordPress admin, go to Plugins → Add New.
- Install the plugin, activate it, and enter your license key on the plugin settings page.
- Also on the settings page, choose how you want the popup cart and checkout to work.
- View your food ordering page, add some items to the cart, and check that you are happy with the minicart.
Add the food ordering page to the menu
If you haven't already done so, then you should add your food ordering page to the menu so that people can find it easily:
- Go to Appearance → Menus.
- Select your main food ordering page on the list, and click 'Add to Menu'.
- On the right, drag it to the required location within your menu, and click 'Save Menu'.
Lesson 10: Add delivery and collection
Now we're going to set up some delivery and collection options for our restaurant.
Delivery and collection are essential to most online restaurant ordering systems. You'll learn how to:
- Create shipping zones. For example, you might offer free pickup or free delivery within specific postcode/zip code areas, and charge for delivery for people within a slightly wider area, and allow people to collect from your location wherever they live.
- Set shipping charges - you can offer free shipping, charge for shipping, or offer free shipping for orders over a minimum value.
- Allow customers to select a specific delivery or collection slot when they will receive or collect their meal.
Shipping zones and charges are part of the free WooCommerce plugin. There will be a small charge for a delivery or collection slot plugins.
Add shipping zones and methods
- In the WordPress admin, go to WooCommerce → Settings → Shipping.
- Create a shipping zone, for example 'Free delivery area'. Your customers won't see this and it's just for your internal purposes. You can select an entire region, country or continent, but most restaurant will have more specific limits on delivery. To set this, click 'Limit specific postcodes' and enter the postcodes or zip codes for the shipping zone - one per row. If required, add * wildcards so that you don't need to enter every possible option. You'll need to spend a bit of time thinking about the logic, for example PL1* also includes PL11 postcodes, which may not be what you want.
- Once you've selected the area, add one or more shipping methods for that zone - for example, Free Shipping and Local Pickup. For each one, click the 'Edit' link to see the available options. Free Shipping lets you enable free shipping over a minimum order value, or you can create a coupon code under WooCommerce → Coupons which people can use to get free shipping. For the other postage methods, you can add a fixed price which will apply to the entire order. You can also rename each shipping method to make it more applicable to restaurants, such as renaming 'Free Shipping' to 'Free Delivery'.
- Repeat steps 2 and 3 to add as many shipping zones as you need. Add shipping methods to each one.
- In the list of shipping zones, you'll see an option at the bottom called 'Locations not covered by your other shipping zones'. For a restaurant that offers collection, I recommend using this zone to offer the 'Local Pickup' method only. That way, the customer can place an order to collect from you, even if they don't live within your usual delivery area. Alternatively, you can leave this option disabled so that only customers within a specific area can place orders.
Now you know what's possible with the free WooCommerce plugin, I'll show you what's possible with additional plugins.
Delivery and collection slots
You'll need another plugin if you want to allow customers to reserve a time to either collect their order or have home delivery. I recommend a choice of 2 plugins for this. They're both good plugins and work well with WooCommerce Restaurant Ordering, so choose whichever one has the features you need.
In a nutshell:
- Iconic's WooCommerce Delivery Slots plugin lets customers choose a delivery or collection slot on the checkout. It most unique feature is that customers can choose a slot before they start adding foods to their order, which can help to avoid disappointment.
- Simba Hosting's WooCommerce Opening Hours and Chosen Slots plugin has lots of features to choose what happens when your restaurant is closed, and it has most of the features that Iconic's Delivery Slots plugin has. It does not let customers choose a time slot before they start choosing foods, as they are only listed on the checkout page. Its most unique feature is the ability to offer different delivery and collection slots per category. For example, if you offer different menus at different times of day - e.g. a lunchtime and evening menu - then you'll need this plugin.
In this lesson, I'll show you how to set up Iconic's Delivery Slots plugin. If you decide to use Simba Hosting's plugin instead, then you can use the documentation to set it up.
Setting up the Delivery Slots plugin
- Get the plugin.
- Download the zip file and copy your license key.
- Go to Plugins → Add New and click on the link to activate your license key.
- Once the license key is active, you'll be taken to a welcome page which talks you through the basics of setting up the plugin.
- First, go to the 'General Settings' tab and set up details such as where the delivery slots appear on the checkout. You can choose which shipping methods people can choose a slot for - a restaurant would normally enable this for every shipping method.
- Next, go to the 'Date Settings' tab and add your delivery slots and opening times. For example, if you're closed on Mondays then you can add this here so that people can't choose a slot on Monday. Lower down the page, set up the rules for your delivery slots, such as whether people can order food on the same day they wish to receive it, how far in advance they can place orders, and whether to charge extra fees for specific slots (note: this is in addition to the shipping fees that you might have added in your shipping zone settings).
- Next, go to the 'Time Settings' tab. For a food website that delivers boxes of food to people's homes - such as chocolate brownies - you may just let people choose a day, without a time slot. For a restaurant, you will normally want to offer time slots. Go through the settings and choose which options to enable. Enable 'ASAP' if you want people can receive their meal as soon as possible instead of choosing a time slot. Set a maximum number of orders per time slot to keep things manageable in the kitchen. Use the 'Allow bookings up to X minutes before slot' to make sure the kitchen has enough time to prepare the food before the time slot, for example 45 minutes.
- Save your changes.
- Next, go to the front end of your website and see what it looks like. Add some food products to the cart, and then click through to the checkout where you can see the date/time picker.
Add a delivery/collection slot reservation table
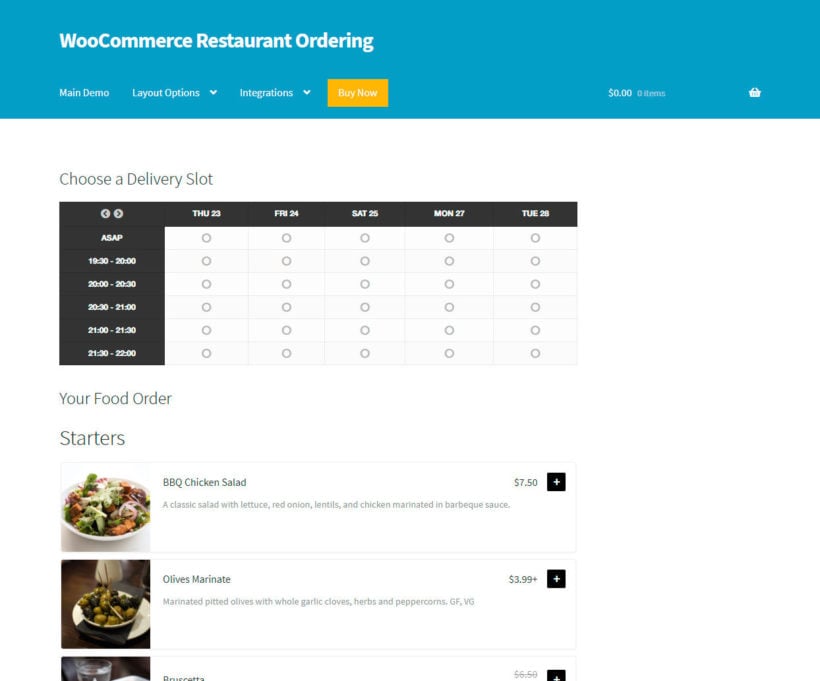
Finally, we'll add a table of available time slots above our food order form:
- Go to WooCommerce → Delivery Slots → Reservation Table, change any options to customize the table, and click Save.
- Go to the 'Pages' list in the WordPress admin and click on your main restaurant ordering page. This will open the 'Edit Page' screen.
- Add a heading called something like '1. Choose a delivery or collection slot', followed by a shortcode to the top of the page: [jckwds]
- You may wish to add another heading underneath, such as '2. Build your meal', followed by the restaurant ordering shortcode. This walks the customer through the process of choosing a slot before selecting their food products.
- Update and view the page.
Lesson 11: Managing food orders
Now you've nearly finished setting up your restaurant website! People can choose their food items, a delivery slot, they can get shipping or collection in their local area, and they can pay for their order online or pay cash when they receive the food.
But what happens when someone places an order? That's what this lesson is about.
First, we'll talk about what WooCommerce itself will do to notify you of new orders. Then, I'll briefly tell you about some plugins that you can use to add extra order management features if you need them.
Order notification emails
When you receive a new order, the website will send an email to the administrator. You can also add a different email address in the WooCommerce email settings.
The email contains everything you need to process and fulfil the order. This includes the customer's details, and a list of each product they ordered along with essential information such as the variations, price, quantity, and payment and shipping method. If you're using a delivery slots plugin then you will also see the date and time slot that they selected.
Viewing orders in the WordPress admin
If you go WooCommerce → Orders in the WordPress admin then you can see a list of all orders.
This screen shows which orders have been paid for, which have a 'Processing' status and which you have already marked as 'Completed'. It's an easy place where you can see all the pending orders in one place, and mark them as complete once the kitchen has finished preparing them.
Click on an order to view full information about it, including a list of products ordered.
It would be a good idea to keep this screen open on the kitchen computer so that you can see the orders coming in. For security reasons, create a new user account (Users > Add New) and create a user with a 'Store Manager' role to use for this. That way, the kitchen staff won't have full administrator privileges over your website.
Print orders to the kitchen
You may wish to install an automatic order printing plugin which would send the orders directly to the kitchen printer.
Alternatively, you might want to install an SMS plugin which would send a text to a mobile phone whenever an order is received.
For recommendations on both types of plugin, read our knowledge base article about managing food orders.
Conclusion and next steps
And that's it! Congratulations - you've completed the course.
You've learned all about how to create a website for taking restaurant order online. You've learned how to:
- Set up a domain name and web hosting.
- Create a basic website with some main pages, a navigation menu, and all the essentials.
- Install the free WooCommerce plugin to add e-commerce features such as taking payments online and adding products.
- Add your foods as products, including extras like variations and other types of option.
- Display a cart on the food ordering page.
- Set up delivery and collection.
To celebrate, you can download a certificate from this link (please note that the certificate is just for fun and is not certified by any official training bodies).
Next steps
The next step is to get the WooCommerce Restaurant Ordering plugin, if you haven't already set it up.
To make sure you know exactly how to tailor it to your needs, we provide full support. Get in touch if you have any specific questions.
You can also view the plugin knowledge base, which has a huge wealth of articles about every part of setting up your restaurant ordering system. It goes through everything we've discussed in the course, and much more including how to set up meal deals and specials, how to accept tip payments online, and so on.
Follow the instructions in this course, and I hope you enjoy launching your finished restaurant website. Thanks for doing the course.